Building a NuGet Packages Architecture Part 1 - Introduction
This is part 1 in a series of 6 articles about building a software architecture based on NuGet packages and feeds. In this series you will see:
- How to refactor your codebase to make it work with custom NuGet packages
- How to build packages on your local machine
- How to build packages using an Azure build pipeline and add the generated packages to a feed
- How to consume your packages in your applications
- Different ways to improve usage of your packages and types with service registration methods
- Various tips and tricks to enhance your package and how to use them
You'll find all the articles in the series here:
In this first article, I'll set the stage with an introduction to NuGet and the sample application I'll use throughout this article series. You'll see how I refactored my code so I can extract packages from it. In part 2 I'll then show you how to create packages from these refactored projects on your local machine. Later articles then show you how to build these packages automatically and add them to a feed using an automated Azure DevOps pipeline.
If you're interested in purchasing the entire article series now as a 60+ page PDF document, check out this post: Introducing a new article series: Building a NuGet packages architecture.
Introduction
In the recent past I've written a few articles about code reusability. In those articles I demonstrated how to abstract functionality behind a common interface, allowing you code against those abstractions. At runtime you then determine which concrete implementation to use by injecting the proper implementation. Here are the links to articles describing how to improve handling email and files in your ASP.NET Core applications using abstractions and dependency injection:
- Improving your ASP.NET Core site's e-mailing capabilities
- Improving your ASP.NET Core site's file handling capabilities – part 1 – Introduction
- Improving your ASP.NET Core site's file handling capabilities – part 2 – Data migration
Sticking to the design principles presented in these articles will great enhance the reusability and maintainability of your code. For example, instead of having to go through tens or even hundreds of files to change the way your application stores files, you can simply replace one IFileProvider for another, as described in the articles about file handling capabilities.
In the sample applications that I used in that article, the code is located in separate projects referenced by the main web project. All projects reside in the same solution. I abstracted out the IFileProvider interface, placed it in the Infrastructure project and then implemented the concrete providers in their own respective projects:
The sample project for the email application wasn't so organized. There, the Toolkit project contained a mix of implementations of IMailSender, with dummy providers, SMTP, SendGrid and MailKit all in one project:

While the above solutions work fine in a single project, they introduce a few issues:
- It's hard to reuse this code in another project. You could maybe share the source code or the binary DLL for a concrete IFileProvider implementation, but it would always require some manual work. It's also easy to forget to upgrade projects when you release a fix and other developers won't easily see you've created an update.
- The project brings in a lot of things that you may not need. For example, if you use SendGrid, it's unlikely you use MailKit as well, and vice versa. Including both in the same project exposes more functionality and risk without added benefit.
- This code is in the main project's solution, adding unnecessary overhead such as longer compilation times (when rebuilding the full solution), more projects to manage in Visual Studio and so on.
It would be a lot cleaner if each of these projects and implementations were in their own NuGet package. Then you can bring in just what you need, and nothing more. And when it's time to upgrade, you get help from the NuGet and Visual Studio tooling to upgrade your packages, manage versions, consolidate packages across your solution and more.
In this article series I'll show you how to switch your development process to a NuGet based approach using private feeds in Azure DevOps (although the same principles apply to public feeds like NuGet.org).
I'll take a sample application that has direct project references (to projects like the Toolkit and the various FileProvider projects discussed in previous articles), take out the dependencies one by one, turn them into NuGet projects with an automated build pipeline and then update the main application to pull in these packages to replace the old project references. This means refactoring the solution on the left that has all its dependencies as local projects to the solution on the right where all separate dependencies have been moved into NuGet packages:

Over the course of the following six articles, I'll introduce you to the following:
Part 1 – Introduction (you're reading it now)- An introduction to NuGet.
- An introduction to the sample project used throughout the article series.
- How to extract code into various sub projects in preparation of the packaging process. For example, I'll break up the Toolkit project into various mail sender packages, each targeting a different platform to send the email with.
- How to create packages on your local machine.
- How to test your packages on your local machine.
- How to set up an automated build pipeline to compile, build and publish packages.
- How to manage package versions.
- How to manage dependencies between packages.
- How to update the main application to use the packages from your own feed, replacing the previous project references.
- How to deal with change – the development cycle of coding – creating a package – consuming that package.
- How to improve discoverability and configuration of your packages using service registration methods.
- How to add metadata to your packages to make them easier to find and use.
- How to add unit tests to the solution and run them as part of the build pipeline.
- How to debug your packages from an application that is using those packages.
Next up: a quick introduction to NuGet and to the sample application.
Introducing NuGet
If you've done any development on .NET recently, it's very likely you already know, use and love NuGet. If you're not familiar with it, NuGet is a package manager for .NET allowing you to quicky add libraries to your .NET projects, be it from external parties or your own. These libraries can be anything: a single DLL that performs a specific task, a collection of files and source code that gets added to your project, client-side libraries and a lot more; The NuGet client tools (such as the UI tools and command line package manager in applications such as Visual Studio and VS Code) provide the ability to produce, consume and manage packages. The NuGet Gallery at nuget.org is the central package repository used by package authors for public packages. In addition, private feeds such as Azure DevOps's Artifact feeds and MyGet allow you to publish packages that aren't available to everyone but only to a selected set of users.
For a quick introduction to NuGet and some interesting insights on how it's used, checkout these links:
- https://www.syncfusion.com/blogs/post/how-to-use-nuget-packages.aspx
- https://docs.microsoft.com/en-us/nuget/
- https://blog.jetbrains.com/dotnet/2020/11/09/diving-into-nuget-history-for-fun-and-community-insights/
Introducing the Sample Application
If you've read my previous articles linked at the beginning of this one about Mail Senders and File Providers, you'll easily recognize the source code for the application that comes with this article. It's a simple MVC web site with a simple page that allows you to view files from a File Provider, and upload new and delete existing files. That part of the code comes pretty much as-is from the articles on File Providers. In addition, whenever a new file is uploaded, an email is sent with an IMailSender. The IMailSender is injected into the controller's constructor and then stored in a private field like this:
public class HomeController : Controller
{
  private readonly IMailSender _mailSender;
  private readonly IFileProvider _fileProvider;

  public HomeController(IMailSender mailSender, IFileProvider fileProvider)
  {
    _mailSender = mailSender;
    _fileProvider = fileProvider;
  }
  ...
}
Then in the Upload method, after storing the file with an IFileProvider, the email is sent by calling SendMessageAsync on the IMailSender:
await _fileProvider.StoreFileAsync("Images", name, fileBytes, false);
await _mailSender.SendMessageAsync("sender@example.com", "recipient@example.com",
         "New file uploaded", BuildBody(file.FileName));
At startup, the desired concrete implementation of IMailSender is injected in Program.cs (or Startup.cs) depending on whether the app runs in Development mode or not. Regardless of the environment, a concrete instance of FileSystemFileProvider is injected. This is just a choice, and I could just as easily have injected the AzureStorageFileProvider or make the type dependent on the environment.
// Use the local FileSystemFileProvider
builder.Services.AddSingleton<IFileProvider>(
        new FileSystemFileProvider(builder.Configuration["RootFolder"]));

if (builder.Environment.IsProduction())
{
  builder.Services.AddSmtpServer();
}
else
{
  builder.Services.AddDropLocalSmtpServer(
        builder.Configuration.GetValue<string>("TempMailFolder"));
}
Here's how the project looks in Visual Studio:

As I mentioned, this code is a slightly modified version of the code from the article on file providers plus some additional code to send email. You can find its full code in the Github repository that comes with this article at https://github.com/Imar/Articles.NuGetPackagesDemo.
While this current code in the demo application works well, it doesn't promote the reuse of projects like the FileSystemFileProvider or various IMailSender implementations. In the next section I'll refactor the application to make it easier to change to a package-based approach later.
Refactoring to a package-based approach
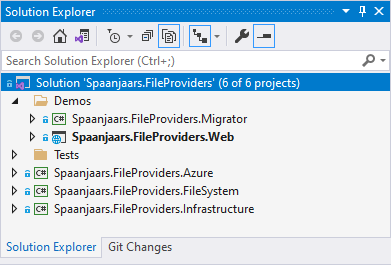
In the sample application, the File Provider related code is already in a good shape. I have a separate Spaanjaars.FileProviders.Infrastructure project that contains the IFileProvider interface. Then there are two separate projects, Spaanjaars.FileProviders.FileSystem and Spaanjaars.FileProviders.Azure both with classes that implement IFileProvider, each in its own way (targeting the local file system and Azure respectively).
For the mail related functionality, a similar setup is needed as well. The current Toolkit project contains a number of different implementations of IMailSender:
- AlwaysDropMailOnLocalDiskMailSender – Saves emails to disk
- InternalMailSender – Reroutes email to a known email address, encapsulating another sender
- MailKitMailSender – Uses MailKit to send the emails
- MailSender – Sends email using .NET's SmtpClient
- SendGrid – Send email using SendGrid
In order to be able to pick and choose the functionality you need and nothing more, it would be good to move these classes and related code to their own projects (and later to packages) as follows:
| Type | Project | Description |
|---|---|---|
DropMailOnLocalDiskMailSender (renamed from AlwaysDropMailOnLocalDiskMailSender) |
Spaanjaars.Email.Development |
I use the DropMailOnLocalDiskMailSender implementation pretty much only during development, so that's why I am placing it in the Development package. |
InternalMailSender |
Spaanjaars.Email.Development |
Same as with DropMailOnLocalDiskMailSender, I only use this during development (and testing). I chose to place it in the same project as DropMailOnLocalDiskMailSender as for development purposes I don't mind bringing in one with the other. But if you prefer, you could also place this in a separate project, called Testing for example. |
MailKitMailSender |
Spaanjaars.Email.MailKit |
This project will reference the MailKit package to handle the email. |
MailSender |
Spaanjaars.Email.Smtp |
This project only references .NET and has no further dependencies. |
SendGridMailSender |
Spaanjaars.Email.SendGrid |
This project will reference the SendGrid package to handle the email. |
IMailSender |
Spaanjaars.Email.Infrastructure |
This solution contains the interface IMailSender, as well as MailSenderBase which other implementors can inherit from to speed up the implementation. |
In the following section I'll provide detailed steps to create the infrastructure project and the implementation of one mail provider. I'll then briefly describe the steps I took to create the other projects without going into too much detail. You find the full source for the before and after situation in the Github repo for this article at https://github.com/Imar/Articles.NuGetPackagesDemo.
Note: the steps below are very specific to my sample project. However, it still shows common situations and problems you'll run into when converting your own projects. If you don't want to follow along, I recommend to at least glance over the steps so you're familiar with the basic concepts and potential problems. You can then pick up again at part 2 that shows how to create packages.
Creating the infrastructure project
Follow these steps to move IMailSender and its support types to a new project. This project will be the base project that others will reference.
- Right-click the solution and choose Add | New Project
- Choose Class Library (and not Class Library .NET Framework) as the project type.
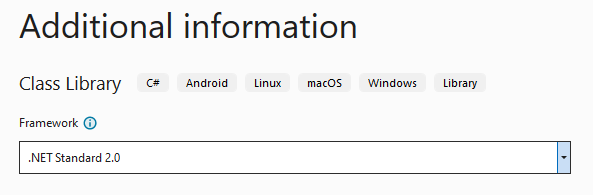
- Enter Spaanjaars.Email.Infrastructure as the name and store the project in the Applications folder, side by side with the web and other projects. Obviously you can use another name if you like. If you do, be sure to adjust future steps to match your project name.
- Click Next and then choose .NET Standard 2.0 as the target:
![]()
I'll talk more about why (and when) to choose .NET Standard over the other options later. - Click Create to add the project to the solution.
- Delete Class1.cs from the project
- Cut the files IMailSender.cs and MailSenderBase.cs (not MailSender.cs) from the Toolkit project into the new Spaanjaars.Email.Infrastructure project. Change the namespaces of the types in these files to Spaanjaars.Email.Infrastructure.
- Right-click on Spaanjaars.Email.Infrastructure and choose Build to confirm the project builds successfully. Resolve any errors you may have.
Note: doing this will leave the solution in a broken state as classes in the Web and Toolkit projects can no longer find IMailSender and MailSenderBase. To fix this, simply add a project reference to Spaanjaars.Email.Infrastructure from the Web and Toolkit projects and adjust the using statements. This will be addressed properly in a later article.
Choosing between .NET Standard 2.0 and .NET 6
When creating the project, I picked .NET Standard 2.0 and not .NET Standard 2.1 or .NET 6. Why did I do that? .NET Standard 2.0 is implemented by the .NET Framework (from version 4.6.1 and up) but .NET Standard 2.1 is not. So, by choosing .NET Standard 2.0 you can create libraries that will work with the older .NET Framework 4.6.1 and later but also with .NET Core 6 and later. In general, when building libraries, it's recommended to choose .NET Standard 2.0 if you can as it ensures the best compatibility between different versions of .NET. If you don't care about the older .NET Framework, you can choose .NET 6 instead. For more information about.NET Standard, take a look here: https://docs.microsoft.com/en-us/dotnet/standard/net-standard and here: https://docs.microsoft.com/en-us/dotnet/standard/library-guidance/cross-platform-targeting.
With the Infrastructure project done, the next step is to create concrete implementations of the mail senders. In the next section I'll move the SendGrid implementation to its own project.
Creating the SendGrid project
- Right-click the solution and choose Add | New Project.
- Choose Class Library (and not Class Library .NET Framework) as the project type.
- Type Spaanjaars.Email.SendGrid as the name and store the project in the Applications folder, side by side with the web and other projects.
- Click Next and then choose .NET Standard 2.0 as the target, just like with the Infrastructure project.
- Click Create to add the project to the solution.
- Delete Class1.cs from the project.
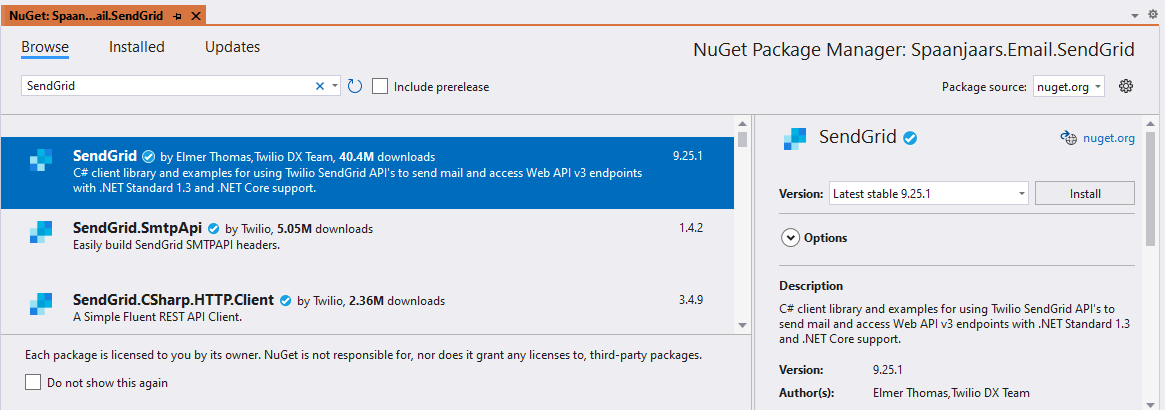
- Right-click on the new project and choose Manage NuGet packages.
- Find the SendGrid package and install it into the project. I am using version 9.25.1 but new versions will likely work just as well:
![Adding the SendGrid package using NuGet]()
- Move the three files that start with SendGrid from the Toolkit project to the new SendGrid project. Update the namespaces to Spaanjaars.Email.SendGrid.
- Moving the files will cause a bunch of compilation errors in the new project:
![Compilation errors in the VS Error List]()
The errors "The type or namespace name 'MailSenderBase' could not be found" and "SendGridMailSender.SendMessageAsync(MailMessage)': no suitable method found to override" are caused by the fact that the new SendGrid project doesn't know where to find MailSenderBase. You can fix that by adding a project reference to Spaanjaars.Email.Infrastructure (right-click the SendGrid project and choose Add | Project Reference and then select the Infrastructure project.) In part 3 of this article series, I'll show you how to replace this project reference with a package reference. Once the project is referenced add using statements for Spaanjaars.Email.SendGrid to resolve the errors.
The error "Feature 'using declarations' is not available in C# 7.3. Please use language version 8.0 or greater" is caused by the syntax of a using statement in GetSendGridAttachment. The Toolkit project targeted .NET 6 so it was able to use this syntax:
using var stream = new MemoryStream();
In .NET Standard 2.0 this is not supported, so the code needs to be written as follows:
using (var stream = new MemoryStream())
{
  attachment.ContentStream.CopyTo(stream);
  ...
}
The error "The type or namespace name 'IOptions<>' could not be found (are you missing a using directive or an assembly reference?)" comes up because the new SendGrid package doesn't reference Microsoft.Extensions.Options yet. Using the Package Manager UI or console, install that package and then resolve any errors by adding the appropriate using statements for Microsoft.Extensions.Options.
You'll also get an error for the AddSendGridSmtpServer method in EmailExtensions.cs. Simply comment out the method for now; I'll add new service registration methods at a later point in this series.
- Right-click on Spaanjaars.Email.SendGrid and choose Build to confirm the project builds successfully. Resolve any build errors you may get.

Creating the remaining projects
As I mentioned, I won't provide detailed instructions for the remaining projects as they follow a similar pattern to the Infrastructure and SendGrid projects. Instead, I'll provide a high-level overview of the steps I took to move the remaining mail types to their own projects. If you don't need to see all the details for my sample app and instead you want to focus on your own code base, you can skip top part 2 of this series that shows you how to build packages.
- Create a new project called Spaanjaars.Email.MailKit by following the steps for the SendGrid project.
- Add a reference to the Spaanjaars.Email.Infrastructure project.
- Install the package MailKit. I am using version 3.0.0 but later versions are likely to work as well.
- Install the package Microsoft.Extensions.Options version 6.0.0 or later.
- Move the file MailKitMailSender.cs from the Toolkit to the new MailKit project.
- Copy the file SmtpSettings.cs from the Toolkit to the new MailKit project. This class is needed by both the MailKit and the SmtpClient implementations but it's best to let each manage its own copy.
- Adjust the namespaces for the various types to match the project (Spaanjaars.Email.MailKit).
- Comment out the code for the AddMailKitSmtpServer method for now.
- Create a new project called Spaanjaars.Email.Smtp by following the steps for the SendGrid project.
- Add a reference to the Spaanjaars.Email.Infrastructure project.
- Install the package Microsoft.Extensions.Options version 6.0.0 or later.
- Move the file MailSender.cs from the Toolkit to the new Smtp project.
- Movethe file SmtpSettings.cs from the Toolkit to the new Smtp project. The MailSender is the last class that needs this file, so you can now move instead of copy it.
- Rename the MailSender class (and its constructor) and file to SmtpMailSender and SmtpMailSender.cs respectively.
- Adjust the namespaces for the various types to match the project (Spaanjaars.Email.Smtp).
- Comment out the code for the AddSmtpServer method.
- In the web project, in Program.cs, comment out the code that configures SmtpSettings and the code that calls AddSmtpServer. I'll add these back at a later point (in part 5 of this series) when creating service registration methods.
- Create one more project called Spaanjaars.Email.Development by following the steps for the SendGrid project.
- Add a reference to the Spaanjaars.Email.Infrastructure project.
- Install the package Microsoft.Extensions.Options version 6.0.0 or later.
- Move the files InternalMailSender.cs and AlwaysDropMailOnLocalDiskMailSender.cs from the Toolkit to the new Development project.
- Adjust the namespaces for the various types to match the project (Spaanjaars.Email.Development).
- Rename the class and file AlwaysDropMailOnLocalDiskMailSender to DropMailOnLocalDiskMailSender. This isn't really needed but I find it a better name.
- For both classes, inherit from MailSenderBase instead of IMailSender and remove the two overloads of SendMessageAsync that accept the to, from, subject and so on as simple types and just leave the one that accepts a MailMessage.
- The Toolkit project is now almost empty and can be removed from the solution and from disk. You'll have to remove some old references to it from code in the Web project.
At this point, the solution should compile. However, because of the commented code in Program.cs, no mail will be sent and the code will crash with a null reference exception on _mailSender in HomeController. To fix that, add a project reference to Spaanjaars.Email.Development and then add the following code to Program.cs:
builder.Services.AddSingleton<IMailSender>(
        new DropMailOnLocalDiskMailSender(
            builder.Configuration["TempMailFolder"]));
This registers the DropMailOnLocalDiskMailSender class as the mail sender. The folder it uses is configured with the key TempMailFolder in appsettings.json.
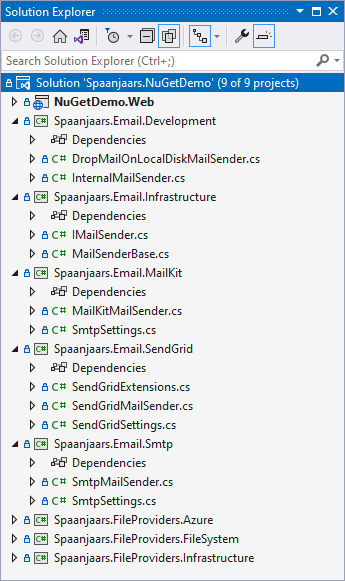
When I was done, my solution explorer looked like this:
Also, running the application and uploading a new file now saved an email message in my temporary email folder using the DropMailOnLocalDiskMailSendermail sender.
The solution is now in a great state. All relevant types have been moved to their own projects. In addition, some projects reference others, where needed. The next step is to set up your projects to be convertible (packable) to NuGet packages. You see how this is done in the next article in this series.
Wrapping up
I have covered quite a lot of ground in this article, in particular:
- An introduction to NuGet
- A walkthrough of the sample application that comes with this article
- How to refactor an existing code base to a more package-based approach
This article has laid a nice foundation for the topics covered in the next two articles: building your packages and then automating that process with a build pipeline in Azure DevOps. You see how to build and test your packages in the next article. Part 3 then shows you how to set up the pipeline and publish your packages to a feed.
Source code
You find the full source code for these articles in the following Github repository: https://github.com/Imar/Articles.NuGetPackagesDemo.
Where to Next?
Wonder where to go next? You can read existing comments below or you can post a comment yourself on this article.
Links in this Document
| Doc ID | 628 |
| Full URL | https://imar.spaanjaars.com/628/building-a-nuget-packages-architecture-part-1-introduction |
| Short cut | https://imar.spaanjaars.com/628/ |
| Written by | Imar Spaanjaars |
| Date Posted | 01/31/2022 16:17 |
| Listened to when writing | Eraser by HVOB |
Talk Back! Comment on Imar.Spaanjaars.Com
I am interested in what you have to say about this article. Feel free to post any comments, remarks or questions you may have about this article. The Talk Back feature is not meant for technical questions that are not directly related to this article. So, a post like "Hey, can you tell me how I can upload files to a MySQL database in PHP?" is likely to be removed. Also spam and unrealistic job offers will be deleted immediately.
When you post a comment, you have to provide your name and the comment. Your e-mail address is optional and you only need to provide it if you want me to contact you. It will not be displayed along with your comment. I got sick and tired of the comment spam I was receiving, so I have protected this page with a simple calculation exercise. This means that if you want to leave a comment, you'll need to complete the calculation before you hit the Post Comment button.
If you want to object to a comment made by another visitor, be sure to contact me and I'll look into it ASAP. Don't forget to mention the page link, or the Doc ID of the document.