Building a NuGet Packages Architecture Part 2 - Building packages
This is part 2 in a series of 6 articles about building a software architecture based on NuGet packages and feeds. In this series you will see:
- How to refactor your codebase to make it work with packages
- How to build packages on your local machine
- How to build packages using an Azure build pipeline and add the generated packages to a feed
- How to consume your packages in your applications
- Different ways to improve usage of your packages and types with service registration methods
- Various tips and tricks to enhance your package and how to use them
You'll find all the articles in the series here:
In this second article, I'll take the application I refactored in part 1 and build packages locally from the projects I extracted out to a separate solution. I'll also show you how to test and use your packages locally. Part 3 then shows you how to automate this process with an Azure DevOps build pipeline.
If you're interested in purchasing the entire article series now as a 60+ page PDF document, check out this post: Introducing a new article series: Building a NuGet packages architecture.
Creating Packages from your Projects
When it comes to building packages from your Visual Studio projects, you have two options:
- Use a .nuspec file – A .nuspec file is an XML document that describes the package's content. It's included in the package itself when it's being created.
- Use MSBuild – When using MSBuild, instructions on how to create the package are embedded in the .csproj file and extracted out by MSBuild.
For simple packages that contain just a single DLL and little more, I prefer to use MSBuild. Your mileage may vary and you can favor the .nuspec file. Either way works fine and produces more or less the same output.
In the next section you see how to use dotnet pack to create the actual packages and then add meta data to the projects' csproj files to influence the packages. Using dotnet pack is just temporary; in later parts of this article series, I'll let an Azure DevOps pipeline create the packages instead and publish them to a feed for consumption in your projects.
Building packages using dotnet pack
Without any further setup, you can already create packages for your projects very easily. To see how that works, follow these steps:
- Open up a command prompt in the folder that contains your solution file. For me, that's in the After folder D:\Repos\Articles\Spaanjaars.NuGetPackagesDemo\After.
- Type dotnet pack and hit enter.
- After a short while you should see a bunch of messages indicating that package have been created for most projects. You should also see a warning about the Web project not being packable.
![Creating packages at the command line using dotnet pack]()
If you now navigate into the bin\debug folder of a project, like Spaanjaars.Email.SendGrid, you should see a Nuget package file named after the project:
![The created package in Windows Explorer]()
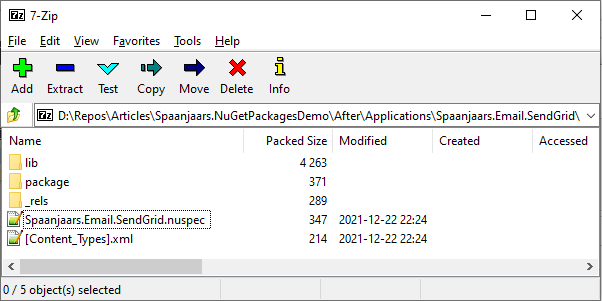
NuGet packages are just zip files with a .nupkg extension, so if you want to see what's inside, rename the file to .zip and open it in a ZIP file manager. Here's what's in the SendGrid package:
![]()
The zip file contains a number of files and folders, two of which are the most important for this package and are described below. The others contain additional meta data for the package.
- lib – This is the folder that contains the package's main content: the Spaanjaars.Email.SendGrid.dll to be exact.
- Spaanjaars.Email.SendGrid.nuspec; this is the NuSpec meta data file that describes the contents of this package.
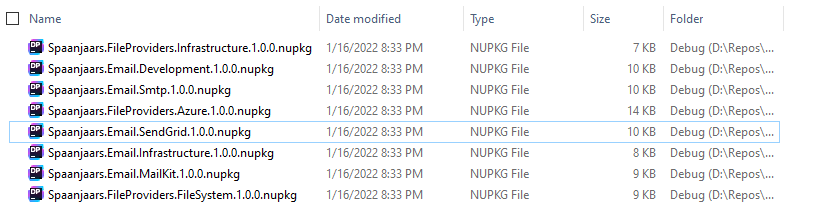
- Open a Windows Explorer at the root of your solution. Use the Search box to look for all .nupkg files. On my machine, I see this:
![Windows Explorer showing all created packages]()
- Copy all files to the clipboard and then paste them in a (new) folder such as C:\MyNuGetPackages.
- In Visual Studio, open the NuGet Package Manager and click the Gear icon in the top-right corner:
![NuGet window with Settings icon]()
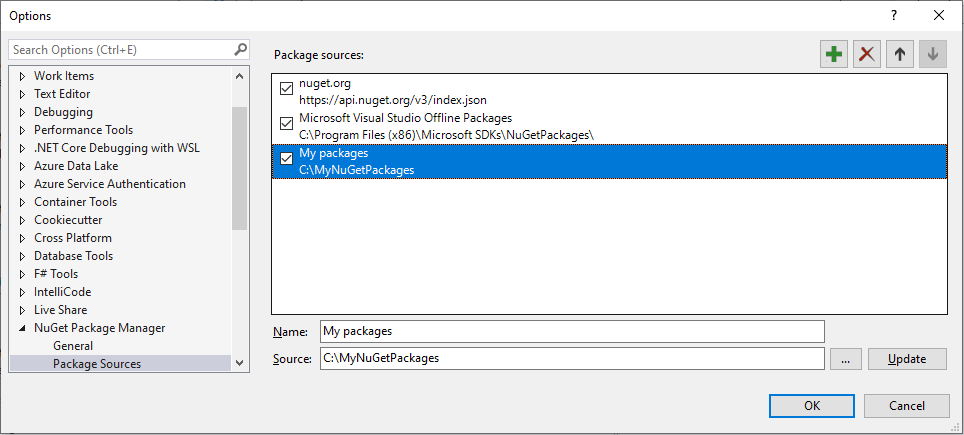
- Click the + icon to add a new feed and then provide a name and the path to the folder with your packages:
![Visual Studio settings for the Package Manager]()
- Close the dialog.
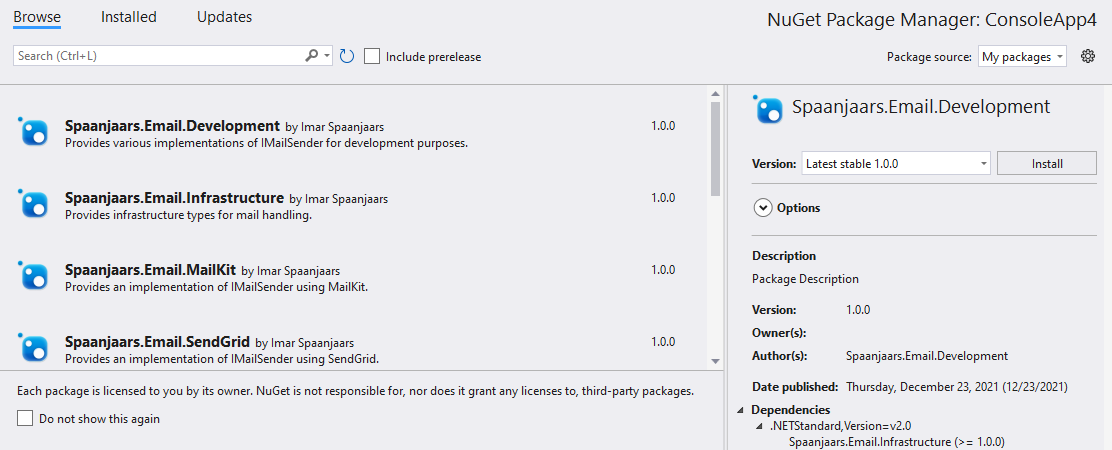
- Create a new project, such as a web application or console application, bring up the NuGet package manager and select your custom feed in the top right of the window. You should see your packages show up on the Browse tab:
![The NuGet Package Manager listing the local packages]()
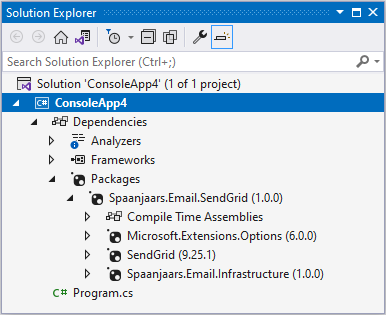
- Select one of the packages that depends on another; for example, select the SendGrid package which depends on the Infrastructure project. Once added, the Dependencies node shows the installed packages, as well as its own dependencies.
![Visual Studio with a Console Application showing NuGet references]()
- At this point you could go ahead and write code against the classes in the package. I'll leave that as an exercise; the final web app that comes with this code has a bunch of examples using dependency injection that you may want to check out.


The nuspec file looks like this:
<?xml version="1.0" encoding="utf-8"?>
<package xmlns="http://schemas.microsoft.com/packaging/2013/05/nuspec.xsd">
  <metadata>
    <id>Spaanjaars.Email.SendGrid</id>
    <version>1.0.0</version>
    <authors>Spaanjaars.Email.SendGrid</authors>
    <description>Package Description</description>
    <dependencies>
      <group targetFramework=".NETStandard2.0">
        <dependency id="Microsoft.Extensions.Options" version="6.0.0"
                     exclude="Build,Analyzers" />
        <dependency id="SendGrid" version="9.25.1" exclude="Build,Analyzers" />
        <dependency id="Spaanjaars.Email.Infrastructure" version="1.1.2"
                     exclude="Build,Analyzers" />
      </group>
    </dependencies>
  </metadata>
</package>
There are a couple of important elements in here:
id – This is the unique NuGet package ID. It's what you'll use later in a command like Install-Package.
version – This is the package version, not to be confused with the assembly version of the DLL inside the package. It defaults to 1.0.0 if you don't set it explicitly. I'll describe how to do that in a later section.
authors – This contains the name(s) of the package authors. When not specified it defaults to the project name. You'll see how to set this later on.
description – This contains a description of your package. You'll see how to set this later on.
dependencies – This lists your project's dependencies such as the .NET version (.NETStandard2.0 in this case) and other packages like the SendGrid package I added earlier. Notice how dotnet pack understood the project reference from the Spaanjaars.Email.SendGrid project to the Spaanjaars.Email.Infrastructure project. And instead of embedding the infrastructure DLL, it referenced it as a package. Since dotnet pack used the solution file in the After folder, it has created packages for all projects in that solution and therefore this reference works because the package actually exists. If you were to run dotnet pack in the SendGrid project's folder, it would create a NuGet package for that project alone in which case the reference won't work (the reference will be there, but its linked package won't). In part 3 of this article series, I'll update the solution and replace project references with package references, making this a non-issue.
That's a pretty good start but we can do better by providing explicit metadata to the packages to make them easier to use and discover. You see how to do this next.
Note: once you've created a package using dotnet pack, you can push it up to a feed like nuget.org from the command line using nuget push. More details on that command can be found here: https://docs.microsoft.com/en-us/nuget/reference/cli-reference/cli-ref-push. I won't discus this command any further as I'll use an Azure DevOps pipeline to push the packages automatically in the next part of this article series.
Adding metadata to your projects
In the previous section you saw how dotnet pack set some metadata based on defaults. In most situations though, you want to be explicit with the data. For example, you want to set your own author and description, version info and more.
When you create a package using a .nuspec file, there's a long list of fields that are available, including fields like id, version, description and authors as you saw before. You find the full list on this page: https://docs.microsoft.com/en-us/nuget/reference/nuspec and the XSD (the full schema for the .nuspec file) here: https://github.com/NuGet/NuGet.Client/blob/dev/src/NuGet.Core/NuGet.Packaging/compiler/resources/nuspec.xsd
When building packages using your .csproj file (that is then processed by MSBuild), you can use many of the same fields, but some of them have a prefix of Package. For example, the nuspec tags element, becomes PackageTags when using inside your .csproj file. You find the full list of elements you can use in the .csproj file here: https://docs.microsoft.com/en-us/nuget/reference/msbuild-targets#pack-target.
Armed with this information, I went into the .csproj file for the project Spaanjaars.Email.Infrastructure and updated the first PropertyGroup from this:
<PropertyGroup>
  <TargetFramework>netstandard2.0</TargetFramework>
</PropertyGroup>
To this:
<PropertyGroup>
  <TargetFramework>netstandard2.0</TargetFramework>
  <PackageId>Spaanjaars.Email.Infrastructure</PackageId>
  <AssemblyVersion>1.0.0.0</AssemblyVersion>
  <Version>1.0.0</Version>
  <Authors>Imar Spaanjaars</Authors>
  <IsPackable>true</IsPackable>
  <Description>Provides infrastructure types for mail handling.</Description>
</PropertyGroup>
With this meta data, a package built from this file shows up like this in the Nuget package manager:

This gives users of your packages a lot of useful information that will help them understand what value your package provides, by whom it was created and when it was last updated and more.
In parts 6 of this series, you'll see how to add more metadata to the package, such as a custom icon to make your packages stand out.
The final thing to do for this part in the series is to test out the locally created packages. This is the topic of the next, and final section of this article.
Testing your packages
Most of time, you'll use packages that come from an external feed, such as the one from nuget.org, myget.org or a custom feed (as discussed in part 3). However, it's also super easy to get them from a local drive. This is great for simple development scenarios and for local testing of your packages. Here's how:

Wrapping up
In this article you saw how to create packages from your .NET projects using dotnet pack. I also demonstrated briefly how to test and use those packages from a local feed (a folder on your local machine). This is nice for some quick testing and even for some simple development scenarios. However, it's much nicer if you can make your packages available through an online feed such as NuGet.org or a feed on Azure DevOps that you can share among developers in your organization. Building your packages whenever code changes and pushing them to such an online feed is the topic of the next article in this series.
Source code
You find the full source code for these articles in the following Github repository: https://github.com/Imar/Articles.NuGetPackagesDemo.
Where to Next?
Wonder where to go next? You can read existing comments below or you can post a comment yourself on this article.
Links in this Document
| Doc ID | 629 |
| Full URL | https://imar.spaanjaars.com/629/building-a-nuget-packages-architecture-part-2-building-packages |
| Short cut | https://imar.spaanjaars.com/629/ |
| Written by | Imar Spaanjaars |
| Date Posted | 02/08/2022 14:49 |
| Listened to when writing | Hellrap by Ghostemane |
Talk Back! Comment on Imar.Spaanjaars.Com
I am interested in what you have to say about this article. Feel free to post any comments, remarks or questions you may have about this article. The Talk Back feature is not meant for technical questions that are not directly related to this article. So, a post like "Hey, can you tell me how I can upload files to a MySQL database in PHP?" is likely to be removed. Also spam and unrealistic job offers will be deleted immediately.
When you post a comment, you have to provide your name and the comment. Your e-mail address is optional and you only need to provide it if you want me to contact you. It will not be displayed along with your comment. I got sick and tired of the comment spam I was receiving, so I have protected this page with a simple calculation exercise. This means that if you want to leave a comment, you'll need to complete the calculation before you hit the Post Comment button.
If you want to object to a comment made by another visitor, be sure to contact me and I'll look into it ASAP. Don't forget to mention the page link, or the Doc ID of the document.