Building a NuGet Packages Architecture Part 4 - Consuming packages and managing changes
This is part 4 in a series of 6 articles about building a software architecture based on NuGet packages and feeds. In this series you will see:
- How to refactor your codebase to make it work with packages
- How to build packages on your local machine
- How to build packages using an Azure build pipeline and add the generated packages to a feed
- How to consume your packages in your applications
- Different ways to improve usage of your packages and types with service registration methods
- Various tips and tricks to enhance your package and how to use them
You'll find all the articles in the series here:
In this article I'll complete the process of migrating to a package-based architecture by updating the demo application. I'll remove all project references and replace them with a package reference instead.
If you're interested in purchasing the entire article series now as a 60+ page PDF document, check out this post: Introducing a new article series: Building a NuGet packages architecture.
Introduction
In the previous articles in this series, you saw how to convert reusable projects to NuGet packages for easy consumption in other projects. You also saw how to automatically build and publish these packages to a feed in Azure DevOps. In this article you see how to take advantage of this new setup. In the next section I'll show you how I converted the demo application by removing all direct project references and their code and then replaced them with package references from the feed.
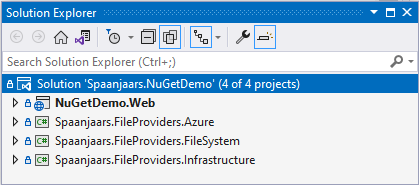
As a starting point, I'll use a copy of the Before folder that I named DemoApplication. You may recall from the first article that the solution looked like this:

The web project has references to the other projects to bring in functionality to work with files and send email. I'll take this solution and delete all projects except for the main NuGetDemo.Web application.
In order to follow along, make sure Visual Studio is set up to use your feed as follows (this is a repeat of the instructions from the previous article so you can skip this if your feed has been set up already).
Configure your feed in Visual Studio
Adding the feed to Visual Studio so you can access its packages is done as follows:
- In Azure DevOps, click Artifacts and select the feed you created. Click Connect to feed and then click the Visual Studio item. Here you find instructions on how to add the feed as well as the feed's URL.
- Follow the instructions by adding the feed to Visual Studio under Tools | Options | NuGet Package Manager.
- To verify the feed was added correctly, open any project in Visual Studio, right-click the project in the Solution Explorer and choose Manage NuGet packages. Then in the top-right ensure your feed has been added. Then click the Browse tab. Your packages should now show up.
Upgrade the solution to a package-based solution
To convert the project to a package-based solution, I followed these steps:
- First, I made sure all my recent changes to the project were checked in and synced to git. That way, I have something to fall back on in case of a failure.
- Next, I removed the Toolkit project from the solution. I also deleted the Toolkit project from disk (since this is now managed in a separate solution. For this demo, I have the sample application and the NuGet packages in the same repo, but normally you'd want to set up a separate repo for the packages.)
- This will cause a bunch of compilation errors but they will go away when I install the packages that contain the same functionality as a replacement.
- Next, I opened the Package Manager Console, selected MyDemoFeed in the top-left, and ran the following commands:
Install-Package Spaanjaars.Email.Smtp
Install-Package Spaanjaars.Email.Development
Note that installing any of these packages will also bring in the dependent package Spaanjaars.Email.Infrastructure.
- Next, I updated the code in Program.cs from this:
if (builder.Environment.IsProduction())
{
  builder.Services.AddSmtpServer();
}
else
{
  builder.Services.AddDropLocalSmtpServer(
        builder.Configuration.GetValue<string>("TempMailFolder"));
}
to this:
if (builder.Environment.IsProduction())
{
  builder.Services.AddSingleton<IMailSender, SmtpMailSender>();
}
else
{
  builder.Services.AddSingleton<IMailSender, DropMailOnLocalDiskMailSender>(
         x => new DropMailOnLocalDiskMailSender(
                builder.Configuration.GetValue<string>("TempMailFolder")));
}
This is just a temporary change. When taking the toolkit apart, I didn't copy over the service registration methods. In part 5 in in this series I'll fix that and implement a bunch of service registration methods so you can call something like builder.Services.AddSmtpServer() again.
- Next, I updated the using statements in HomeController as the IMailSender was moved to a new namespace.
- I ran the application to ensure everything still worked. I uploaded a test file and then confirmed that an email was sent successfully.
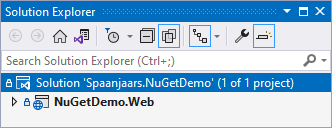
My solution now looked like this:
![The demo project without the Toolkity project]()
- Next, it was time to remove the code for the file providers. I removed all three projects from the solution and deleted their code from disk.
- I then ran the following command in the NuGet package manager:
Install-Package Spaanjaars.FileProviders.FileSystem
That command installs that package as well as the one it depends on: Spaanjaars.FileProviders.Infrastructure.
Note: I didn't install the Azure package as my code doesn't need it. Unlike the email packages that are configured depending on the environment, I just hardcode one of the two implementations:builder.Services.AddSingleton<IFileProvider>( new FileSystemFileProvider(builder.Configuration["RootFolder"]));If I wanted to use the Azure one, I would install that one instead. If you want to switch between the two IFileProvider implementations at runtime, you would install both packages and then use one or the other depending on some condition just as I did with the email packages.
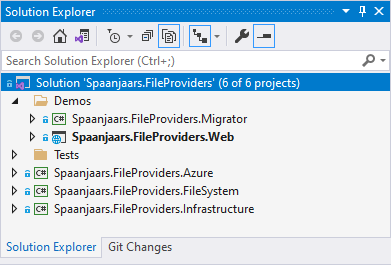
No other changes were needed. Since the namespaces for the File System project remained the same, my web project continued to work as before; it just references the DLLs coming from the packages instead of from the projects as it previously did.My Solution Explorer now looked like this:
![The demo project in the Solution Explorer with all other projects removed]()
Isn't that a thing of beauty? 😉 No other dependencies as code anymore, and just the main project to work with and focus on. Here's how the project looks with its dependencies:
![The demo project in the Solution Explorer showing the 3 packages under the Packages node]()
-
I ran the application one more time and tested all functionality. Uploading a file still worked as before and an email was still sent but now the IFileProvider and IMailSender dependencies came from NuGet packages.

Mission accomplished: my web demo project now fully relies on the external packages for common functionality like file handling and email. More importantly, I now have a framework in place that I can reuse for other projects. From now on, every time I need, say, emailing capabilities in a project, all I need to do is install a package, add some startup configuration code and then I can use the IMailSender to send my emails.
With the conversion of the sample project, my initial work is done. My demo project no longer relies on the projects directly but now uses package references. But what if you need to add more functionality to change the existing implementation? That's the topic of the next section.
Dealing with changes
The projects I have converted to packages have been in use for quite a while. That means that when I converted them, they already had the functionality I needed, and most of the code was tried and tested.
Note: this is my recommended approach. You usually do not want to start a new package from scratch. Instead, it's common that only when you need to reuse an existing project elsewhere that you convert it to a package. That way, the code that gets packed is already fairly stable which will lower the need for frequent package updates.
However, this may not always be the case. It's also common that you need to update a package with new functionality after it has first been released. In the remainder of this article, I'll show you how to update the mail packages to support attaching a file to the email. I'll do this by adding an overload to IMailSender that accepts a file stream and a file name. This data is then used to attach the file to the outgoing email.
Note: this may not be the best implementation. First of all, allowing just one attachment is a bit limiting. It would be better to accept some kind of collection. Furthermore, one of the overloads accepts a MailMessage instance which already exposes an Attachments collection that allows you to add one or more attachments. However, it's still useful as an example as it changes the public API of code in an existing package and affects multiple packages, without lots of other distracting code needed to implement a collection.
Implementing the main code change
I started by adding a new method to the IMailSender interface:
Task SendMessageAsync(string from, string to, string subject, string body,
              bool isBodyHtml, string fileName, Stream fileContents);
This new method takes the name of the file used for the attachment as well as a file stream representing the file to attach.
I also implemented this new method in MailSenderBase which is located in the same project.
public async Task SendMessageAsync(string from, string to, string subject,
      string body, bool isBodyHtml, string fileName, Stream fileContents)
{
  var mailMessage = new MailMessage
  {
    From = new MailAddress(from),
    Subject = subject,
    Body = body,
    IsBodyHtml = isBodyHtml
  };

  mailMessage.To.Add(new MailAddress(to));
  mailMessage.Attachments.Add(new Attachment(fileContents, fileName));
  await SendMessageAsync(mailMessage);
}
This way the implementations that use this base class get this functionality for free.
If you now compile the solution, everything should work fine without any errors. At first this may throw you off. Didn't we just change the interface that other classes, such as MailKitMailSender and SendGridMailSender, depend on? The answer is: yes, we did, but the changes are made to a version of the project (and eventually a package) that these classes do not depend on. The concrete mail senders depend on the latest version of the published package, and not on the recently changed one. So, to implement the changes in the other packages, you need to commit and sync your code first, wait for the build and packing operation to complete and then update the NuGet references. Here are the steps I took.
Updating packages that depend on the latest changes
- First, I changed the version number of the project. Without that change, the build pipeline will not pick up the changes:
Since I am changing an interface, I increased the major version number to reflect the fact this introduces breaking changes.<AssemblyVersion>2.0.0.0</AssemblyVersion> <Version>$(AssemblyVersion)</Version>
- Next, I committed my changes to Git and then synchronized them to GitHub. After a while, the build kicked off, compiled the solution and then pushed the updated packages to my feed in Azure DevOps:
![My custom feed in Azure DevOps with the new version of the Infrastructure project]()
- Next, I right-clicked on my Visual Studio solution for the NuGet packages and chose Manage NuGet Packages for Solution. With MyDemoFeed selected as the main feed, I clicked the Updates tab which showed there was a new version of the Infrastructure project.
- I selected the package, made sure that Latest stable 2.0.0 was selected and clicked Install. This updated the package in all four projects that depend on it.
- This update now did introduce the breaking changes I was expecting. The implementation of SmtpMailSender doesn't inherit MailSenderBase but instead implements the IMailSender interface directly. Therefore, it didn't get the overloaded method for free. I chose to implement it myself in SmtpMailSender in the same way as I did in MailSenderBase. I also could have chosen to inherit from that class instead.
- Next, I increased the major version number and reset the minor and patch numbers to 0 for the four email packages just like I did with the infrastructure. Since the Infrastructure project is brought in as a depency, these changes count as breaking changes. For example, someone could have inherited IMailSender and would now be forced to upgrade the code.
- Finally, I committed and synced my changes to GitHub. This triggered a new build and published the latest versions of the updated packages to my feed.

Note, in some scenarios, you may be able to implement functionality with a default implementation in the interface, minimizing the number of breaking changes. This requires C# 8.0 or later. More details can be found here: https://devblogs.microsoft.com/dotnet/default-implementations-in-interfaces/.
With all the changes committed and published to the feed, the last step was updating the demo application to take advantage of the new method in the mail senders. Here are the steps I took:
- I ran an update of the packages for the Demo Web application. This showed the following updates which I installed:
![The updated Development and Smtp packages in the NuGet Package Manager in Visual Studio]()
- Next, I modified the code on the Update method of the HomeController as follows:
await _fileProvider.StoreFileAsync("Images", name, fileBytes, false);

var stream = new MemoryStream(fileBytes);
var from = "sender@example.com";
var to = "recipient@example.com";
var subject = "New file uploaded";
var body = BuildBody(file.FileName);
if (file.FileName.EndsWith(".txt", StringComparison.CurrentCultureIgnoreCase))
{
  await _mailSender.SendMessageAsync(
        from, to, subject, body, true, file.FileName, stream);
}
else
{
  await _mailSender.SendMessageAsync(from, to, subject, body, true);
}
return RedirectToAction("Index");
This code calls one of the overloads of SendMessageAsync conditionally. When the uploaded file is a text file, it's added as an attachment; otherwise, it's not.
- Finally, I ran the application, and uploaded a new file. I then received an email that had the uploaded file attached:
![An example email with the file attached]()
Note: in your own applications you'll need to protect the upload page properly so not just anyone can upload files into your server. Also, attaching uploaded files to emails without further checks poses a security risk. I mitigated this a bit by only attaching files with a .txt extension. But don't use this code as-is without taking further security measures.

Wrapping up
With this last change, I've come to the end of this article in which I have shown you how to update an existing application so it uses NuGet packages for functionality that previously came from projects that were directly referenced in the solution. You saw how to remove the old project references and how to install packages from a custom feed. You also saw how to go through a cycle of code changes. Since the code is no longer in your main solution, your development cycle changes a bit. You now implement the change in the package, publish it and then update the existing application to use the new package. While this introduces a bit more work to get the change in your application, it's worth the trouble in the long run because you now have easily reusable and sharable packages. Part 6 in this article series shows you how to debug your package's code, making it even simpler to work with packages.
In the next article in this series, I'll explain how to add service registration methods to your packages to make it easier for developers consuming your packages to use and configure your types.
Source code
You find the full source code for these articles in the following Github repository: https://github.com/Imar/Articles.NuGetPackagesDemo.
Where to Next?
Wonder where to go next? You can read existing comments below or you can post a comment yourself on this article.
Links in this Document
| Doc ID | 631 |
| Full URL | https://imar.spaanjaars.com/631/building-a-nuget-packages-architecture-part-4-consuming-packages-and-managing-changes |
| Short cut | https://imar.spaanjaars.com/631/ |
| Written by | Imar Spaanjaars |
| Date Posted | 03/02/2022 14:33 |
Talk Back! Comment on Imar.Spaanjaars.Com
I am interested in what you have to say about this article. Feel free to post any comments, remarks or questions you may have about this article. The Talk Back feature is not meant for technical questions that are not directly related to this article. So, a post like "Hey, can you tell me how I can upload files to a MySQL database in PHP?" is likely to be removed. Also spam and unrealistic job offers will be deleted immediately.
When you post a comment, you have to provide your name and the comment. Your e-mail address is optional and you only need to provide it if you want me to contact you. It will not be displayed along with your comment. I got sick and tired of the comment spam I was receiving, so I have protected this page with a simple calculation exercise. This means that if you want to leave a comment, you'll need to complete the calculation before you hit the Post Comment button.
If you want to object to a comment made by another visitor, be sure to contact me and I'll look into it ASAP. Don't forget to mention the page link, or the Doc ID of the document.