Improving your ASP.NET Core site's file handling capabilities – part 1 – Introduction
In a previous article I talked about hiding email capabilities behind an interface to make your code easier to unit test, to centralize configuration and to make it simple to switch to a completely different solution such as a cloud-based email handler like SendGrid, MailChimp or MailGun. Instead of newing up an SmtpClient directly, I created an interface called IMailSender and several concrete implementations that handle the sending of email differently (such as storing it on disk as .eml messages, sending it over SMTP or sending it with SendGrid).
In this article (and the next) I am going to talk about a similar improvement: handling files in a filesystem. I'll show you how to hide file handling - reading, writing and deleting files - behind an interface, similar to how I hid the emailing details behind IMailSender. I'll then create two concrete implementations: one using the local filesystem, the other using Azure storage. I'll then show you how to use dependency injection to inject one of the concrete classes at run-time to determine where your files are located and how to access them. With this setup, it's easy to write code to target yet another (remote) file storage solution like Box or OneDrive and plug that in without making any changes your application code.
In part 2 I'll then show you how you can migrate from a file-based solution to a cloud-based solution or vice versa with very little code.
The sample code that comes with this article (which can be found on Github) targets ASP.NET Core 5, which was the latest official release at the time of writing. However, almost everything presented in this article will also work on the older .NET Framework. The biggest difference you'll run into is how dependencies are injected. In ASP.NET Core this is built in while for the .NET Framework you'll have to use other libraries like Ninject or StructureMap.
Dealing with files the "old way"
It is very common to see code that deals with files using the System.IO namespace directly. For example, it's common to have code that uses System.IO.File.ReadAllTextAsync to read the contents of a file, like this:
public async Task<IActionResult> Index()
{
  var path = Path.Combine(_webHostEnvironment.ContentRootPath, "DemoSettings\\Demo.txt");
  var contents = await System.IO.File.ReadAllTextAsync(path);

  // Do something with contents here. Returning it to the browser as an example only.
  return Ok(contents);
}
In this example, IWebHostEnvironment is injected into the class constructor by the dependency injection framework in .NET Core. IWebHostEnvironment provides information about the web hosting environment an application is running in and gives you access to properties like ContentRootPath that hold the physical location of your site's root on disk and WebRootPath that returns the physical location on disk of the wwwroot folder.
Here's another example from an application I work on regularly, running on .NET Framework 4.8:
public static Settings GetSettings(string configRootPath)
{
  var fileName = Path.Combine(configRootPath, "Settings.xml");
  if (!File.Exists(fileName))
  {
    throw new FileNotFoundException($"Can't find settings file.", fileName);
  }
  return new SettingsConverter().Deserialize(File.ReadAllText(fileName));
}
The root folder, passed in with the configRootPath parameter, is read from a configuration file and sent into the GetSettings method. The code then uses File.ReadAllText to read the settings file from the local filesystem.
While the above examples work fine, they have some major drawbacks:
- They create a strong dependency between the application and the local filesystem. This makes unit testing very hard as the code will always attempt to read a specific file from disk, even if that file may not exist while running your unit tests, or when it's undesirable to use that specific file during tests.
- It also makes it hard to provide access to the files from multiple applications, such as multiple Azure App Services for the same frontend application. As an example, I used this code to store settings for a third-party library. That worked well when we self-hosted the application on a single instance but became much more problematic when we scaled-out to Azure with multiple front-end services requiring access to the same settings files.
In the remainder of this article, I'll show how to hide common file operations behind an interface called IFileProvider, how to implement two concrete implementations (one using the local filesystem, the other targeting Azure storage) and how to select the correct one at run-time. In the second part of this article I'll show you how to use both concrete implementations to move data from one location to another.
Note: ASP.NET Core also comes with its own IFileProvider and a number of concrete implementations. However, this interface provides read-only access to files and is typically used for "site files", like views, static files and so on, and not for user content. Check out the following links to learn more about this interface and its implementations:
Defining the File Provider
When you think about the file operations that a file provider should support at the very least, it's easy to come up with some CRUD methods that allow you to create a file, read it, overwrite it and delete it again. For the sample application that comes with this article I initially defined those methods as follows:
- StoreFile – This creates a new file when it doesn't exist yet, or overwrites the existing file when it does exist.
- GetFile – Gets a single file by its path
- GetFiles – Gets all files in a single folder
- DeleteFile – Deletes a single file by its path
In addition to the above, here are a few other requirements that I typically encounter in my applications:
- In order to point to a storage location, you need some kind of connection info. In Azure storage, this can be a connection string pointing to a storage account. For the local filesystem, this could be a folder on your local drive such as C:\Files. The connection string or root folder can be passed to the concrete providers in their constructors.
- I like the ability to store documents in top-level folders such as Images, Documents and so on inside the storage root. In Azure blob storage you can create a single top-level folder called a blob container to segment your files. On the local filesystem you can simply create sub folders inside the storage root folder. Here's what that could look like on Windows:
![]()
And here's a similar structure inside Azure storage:
![]()
The top-level folder is called the Root Container in my implementation as you'll see in a bit.
- Within the root container, I like the ability to create further sub folders which should be created automatically.
- The provider should expose async methods as the underlying implementations are async as well.

With these requirements, I created my IFileProvider interface as follows:
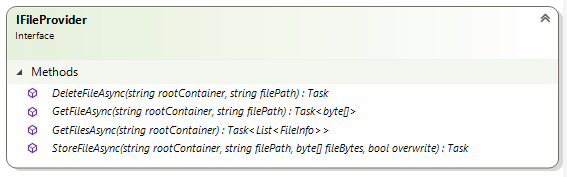
Note that the code presented in this article and Git repository is just a starting point. The code lacks more advanced features such as security, filtering, paging over large data sets and more. However, these features can be added on later quite easily, once you have the basics in place.
The tables below describe each method of IFileProvider and its signature in more detail:
DeleteFileAsync
Deletes the given file.
| Parameter | Type | Description |
|---|---|---|
|
rootContainer |
string |
The top-level folder that contains the file to delete. This is the blob container in Azure storage. Example: "Images" |
|
filePath |
string |
The path to the file to delete.
|
GetFileAsync
Retrieves the given file as a byte array.
| Parameter | Type | Description |
|---|---|---|
|
rootContainer |
string |
The top-level folder that contains the file to retrieve. This is the blob container in Azure storage. Example: "Images" |
|
filePath |
string |
The path to the file to get.
|
GetFilesAsync
Gets all the files in the given root container.
| Parameter | Type | Description |
|---|---|---|
|
rootContainer |
string |
The top-level folder to search for files. |
StoreFileAsync
Saves the file in the given location.
| Parameter | Type | Description |
|---|---|---|
|
rootContainer |
string |
The top-level folder where the file is stored. This is the blob container in Azure storage. Example: "Images" |
|
filePath |
string |
The path where the file should be stored.
|
|
fileBytes |
byte[] |
The file bytes to store. |
|
overwrite |
bool |
When true, the file will be overwritten when it exists. When false and the file exists, an exception will be thrown. |
With the interface done, the next step is implementing two concrete providers as you'll see next: one that targets the local filesystem, the other targeting Azure storage. In a later section of this article, you'll see how to use the IFileProvider abstractions with a concrete implementation to manage the files in your application.
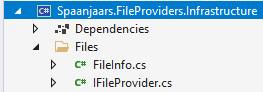
I placed the IFileProvider interface and associated class FileInfo in my Infrastructure project so they are accessible to all other projects in my solution that need them:
Implementing the FileSystemFileProvider
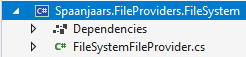
The FileSystemFileProvider is a concrete implementation of IFileProvider and targets the local filesystem using the types in the System.IO namespace. It's probably the easiest file provider to implement as the .NET types and methods in System.IO are pretty straightforward and since you're probably already very familiar with them. In the sample project (see link at the end of this article) you find the code for this provider in the project Spaanjaars.FileProviders.FileSystem:
Note: I won't show the full code of the provider here as you can find it on Github here. Instead, I'll highlight just a few bits and pieces to explain the underlying principles.
As I mentioned earlier, the file providers require some input about where to look for the files. For the Azure provider, this is the connection string of the storage account. For the File System provider, it's the base folder like C:\Files on the local filesystem. The constructor of the FileSystemFileProvider has a parameter for that folder:
public FileSystemFileProvider(string rootFolder)
{
  ThrowIfFolderNotExists(rootFolder);
  if (!rootFolder.EndsWith(Path.DirectorySeparatorChar) && !rootFolder.EndsWith(Path.AltDirectorySeparatorChar))
  {
    rootFolder += Path.DirectorySeparatorChar;
  }
  _rootFolder = rootFolder;
}
The code checks if the folder exists, and throws an exception if it doesn't. It then ensures the path is in a correct format and stores it in the private _rootFolder field for later use. Other methods in the class use that root folder to store and retrieve files.
To see how the provider works with this folder and the file system, consider the code in StoreFileAsync, which stores a file on disk:
public async Task StoreFileAsync(string rootContainer,
               string filePath, byte[] fileBytes, bool overwrite)
{
  var folder = GetFolderPath(rootContainer);
  var file = GetFilePath(folder, filePath);
  var fileFolder = Path.GetDirectoryName(file);
  if (fileFolder == null)
  {
    throw new Exception($"Could not get parent folder of {file}.");
  }
  Directory.CreateDirectory(fileFolder);
  if (File.Exists(file) && !overwrite)
  {
    throw new InvalidOperationException($"The file {file} already exists.");
  }
  await File.WriteAllBytesAsync(file, fileBytes);
}
GetFolderPath returns the physical location of the root container with the root of the filesystem folder. So, if you configured C:\Files as the root folder when constructing the FileSystemFileProvider and specified Images as the rootContainer when calling StoreFileAsync, then GetFolderPath returns C:\Files\Images. The method GetFilePath then expands the path with the file name giving you something like C:\Files\Images\Logo.png.
The code then calls Directory.CreateDirectory to ensure the folder to store the file in exist. It then checks if the file exists and throws an exception when it does and overwrites are not allowed. Finally, it writes the raw file bytes to disk.
DeleteFile is similar in that it calls GetFolderPath and GetFilePath. It throws exceptions when either the parent folder or the file does not exist and then deletes the file from disk.
public Task DeleteFileAsync(string rootContainer, string filePath)
{
  var folder = GetFolderPath(rootContainer);
  ThrowIfFolderNotExists(folder);
  var file = GetFilePath(folder, filePath);
  ThrowIfFileNotExists(file);
  File.Delete(file);
  return Task.CompletedTask;
}
And finally, here's GetFilesAsync that again uses similar concepts:
public Task<List<FileInfo>> GetFilesAsync(string rootContainer)
{
  var folder = GetFolderPath(rootContainer);
  ThrowIfFolderNotExists(folder);
  var files = new DirectoryInfo(folder).GetFiles("*", SearchOption.AllDirectories );
  var result = new List<FileInfo>();
  foreach (var file in files)
  {
    string relativePath = file.FullName.Replace(folder, "", StringComparison.CurrentCultureIgnoreCase);
    result.Add(new FileInfo(file.Name, relativePath, file.FullName));
  }
  return Task.FromResult(result);
}
The method returns a list of FileInfo instances, which is a custom class that holds the file name (like Logo.png), its full path like C:\Files\Images\06\Logo.png and its relative path (like 06\Logo.png). The code searches the root container recursively and therefore returns all the files that folder contains.
As you can see, none of this is particularly difficult code to understand. It's very similar to normal code using System.IO you would use in your applications that directly target the filesystem. Where hiding the concrete implementation behind the IFileProvider shows its strengths is when you can decide – at development time or at run-time – whether you want to use the local filesystem or some remote storage account like Azure. In the next section I'll show you the implementation of AzureStorageFileProvider that targets Azure storage and in the section that follows you see the sample application that uses one of the two at run-time.
Implementing the AzureStorageFileProvider
The AzureStorageFileProvider is another concrete implementation of IFileProvider, this time one that targets an Azure blob storage account. It uses the package Azure.Storage.Blobs for all interactions with Azure. To promote reuse, I separated the implementation in two separate classes:

StorageService.cs contains the code to interact with Azure. It creates instances of classes like the BlobContainerClient and BlobClient to communicate with Azure and get, upload and delete files. You can reuse this service in other Azure related code, for example, if you want to directly interact with a blob storage account or through another interface similar to IFileProvider. The code in this class is pretty standard Azure blog storage code. You can find sample code and documentation on the package's NuGet page. You'll also find great documentation on the Microsoft documentation site at https://docs.microsoft.com/en-us/dotnet/api/azure.storage.blobs?view=azure-dotnet.
Similar to how FileSystemFileProvider receives the root folder in a constructor parameter, AzureStorageFileProvider accepts the Azure storage connection string as a parameter:
public AzureStorageFileProvider(string connectionString)
{
  _storageService = new StorageService(connectionString);
}
The connection string contains the information to connect to the Azure storage account. During development I usually use the local storage emulator which means my connection string simply looks like this:
UseDevelopmentStorage=true
Once you deploy your application to a staging or production environment, you replace it with a real connection string that looks as follows:
DefaultEndpointsProtocol=https;AccountName=YourAccountName;AccountKey=YourAccountKey;EndpointSuffix=core.windows.net
The connection string is used to initialize a new instance of the StorageService class which stores it in a private field for later use by the BuildContainerClient method.
The AzureStorageFileProvider class implements IFileProvider by delegating a lot of work to the StorageService. Here's the code for AzureStorageFileProvider (the full implementation - including XML documentation - can be found in the Github repo):
public class AzureStorageFileProvider : IFileProvider
{
  private readonly StorageService _storageService;

  public AzureStorageFileProvider(string connectionString)
  {
    _storageService = new StorageService(connectionString);
  }

  public async Task StoreFileAsync(string rootContainer, string fileName, byte[] fileBytes, bool overwrite)
  {
    if (await _storageService.FileExists(rootContainer, fileName) && !overwrite)
    {
      throw new InvalidOperationException($"The file {fileName} already exists.");
    }
    await _storageService.UploadFile(rootContainer, fileName, fileBytes, overwrite);
  }

  public async Task<List<FileInfo>> GetFilesAsync(string rootContainer)
  {
    var files = await _storageService.GetFilesInFolderAsync(rootContainer);
    var result = new List<FileInfo>();
    foreach (var item in files)
    {
      var fileName = item.Contains("/") ? item.Substring(item.LastIndexOf('/') + 1) : item;
      result.Add(new FileInfo(fileName, item, item));
    }
    return result;
  }

  public async Task<byte[]> GetFileAsync(string rootContainer, string filePath)
  {
    return await _storageService.DownloadFile(rootContainer, filePath);
  }

  public async Task DeleteFileAsync(string rootContainer, string fileToDelete)
  {
    await _storageService.DeleteFile(rootContainer, fileToDelete);
  }

  public async Task ClearAsync(string rootContainer)
  {
    var allFiles = await _storageService.GetFilesInFolderAsync(rootContainer);
    foreach (var file in allFiles)
    {
      await _storageService.DeleteFile(rootContainer, file);
    }
  }
}
As you can see, some methods - like DeleteFileAsync - delegate directly to their StorageService counterpart. Other methods implement more logic. For example, StoreFileAsync first checks if the file exists and throws an exception when it does, and overwrite is not true.
Conceptually, the code in this provider class is very similar to that in FileSystemFileProvider. However, the actual implementation is quite different as it uses completely different concepts (a local filesystem that is directly accessible versus a system that is only accessible over a REST API).
From a calling code perspective however, there's no difference. The calling code is just ware of methods defined in the IFileProvider interface, and is unaware of the implementation details.
In the next section, I'll discuss the calling code used in the sample application. In particular I'll show you:
- How to upload, display and delete files using the IFileProvider.
- How to make the right file provider available at run-time.
Introducing the Sample Application
The sample application that comes with this article is very simple. Its purpose is to show the concepts of the IFileProvider in an application, and not how to build a full-blown file management web site. That means the application lacks a number of features that you'll likely need in a real application:
- Security – where you control who can upload and access which files.
- Paging for large file sets.
- Chunked uploading for large files.
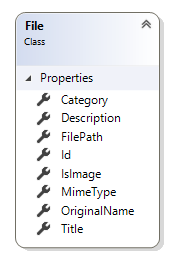
- Linking files to your domain model entities instead of pulling them directly from storage. For simple files like a settings file, it's probably OK if you access the file by a known path directly. However, for other scenarios it's common to store information about a file in a File entity that you can link to other entities. Here's an example of a File class that comes from a real-world application I work on:
With this class you can store metadata about a file in the database. Properties like the OriginalName, MimeType and IsImage help to describe the file. Using the file's Id, you can link a file to other entities in a one-to-one or one-to-many relationship. The FilePath property contains the relative path to the file in the associated file provider.![]()
You won't find this in the sample application but it's straightforward to add to your own apps when you need it.
Managing Files
The most important code of the sample application can be found in the HomeController class and its associated Index.cshtml view.
Again, I won't show all code but highlight a few important topics. First, there's the controller's constructor:
public class HomeController : Controller
{
  private readonly IFileProvider _fileProvider;

  public HomeController(IFileProvider fileProvider)
  {
    _fileProvider = fileProvider;
  }
  …
}
The controller accepts an instance of IFileProvider that it stores in a private field for later use. You'll see how the correct provider is selected after the discussion of the HomeController.
Here's the code for the Index method that returns all available files by calling GetFilesAsync on the provider. It specifies Images as the root container to look in for the files to be returned:
public async Task<IActionResult> Index()
{
  var allFiles = (await _fileProvider.GetFilesAsync("Images")).Select(
                 x => new FileDto (x.Name));
  return View(allFiles.ToList());
}
Instead of returning the file instances directly, I convert them to a collection of FileDto instances, to avoid leaking model data to the UI.
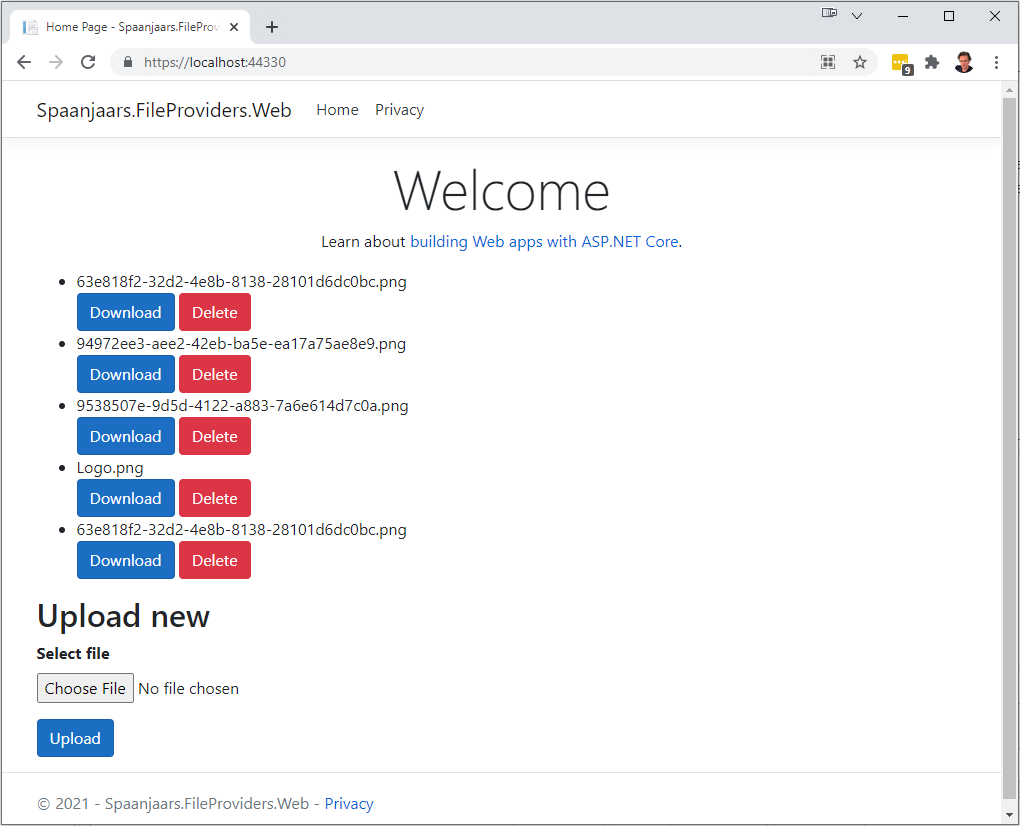
In Index.cshtml, the available files are displayed with a simple loop:
<ul>
  @foreach (var file in Model)
  {
    <li>@file.Name</li>
    <button asp-action="Download" asp-route-path="@file.Name">Download</button>
    <button asp-action="Delete" asp-route-path="@file.Name">Delete</button>
  }
</ul>
Next to each file there's a Download and a Delete button. When you click Download, this code gets executed:
[HttpPost]
public async Task<IActionResult> Download(string path)
{
  var file = await _fileProvider.GetFileAsync("Images", path);
  string fileName;

  if (path.Contains("/"))
  {
    fileName = path.Substring(path.LastIndexOf('/') + 1);
  }
  else
  {
    fileName = path;
  }
  return File(file, "application/x-unknown", fileName);
}
It gets the file from the file provider by calling GetFileAsync. It then takes the last path segment as the file name and then uses the built-in File method to return the file to the browser. By specifying application/x-unknown as the content type you can force the browser to display a Save As dialog.
When you click the Delete button, this code gets executed:
[HttpPost]
public async Task<IActionResult> Delete(string path)
{
  await _fileProvider.DeleteFileAsync("Images", path);
  return RedirectToAction("Index");
}
This code calls DeleteFileAsync on the configured provider to delete the file and then redirects to the Index action to display the updated list of files.
To upload a new file, you can browse to a file and then click the Upload button. When the file gets uploaded to the server, this code is run:
[HttpPost]
public async Task<IActionResult> Upload(IFormFile file)
{
  await using var ms = new MemoryStream();
  await file.CopyToAsync(ms);
  var fileBytes = ms.ToArray();
  var name = $"{Guid.NewGuid()}{Path.GetExtension(file.FileName)}";
  await _fileProvider.StoreFileAsync("Images", name, fileBytes, false);
  return RedirectToAction("Index");
}
IFormFile (from the Microsoft.AspNetCore.Http namespace) abstracts the uploaded file. It provides access to the file's name and content type and has methods to copy the file's bytes to another stream. I use CopyToAsync to copy the file to a new MemoryStream which I then convert into an array of bytes which are then sent to StoreFileAsync which stores the file in the underlying storage mechanism.
Note: in larger applications, I would introduce another layer of abstraction. The controller would receive an instance of an IFileService instead of the IFileProvider. The service would then get an IFileProvider in its constructor so it can work with the files. By introducing the service, you can write centralized code for validation (i.e., only accept images), schedule files to be converted to thumbnails using a queue and remote functions, associate the file with entities in your model and a lot more.
Selecting the correct IFileProvider
With the two implementations of IFileProvider done, you can now determine the one you want to use at run-time. But which one should you choose? The answer is: it depends. If you're fine with using the local filesystem and don't need any of the benefits that a remote storage service brings yet, use the FileSystemFileProvider. By using that provider, you can quickly start now but still have an easy upgrade path in the future should you require to switch to cloud-based storage. If you already have an Azure blob storage account you want to use, then configure the AzureStorageFileProvider. And if you want to use some other storage account (Dropbox, Box, AWS storage, One Drive etc.), write your own implementation of IFileProvider using the storage provider's SDKs and use that instead.
Configuring the provider to use is easy. In .NET Core, you add the correct provider in ConfigureServices in Startup.cs, like so:
// Use the local filesystem
services.AddSingleton<IFileProvider>(_ => new FileSystemFileProvider(Configuration["RootFolder"]));

// Use Azure blob storage
services.AddSingleton<IFileProvider>(_ => new AzureStorageFileProvider(Configuration["StorageConnectionString"]));
Depending on your requirements, you pick one of the two options above. This then makes a single instance of the provider available across the application. When a new instance of HomeController is instantiated, it automatically receives that instance in its constructor argument. You would use only of the two examples above; calling AddSingleton twice as per the code above would overwrite the previous type assigned.
When you now run the application, you see the files that are in your selected storage location. You can add new files using the Upload button. Here's how the app looks for me after adding a few files:
Local development with Azurite
During development of an application that targets Azure, it's useful to work with a local storage emulator so you don't have to use a real account and pay for your storage. For a long time, my tool of choice has been the Microsoft Azure Storage Emulator which comes with Visual Studio. However, Microsoft has now deprecated this tool in favor of the cross-platform Azurite which you get by following the instructions from this page: https://docs.microsoft.com/en-us/azure/storage/common/storage-use-azurite?tabs=visual-studio. There are a few ways to install the tool, but I prefer the NPM route by running this command once to install the tool (assuming you have NPM installed):
npm install -g azurite
Onze installed, you can simply call Azurite from the command prompt to start the emulator.
What's nice about the emulator is that you can also target it with the Microsoft Azure Storage Explorer to analyze and update its contents. To connect to the emulator, open up Microsoft Azure Storage Explorer (you can install it from the Visual Studio Installer or download it from here: https://azure.microsoft.com/en-us/features/storage-explorer/), right-click Storage Accounts, choose Connect to Azure Storage and finally choose Local storage emulator:
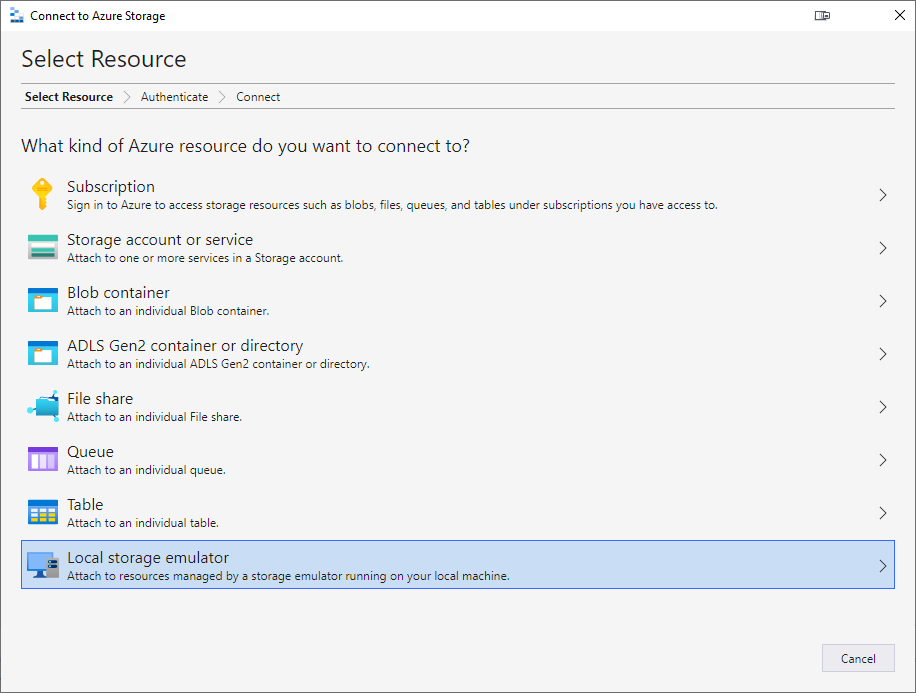
You can then see and manage the various root containers and the files they contain:

Wrapping up
In this article you saw how to abstract file management behind an interface to make it easier to work with files in your application. By using an interface, you make it easier to unit test your application and to switch between various storage locations such as the local filesystem and a remote storage location like Azure storage. You then saw how to write concrete implementations to target the local filesystem and Azure storage and how to determine which provider to use at runtime. At the end of the article, I showed you the (very limited) demo application that uses the file provider and briefly discussed Azurite, the storage emulator you can use for local development.
In the next article I'll discuss the strategy to migrate your files from local storage to a remote storage account (or actually, from any IFileProvider to another).
Source code
You can find the source code for this article in this Github repository.
Where to Next?
Wonder where to go next? You can post a comment on this article.
Links in this Document
| Doc ID | 626 |
| Full URL | https://imar.spaanjaars.com/626/improving-your-aspnet-core-sites-file-handling-capabilities-part-1-introduction |
| Short cut | https://imar.spaanjaars.com/626/ |
| Written by | Imar Spaanjaars |
| Date Posted | 10/20/2021 15:29 |
Comments
Talk Back! Comment on Imar.Spaanjaars.Com
I am interested in what you have to say about this article. Feel free to post any comments, remarks or questions you may have about this article. The Talk Back feature is not meant for technical questions that are not directly related to this article. So, a post like "Hey, can you tell me how I can upload files to a MySQL database in PHP?" is likely to be removed. Also spam and unrealistic job offers will be deleted immediately.
When you post a comment, you have to provide your name and the comment. Your e-mail address is optional and you only need to provide it if you want me to contact you. It will not be displayed along with your comment. I got sick and tired of the comment spam I was receiving, so I have protected this page with a simple calculation exercise. This means that if you want to leave a comment, you'll need to complete the calculation before you hit the Post Comment button.
If you want to object to a comment made by another visitor, be sure to contact me and I'll look into it ASAP. Don't forget to mention the page link, or the Doc ID of the document.