Building a NuGet Packages Architecture Part 6 - Enhancing your packages
Welcome to the last episode in the article series on building a NuGet packages architecture for your own software development purposes. This is the last part in a series of 6 articles about building a software architecture based on NuGet packages and feeds. In this series you will see:
- How to refactor your codebase to make it work with packages
- How to build packages on your local machine
- How to build packages using an Azure build pipeline and add the generated packages to a feed
- How to consume your packages in your applications
- Different ways to improve usage of your packages and types with service registration methods
- Various tips and tricks to enhance your package and how to use them
You'll find all the articles in the series here:
In this article I'll wrap up the series by providing some additional tips and tricks to improve your packages, their usability and your development process using packages in general. In particular, I'll discuss:
- How to add additional metadata and an icon to your package
- How to add XML documentation for the types in your packages
- How to add unit tests and run them as part of your build pipeline
- How to debug the code in your packages
If you're interested in purchasing the entire article series now as a 60+ page PDF document, check out this post: Introducing a new article series: Building a NuGet packages architecture.
Adding metadata
In part 2 of this article series, I added some metadata for the package by adding it to the .csproj file. Here's what I currently have for the Spaanjaars.Email.Infrastructure package:
<PropertyGroup>
  <TargetFramework>netstandard2.0</TargetFramework>
  <PackageId>Spaanjaars.Email.Infrastructure</PackageId>
  <AssemblyVersion>1.1.0.0</AssemblyVersion>
  <Version>$(AssemblyVersion)</Version>
  <Authors>Imar Spaanjaars</Authors>
  <IsPackable>true</IsPackable>
  <Description>Provides infrastructure types for mail handling.</Description>
</PropertyGroup>
A few of these will show up in NuGet. For example, here's the same package in the NuGet package manager:
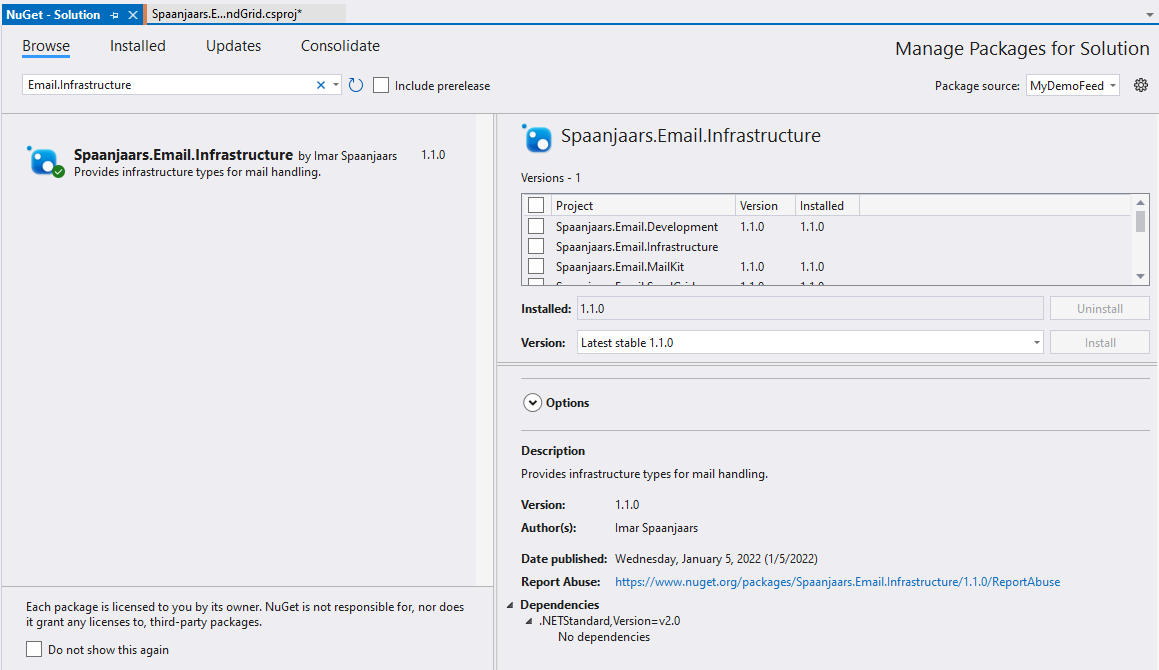
It's easy to see where the various pieces of metadata like the Author and Description come from. You're not limited to these fields though. You can add many others such as a Title, license information and copyright information. For a full list of options, take a look here: https://docs.microsoft.com/en-us/nuget/reference/msbuild-targets.
One of the options I like a lot is PackageReleaseNotes. This field allows you to provide information about what's new or has changed in the latest version of the package. This is great for consumers of your packages as they can quickly see if a newer version includes functionality or bug fixes they are interested in. Unfortunately, the field doesn't work exactly as expected. It shows up as it should in the feed on Azure DevOps:
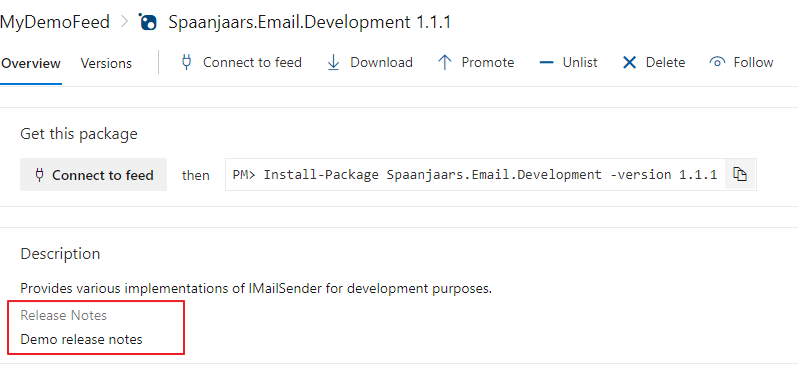
It's also added to the package's .nuspec file. However, Visual Studio doesn't show it in the Package Manager window, defeating its purpose a bit.
On StackOverflow.com I found this answer (https://stackoverflow.com/a/66782851/1498619) that describes a nice work around. You manage the release notes in its own element but then copy it over to the Description field, like so:
<PackageReleaseNotes>Release notes here</PackageReleaseNotes>
<Description>
  Description:
  Description here.
  Release Notes:$(PackageReleaseNotes)
</Description>
That way you can see the release notes as part of the description but still maintain them in a separate element. It's not perfect and it would be nice if Visual Studio would show this data correctly some day.
I also ran into this article: https://dev.to/j_sakamoto/writing-a-nuget-package-release-notes-in-an-outside-of-a-csproj-file-3f94 that shows how to pull in the release notes from a separate file. I haven't tried it but it looks interesting.
Adding icons
Another way to enhance your packages is to provide a custom icon. I've seen various implementations with a varying degree of success. I tried some of them and in many cases I can't get the icon to show up. With the following changes, I do see the icon when I manage installed packages for a solution, like this where I customized the icon for the Spaanjaars.Email.Development package:
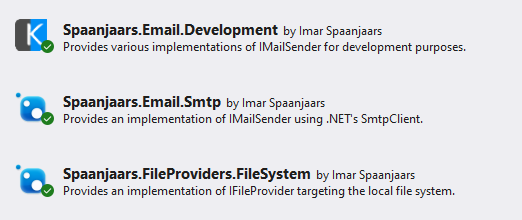
Here's what I did to make this work:
- Add a .png image to your project. You can call it whatever you want. In the example below, I called mine ImageName.png. In case you need it, the image supports transparency.
- Update the .csproj file to reference the image as follows:
<ItemGroup>
  <None Include="ImageName.png"Pack="True" Visible="false" PackagePath="\" />
</ItemGroup>
The Visible attribute hides the image in the Solution Explorer unless you have Show All Files turned on.
Set the PackageIcon element as follows:
<PackageIcon>ImageName.png</PackageIcon>
- Update the version number or else you package won't be published.
- Commit and sync your changes. After the package has been built and published, you can see its custom icon on the Installed tab of the package manager.
Note: It may be that the icons don't show on the other tabs in the NuGet Package Manager in Visual Studio for custom feeds like the Azure one only and that they show up just fine when published to NuGet.org. I've seen tons of packages on NuGet that have their own image, so it's clearly possible to have them show up in other places as well. I just haven't been able to get them to work on an Azure DevOps feed.
Add XML docs
To help consumers of your packages to use the types you have built, it's a good idea to include XML documentation. This then shows up in standard IntelliSense help tips like this:

To add the XML documentation file, follow these steps:
First add the following element to the main PropertyGroup in the .csproj file:
<GenerateDocumentationFile>True</GenerateDocumentationFile>
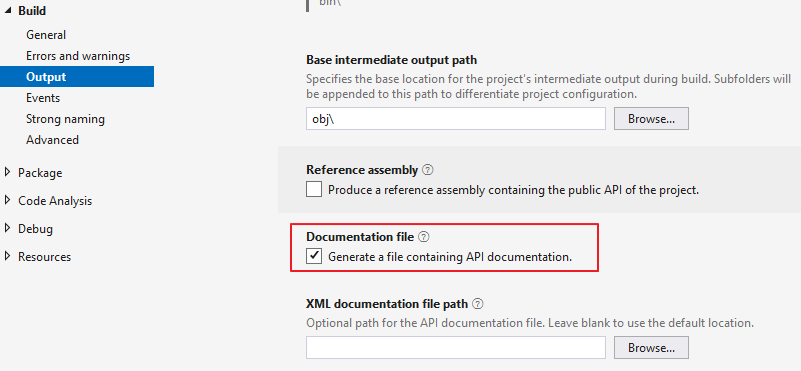
Instead of modifying the .csproj file directly, you can also set this checkbox in the project's Property pages:
![The project's Property Pages in Visual Studio showing the Documentation file option]()
- Next, document your types and methods using the triple-slash XML documentation syntax. Here's an example from one of the SendMessageAsync methods of the IMailSender interface:
/// <summary>
/// Sends an email.
/// </summary>
/// <param name="from">The sender's email address.</param>
/// <param name="to">The recipient's email address.</param>
/// <param name="subject">The subject of the email.</param>
/// <param name="body">The body text of the email.</param>
/// <param name="isBodyHtml">Determines if the body is
               sent as HTML or as plain text.</param>
/// <param name="fileName">The name of the file to attach.</param>
/// <param name="fileContents">The contents of the file to attach.</param>
Task SendMessageAsync(string from, string to, string subject, string body,
      bool isBodyHtml, string fileName, Stream fileContents);
You'll find plenty of other examples of XML documentation in the GitHub project for this article at https://github.com/Imar/Articles.NuGetPackagesDemo.
- Commit and sync your code. Then update a project to use the latest version of your package that has XML documentation. When using the types in your package, you'll see something similar to the screenshot I showed at the beginning of this section.
Note: when adding XML to the Infrastructure projects, don't forget to update the higher-level packages to this newer version or you won't get the documentation included.
Adding Unit Tests
It's easy to introduce changes in your packages that would break consuming applications. Earlier, when the consuming application and shared projects were all in the same solution, you would immediately know when you introduced a breaking change, like renaming a method for example, as your application simply wouldn't compile anymore. However, with packages this is a little harder. You won't find out until you've upgraded a package and undoing that change could mean some additional work. This means it becomes even more important to have proper unit tests in place. Fortunately, with the current infrastructure in place, this is easy to do. Here's how I did it for one of my packages:
- I added a new unit test project to my solution in a Tests solution folder
- I created a project reference to the project I want to test (Spaanjaars.Email.Infrastructure) in my case.
- I installed two packages:
- Moq – to easily create mock objects to make testing easier
- FluentAssertions – to improve the way you write assertions in your test class
- Next, I implemented some tests as follows:
[Fact] public async Task SimpleOverloadsCallFinalMethod() { var sut = new Mock<TestMailSender>(); sut.Setup(x => x.SendMessageAsync(It.IsAny<MailMessage>())).Callback( (MailMessage message) => { // This fires after SendMessageAsync below has been called // and verifies the results. message.IsBodyHtml.Should().BeTrue(); message.From?.Address.Should().Be(FromAddress); message.Subject.Should().Be(Subject); }); await sut.Object.SendMessageAsync(FromAddress, ToAddress, Subject, Body); sut.Verify(x => x.SendMessageAsync(It.IsAny<MailMessage>()), Times.Once); } [Fact] public async Task HtmlOverloadsCallFinalMethodAndSetsHtml() { var sut = new Mock<TestMailSender>(); sut.Setup(x => x.SendMessageAsync(It.IsAny<MailMessage>())).Callback( (MailMessage message) => { // This fires after SendMessageAsync below has been called and // verifies the results. message.IsBodyHtml.Should().BeFalse(); message.From?.Address.Should().Be(FromAddress); message.Subject.Should().Be(Subject); }); await sut.Object.SendMessageAsync(FromAddress, ToAddress, Subject, Body, false); sut.Verify(x => x.SendMessageAsync(It.IsAny<MailMessage>()), Times.Once); } - Next, before I committed and synced my code, I modified my pipeline and changed the coded for VS Test as follows:
- task: VSTest@2
inputs:
  testSelector: 'testAssemblies'
  testAssemblyVer2: |
    **\*tests.dll
    !**\*TestAdapter.dll
    !**\obj\**
    !**\ref\**
  searchFolder: '$(System.DefaultWorkingDirectory)'
This includes all assemblies ending in tests.dll for the unit test run. If you get an error like this:
The current .NET SDK does not support targeting .NET 6.0. Either target .NET 5.0 or lower, or use a version of the .NET SDK that supports .NET 6.0.
refer back to part 3 of this series where I explained why this can happen. When you change the vmimage from windows-latest to windows-2022 your error will likely go away.
pool:
  vmImage: 'windows-2022'
- When I then committed and synced my changes, the pipeline ran and executed my unit tests. You'll see a summary of the tests that have been run in the overview of the pipeline:
![The pipeline results showing executed tests]()

By setting up your unit tests and pipeline like this, all your tests are executed after the build and before your projects are packed. This way you can avoid publishing packages with broken tests.
Debugging code in packages
Because your shared code is no longer in the same solution as your primary application, it'll be harder to debug that code. For example, considering my demo application, I can't directly debug the code in, say, the InternalMailSender class anymore as my code is no longer in the same solution. All I have is a DLL with the compiled code. There are a few solutions that will makes this a little easier:
- Add plenty of unit tests to your packages. That way, you can improve quality and stability of your packages, minimizing the need to debug your code in a consuming application in the first place.
- Add test / demo projects to your packages solution so you can easily consume, test and debug a project as a project reference rather than a package reference. By this I mean real applications, not unit test projects similar to the demo application I built for this article series. Having a separate, runnable project allows you to easily step through your projects' code. I have seen others recommend munging your project files temporarily, replacing NuGet package references with project references against a local copy of the source. I'm not a big fan of it as it requires you to change your code in order to debug and, even more important, change it back when you're done.
- Use a tool to decompile your package code and step through it.
In the next (and final) section of this article, I'll briefly discuss this last point by showing you how to debug the code in your packages by decompiling the source code using two methods: with Visual Studio's built-in debug capabilities and with ReSharper.
As an example, imagine you want to debug the code for the SendMessageAsync method of a specific implementation from the HomeController in the demo application:
if (file.FileName.EndsWith(".txt", StringComparison.CurrentCultureIgnoreCase))
{
  await _mailSender.SendMessageAsync(
        from, to, subject, body, true, file.FileName, stream);
}
Now, let's say that that the currently configured IMailSender is the InternalMailSender. To debug its code using just Visual Studio, you can decompile and step through it as follows:
- Set a breakpoint on the line that calls SendMessageAsync.
- Run your application and make sure it hits the line with the breakpoint (in my case, I can do that by uploading a document with a .txt extension).
- When the breakpoint is hit, choose Debug | Windows | Modules.
- Use the search box in the top-left to search for the assembly that contains the code you want to debug.
- Then right-click the assembly and choose Decompile Source to Symbol File. This will decompile the source code and add the generated files as miscellaneous solution items:
![The miscellaneous files element in the Solution Expolorer showing the decompiled source code file]()
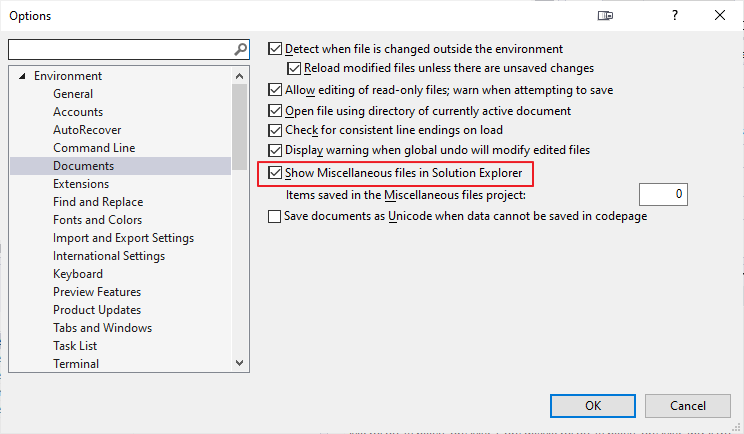
Note: for this to work you need to enable the miscellaneous files in the VS Options dialog:
![]()
If you're changing the options the first time, you may have to decompile the source again in order to step through it.
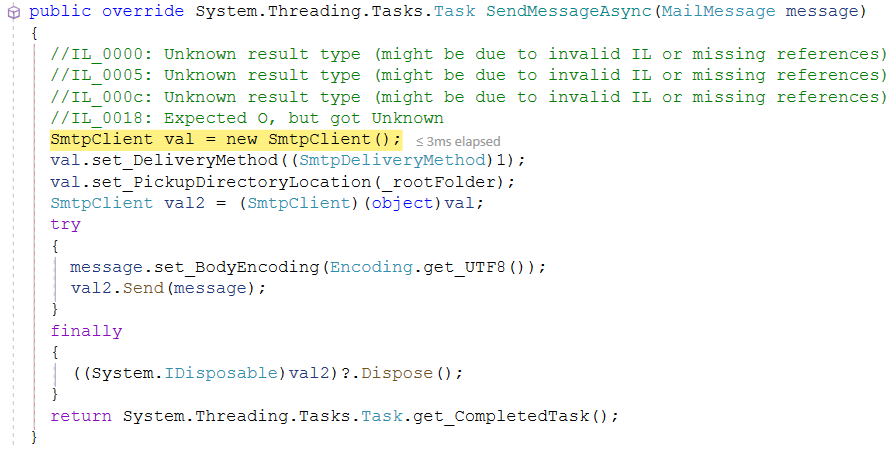
- If it all worked as expected, you can now step through the source code as you would with normal code:
![Stepping through the decompiled code]()
Note that your code may look a little different. In my case, the original source code looked like this:

-
public override Task SendMessageAsync(MailMessage message)
{
  using (var smtpClient = new SmtpClient
        {
          DeliveryMethod = SmtpDeliveryMethod.SpecifiedPickupDirectory,
          PickupDirectoryLocation = _rootFolder
        })
  {
    message.BodyEncoding = System.Text.Encoding.UTF8;
    smtpClient.Send(message);
  }
  return Task.CompletedTask;
}
Even though the code looks different, it's still similar enough to step through it, see what it does and find and squash any bugs if needed.
For more information about debugging third-party code with Visual Studio and some of the limitations you will encounter, check out these links:
The user flow for ReSharper is almost the same:
- Set a breakpoint on the line that calls SendMessageAsync.
- Run your application and make sure it hits the line with the breakpoint (in my case, I can do that by uploading a text document).
- When the breakpoint is hit, choose Debug | Windows | Modules.
- Use the search box in the top-left to search for the assembly that contains the code you want to debug.
- Then right-click the assembly and choose Load Symbols with ReSharper Decompiler.
- Next, right-click the assembly again and choose Load Symbols.
- From here on you should be able to step in and debug the source code:
![Stepping through ReSharper's decompiled code]()
- If you can't get the compiled code to hit, click on the call to SendMessageAsync (or whatever code you are decompiling) and press F12. This will bring up the decompiled code. Then find the SendMessageAsync method, and add a break point to it. Now you can then step through the code and hit the breakpoint you set.
For more information on debugging decompiled code with ReSharper, check out these links:
- https://cezarypiatek.github.io/post/debug-without-sources-part-one/
- https://jackspektor.medium.com/not-just-my-code-how-to-debug-third-party-libraries-without-decompiling-them-8e47e706dbe7
For more information about debugging third-party tools check out this post:
Michael has also written a book on debugging in .NET in general that I can highly recommend. You can find more about the book here: https://practicaldebugging.net/.

Wrapping up and series summary
This is the end of the article series on building and using a NuGet packages architecture. I've covered a lot of different topics, including:
- Refactoring towards a packages architecture
- Building your first package
- Automating the process of package creation and publishing them to a feed
- Updating your main applications to make use of the new packages instead of the old local project references
- How to improve the quality and stability of your packages by adding metadata, XML documentation and unit tests
- How to debug your packages to easily step through the code they contain
I hope you find this series useful and that it will help you refactor your own code base to a NuGet packages-based one. If you manage to do this with the help from these articles, or if you get stuck somewhere in the middle of the process, be sure to reach out to me.
Happy packing!
Source code
You find the full source code for these articles in the following Github repository: https://github.com/Imar/Articles.NuGetPackagesDemo.
Where to Next?
Wonder where to go next? You can read existing comments below or you can post a comment yourself on this article.
Links in this Document
| Doc ID | 633 |
| Full URL | https://imar.spaanjaars.com/633/building-a-nuget-packages-architecture-part-6-enhancing-your-packages |
| Short cut | https://imar.spaanjaars.com/633/ |
| Written by | Imar Spaanjaars |
| Date Posted | 04/21/2022 09:05 |
Talk Back! Comment on Imar.Spaanjaars.Com
I am interested in what you have to say about this article. Feel free to post any comments, remarks or questions you may have about this article. The Talk Back feature is not meant for technical questions that are not directly related to this article. So, a post like "Hey, can you tell me how I can upload files to a MySQL database in PHP?" is likely to be removed. Also spam and unrealistic job offers will be deleted immediately.
When you post a comment, you have to provide your name and the comment. Your e-mail address is optional and you only need to provide it if you want me to contact you. It will not be displayed along with your comment. I got sick and tired of the comment spam I was receiving, so I have protected this page with a simple calculation exercise. This means that if you want to leave a comment, you'll need to complete the calculation before you hit the Post Comment button.
If you want to object to a comment made by another visitor, be sure to contact me and I'll look into it ASAP. Don't forget to mention the page link, or the Doc ID of the document.