Building and auto-deploying an ASP.NET Core application - Part 6 - Setting up a CD pipeline - Deploying to an Azure App Service
In the previous article you saw how to take your compiled application and deploy it to a web server running IIS. This is a convenient scenario when you own or manage the remote server completely as you need to install a release agent on it. You also saw how to use a SQL task in the release pipeline to automatically apply the EF migrations to your database on release.
In this article you see how to do the same, but with an Azure App Service and an Azure SQL database instead. An App Service is a fully managed web hosting service for running web sites, mobile back ends, and RESTful APIs. It allows you to run web sites on the Internet without the need to manage a complete server yourself. Azure SQL is Microsoft's cloud version of their popular database system SQL Server.
App services and SQL Azure are popular choices for running a data-driven web site in Microsoft's cloud solution. I use them a lot for many of my customers' solutions and therefore thought it made sense to demonstrate and discuss them here as well. In this article I'll show you how to create a release pipeline in Azure DevOps that deploys your application to an Azure App Service. In addition, you see how to create and configure an Azure SQL server and database and how to automatically update the database's schema during the release with changes coming from your EF migrations.
If you haven't read the previous parts in this series you're encouraged to do that now. Here's the full list of the articles in the series:
- Introduction
- Creating the web application
- Using GitHub and managing change in your application
- Setting up a CI Pipeline in Azure DevOps
- Setting up a CD pipeline: Deploying with web deploy to a Virtual Machine or on-premises server
- Setting up a CD pipeline: Deploying to an Azure App Service (you're reading it now)
- Improving your builds with a custom build agent and Azure Deployment Slots
Before you create the pipeline and deploy your app to an Azure app service, you need to create the app service first. Here's how:
- Log in to the Azure Portal, click the burger menu in the top-left and choose Create a resource.
- In the filter above the list of resources, type app service plan and select that option.
![]()
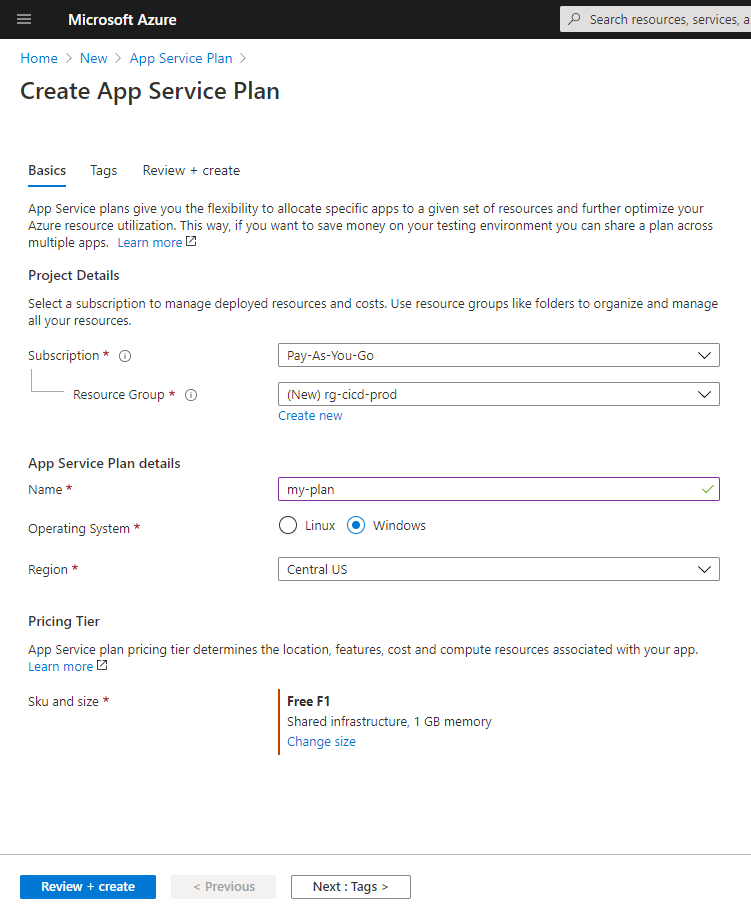
- Click Create and fill in the details.
- For the Resource Group click New and then enter something that describes your group of resources well. For example, one or more web sites, a database and a function app could be grouped in the same resource group named after the service it's providing. A common pattern is to use [rg-]ServiceName-Environment. Here, rg stands for resource group and is optional. ServiceName is the main app's or service's name, such as SalesApp and Environment could be something like Staging or Production. For the demo app, I called my group rg-cicd-prod but cicd-prod would have been equally fine. For more naming considerations, checkout these links:
- Enter a unique name, choose Windows as the operating system and choose a location closest to where you expect your customers to be.
- Finally, under SKU and size, pick an option that matches your expected load. You can start with a free plan and scale up (you can do that now as part of the setup, but you can also do that later when the application has been deployed and you can see how it's being used.)
![]()
- Click Review + create and then Create to create the App Service Plan.
- It'll take a while to create the service plan and you'll be notified when it's ready. When it's ready, click Go to resource to view its details. If you need find it later, press G+/ while in the portal, type its name (my-plan in my example) and the select it in the list of resources.
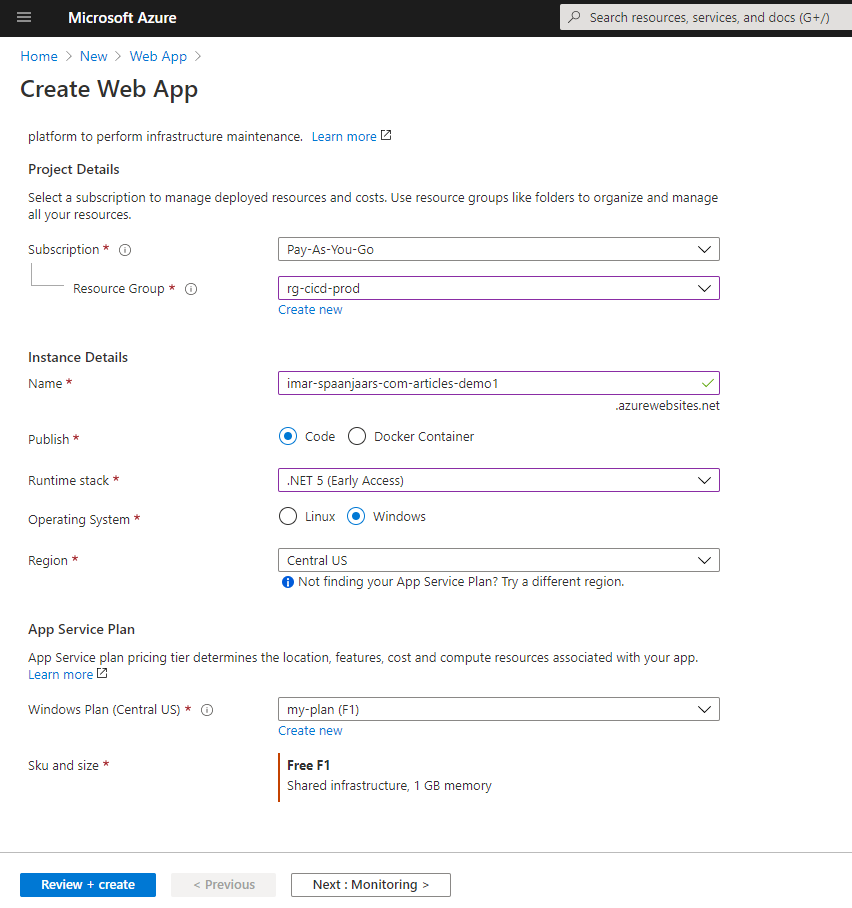
- Next, to add a web site (an App Service in Azure parlance) to your App Service Plan, click the burger menu again, choose Create a resource and search for Web App. Click Create to start the resource creation process. Select your subscription and your resource group and then enter a name for the site. This name, followed by .azurewebsites.net will be how you can browse to your site if you don't associate it with a custom domain name. I entered imar-spaanjaars-com-articles-demo1 so my full URL will be imar-spaanjaars-com-articles-demo1.azurewebsites.net.
- Leave Code as the selected option under Publish and choose .NET 5 as the runtime stack. I'll run my demo app under Windows but depending on your application you can also choose Linux.
- Finally, choose a region closest to your final users, and select the App Service plan created earlier.
![]()
Click Review and create and then Create again to create the app service. After a while the resource is ready and you can browse to it by the name you gave it, followed by azurewebsites.net. If you now browse to it, you should see something like this:
![]()
This means that creating the site worked out fine, but that it doesn't contain any code yet. You'll see how to fix that next by publishing the application from Azure Dev Ops using a release pipeline.


Building a Release Pipeline
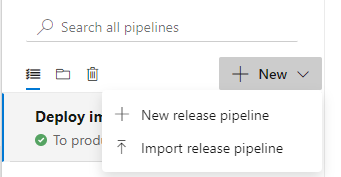
- Log in to Azure DevOps, click Releases, then Pipelines and choose New | New release pipeline:
![]()
- In the list of templates, choose Azure App Service deployment. It's a good idea to scroll through the list of templates so you can see what other options are available for different scenarios, such as deploying to IIS directly as you saw in the previous article in this series.
- Click Apply to select the template.
![]()
- In the section on the left, click Add an artifact. Select Build as the source, and choose your project and source, select Latest as the default version, change the Source alias (a friendly name for your artifact) to SiteSource and finally click Add:
![]()
You can change SiteSource to something else if you like. Just remember it later when configuring the SQL Scripts to run to deploy your database.The artifact is the result produced by a build and contains your deployable site as well as the SQL script to update the database. In this case, the selected artifact is the output of the build step from the selected build. If your artifacts are located elsewhere, such as on GitHub you can configure that here as well.
- The release starts out as a manual action; this means that it won't be triggered automatically when the build completes. By clicking on the lightning bolt for the artifact you can change that as you'll see later.
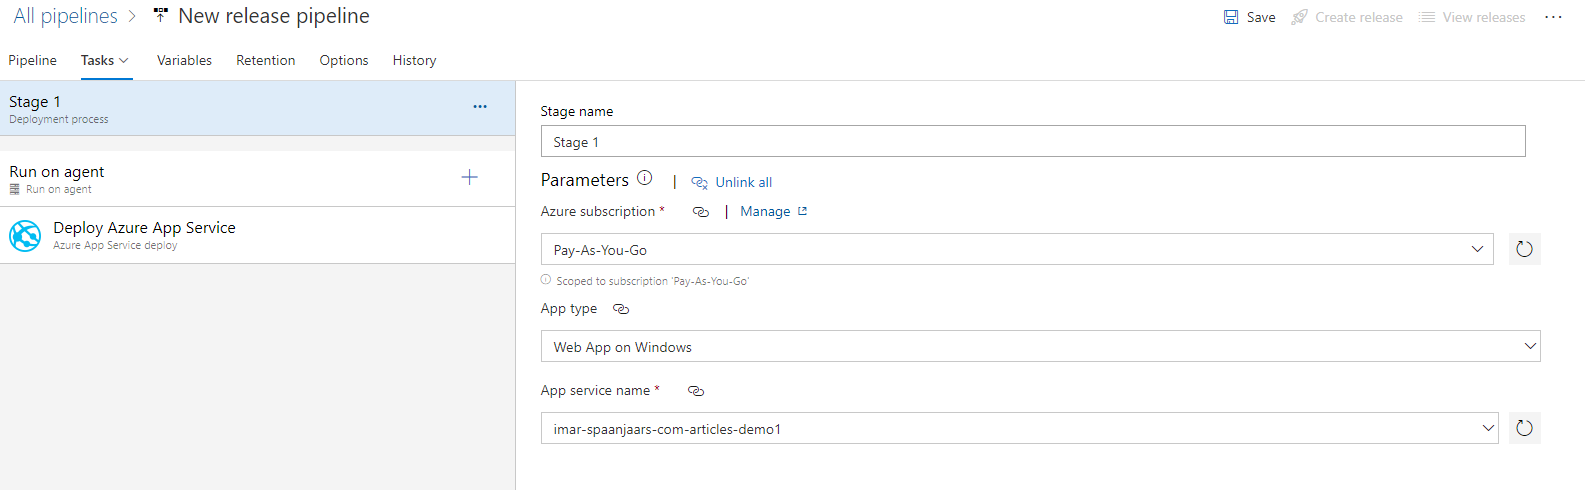
- Next, in the bread crumb above the artifact, choose Tasks:
![]()
-
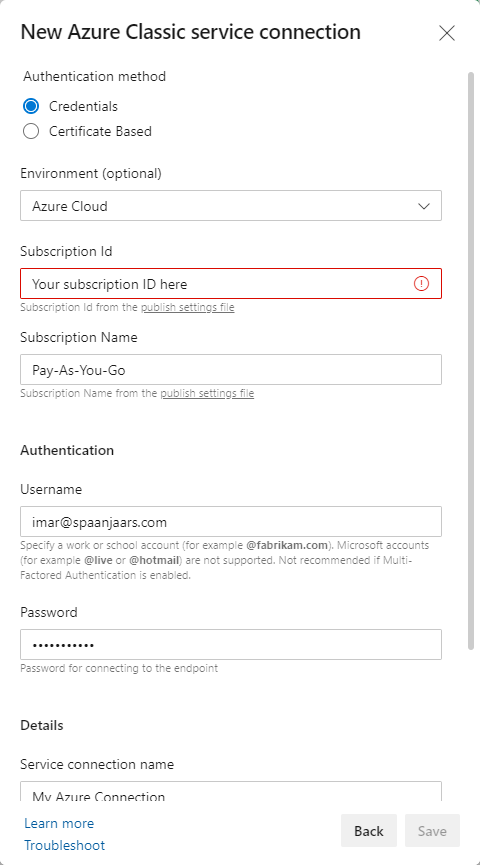
Under Stage 1, select your Azure subscription. If you don't see it show up, click Manage, then click New service connection and choose Azure Classic. Fill in the details such as your subscription ID, name, and the credentials needed to connect to it:
![]()
- Once the subscription has been created, you can click the Refresh icon next to the Azure subscription list and then it'll show up in the drop down.
- Select your subscription in the drop down. If this is the first time you're selecting it you'll need to Authorize it first by clicking the Authorize button.
- Next, choose Web App on Windows as the Application type and finally pick the app service you created earlier from the drop down list:
![]()
- Click Save to save your pipeline.


This completes the initial steps of creating a release pipeline. This pipeline is the definition of the process to take your build artifacts and deploy them to a remote service, like an Azure App Service in this example.
To get your actual code deployed to Azure, you need to create a release from this release pipeline.
Deploying your code
To create a release, click Create release in the top-right corner of the pipeline in edit mode. Alternatively, in the main DevOps menu, click Releases, find and click your pipeline and then click Create a release. Regardless of how you got there, click Create again to start the process of deploying your site to Azure.
![]()
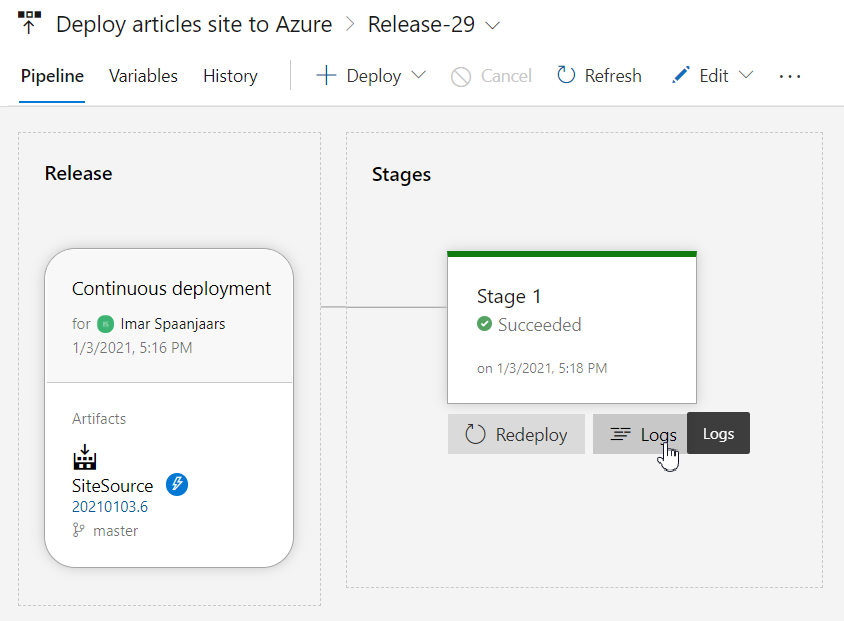
-
After a while, the release should complete successfully. If it doesn't complete successfully, open the release and under the deployment stage, click Logs
![]()
The logs may hopefully help in understanding what failed, and how to fix it.
If deployment succeeded, browsing to the site may now give you an error like this:HTTP Error 500.32 - ANCM Failed to Load dll
Common solutions to this issue:
The application was likely published for a different bitness than w3wp.exe/iisexpress.exe is running as.
When that happens, make sure that the "bitness" you specified in the build (like x64 for a 64-bit application or x86 for a 32-bits application) matches the settings of your app service. To check the former, review the runtime setting as explained in the article on creating the build. And to validate the latter, open your App Service in the portal, choose Configuration in the menu on the left and then check the Platform under General settings:![]()
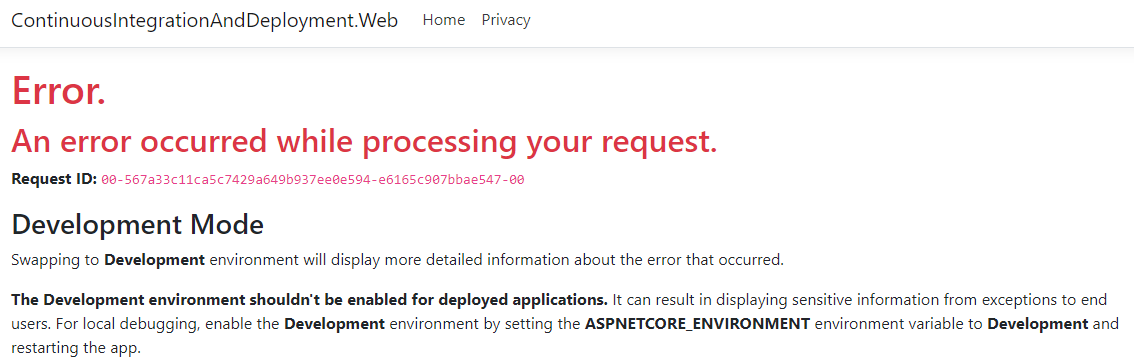
-
If the deployment worked out as expected you will still see an error (at least when following along with this article series) as the database hasn't been created yet:
![]()
You'll see how to deploy the database in the next section. If you want to see the real exception message follow the instructions in the error message by creating an app config key called ASPNETCORE_ENVIRONMENT with a value of Development in the Configuration section of the App Service in Azure, save your changes and reload your browser. Don't forget to remove the setting again afterwards.


Deploying the database
Preparing the database for your application is a three step process: first you need to create the database in Azure. This is a one-time operation. Next, you need to update the database's schema with the latest changes coming from the build. This happens every time you release a new version of your application. Finally, you need to create a connection string in your application that points to your SQL server. Each of these steps is discussed next.
Creating the database
To create the database, follow these steps. Note: the steps below also create a new SQL Server, something you can skip if your Azure subscription already has a SQL Azure instance you want to use.
- Log in to the Azure Portal, click the burger menu and choose Create a resource. Search for SQL Database, select it and then click Create.
- Select your subscription and a resource group.
- Provide a name for your database. I called mine imar-spaanjaars-com-articles-demo1.
- Under Server, select an existing one or click Create new to set up a new instance. In the latter case, you need specify information such as its name, location and credentials for admin access.
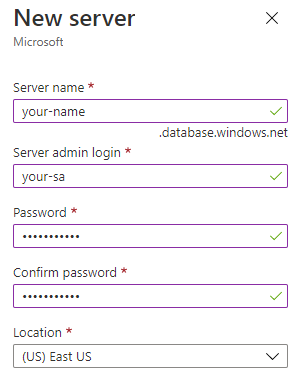
Then click OK to create the SQL Server.
- Under Compute + storage, click Configure database and choose a configuration that matches your budget and expected server load. I picked the Basic plan for my demo as it costs next to nothing (but obviously doesn't perform so well; that's fine for this article series though.)
- Finally, click Review and create and then Create again to kick off the creation process of your SQL Server and database.
Updating the database schema
- Log in to Azure DevOps and open your Release pipeline and click Tasks in the bread crumb above the build artifacts.
- Click the + icon in the Run on agent section on the left and find the task "Azure SQL Database deployment" and click Add.
- Click on the task to configure it.
- In the top part, select your subscription details and then configure the bottom part as follows:
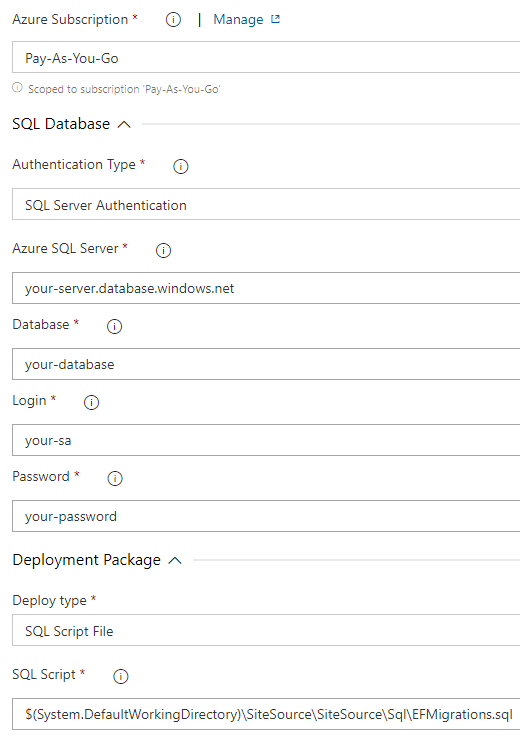
There are a couple of things worth pointing out here:
- The SQL file points to $(System.DefaultWorkingDirectory)\SiteSource\SiteSource\Sql\EFMigrations.sql. This is the path to the Migrations file created in a previous article. The first reference to SiteSource points to the friendly name of the artifact that I set earlier in this article. The second one is defined in the build as you saw in part 4 of this series.
- The task has details for the SQL Server, database and credentials. I am using a direct password here, but you shouldn't do that in your own builds. Instead, you should store your connection details in something like Azure Key Vault and bring them into the release dynamically. More info can be found here: https://azuredevopslabs.com/labs/vstsextend/azurekeyvault/.
-
What's nice about this task is that because of the trust relationship between Azure DevOps and the portal through your subscription, the release pipeline will automatically add the release agent's IP address to your SQL Server firewall just before the script is deployed, and removes it again afterwards. This allows for transparent access to your SQL Server without exposing it more than necessary. Take a look here for a description of the task from a YAML perspective: https://docs.microsoft.com/en-us/azure/devops/pipelines/tasks/deploy/sql-azure-dacpac-deployment?view=azure-devops. The setting ipDetectionMethod is what drives this behavior.
If you use a different task (such as SQL Server database deploy used in part 5 of this series) you are responsible for providing access to SQL Server yourself. You can do this by adding the release agent's IP addresses to your SQL Server firewall or you can use the option "Allow Azure services and resources to access this server" that you can configure in the portal:![]()
However, you should avoid this option if you can and use one of the alternatives instead. With this option turned on, any Azure service can access your database, including any other resource from any other Azure customer. So turning this option on, is almost the same as exposing it publicly over the internet. Be sure to have very strong password policies if you decide to use this feature anyway.
If you don't turn on this option (and again, you shouldn't) then you will need to add the IP addresses of your web sites (app services) to the list of allowed IP addresses in SQL Server. To do this for your app service, log in to the Azure portal, find your app service and click Properties in the main menu. This will show a list of the IP addresses used by your app service:
![]()
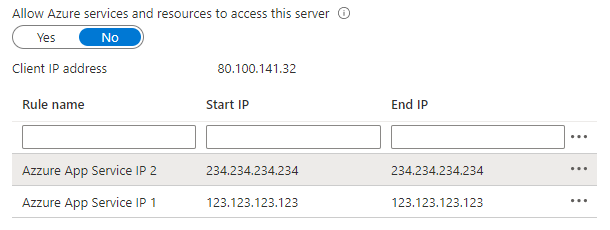
- You should then add these IP addresses to the firewall of your SQL Server instance:
![]()
For more information on the SQL Azure firewall, check out the documentation: https://docs.microsoft.com/en-us/azure/azure-sql/database/firewall-configure.


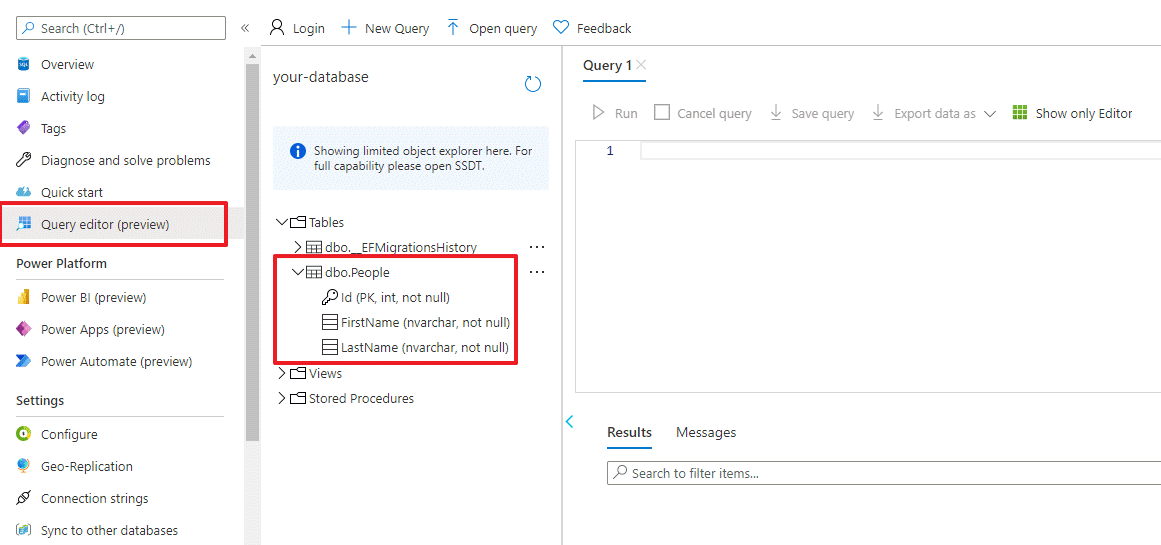
- Save all your changes and kick off a release by clicking Create release. After a while the release should complete. If you review the logs you should see that your migrations have been applied. To further verify this, connect your application to the database as you see in the next section of this article. Alternatively, log in to your SQL Server database in Azure and use the Query Editor to confirm your database has the right schema:
![]()
Another option is to log in to your database using SQL Server Management Studio. Before you do, make sure you add your own IP address to the list of addresses in the firewall for your SQL Server.
Configuring your app to use your database
The final step in the process is to connect your application to your SQL Azure database. As you may recall from an earlier article, I stored my connection string in a JSON file called appsettings.json in the root of my site. This file supports different copies for different environments. For example, you can have appsettings.Development.json and appsettings.Production.json to store data for your development and production environments respectively. However, with an Azure App Service there's a better option: configure your connection string directly on the app service. If you give it the same name as the one in appsettings.json (PeopleContext in my case) it will overwrite that one.
Here's how to configure it:
- Log in to the Azure portal and locate your app service.
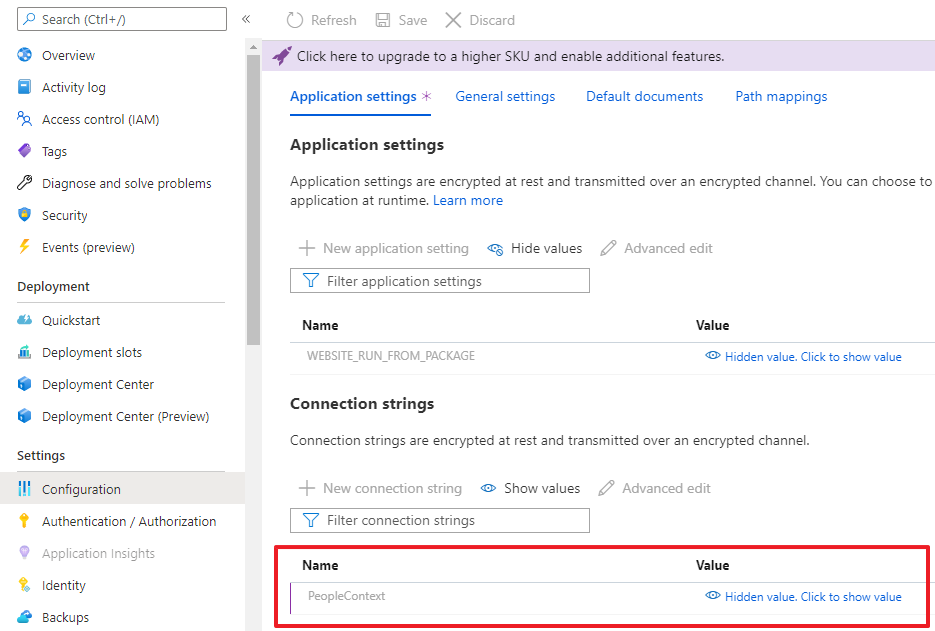
- Click Configuration in the left menu and then in the bottom section under Connection strings click New connection string:
![]()
- Supply the name of your connection string (mine is PeopleContext), set Type to SQLAzure and provide a valid connection string. For Azure databases, here's the format that I use:
Server=tcp:your-server.database.windows.net,1433;Initial Catalog=your-database;Persist Security Info=False;
    User ID=your-user;Password=your-password;MultipleActiveResultSets=False;Encrypt=True;
    TrustServerCertificate=False;Connection Timeout=30;
For more examples of connection strings, also for environments other than SQL Azure, check out https://www.connectionstrings.com/
![]()
When you're done, the connection string shows up at the bottom of the screen.
![]()
- When you now save your changes and browse to your application, you should see the data from the People table appear. If you don't have any data in that table yet, you can add it using SSMS or the Azure query editor. Alternatively (and far more likely), you need to build functionality in your application to add new and modify existing data in your database.


I have covered a lot of ground in the past few articles. I started with an empty application and built functionality and pipelines up to the point where builds are created automatically on every code sync and releases can be rolled out programmatically as well, although the last step (starting the release process) is still a manual one. To automate that too and reach a full CI/CD workflow all you need to do is configure the release to automatically run when a build completes successfully. Whether you want this or not really depends on your situation. In many cases, doing a deployment during business hours may not be an option and you're required to roll out new versions of the app on a more strict schedule, for example every other week on a Tuesday after business hours. In that case, triggering the deployment automatically is not a good option and you should manually kick off the release, or schedule it to run at a specific time.
However, for many other applications and scenarios, this may work very well. If your site is stateless, your users may not even realize when a new version of your site gets released. When you use an Azure App Service with Deployment Slots, you can deploy a new version of your site and warm it up in a separate slot, minimizing down time and impact on your users. Part 7 of this article series discusses deploying to an Azure Deployment Slot in more detail.
If auto-releasing is an option for you, read on as the next section shows you how to set that up, along with an end to end demo of a change to your data model and application making it into production without any manual intervention.
Automatically deploying the application
To kick off the release every time a build completes successfully, you need to enable the continuous deployment trigger. To do this, open the release definition, click the lightning bolt in the Artifacts section an then enable the trigger in the dialog that appears:
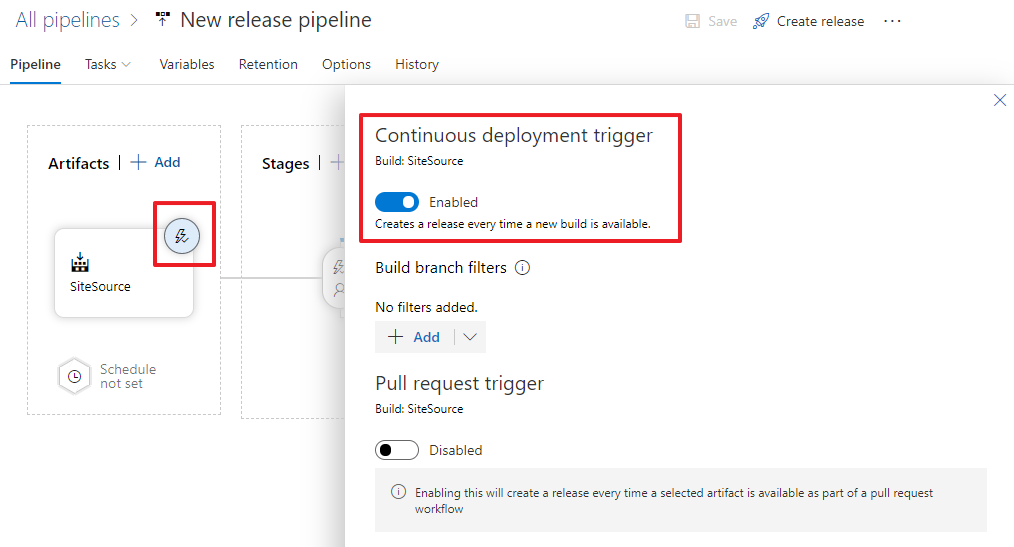
Then save the changes.
To test it all out, you can make a change to the app's model and commit and sync your changes to GitHub. That then triggers the build as you saw before which compiles your source code and runs your tests. Then when the build completes successfully, the release is triggered automatically which then updates the application's code in the Azure App Service and the database schema in the SQL Azure database. All of this now runs automatically so you can just sit and watch it all happen automatically.
To see it at work, I modified my Person class and added a non-nullable DemoProperty:
public bool DemoProperty { get; set; }
I set the default value to 0 in the database so all existing records will get a default value of false. Note that this sets the default for the column in the database for new records to false as well:
builder.Property(x => x.DemoProperty).HasDefaultValueSql("0");
See the third article in this series about managing change to see another solution using MigrationBuilder.Sql to handle updates by modifying records without setting a column default.
I then added DemoProperty to the PersonDto, assigned it in the controller and used it in the view:
// PersonDto.cs
public bool DemoProperty { get; set; }

// HomeController.cs
var data = people.Select(x => new PersonDto
{
  Id = x.Id,
  FirstName = x.FirstName,
  LastName = x.LastName,
  DemoProperty = x.DemoProperty
}).ToList();

// Index.cshtml
<span>@person.FirstName @person.LastName
            @person.DateOfBirth DemoProperty: @person.DemoProperty</span><br />
I then ran Add-Migration "Add DemoProperty" in the Package Manager Console to record the changes to the model in an EF code migration which is used later create the necessary SQL code to update the database schema during the release.
Next, I checked in my changes and synced to GitHub. You can do that using the UI tools in Visual Studio or with Git at the command line:
git add .                                                          // Add all pending changes to the staging area
git commit -m "Add DemoProperty to Person class for demo purposes" // Create the commit
git push                                                           // Send the changes to GitHub.com
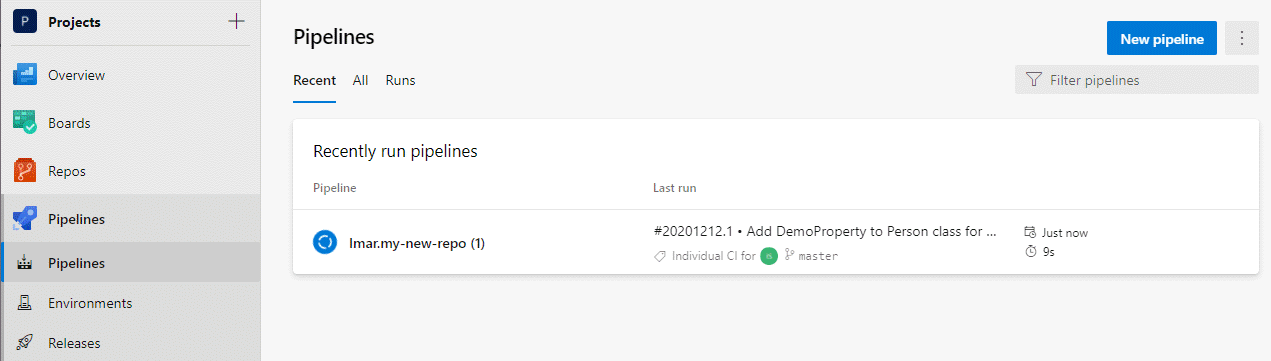
That triggered the build automatically as you can see in the Pipelines section on Azure DevOps:
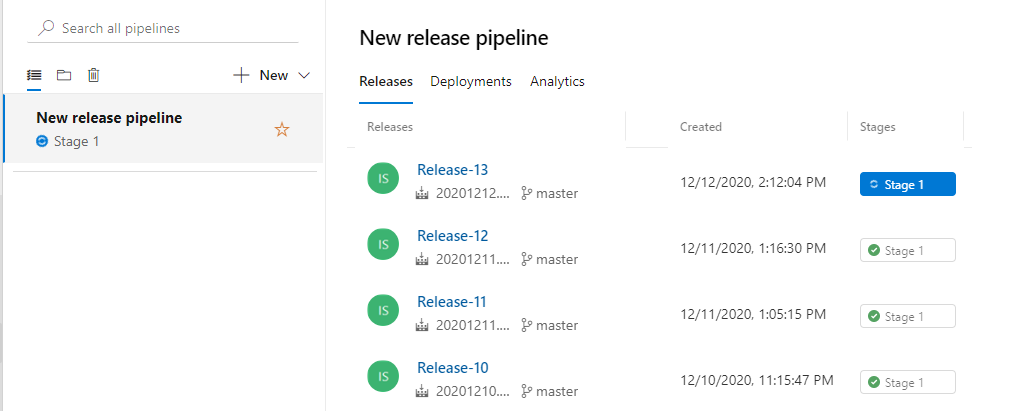
And once the build completed successfully the release kicked off as well:
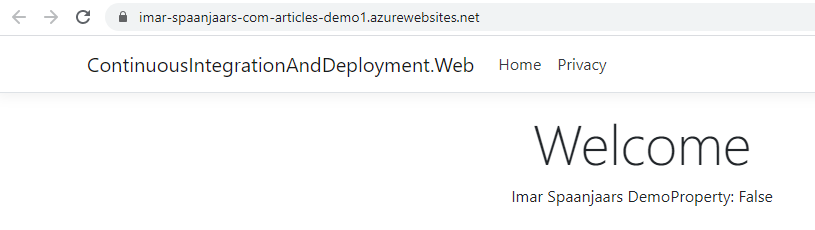
And finally, when the release was done, I tested the application which then showed the new property in use:
Wrapping Up
This wraps up the process of releasing a site to various remote locations using automated processes. In the previous article you saw how to deploy your site to your own IIS server and this article showed how to do the same using an Azure App Service. There are lots of other options and cloud providers that you can deploy to. And while the exact mechanics will be different for each setup, the overall concept that I demonstrated in these articles will be the same. You should now be armed with enough knowledge to set up your own CI/CD pipelines for your own software projects. Do note that if you're new to all of this, there's still a fairly steep learning curve ahead of you. I have shown you the basics that are required to set up a simple CI/CD pipeline but it's likely you want to tune it and add more features and functionality to it. If you need help setting this up, consider hiring me on your projects.
In the next article you see how to speed up the build process by installing your own build agent and you'll see how to use Deployment Slots on Azure to make your deployments more robust.
Where to Next?
Wonder where to go next? You can read existing comments below or you can post a comment yourself on this article.
Links in this Document
| Doc ID | 623 |
| Full URL | https://imar.spaanjaars.com/623/building-and-auto-deploying-an-aspnet-core-application-part-6-setting-up-a-cd-pipeline-deploying-to-an-azure-app-service |
| Short cut | https://imar.spaanjaars.com/623/ |
| Written by | Imar Spaanjaars |
| Date Posted | 04/19/2021 14:18 |
Talk Back! Comment on Imar.Spaanjaars.Com
I am interested in what you have to say about this article. Feel free to post any comments, remarks or questions you may have about this article. The Talk Back feature is not meant for technical questions that are not directly related to this article. So, a post like "Hey, can you tell me how I can upload files to a MySQL database in PHP?" is likely to be removed. Also spam and unrealistic job offers will be deleted immediately.
When you post a comment, you have to provide your name and the comment. Your e-mail address is optional and you only need to provide it if you want me to contact you. It will not be displayed along with your comment. I got sick and tired of the comment spam I was receiving, so I have protected this page with a simple calculation exercise. This means that if you want to leave a comment, you'll need to complete the calculation before you hit the Post Comment button.
If you want to object to a comment made by another visitor, be sure to contact me and I'll look into it ASAP. Don't forget to mention the page link, or the Doc ID of the document.