Building and auto-deploying an ASP.NET Core application - Part 5 - Setting up a CD pipeline - Deploying with web deploy to a VM
In the previous article you saw how to create a build pipeline in Azure DevOps to automatically build and test your software every time changes are submitted to your GitHub repository.
In this article and the next you see how to complement this process with an additional pipeline that automatically releases your software to a remote server so it can be accessed by your end users. In this article you see how to deploy your site site to a server running IIS, such as a virtual machine in the cloud or a (virtual or physical) machine in your own network. The next article then shows how to do the same but for an Azure App Service, an HTTP-based service for hosting web applications, REST APIs, and mobile back ends in the Microsoft Azure cloud.
Note: if you like to purchase the entire series now and not wait for the remaining parts to come online, check out this blog post that explains how you can purchase it for only $8.
If you haven't read the previous parts in this series you're encouraged to do that now. Here's the full list of the articles in the series:
- Introduction
- Creating the web application
- Using GitHub and managing change in your application
- Setting up a CI Pipeline in Azure DevOps
- Setting up a CD pipeline: Deploying with web deploy to a Virtual Machine or on-premises server (you're reading it now)
- Setting up a CD pipeline: Deploying to an Azure App Service
- Improving your builds with a custom build agent and Azure Deployment Slots
In order to deploy an app to IIS, there are a few things you need to do:
- Ensure your server has all prerequisites such as IIS and SQL Server installed
- Create and configure a site in IIS
- Create and configure a release agent on your target machine. This agent communicates with Azure DevOps and deploys the release on the server that it runs on
- Configure SQL Server and create the initial database
- Create a release pipeline that deploys the application
In this article I'll focus on the last three steps and only briefly touch on the first two. A lot has already been written about this so I don't intend to cover this again in detail.
Prerequisites
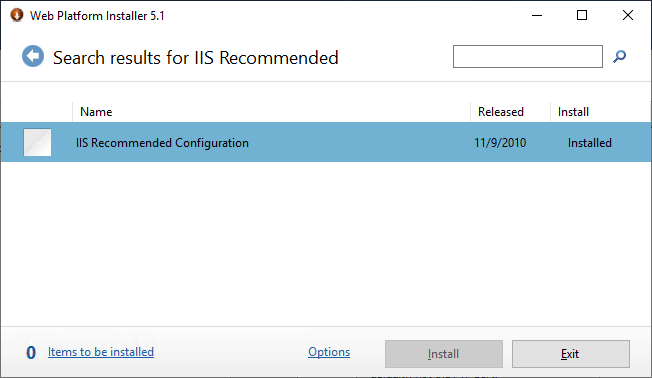
In order to deploy to a specific server, you need to install IIS on it and then create a web site. You can do this as part of the release step or you can do it manually up front. I prefer the latter as it gives me more control over the process. I usually use the Web Platform Installer and then install the IIS Recommended Configuration on my machine:
Another prerequisite for the site in my sample project is SQL Server. You have a few options when it comes to selecting SQL Server, including:
- SQL Server running on a remote server such as a VM
- Azure SQL Server
- A locally installed SQL Server that runs on the same box as the web server
For small web sites that don't have a high demand in terms of performance or database size, using SQL Server Express running on the same machine as the web server, or in the same local network, is a good option. For information on how to acquire and install SQL Server, check out these links:
- https://docs.microsoft.com/en-us/sql/sql-server/editions-and-components-of-sql-server-version-15?view=sql-server-ver15
- https://www.sqlshack.com/how-to-install-sql-server-express-edition/
Creating the site in IIS
Again, I'll keep this short as a lot has already been written about this. Be sure to google for things like "create IIS site" and "configure IIS site" if you need more help.
- Create a folder on your C-drive and call it Domains (it can be something else, but I like Domains)
- Create a sub folder named after your website. I call mine article-demo.spaanjaars.com because that's going to be the domain for my web site.
- Start Internet Information Services (IIS) Manager from the start menu by searching for IIS
- Expand your server node, right-click the Sites node and choose New site.
Set up the dialog similar to how I set up mine:
![]()
Click OK to create the site. In addition to the site, this also creates an Application Pool with the same name (which you can find under Application Pools in IIS).
Note: make sure the DNS is set up so that your selected domain points to the server you're configuring.
- Open a File Explorer, and right-click the folder with your site (C:\Domains\article-demo.spaanjaars.com in my example). On the security tab, assign at least read and list rights for the IIS AppPool account (IIS AppPool\article-demo.spaanjaars.com in my case). This account has also been created when you created the web site and application pool. It's this account that the site runs under, and thus the one that needs permissions to access the files on disk.
Now browse to your site (http://article-demo.spaanjaars.com in my case). You may get an error because your site is still empty but that's fine for now.

Set up a release agent on your target machine
With the site created, the next step is to install a release agent on your machine that hosts your IIS site. This agent acts as a bridge between an Azure DevOps pipeline and IIS and is responsible for installing and configuring the site based on the build and release data coming from DevOps. Fortunately, Microsoft has made the process very simple as you'll see shortly.
Note: in part 7 of this series you'll see how to install a build agent to build and test your software on your own machine to speed up the build process. Under the covers, the agent software is the same for a build and a release agent. However, you can't have a single installation handle both responsibilities so you'll have to install them side by side in separate folders. You can do this by creating another sub folder under your agents folder, extract the agent and then run config.cmd from there. The PowerShell script you get from the portal contains some instructions on acquiring and unzipping the agent software and then running config.cmd with a bunch of parameters. By unzipping yourself in a folder of your choosing and then calling config.cmd with the right parameters, you can control where your agents are located and which features they support. Run config.cmd --help for help on the parameters that it accepts and a whole bunch of very useful sample commands. For more information on side by side installation, go here: https://github.com/Microsoft/azure-pipelines-agent/issues/1346 and more information on pipeline agents in general can be found here: https://docs.microsoft.com/en-us/azure/devops/pipelines/agents/agents.
Before you can run the install scripts, you need to create a Personal Access Token in DevOps as follows:
- Log in to Azure DevOps, click the icon next to the icon with your initials and choose Personal access tokens:
![]()
- Click New token and fill in the details such as a name for the token, your organization and an expiry date. You can choose a short lifetime for the token as it's used during registration of the agent only. Click Show all scopes at the bottom and then find the Deployment Groups
item and select Read & manage. Click Create. Copy the generated Personal Access Token to the clipboard and then store it somewhere safe. DevOps won't show you the token anymore.
For more information about personal access tokens, take a look here: https://docs.microsoft.com/en-us/azure/devops/organizations/accounts/use-personal-access-tokens-to-authenticate.

Next, you need to install the release agent. Here's what you need to do:
- Log in to Azure DevOps and under Pipelines click Deployment groups. A deployment group is a logic group of target machines for parallel deployment. This means you can use it to deploy the same site to multiple, load-balanced servers. But even in a simple, single-site scenario, a deployment group is required as the target of the deployment.
- Click Add a deployment group ( or the New button on the toolbar of you already have an existing deployment group) and enter a name. Give it a name that describes the target server such as the machine's name or the domain name of the site you want to deploy to it (note that you can use the same agent to deploy many different sites, so naming it after the machine probably makes more sense than naming it after a web site).
- Once you create the group you'll see the PowerShell script you need to run on the target machine. You need to make sure you select Windows as the target to register or you won't see the PowerShell script.
- Copy the script to the clipboard and go to your server.
- Start a Power Shell in administrative mode (right-click and choose Run as Administrator or press Ctrl+Shift+Enter when you have PowerShell selected in the Windows Start Menu).
- Paste the script you copied in the PowerShell prompt and hit Enter. The first thing you'll be asked for is how you want to authenticate, Press enter to select PAT (Personal Access Token) and the enter your token.
- Next, the script will communicate with DevOps and configure your machine. You can skip assigning deployment group tags unless your intend to set up different machines with different capabilities and software installed on it.
- To the question about performing an unzip for task, choosing Yes will make your system a little more secure than when answering No. More details can be found here: https://github.com/microsoft/azure-pipelines-agent/issues/3185
- Finally, select the default security account by pressing Enter one more time. After a short period of time you should see a message indicating the service has been installed. If you check your Deployment group in Azure DevOps you should see one online agent:
![]()

The release agent is installed as a service on your machine (you'll find it under Azure Pipelines Agent in the list of services), so it'll always be available, even if you reboot your machine.
For more information about installing agents, check out the Microsoft documentation.
The agent is now ready to pull instructions from the Azure DevOps release pipeline. In the next section you see how I created my pipeline.
Create a release pipeline that deploys the application
In this section you'll see how to create a release pipeline using the classic pipeline editor. This editor allows you to visually configure your pipeline and doesn't use YAML. You could, however, do the same in YAML as well, and include your deployment steps into your main build pipeline as well. For more information on this option, check out the following links:
- https://azuredevopslabs.com/labs/azuredevops/yaml/
- https://devblogs.microsoft.com/devops/announcing-general-availability-of-azure-pipelines-yaml-cd/
To create the release pipeline, follow these steps:
- Log in to Azure DevOps and under Pipelines click Releases.
- Click New and then choose New release pipeline.
- In the list of task templates that appears, search for IIS and then choose IIS website deployment and click Apply. Don't choose IIS website and SQL database deployment as that template uses a SQL task that works off of a Dacpac file and not a SQL script).
- On the Pipeline tab, click Add in the Artifacts box.
- In the Add an artifact dialog, make sure the correct project and source (from the build pipeline) are selected. Then choose Latest as the Default version (so the pipeline automatically releases the most recent build) and finally, enter a source alias like SiteSource. You need this alias later when the SQL file gets deployed.
- Next, click on Tasks in the bread crumb at the top to open the tasks list.
- Remove the task "IIS web app manage" (right-click it and choose Remove selected task(s)). This task can be used to create and update websites on your target IIS server and even install IIS when it's not present yet. However, in my case I have installed IIS and created the site already.
- Then go through the various sections one by one and configure them as follows:
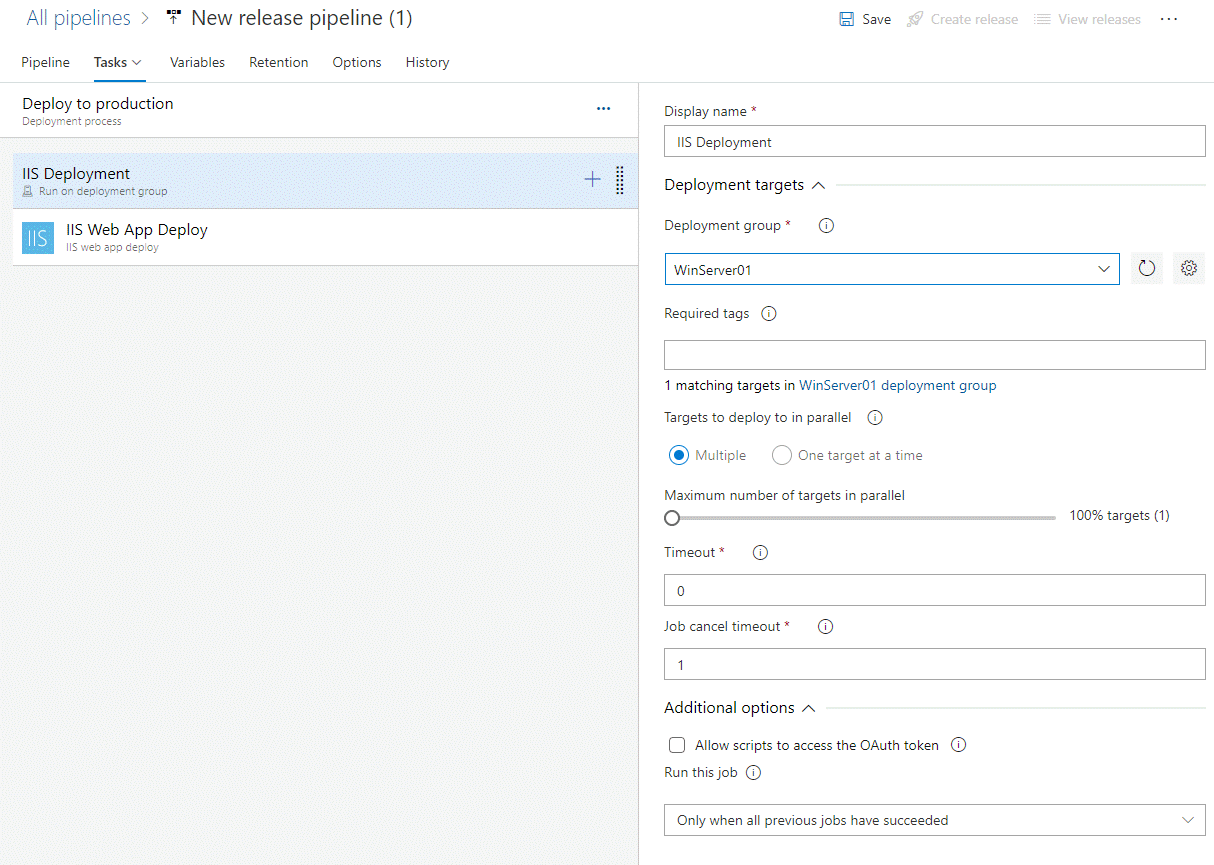
The stage name describes the overall purpose of the various tasks. In my case, I am deploying this directly to a production server and therefore I named it Deploy to production. In other situations, with a multi-stage environment I can also have stages called "Deploy to staging" for example.![]()
The Website name is the exact name of the web site in IIS, article-demo.spaanjaars.com in my case.
The most important setting that you need to change here is the Deployment group. This defines the machine or machines you want to deploy to. If needed you could select specific machines in the group by their deployment group tags. For example, if your group contains web servers and database servers, here's where for example you can bring in only the web servers with a specific tag (you then also need to configure the web servers to respond to that tag).![]()
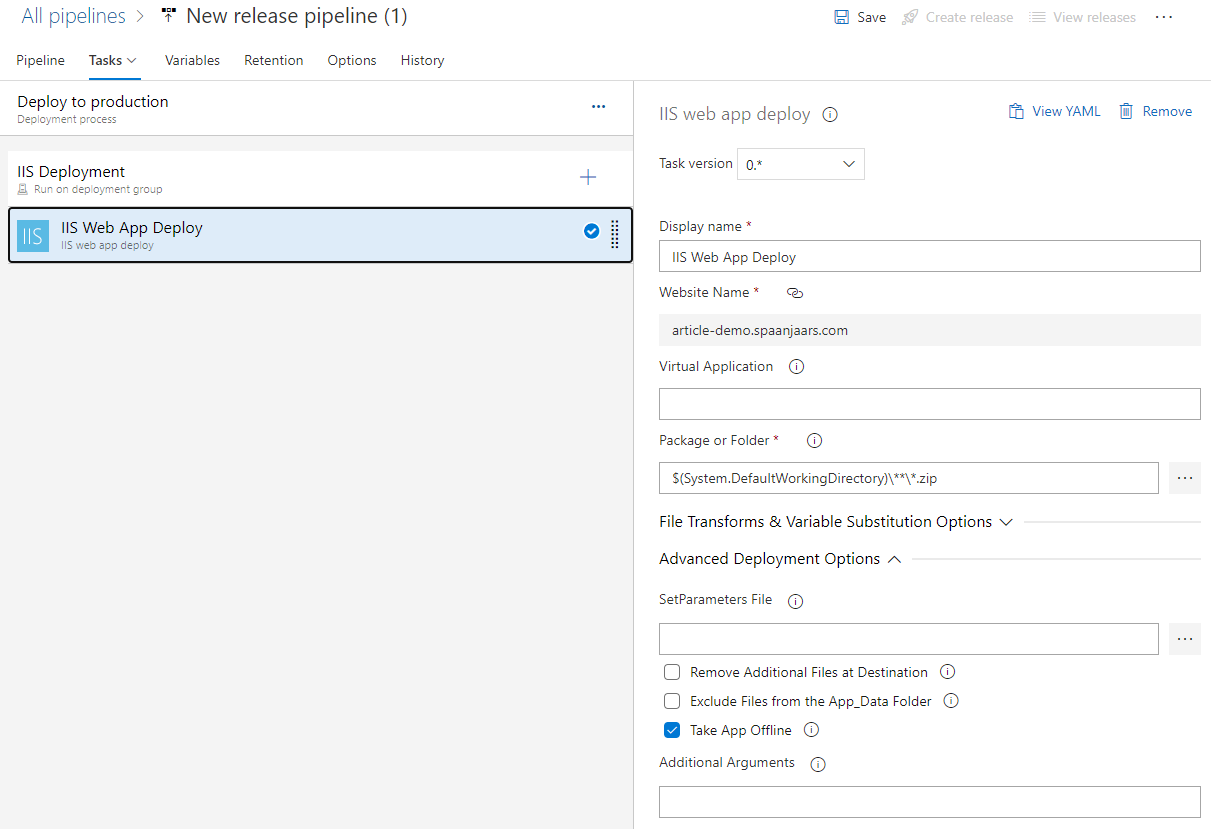
The IIS Web App Deploy task looks as follows:
![]()
The Website name here is linked to the Website name variable that was set earlier. The Package or folder points to any ZIP file in your artifact. Since there's only one, this will work fine. Otherwise, you can click the Browse button and select the source explicitly.
The "Take App Offline" check box will add an HTML file to your site informing your users the site is down while deployment is in progress.
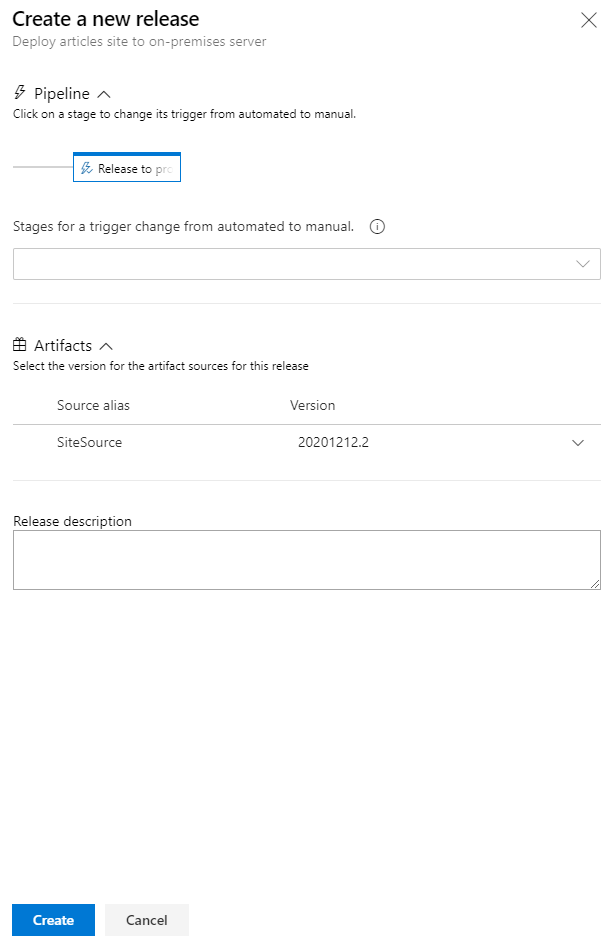
- With all tasks set up now, click Save and then click Create release in the top right corner. You can bring up the Create release dialog at a later point from the main Releases page. Just click on the pipeline you want to release and then choose Create a release.
To kick off the release process, just click Create.![]()
After a while, the release is ready. If you now browse to the site using the domain name that you assigned to the site in IIS, you may get an error like this:
HTTP Error 500.32 - ANCM Failed to Load dll
Common solutions to this issue:
The application was likely published for a different bitness than w3wp.exe/iisexpress.exe is running as.
When that happens, make sure that the "bitness" you specified in the build (like x64 for a 64-bit application or x86 for a 32-bits application) matches the settings of your target machine. To check the former, review the runtime setting as explained in the article on creating the build. And to validate the latter, check the System settings of your deployment server (right-click the Start menu and choose System).

If the deployment worked out as expected you will still see an error (at least when following along with this article series) as the database hasn't been created yet:
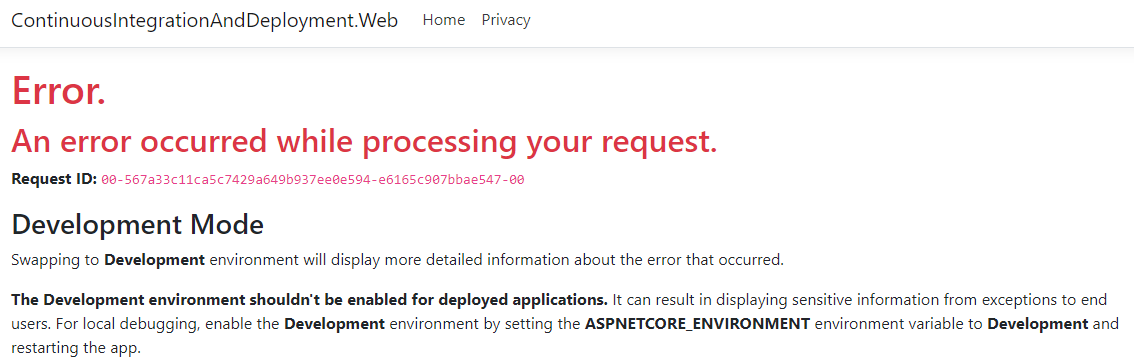
You'll see how to deploy the database in the next section. If you want to see the real exception message follow the instructions in the error message by setting the ASPNETCORE_ENVIRONMENT variable to true. You would normally set this to a static value like Staging or Production using a system variable but for a quick change to debug a problem you can also change it in the web.config as follows:
<?xml version="1.0" encoding="utf-8"?>
<configuration>
  <location path="." inheritInChildApplications="false">
    <system.webServer>
      <handlers>
        <add name="aspNetCore" path="*" verb="*" modules="AspNetCoreModuleV2" resourceType="Unspecified" />
      </handlers>
      <aspNetCore processPath=".\ContinuousIntegrationAndDeployment.Web.exe" stdoutLogEnabled="false"
                           stdoutLogFile=".\logs\stdout" hostingModel="inprocess">
      <environmentVariables>
        <environmentVariable name="ASPNETCORE_ENVIRONMENT" value="Development" />
      </environmentVariables>
    </aspNetCore>
  </system.webServer>
</location>
</configuration>
For more information on this, check out this article: https://exceptionnotfound.net/setting-aspnetcore_environment-using-a-web-config-file/
Don't forget to undo the config changes afterwards. Note that on your next build and release, the config file will be overwritten, causing you to lose your changes also.
At this point, the site still doesn't work because the database hasn't been created and configured yet. However, you should see the files that make up your site on the server now:
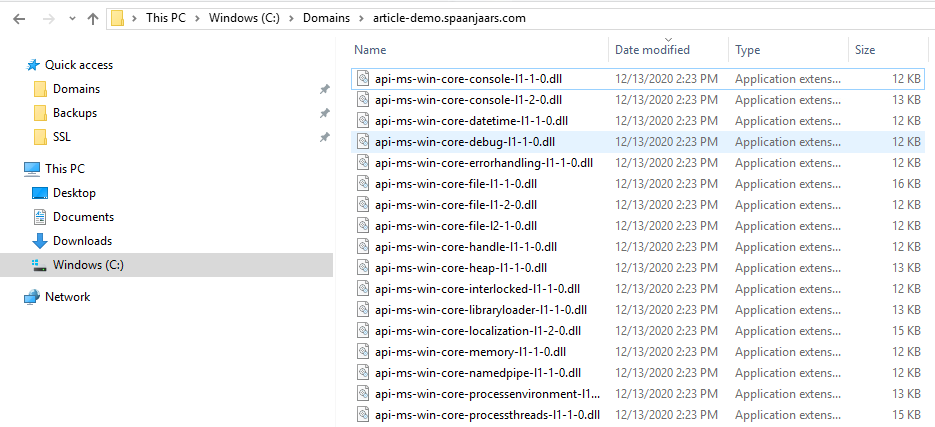
To get the site fully functional, the last step to implement is setting up the database.
Deploying the database
Preparing the database for your application is a three step process: first you need to create the database on your SQL Server and configure permissions. This is a one-time operation. Next, you need to update the database's schema with the latest changes coming from the build. This happens every time you release a new version of your application. Finally, you need to create a connection string in your application that points to your SQL server. Each of these steps is discussed next.
In my examples below, my SQL Server is on the same machine as IIS. This simplifies things like permissions. However, it's also very common to have SQL on its own dedicated machine. In that scenario, you'll probably want to use SQL authentication instead of integrated security like I am using below.
Creating the database
To create the database and configure permissions, follow the steps below.
- Open up SQL Server Management Studio (SSMS) and log in to your SQL Server.
- Right-click the Databases node, choose New database and give it a name. I called mine articles-demo1.
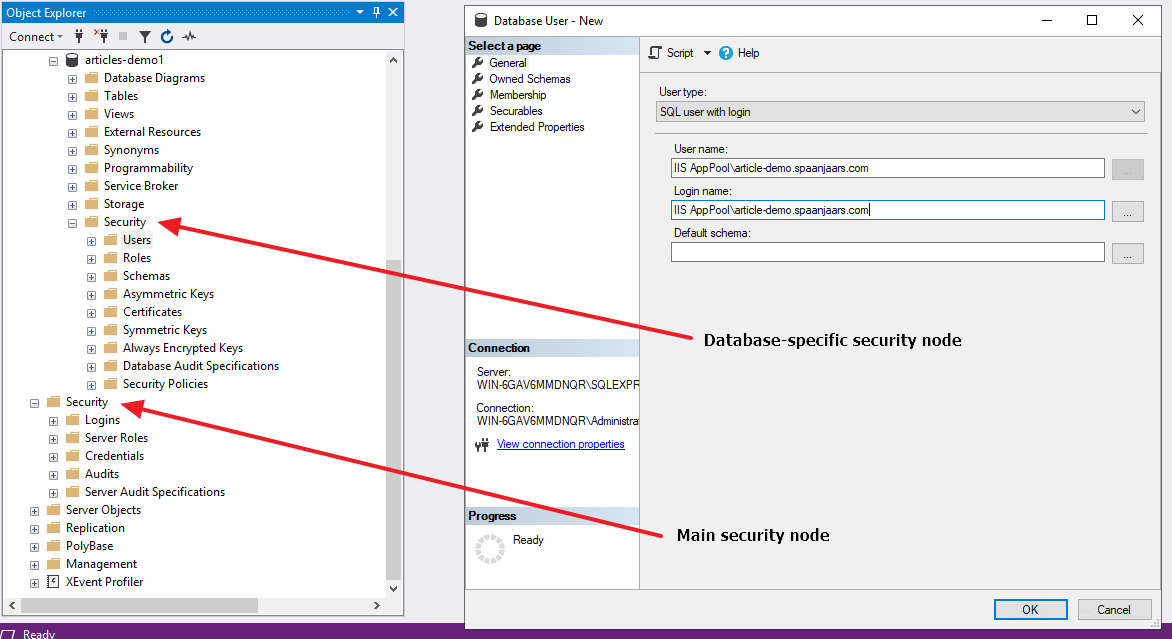
- Next, expand the Security node of your SQL Server (the top-level directly after Databases, and not the one in the database you just created). See the image below for the different Security nodes.
- Right-click logins and choose New login. As the log in name, enter IIS AppPool\NameOfAppPoolInIIS. In my setup, the app pool name I used is article-demo.spaanjaars.com so I entered IIS AppPool\article-demo.spaanjaars.com. This is the account name that IIS created automatically when you create the site. Click OK to create the login.
- Now expand the Security node of your newly created database. See the image below for the different Security nodes. Then right-click Users and choose New user. Enter the same user account again twice (IIS AppPool\NameOfAppPoolInIIS) for the User name and the Login name.
- Switch to the Membership tab of the New User screen and set the permissions for the user. My app requires db_datareader and db_datawriter only (to read from and write to all tables) but your requirements may be different.
- Click OK to create the user.
- Right-click Users and choose New user again. This time, add the account NT AUTHORITY\SYSTEM and assign it to the following roles:
- db_datareader
- db_datawriter
- db_ddladmin
This account is used by the release agent process that installs the site and runs the database updates. It needs DDL permissions (from the db_ddladmin role) to alter the schema of your database and it needs read/write permissions to see and write to the the __EFMigrationsHistory table.
The database is now ready and can be accessed by the account that your application pool runs under.
Updating the database schema
The next step is to execute the Migrations scripts as part of the release. Here's how to do that:
- Log in to Azure DevOps, edit your Release pipeline and click Tasks in the breadcrumb above the build artifacts:
![]()
- Click the + icon in the Run on deployment group section on the left and find the task "SQL Server database deploy" and click Add.
- Click on the task to configure it.
- Configure the task as follows, updating it to match your own setup:


There are a couple of things worth pointing out here:
- The SQL file points to $(System.DefaultWorkingDirectory)\SiteSource\SiteSource\Sql\EFMigrations.sql. This is the path to the Migrations file created in the previous article. The first reference to SiteSource points to the friendly name of the artifact that I set earlier in this article. The second one is defined in the build as you saw in the previous article.
- The task has details for the SQL Server (an instance called SqlExpress in my case), database and credentials. I use Windows Authentication which means I don't need to store credentials in my pipeline. Instead, the connection to SQL Server is made under the context of the account that runs the agent on the server, This account is NT AUTHORITY\SYSTEM and earlier I showed you how to give it DDL and data read/write permissions.
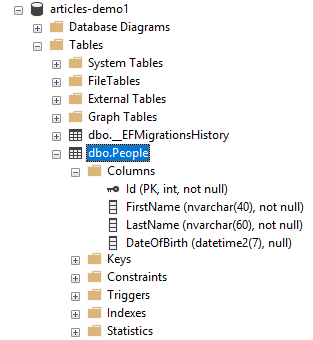
- Save all your changes and kick off a release by clicking Create release in the top right. After a while the release should complete. If you review the logs you should see that your migrations have been applied. To further verify this, connect your application to the database as you see in the next section of this article. Alternatively, log in to your SQL Server database using SSMS and confirm your database has the right schema:
![]()
Configuring your app to use your database
The final step in the process is to connect your application to your SQL Server database. With .NET core running on IIS directly, you have a few options to do this.
As you may recall from an earlier article, I stored my connection string in a JSON file called appsettings.json in the root of my site. This file supports different copies for different environments. For example, you can have appsettings.Development.json and appsettings.Production.json to store data for your development and production environments respectively. This enables you to have a production-specific version of that file in you site to override the default settings coming from the main appsettings file. Personally, though, I don't like this too much. It means you have a file on your server that you probably don't want to touch during deployment which could then lead to problems when your deployment is set to clear out the target site first. As an alternative, you can store the connection string in an environment variable on the server. This means that your code doesn't have to change and the release pipeline doesn't need to be updated at all. Instead, a server admin (probably you) would go into the server and set an environment variable named after your connection string. In my case, that would be ConnectionStrings__PeopleContext (for environment variable names you can use a double underscore instead of a dot). Once the environment variable is set, you need to either reboot the machine, or make sure that Load User Profile is set to true on the application pool, in which just recycling the application pool instead of rebooting the machine is enough for the application pool to see the new connection string.
This could be a good solution for a controlled environment where developers typically don't access the production server and a server admin sets the connection string. What I don't like about it is how hidden it is from other settings. If you're not aware of the environment variable, the connection string used for the app may seem to come out of nowhere which makes troubleshooting harder.
A much better way is to use Azure Key Vault to store your connection strings. Then your app makes use of that connection string without having to specify it in code anywhere. Azure Key Value is a bit out of scope for this article, but you can find more about it here: https://github.com/Azure/azure-sdk-for-net/blob/master/sdk/keyvault/Azure.Security.KeyVault.Secrets/README.md
To test out the connection string during the set up of the release pipeline, you could modify the appsettings.json file directly, and put in a new connection string. In my case, I updated my connection string as follows:
"ConnectionStrings": {
  "PeopleContext": "Server=.\\SqlExpress;Database=articles-demo1;Trusted_Connection=True;MultipleActiveResultSets=true"
},
When you then browse to your application, you should see the data from the People table appear. If you don't have any data in that table yet, you can add it using SSMS directly. Alternatively (and far more likely), you need to build functionality in your application to add new and modify existing data in your database. But as I mentioned in the intro of this article series, that's outside the scope of this series.
Setting the connection string during the release
As I mentioned before, to manage your production connection string on your target machine, you should look into Azure Key Vault. This way, neither your web server nor your pipelines hold the secrets needed to connect to your SQL Server. And if Azure Key Vault is not an option, you can use the environment variable as I mentioned earlier. However, sometimes it's still useful to be able to do this as part of the release. In the section that follows you see how to do this. Note, you can also use Azure Key Vault in your pipelines to further avoid having secrets in your pipelines. Also note that this is not just about connection strings, but applies to any configuration setting.
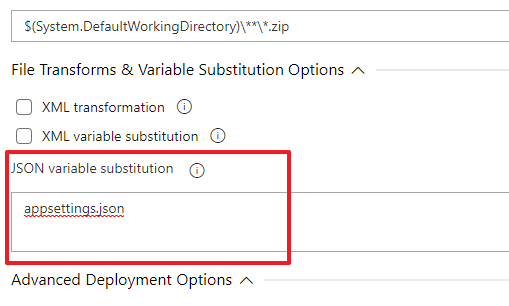
- Log in to Azure DevOps and open up the IIS Web App Deploy task in the Azure release pipeline and under JSON variable substitution, enter the name of the primary settings file: appsettings.json.
![]()
If you click on the info icon for this setting you get an explanation:Provide new line separated list of JSON files to substitute the variable values. Files names are to be provided relative to the root folder.
To substitute JSON variables that are nested or hierarchical, specify them using JSONPath expressions.
For example, to replace the value of ‘ConnectionString’ in the sample below, you need to define a variable as ‘Data.DefaultConnection.ConnectionString’ in the build or release pipeline (or release pipeline's stage).
{
"Data": {
"DefaultConnection": {
"ConnectionString": "Server=(localdb)\SQLEXPRESS;Database=MyDB;Trusted_Connection=True"
}
}
}
Variable Substitution is run after configuration transforms.
Note: pipeline variables are excluded in substitution.In my case, I have a connection string called PeopleContext in the ConnectionStrings node, so the variable I need to create is ConnectionStrings.PeopleContext. The Data part in the variable name in the example above is just there because the sample JSON also has a Data node.
-
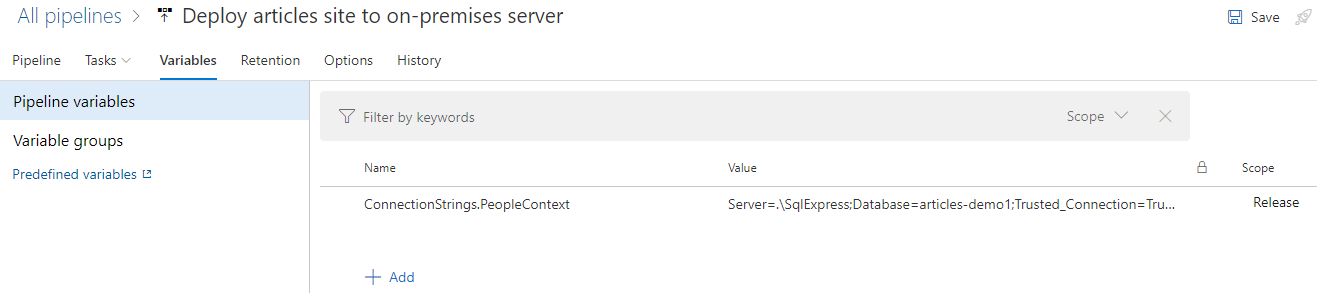
Switch to the Variables tab and click Pipeline variables. Click Add and then create a variable called ConnectionStrings.PeopleContext and with your target connection string as the value:
![]()
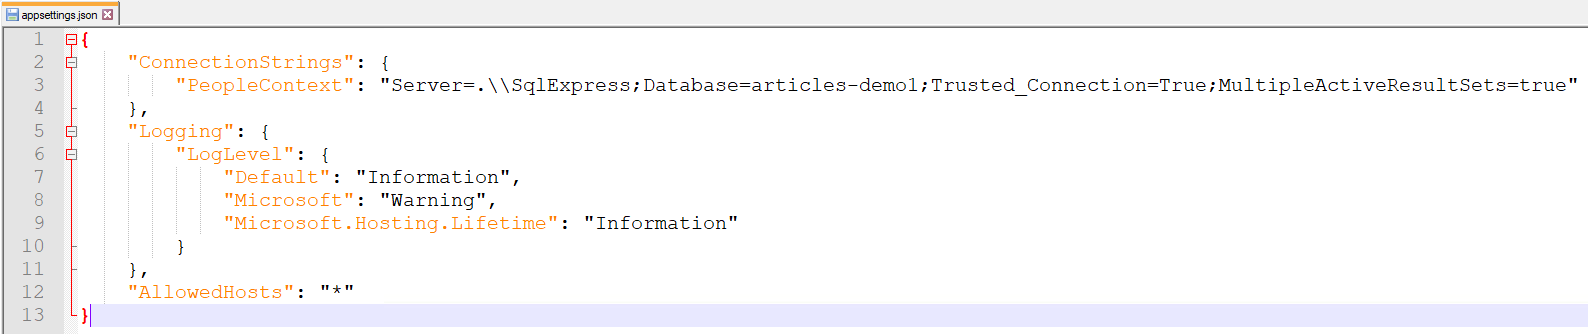
- Save all your changes and click Create release in the top-right corner of the pipeline editor. Once the release is done, your appsettings.json file on your production server should now have the proper connection string.
![]()
- If you now browse to your site again, you should see the data coming from the database you configured in the pipeline as the target connection string.
I have covered a lot of ground in the past few articles. I started with an empty application and showed you how to create functionality and pipelines up to the point where builds are created automatically on every code commit and releases can be rolled out programmatically as well. Although rolling out the release is now automated, triggering the release (using the Create release command in DevOps) is still a manual one. To automate that too and reach a full CI/CD work flow all you need to do is configure the release to automatically run when a build completes successfully. Whether you want this or not really depends on your situation. In many cases, doing a deployment during business hours may not be an option and you're required to roll out new versions of the app on a more strict schedule, for example every other week on a Tuesday after business hours. In that case, triggering the deployment automatically is not a good option and you should manually kick off the release, or schedule it to run at a specific time.
However, for many other applications and scenarios, this may work very well. If your site is stateless, your users may not even realize when a new version of your site gets released. Also, if you have a multi-IIS-site setup with a load balancer between them, taking out one site to update it while the others continue to serve your users would work well. Also, when deploying to a staging or test environment before pushing to production, this scenario may work well as it's often less of a problem when the staging site restarts when a new release is rolled out. On Azure you can use Deployment Slots to deploy a new version of your site and warm it up in a separate slot, minimizing down time and impact on your users. Part 6 and 7 of this article series discuss deploying to Azure and using Deployment Slots in a lot more detail.
If auto-releasing is an option for you, read on as the next section shows you how to set that up, along with an end to end demo of a change to your data model and application making it into production without any manual intervention.
Automatically deploying the application
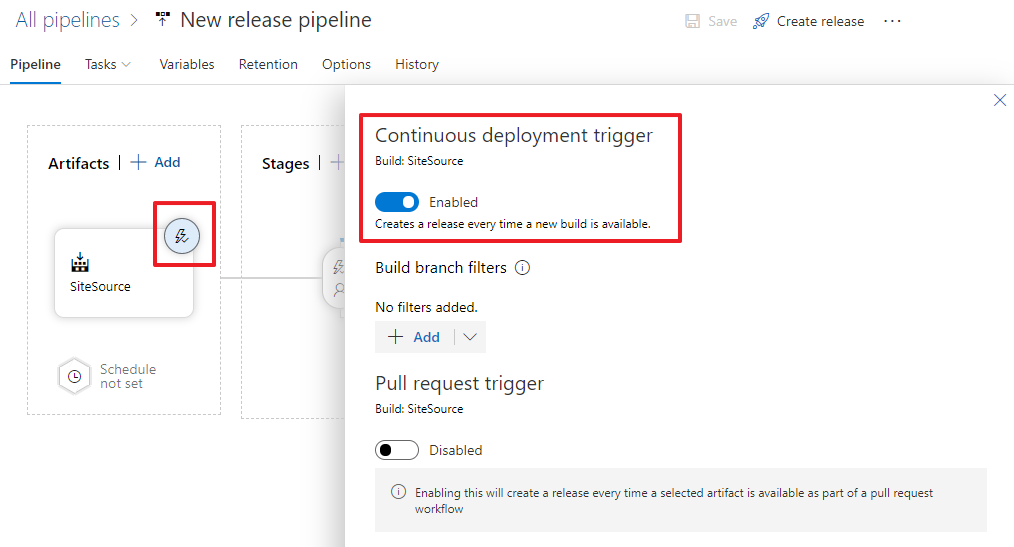
To kick off the release every time a build completes successfully, you need to enable the continuous deployment trigger. To do this, open the release definition, click the lightning bolt in the Artifacts section and then enable the trigger in the dialog that appears:
Next, click the Save button to apply the changes.
To test it all out, you can make a change to the app's model and commit and sync your changes to GitHub. That change then triggers the build as you saw before which compiles your source code and runs your tests. Then when the build completes successfully, the release is triggered automatically which then updates the application's code and database schema. All of this now runs automatically so you can just sit and watch it all happen automatically!
To see it at work, I modified my Person class in Visual Studio and added a non-nullable DemoProperty:
public bool DemoProperty { get; set; }
I set the default value to 0 in the database so all existing records will get a default value of false. Of course you could set it to true as well by specifying 1 as the default SQL value. The point is that you can control whatever value is used during release to update any existing records and to set the column default.
builder.Property(x => x.DemoProperty).HasDefaultValueSql("0");
See the third article in this series about managing change to see another solution using MigrationBuilder.Sql to handle updates by modifying records without setting a column default.
Next, I added DemoProperty to the PersonDto and used it in the view:
// PersonDto.cs
public bool DemoProperty { get; set; }

// Index.cshtml
<span>@person.FirstName @person.LastName
            @person.DateOfBirth DemoProperty: @person.DemoProperty</span><br />
I then ran Add-Migration "Add DemoProperty" in the Package Manager Console against my EF project to record the changes to the model in an EF code migration which is used later to create the necessary SQL code to update the database schema during the release.
Next, I checked in my changes and synced to GitHub. You can do that using the UI tools in Visual Studio or with Git at the command line:
git add .                                                          // Add all pending changes to the staging area
git commit -m "Add DemoProperty to Person class for demo purposes" // Create the commit
git push                                                           // Send the changes to GitHub.com
That triggered the build automatically as you can see in the Pipelines section on Azure DevOps:
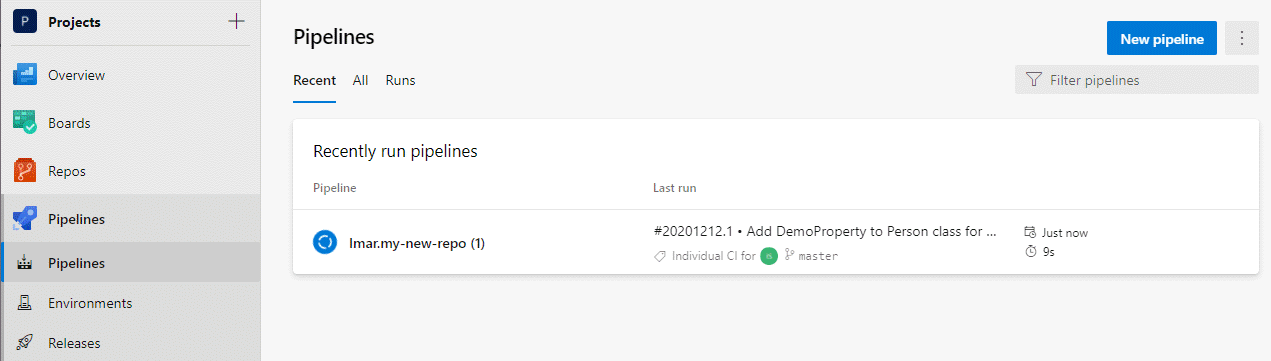
And once the build completed successfully the release kicked off as well:
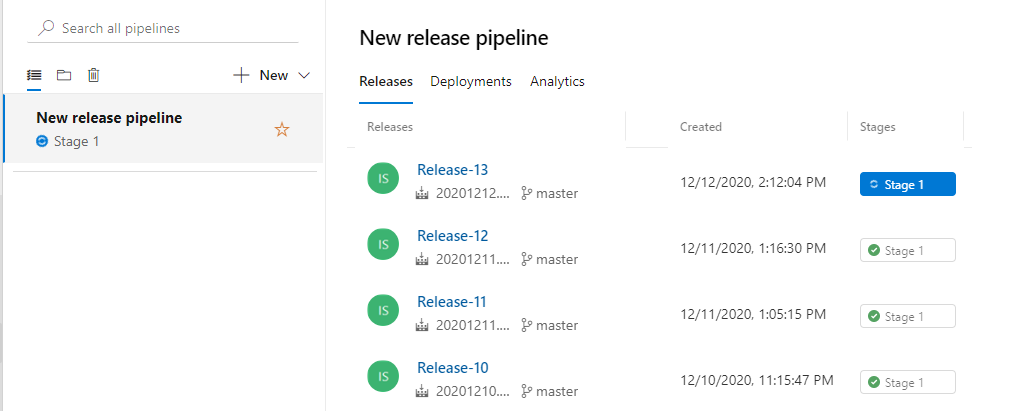
And finally, when the release was done, I tested the application which then showed the new property in use:

Wrapping up
In this article I completed the cycle of creating code, submitting it to an online repository, automatically building and testing it, and finally deploying it to an on-premises or other (virtual) server you control. With the concepts shown in this article you can build your own pipelines in Azure DevOps to release your software to your own servers.
In the next article I'll show how to deploy to an Azure App Service instead, which is a great alternative to running and managing your own servers. In the last part of the series I'll then show you how to install a custom build agent to speed up the build process and how to use Deployment Slots in Azure to minimize downtime when deploying to an Azure App Service.
Where to Next?
Wonder where to go next? You can read existing comments below or you can post a comment yourself on this article.
Links in this Document
| Doc ID | 622 |
| Full URL | https://imar.spaanjaars.com/622/building-and-auto-deploying-an-aspnet-core-application-part-5-setting-up-a-cd-pipeline-deploying-with-web-deploy-to-a-vm |
| Short cut | https://imar.spaanjaars.com/622/ |
| Written by | Imar Spaanjaars |
| Date Posted | 04/01/2021 10:05 |
Talk Back! Comment on Imar.Spaanjaars.Com
I am interested in what you have to say about this article. Feel free to post any comments, remarks or questions you may have about this article. The Talk Back feature is not meant for technical questions that are not directly related to this article. So, a post like "Hey, can you tell me how I can upload files to a MySQL database in PHP?" is likely to be removed. Also spam and unrealistic job offers will be deleted immediately.
When you post a comment, you have to provide your name and the comment. Your e-mail address is optional and you only need to provide it if you want me to contact you. It will not be displayed along with your comment. I got sick and tired of the comment spam I was receiving, so I have protected this page with a simple calculation exercise. This means that if you want to leave a comment, you'll need to complete the calculation before you hit the Post Comment button.
If you want to object to a comment made by another visitor, be sure to contact me and I'll look into it ASAP. Don't forget to mention the page link, or the Doc ID of the document.