Building and auto-deploying an ASP.NET Core application - Part 4 - Setting up a CI pipeline in Azure DevOps to build and test your code
In this article I finally get to showing you how to create pipelines in Azure DevOps. I've been mentioning this for a few articles now but there was some groundwork I had to take care of first. In this article, the 4th in a series of 7, I'll show you the following:
- What YAML is and why you need it
- How to build a pipeline in Azure DevOps to build your source code every time you do a check in on GitHub.
- How to modify your build to save the results so they can be deployed to a remote server at a later stage
- How to add a unit test project to your solution and configure the build to execute your tests
- How to create EF Migration scripts which can be run against the database during the release
If you haven't read the previous parts in this series you're encouraged to do that now. Here's the full list of the articles in the series:
- Introduction
- Creating the web application
- Using GitHub and managing change in your application
- Setting up a CI Pipeline in Azure DevOps (you're reading it now)
- Setting up a CD pipeline: Deploying with web deploy to a Virtual Machine or on-premises server
- Setting up a CD pipeline: Deploying to an Azure App Service
- Improving your builds with a custom build agent and Azure Deployment Slots
Note: if you like to purchase the entire series now and not wait for the remaining parts to come online, check out this blog post that explains how you can purchase it for only $8.
Introducing YAML
As I mentioned in part one of this series, as part of a CI/CD workflow, your software is automatically built (the CI part) and released (the CD part). The build and release processes can be configured in Azure DevOps using something called a pipeline. A pipeline is a definition of steps that are executed to implement the entire process. For a build process, these steps can be acquiring the source code, compiling the application and storing the results back in Azure DevOps. For a release pipeline, these steps include deploying the application to a remote server and updating the database.
When you build an Azure pipeline you can choose between the Classic Editor and a YAML pipeline. The Classic Editor is great for new users as you configure the pipeline in a very visual way. Here's an example of a pipeline you can use to build, test and deploy an ASP.NET application to an Azure app service:
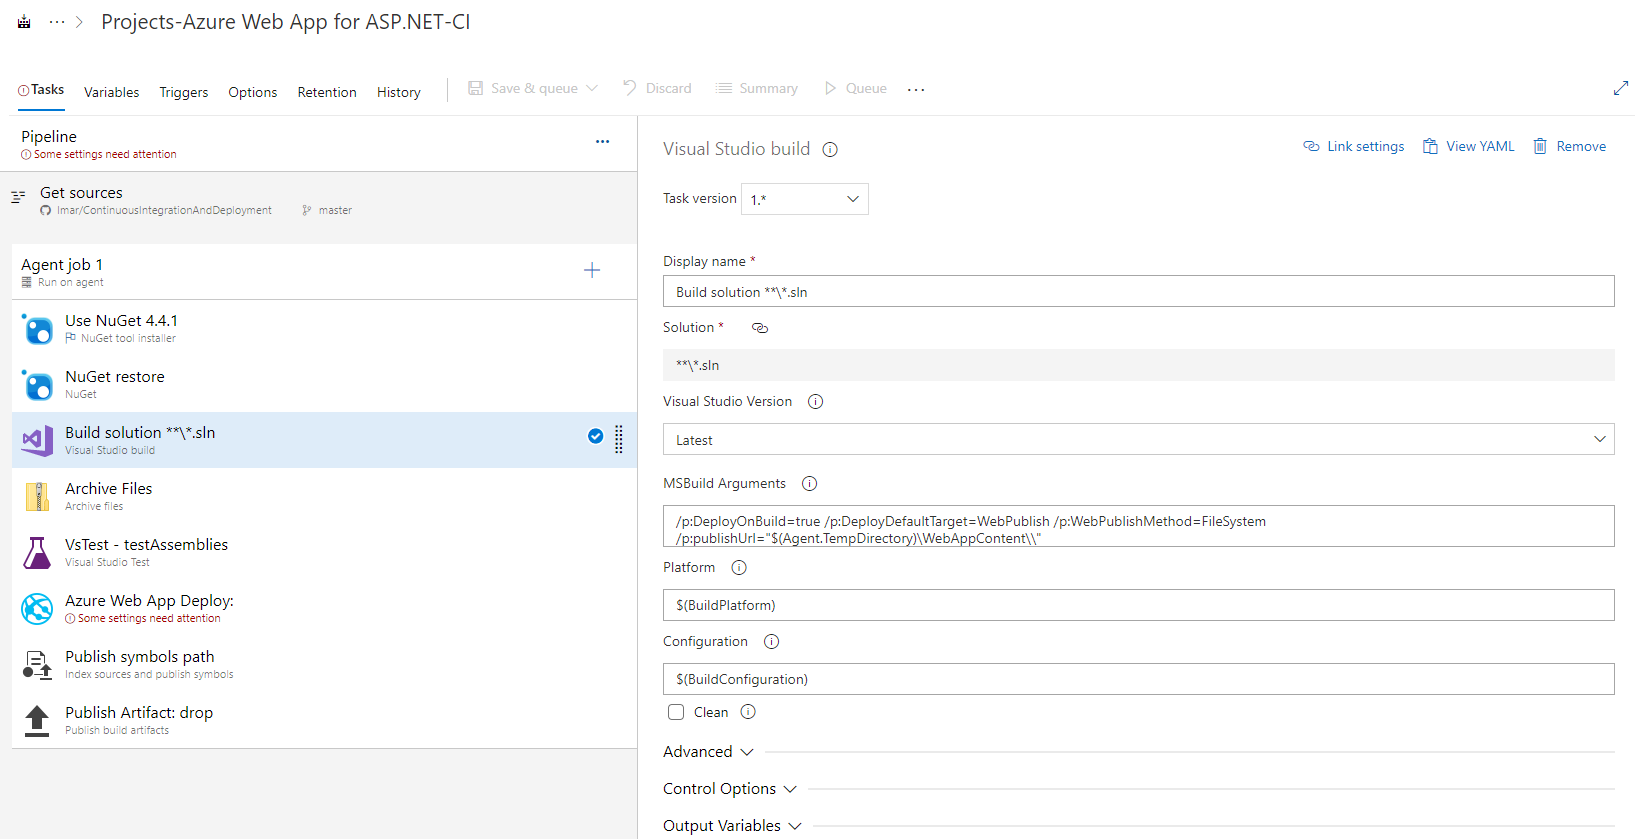
On the left you see the overall pipeline definition, a panel to configure where your source is coming from and then a collection of tasks that you can visually configure and reorder. Clicking on a task loads its UI in the right-hand panel where you can then configure it. For many, this works really well as it's mostly pretty straightforward because it's so visual. There's a big downside to this though; with the classic pipeline, Microsoft stores and maintains all the logic and code on their servers. That makes it harder to reuse in other places, such as in custom scripts or unrelated pipelines. The new trend is Infrastructure as Code, or IaC which means that you define things like builds, releases and even remote environments such as virtual machines or app services, in a code file which can be used to repeatedly and consistently deploy the same configuration over and over again. As another example of IaC besides for a pipeline, consider Azure's ARM templates (Azure Resource Manager templates). These templates written in JSON allow you to define an Azure resource such as a Virtual Machine, a SQL Server or database, an App Service (to host web sites) and more in code. Then when you deploy that template, Azure will either create a new or update an existing resource. This ensures highly consistent, repeatable and parameterizable deployments of your resources.
What all this means is that you don't configure everything with a visual editor anymore, but that you write things in code. Fortunately, Azure DevOps still has some nice UI tools that help you generate code from a user interface and add that to a code file. This makes it easier to know what to add to the YAML file and how.
For Azure pipelines, IaC is implemented in YAML, which stands for Yaml ain't a Markup Language. YAML is a very terse syntax that looks a bit like JSON, but with even less ceremony. Here's an example of YAML code for a simple ASP.NET Core build pipeline:
trigger:
- master

pool:
  vmImage: 'ubuntu-latest'

variables:
  buildConfiguration: 'Release'

steps:
- script: dotnet build --configuration $(buildConfiguration)
  displayName: 'dotnet build $(buildConfiguration)'
This pipeline does the following:
- Configure a trigger to run this pipeline every time code is committed to the master branch of the repository connected to this pipeline.
- Configure an agent pool (machines that can run your build process) and require the latest ubuntu version available.
- Define a variable that can be used throughout the pipeline. It's set to Release and is used later to define which version of your software to build.
- Finally, it calls dotnet build to kick of the compilation process.
YAML is indentation-sensitive. So the indention of the buildConfiguration under variables is important; without it the code would have a completely different meaning (and would also break the pipeline).
For an introduction to YAML in general and for Azure pipelines specifically, check out the following links:
- https://rollout.io/blog/yaml-tutorial-everything-you-need-get-started/
- https://www.youtube.com/watch?v=cdLNKUoMc6c
- https://iscinumpy.gitlab.io/post/azure-devops-intro/
And for the full schema reference of a YAML pipeline, check out this link: https://docs.microsoft.com/en-us/azure/devops/pipelines/yaml-schema
While building a pipeline with YAML can be daunting at first, you'll find plenty of examples online when you are searching for specific information.
In the next section, you'll see how to create the pipeline to build the sample application from source code in GitHub.
Creating the pipeline
- Go to your DevOps account at https://dev.azure.com/YourAccount. If you don't have an account, refer to the first article in this series.
From the main menu, click Pipelines | Pipelines and then choose New Pipeline
![]()
- For the question "Where is your code?", choose GitHub (YAML). If you added your code to an Azure DevOps repo instead of a GitHub repo, choose Azure Repos Git (YAML). Of course you can also pick one of the other options to suit your requirements.
- Authenticate with GitHub by following the on-screen instructions.
-
Back in DevOps, select the repository that contains your code. If this is the first time you are selecting this repo, you'll have to configure access to your repository as shown in the following image.
![]()
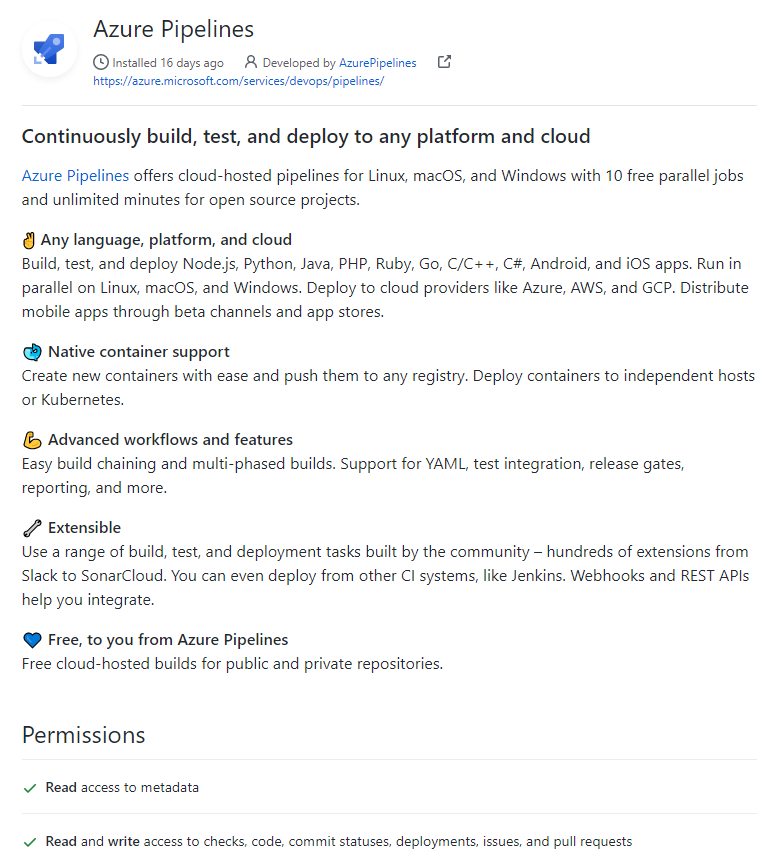
- Click Approve and Install.
-
Under Configure your pipeline, choose Show more and then click ASP.NET Core. The code for the pipeline should be the same as I showed you earlier:
trigger:
- master

pool:
  vmImage: 'ubuntu-latest'

variables:
  buildConfiguration: 'Release'

steps:
- script: dotnet build --configuration $(buildConfiguration)
  displayName: 'dotnet build $(buildConfiguration)'
Running the build now would result in a failure because the requested build agent (ubuntu-latest) doesn't have .NET 5 available, so building your software would fail. This may change in the future though.
Update the code so the vmImage points to 'windows-latest' instead:
pool:
  vmImage: 'windows-latest'
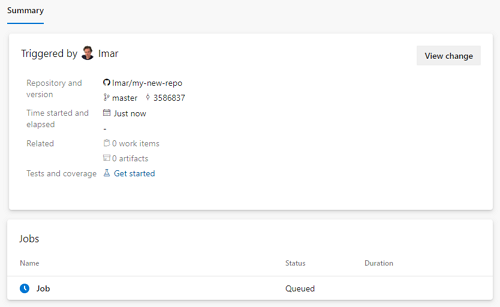
Click Save and Run and then click Save and Run again to execute the pipeline. The build should show up as queued:
![]()
-
And a bit later it should have completed successfully. The next screen shows the logs for the completed build:
![]()

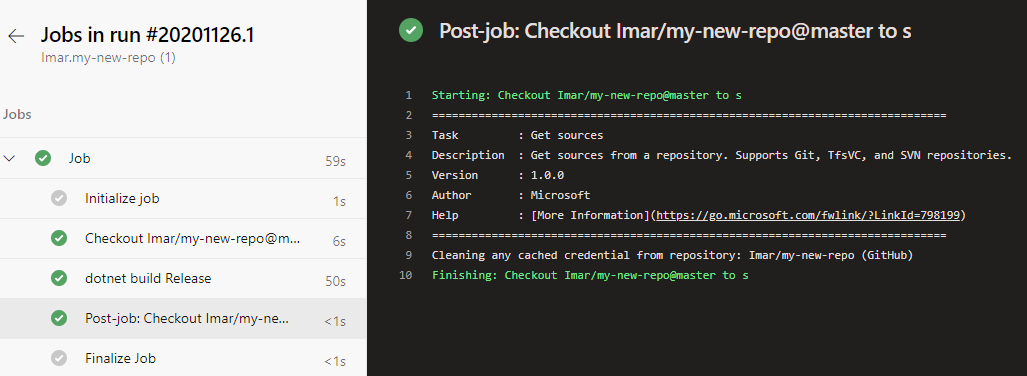
Congratulations. The first build succeeded!
A powerful concept of build pipelines is the ability to execute them every time somebody commits code to the repository. This is especially useful in a team environment where multiple developers submit code in the same repository. The build pipeline is then responsible for integrating and building all code from all developers. If somebody submits code that causes the pipeline to fail, the build is considered broken and attention should be focused on getting it back up and running as soon as possible. A broken build is bad as you have no clue whether new code you add to a repo can build successfully. Even when you're a single developer, using an automated pipeline is still very useful to catch issues early on. As a example, I am the only developer working on this website - imar.spaanjaars.com - yet I have automated build and release pipelines set up for it to deploy to my staging and production environments.
The ability to execute the pipeline every time somebody commits code to the repository - called CI for Continuous Integration - is already turned on for your build by default. To turn it off (for example when you create a build pipeline that should only run manually or at a scheduled interval), follow these steps:
-
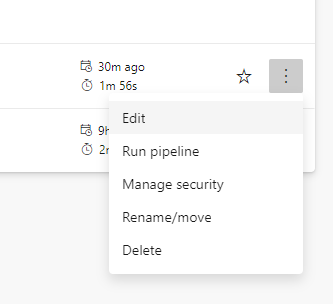
Click Pipelines | Pipelines and for the pipeline you created earlier click the ellipses and then choose Edit.
![]()
-
In the top-right corner click the ellipses and then choose Triggers.
![]()
-
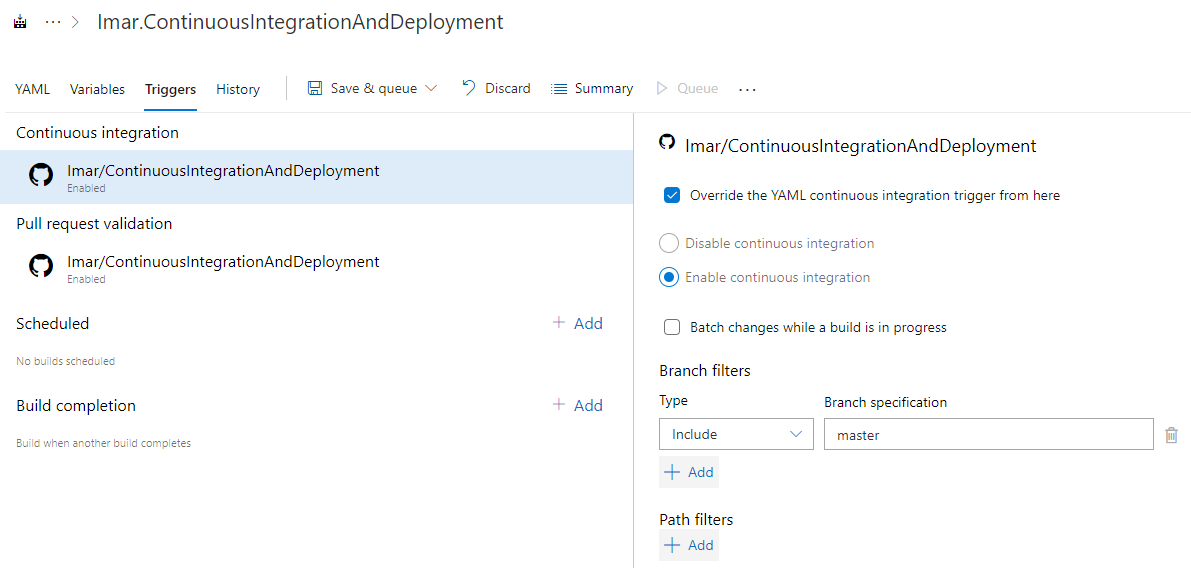
In the dialog that follows you can override the default settings for the CI pipeline. This allows you to configure stuff like batching changes while a build is in progress. This means that you won't see a build for every individual sync operation. Instead, multiple changes are accumulated and built at once. This has pros and cons. One advantage is that you'll have fewer builds and less queueing which can help when you have lots of developers committing to the same branch. As a downside it means that multiple changes are integrated and built at once which can make it harder to track down which commit and developer was responsible for breaking the build.
On the same screen you can also configure branch and path filters to control which branches and folders within your code base trigger the build.
![]()

In its current form, this basic build pipeline is already quite helpful as it will tell you and your teammates if all committed code can build successfully. However, at the moment it's lacking a few important features:
- The build results are ignored. In order for this build to be deployed to a web server later, you need to save its output (called the Build Artifacts) so it's available to a release at a later point.
- No unit tests are executed because the project doesn't have any yet, so they should be added and then executed.
- The pipeline doesn't deal with EF migrations yet. Migrations are typically collected during the build phase and then executed during the release phase.
The remainder of this article demonstrates how to implement this.
Saving build artifacts
Since the build results are eventually deployed as a web application, you can use the following YAML code to create a ZIP file with all the site's required files.
- task: DotNetCoreCLI@2
  inputs:
    command: publish
    publishWebProjects: True
    arguments: '--configuration $(BuildConfiguration) --output $(Build.ArtifactStagingDirectory) --self-contained true
                                                                --runtime win-x64'
    zipAfterPublish: True

- task: PublishBuildArtifacts@1
  inputs:
    pathtoPublish: '$(Build.ArtifactStagingDirectory)'
    artifactName: 'SiteSource'
I have set self-contained to true to create a ZIP file that embeds the .NET Core run-time. This makes it easier to deploy your app to an environment that doesn't have your selected runtime yet. I found this very useful during the time where .NET 5 was still in beta; instead of updating my servers whenever a new version came out, I just deployed the entire run-time along with the application. It does mean that your deployment artifacts get a little bigger though.
I set runtime to win-x64 to produce a Windows 64-bit version of my applications as that's what I'll be deploying to in the next article. In a later article in the series I'll be deploying this app to an Azure App service which only supports 32-bit applications in the free edition in which case I'll replace win-x64 with win-x86. For paid versions of Azure services you can build and 64-bit versions of your application as well. For your own environment, you should choose the most appropriate option. For a list of all possible runtime targets, take a look here.
You can make up the name you give to the artifact - SiteSource in this example. You need to remember it though as you need it during the release phase.
Note the use of the variable Build.ArtifactStagingDirectory; this variable points to a folder where files can be stored during the build process temporarily. The first task saves the produced web publish file in that folder and then the second task - PublishBuildArtifacts - picks it up from that location and associates it with the build in DevOps.
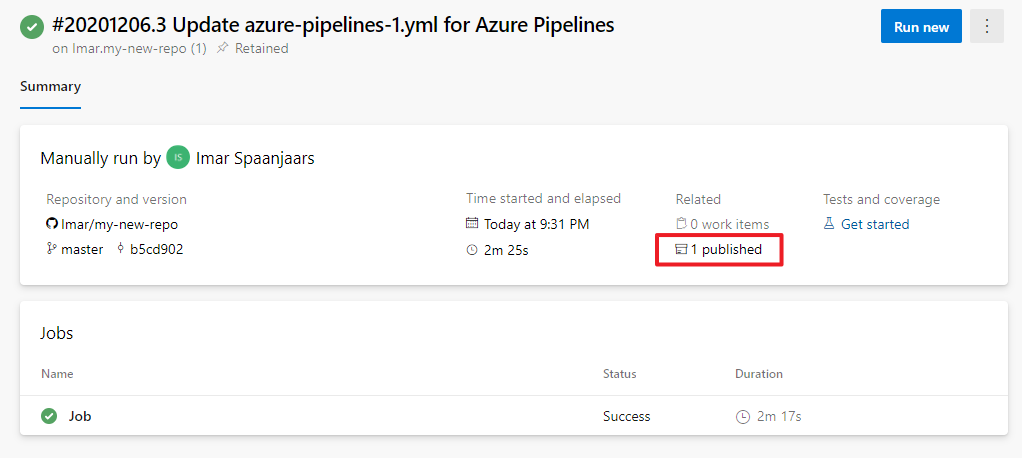
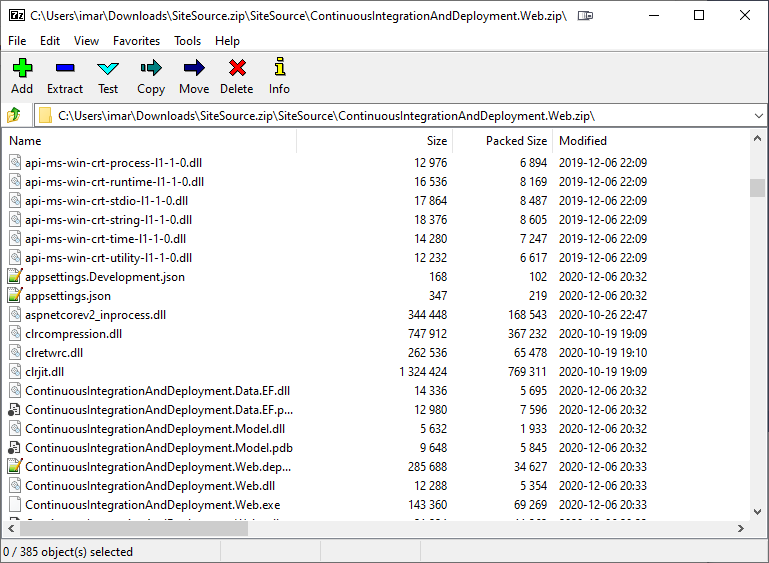
With the above code added to your YAML file, running a build now compiles your application, grabs all the files needed at the web server and adds them a ZIP file and finally associates the ZIP file with the build run in Azure DevOps where it can be accessed later. You'll see an example of that in the next two articles where the build is used to publish automatically to a remote server. For now, you can see the build artifact on the build run's summary page:
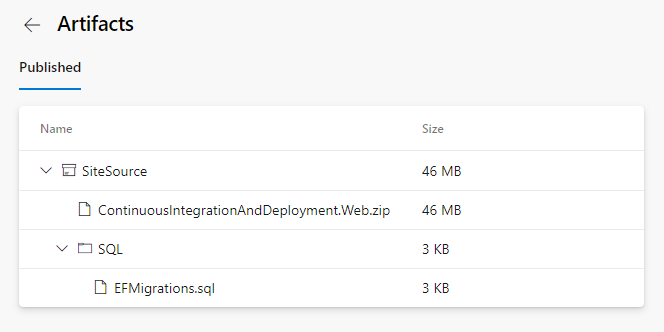
If you click on the artifact you can browse its contents or download it:
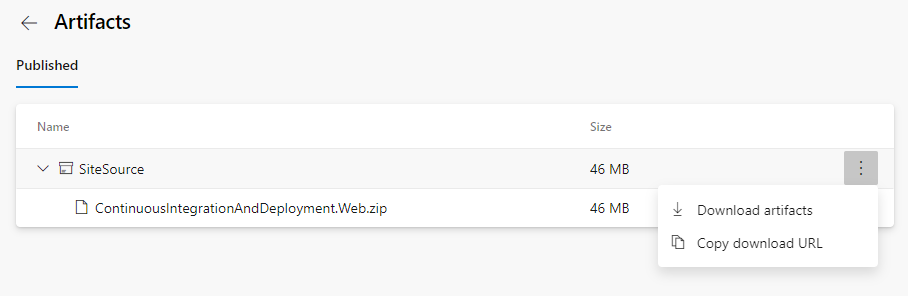
And once you download the ZIP file you can look inside and you'll see the files that make up your site:
Adding tests
A second improvement to the pipeline is executing unit tests. With a proper unit test suite you can run your tests as part of your build and be confident that things work as expected. Unit testing is a large topic by itself and I won't go into much details here. However, I will quickly show you how to add a unit test project to your solution, add a single test and then execute that test as part of your build. For your own applications it's highly recommended to write a lot more tests than just one, but in the context of my CI/CD demo, it will suffice.
- Right-click on your solution and choose Add | New Solution Folder. Call the new folder Tests. This folder is used to group your test projects and visually separate them from your other projects which makes it easier to manage them.
- Right-click this new project and choose Add | New Project.
- In the dialog that follows, choose MS Test Test Project (.NET Core). You can also use other test framework like XUnit if you prefer and use those. I normally store my test projects in a folder called Tests next to the Applications folder; that way your project are nicely grouped together on disk as well.
- Give your test project a name. I follow the pattern ProjectName.Tests.TestType where ProjectName refers to the project I am writing the tests for and TestType is either Unit or Integration. Integration tests aren't often easily run on a build server, for example because they depend on a database, and thus having a way to easily exclude them (or actually, include the Unit tests) on the build server is very helpful. In my sample, I ended up with a unit test project called ContinuousIntegrationAndDeployment.Web.Tests.Unit.
- Once the project is created, you can modify the sample test so it tests one of your controllers. The exact code doesn't matter much but the test in my sample project looks as follows:
[TestMethod]
public void CallingPrivacyReturnsViewResult()
{
  var controller = new HomeController(null, null);
  var result = controller.Privacy() as ViewResult;
  Assert.IsNotNull(result);
}
Note: in order for your test project to see your web project, you need to make sure the target framework is the same for both (or higher in your test project). In my case I had to set it to .NET 5.0. To do this, right-click your project in the VS Solution Explorer and choose Properties. Then on the build tab make sure that .NET 5.0 is selected as the Target Framework:
![]()
- Next, you can run the test locally to make sure that it works and then check in your changes and sync. That will cause the build to run, still without the tests.
-
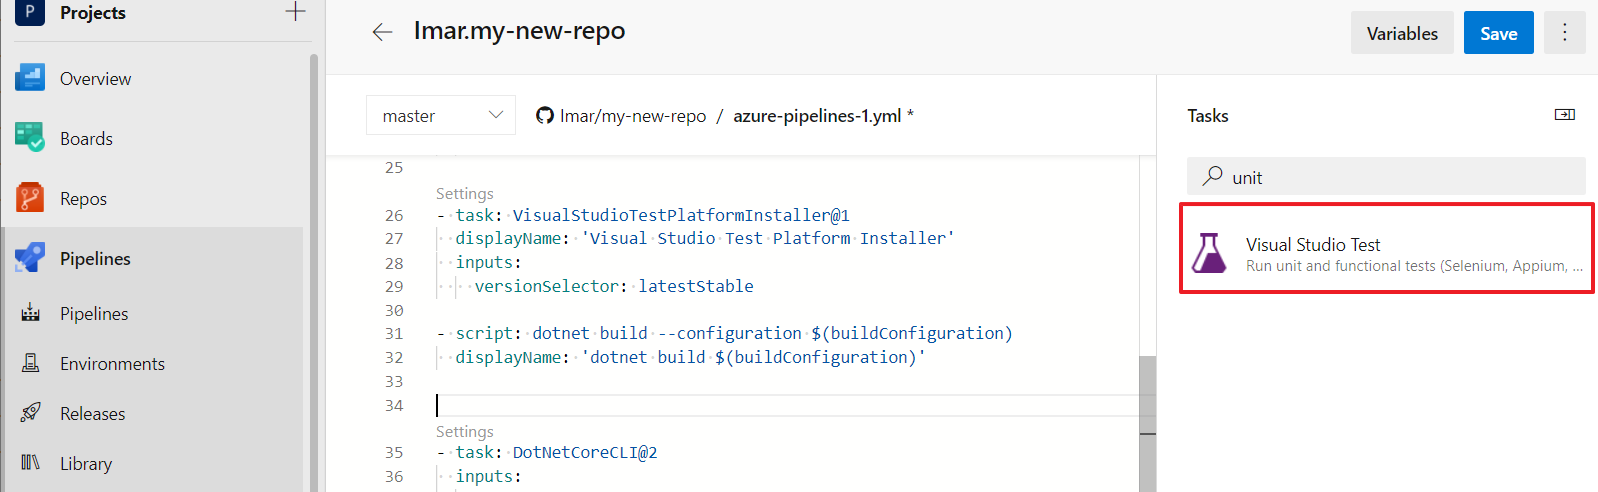
To have the tests run automatically as part of your build you need to add code to your YAML file to execute them. TO do that, open your build configuration in Azure DevOps, place your cursor after the build step but before the publish step, and then in the Tasks section on the right search for Unit and add the Visual Studio Test task.
![]()
Notice how the Tasks panel makes it easy to create the YAML that you want to add to the pipeline.
-
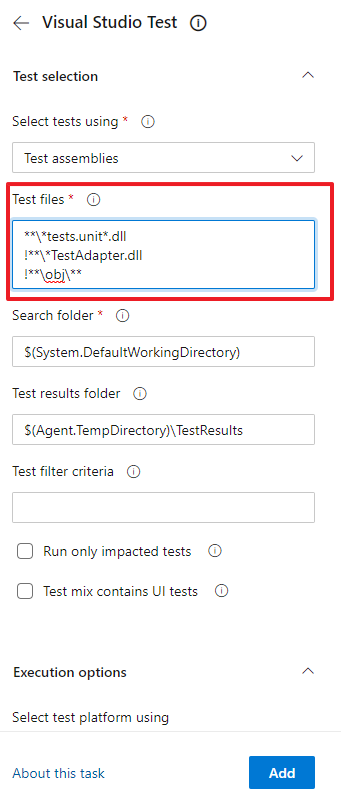
Most defaults work well for me, but the one change I usually make is to only select my Unit test projects by specifying **\*tests.unit*.dll in the Tests file input box:
![]()
-
I also exclude the refs folder by adding !**\ref\**, similar to how the obj folder is excluded. That folder contains a copy of your assembly and by excluding it here you prevent DevOps from attempting to run your tests twice. You can't see the refs folder being excluded in the image above, but you can see it in the YAML code below.
-
Click Add to add the task to your YAML code. Clicking About this task takes you to the online documentation which provides a detailed view of the all the configurable options.
You should now have the following YAML code:
- task: VSTest@2
  inputs:
    testSelector: 'testAssemblies'
    testAssemblyVer2: |
      **\*tests.unit*.dll
      !**\*TestAdapter.dll
      !**\obj\**
      !**\ref\**
    searchFolder: '$(System.DefaultWorkingDirectory)'
Tip: for code that's already in the YAML pipeline, you can click the Settings link just above each code block. That loads up the YAML settings into the UI in the tasks panel again, enabling you to visually make changes to your code. This is not as convenient as using the classic UI pipeline editor, but it's a good help anyway:
![]()
-
If you now save your pipeline, a new build is scheduled and as part of that build, your unit tests are executed automatically as well. If you don't exclude the refs folder like I showed earlier, you may get an error like the one below and your build may fail:
##[error]Unable to find D:\a\1\s\ContinuousIntegrationAndDeployment.Web.Tests.Unit\bin\Release\net5.0\ref\ContinuousIntegrationAndDeployment.Web.Tests.Unit.deps.json.
     Make sure test project has a nuget reference of package "Microsoft.NET.Test.Sdk".
The error message is a bit confusing; the project already references Microsoft.NET.Test.Sdk. The real issue is that your test assembly also exists in the refs folder and is therefore included in the list of assemblies to execute. But that folder doesn't contain the required deps.json file. But even if it did, excluding the assembly in the refs folder is a good idea as it prevents your tests from being executed twice.
-
From now on, every time you commit new code, your tests are executed as part of the build. If one or more of your tests fail, the entire build is considered as failed which will then stop your code from automatically being deployed to the remote server (if you have a release pipeline).
On the build summary you should now have a new Tests tab that shows the test results. By default it only displays failed tests but you can change the filter to have it show passed tests as well:
![]()


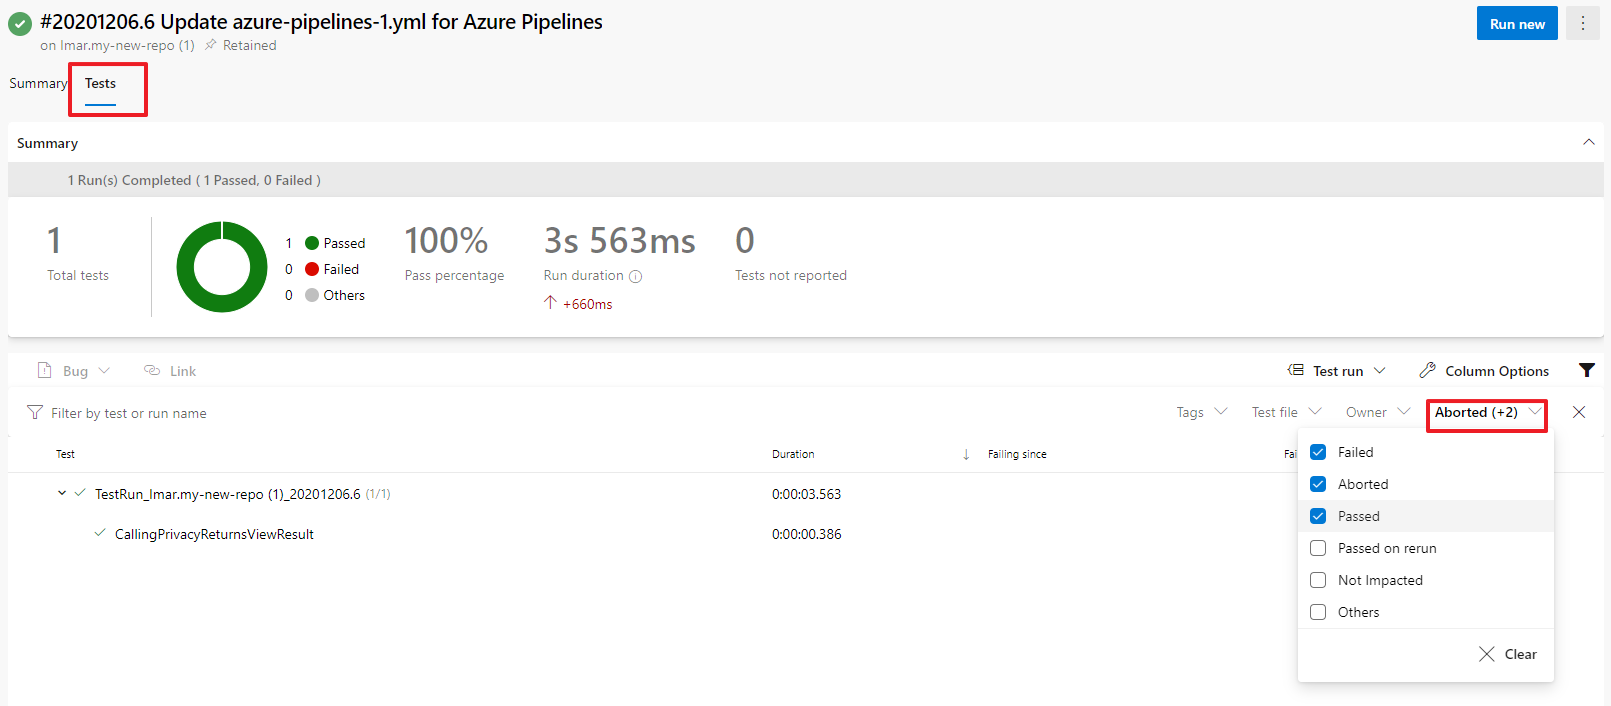
It's important to stress that most of my code is sample code to illustrate the point of CI/CD. In real-world applications you want a lot more unit tests to prove that your system is built and behaves as it should!
Creating EF Migration Scripts
The final change to the build script I like to make is to have it generate an EF migrations file. In the previous article I explained how Add-Migration and Update-Database are used to record changes in your model in code, and then to convert that code to SQL scripts that alter the definition and data of the target database. Doing this at run-time has long been problematic and difficult to do. Some of the options to do this include using SQL Server Database Projects that can also be executed at runtime, using EF's run-time migrations functionality (which I never liked as it means the day-to-day account your site runs under needs DDL permissions) and even keeping track of changes and executing them automatically as part of the application's startup (essentially mimicking EF migrations with custom code).
Another approach I use very often uses EF's ability to generate a completely new database off of your model and then use tools to script and apply the changes between that database and your production database. It works like this:
- I usually create a console application that deletes and then recreates a database with the latest model. This database has a name that's different from the main development database (ending in -For-Schema-Compare for example) so I can easily delete it and recreate it.
var connectionString = "...";
var context = new PeopleContext(connectionString);
context.Database.EnsureDeleted();
context.Database.EnsureCreated();
-
Next, I use a tool like Red Gate's SQL Compare to script the differences between my newly created up-to-date database and the one I use in production.
- Then in the release pipeline there's a manual approval step to pause the release. That gives me an opportunity to execute the scripts against the production database as part of the release.
This solution has some pros and cons. As one benefit, you can argue it gives you more control over what gets run and when. You can test the scripts manually (against a staging database for example) and also update it to include data manipulation statements. But a downside is that it requires manual intervention during the release. This can very well be acceptable if you do mostly CI and then release less frequently and in a more manually controlled fashion. But it won't work very well if you want fully unattended releases to production multiple times a day.
The good news is that you can execute your EF migrations as part of your release automatically to update your target database. However, the migration scripts need to be created as part of the build, and not as part of the release. So, in the final section of this article you see how to create the scripts using the command line and then include the output in the build artifacts. In the next two articles you'll then see how to execute the scripts during the release.
To create the SQL migration file, add the following YAML to your build pipeline. I usually add it after the tests have run (so I can skip it when they fail somehow) but run them before creating and publishing the artifacts.
- powershell: |
   dotnet tool update --global dotnet-ef
   dotnet ef migrations script --output $(Build.ArtifactStagingDirectory)\SQL\EFMigrations.sql
                               --startup-project Applications\ContinuousIntegrationAndDeployment.Web
                               --project Applications\ContinuousIntegrationAndDeployment.Data.EF
                               --context PeopleContext
                               --idempotent
There are a couple of things worth calling out here:
- The first command installs or updates the latest version of the EF tools which are used to create the SQL scripts.
- The second command references the startup project (with EF needs to find stuff like the connection string). It also references the EF project (with --project) as that's where it'll look for the migration files.
-
Finally, I specified the idempotent parameter. With this option turned on, the script is crafted in such a way that it can be run on any database with any version of your application. Normally, when EF creates the script, it looks at your database, finds the latest applied migration and then creates code to script out the remaining ones. With the idempotent option it'll create SQL statements for all migrations but includes a check to ensure that the migration hasn't been applied yet. For example:
IF NOT EXISTS(SELECT * FROM [__EFMigrationsHistory] WHERE [MigrationId] = N'20201125221750_Initial Creation')
BEGIN
    CREATE TABLE [People] (
        [Id] int NOT NULL IDENTITY,
        [FirstName] nvarchar(50) NOT NULL,
        [LastName] nvarchar(50) NOT NULL,
        CONSTRAINT [PK_People] PRIMARY KEY ([Id])
    );
END;
GO
For more information about the EF command line options, take a look here: https://docs.microsoft.com/en-us/ef/core/cli/dotnet
With the dotnet ef migrations script command in your build pipeline, the SQL script is now included in the SiteSource build artifact:
Wrapping Up
In this article you saw how to create a pipeline that builds and tests your software and how to create and store the EF Migration scripts you need to update the database in your testing and production environments.
In the next two articles you see how to take the generated build artifacts and deploy them to a remote server. In the next article you see how to deploy your site to a Windows Server running IIS. This could be an on-premises (virtual) server, or it could be some other server running in the cloud somewhere. The article that then follows - part 6 - shows how to deploy your web site to a Microsoft Azure App Service, a fully managed web hosting service for running web sites, mobile back ends, and RESTful APIs. These two options cover a big portion of the deployment scenarios for ASP.NET web sites running on Windows (although it's just as easy to deploy to a Linux app service if you app works on that platform), so it's likely you'll find these two articles useful for your own environments as well.
References
- https://dev.to/paulasantamaria/introduction-to-yaml-125f
- https://docs.microsoft.com/en-us/azure/devops/pipelines/yaml-schema
- https://docs.microsoft.com/en-us/azure/devops/pipelines/ecosystems/dotnet-core
- https://docs.microsoft.com/en-us/azure/devops/pipelines/get-started/pipelines-get-started
- https://docs.microsoft.com/en-us/azure/devops/pipelines/get-started/key-pipelines-concepts
Where to Next?
Wonder where to go next? You can post a comment on this article.
Links in this Document
| Doc ID | 621 |
| Full URL | https://imar.spaanjaars.com/621/building-and-auto-deploying-an-aspnet-core-application-part-4-setting-up-a-ci-pipeline-in-azure-devops-to-build-and-test-your-code |
| Short cut | https://imar.spaanjaars.com/621/ |
| Written by | Imar Spaanjaars |
| Date Posted | 03/08/2021 09:25 |
Comments
Talk Back! Comment on Imar.Spaanjaars.Com
I am interested in what you have to say about this article. Feel free to post any comments, remarks or questions you may have about this article. The Talk Back feature is not meant for technical questions that are not directly related to this article. So, a post like "Hey, can you tell me how I can upload files to a MySQL database in PHP?" is likely to be removed. Also spam and unrealistic job offers will be deleted immediately.
When you post a comment, you have to provide your name and the comment. Your e-mail address is optional and you only need to provide it if you want me to contact you. It will not be displayed along with your comment. I got sick and tired of the comment spam I was receiving, so I have protected this page with a simple calculation exercise. This means that if you want to leave a comment, you'll need to complete the calculation before you hit the Post Comment button.
If you want to object to a comment made by another visitor, be sure to contact me and I'll look into it ASAP. Don't forget to mention the page link, or the Doc ID of the document.