Building and auto-deploying an ASP.NET Core application - Part 3 - Dealing with change
In the previous article in this series I showed how to set up the initial web application and add Entity Framework as the database persistence framework. This provides a good starting point for the application. As you'll be expanding the application you need a good way to manage code and database schema changes. In this article you'll see how to leverage Git, GitHub and EF migrations to manage code changes. In the next article in the series I'll then finally show you how to set up a CI pipeline followed by a CD pipeline in a later article.
If you haven't read the previous parts in this series you're encouraged to do that now. Here's the full list of the articles in the series:
- Introduction
- Creating the web application
- Using GitHub and managing change in your application (you're reading it now)
- Setting up a CI Pipeline in Azure DevOps
- Setting up a CD pipeline: Deploying with web deploy to a Virtual Machine or on-premises server
- Setting up a CD pipeline: Deploying to an Azure App Service
- Improving your builds with a custom build agent and Azure Deployment Slots
Note: if you like to purchase the entire series now and not wait for the remaining parts to come online, check out this blog post that explains how you can purchase it for only $8.
Managing change with Git
As you write code for your application, you need to have a way to manage changes. It's very helpful to see, for example the history of a code file and the changes it has gone through over time. It's also very helpful to compare the current version of a file with one that was modified earlier to see which changes were made by whom and when. It's also very helpful to be able to make experimental changes to code to try something out and then undo your changes altogether if it didn't work out as expected. For all these reasons, you should have a good source control system like Git in place. I use Git because it's an industry standard that is widely used and has a great feature set. It has a bit of a learning curve but I feel it's worth going through that phase in an attempt to really understand and master Git. I also use GitHub.com to store my private and public repositories (to store the source code for some of my articles).
Note: don't confuse Git with GitHub. Git is the free and open source distributed version control system that you can use on your local machine and also with remote services like GitHub and Azure DevOps. GitHub is a cloud service that provides hosting for software development and version control using Git with additional features like discussions, wikis and pull requests.
To use Git and an online service like GitHub, you typically follow this development work flow:
- You perform a one-time setup of a remote repository per project (on GitHub, Azure DevOps or another system)
- You set up a local git repository with your source code, mapped to the remote repository. This is also a one-time operation per project.
- You then make code changes locally
- You commit your changes to the Git repository locally
- You synchronize your local commits with the remote repository
Steps 3 and 4 are done on a frequent basis, often multiple times a day. Step 5 can and should be done frequently as well, to ensure your code integrates well with the main repository and to give other team members the ability to see and integrate your code too. It's also helpful to sync to ensure your code is backed up somewhere. Step 5 is also typically where the automated build pipeline is kicked off as you'll see later.
You'll see these steps in detail in the remainder of the article.
Setting up a remote repository
- Log in to your GitHub account. If you don't have an account yet, check out part one of this article series to see how to set up a free account.
- In the top-right corner click the plus (+) icon and choose New Repository.
- Give it name and decide if it should be public or private. Both work for this walkthrough.
![]()
- Click Create repository
- When the repository is created, you'll see the Quick setup screen. From that screen, find and copy the https link for your repository. For the example above, mine looks like this: https://GitHub.com/Imar/my-new-repo.git.

Creating a local Git repository and linking it to the remote
To initialize a local git repository and link it to a remote you have a few options. One is to use the command line; another is to use the GitHub functionality within Visual Studio. I'll show you both so you can pick the one you like best. I'll start with the command line version.
Open up a Windows command prompt in the folder that contains your Visual Studio solution. Here's a quick tip on how I do this:
- Right-click your solution in the Solution Explorer in Visual Studio and choose Open Folder in File Explorer.
- Press Alt+D to put the focus on the address bar
- Type CMD and hit enter. A command prompt in your solution's folder opens.
And to do this even quicker: install an extension to directly open a command prompt from the Solution Explorer like the one from Mads Kristensen.
-
Type the following command and hit Enter. This initializes a local git repository in the solution's folder:
git init
-
Next, type the following command and hit Enter (note the dot (.) at the end). This adds all the solution's files to the Git staging area:
git add .
-
Next, enter the following command and hit Enter again. This packages all the pending files added by git add in a single commit called Initial Commit:
git commit -m "Initial commit"
-
To link your remote git repository at GitHub.com to your local repository execute the following command, replacing YourAccount/YourRepoName with your GitHub's user name and repository name. This is the URL you captured in the previous section when creating the remote repository.
git remote add origin https://github.com/YourAccount/YourRepoName
-
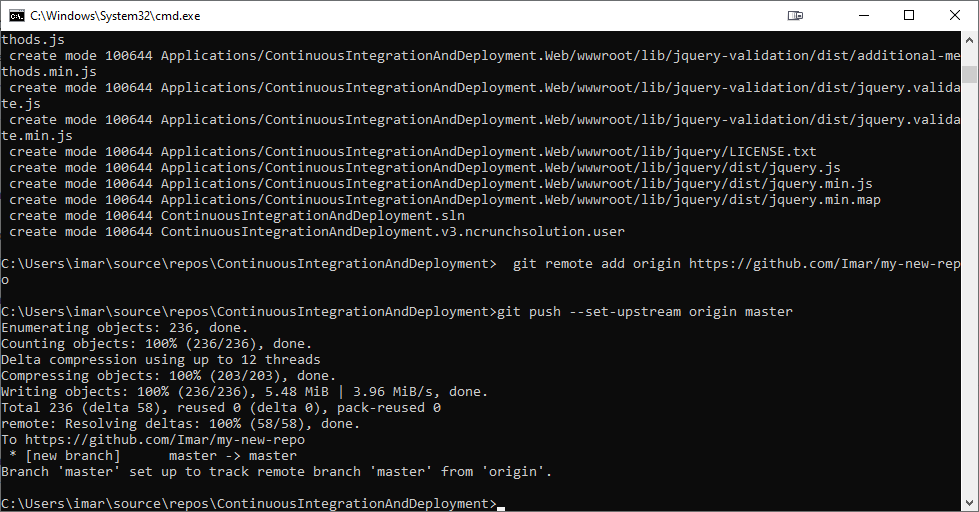
Finally, execute the command below. This completes the link between your local and remote git repositories which git needs in order to figure out what needs to be synchronized between the two. It then pushes the pending commits (1, in my example) to the remote repository.
git push --set-upstream origin master
When it all worked out as expected, you should see something like the following:
And if you to go your GitHub repository you should see all the files of your solution:
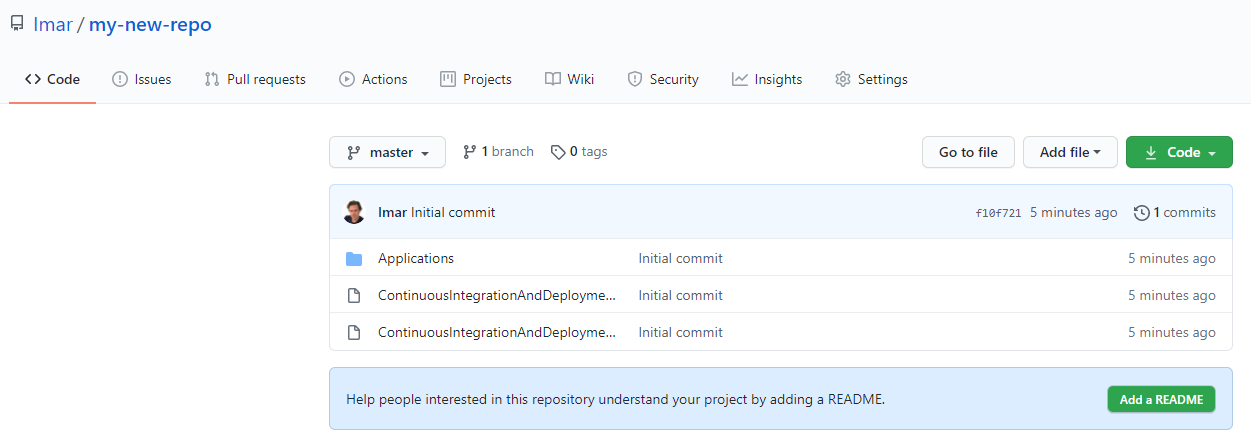
That's it; your local repository is now linked to the remote which means you can now easily synchronize changes between your local system and the remote GitHub repository. Later in this article you see how to make further changes and send them to the remote.
If you don't like the command line, you can also use the tools built into Visual Studio, as follows:
-
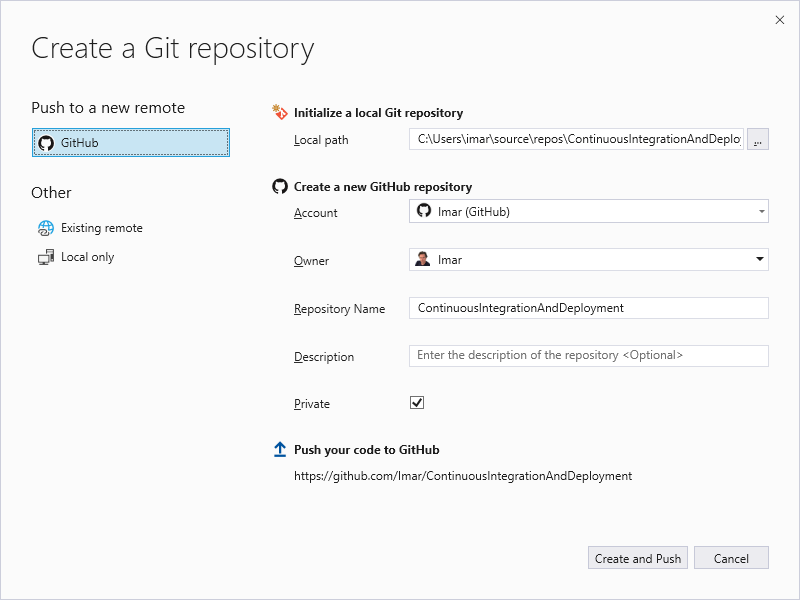
Right-click the solution and choose Create Git Repository. Depending on your version of Visual Studio, this may be called Publish to Git Service instead. If you don't see either option, check under Tools | Options | Environment | General | Preview Features and see if a preview feature called New Git user experience is turned on. For more information about this feature, take a look here at this Microsoft article.
From this screen you can create a new remote repository by entering your account data and a suggested repo name:
![]()
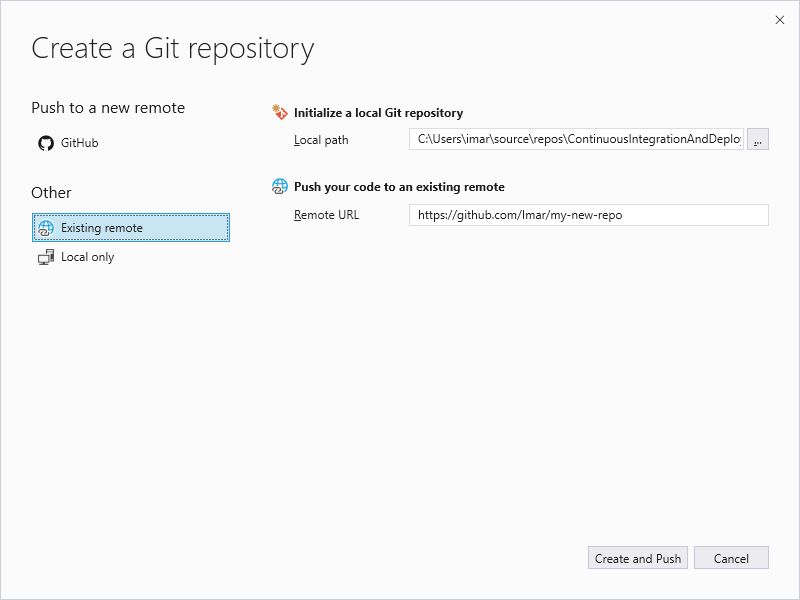
Since I already created the repository on GitHub, I switched to the Existing remote tab and entered the URL of my remote GitHub repository and hit Create and Push:
![]()
-
After a short while your source is then visible in GitHub, just as with the command line option.
Regardless of how you added your code to GitHub, Visual Studio now shows that your projects are backed by source control with the lock icons in front of the files:
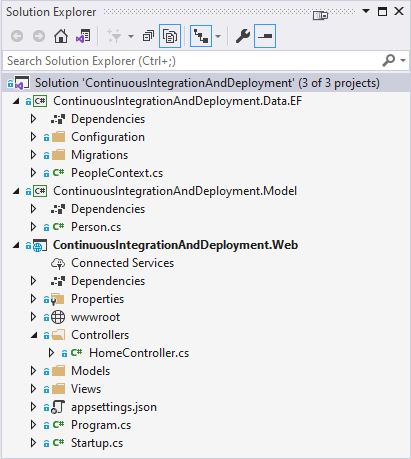
When you make changes to your code, these icons will change to indicate you have changes that haven't been committed yet. I'll briefly touch on this in the next section.
Making changes to your model
So far you've seen some fairly basic operations: create a new web site, add a model project, configure Entity Framework and show the data in an MVC controller. Simple or not, these operations form the basis of many ASP.NET Core applications.
Once the basics are done, you'll be making changes to your app. You'll add new pages and functionality, and ultimately you will also update your model. And that's where the trouble starts. When you make model changes - for example when you add a new entity, or add or rename properties for existing entities - your database schema also has to change. Traditionally EF solved this by allowing you to recreate the entire database from scratch which was fine on a development machine. For production scenarios you would use tools like Red Gate's SQL Compare to create a diff script between the locally generated database and the remote one. Then when you are ready to deploy your code you would also run the update scripts to bring the production database in sync with the code. Other alternatives exist also, such as a SQL Sever Database project using dacpacs.
Fortunately, EF Migrations are now a good alternative as well. You've seen them briefly at work in the previous article in this series when the database was created, but overall the flow is as follows:
- You make changes to your code and model.
- At certain times (for example when a feature is nearing completion) you run the command "Add-Migration" and specify a name. With this command, EF records the changes between the last migration and the current state of the model and generates C# code that, when executed updates the target database.
- When you're ready to update your database, you execute the command "Update-Database". This looks in the __EFMigrationsHistory table in your database to find the last executed migration and then executes the ones that have been added since. This way, you can pick any version of your app and database model and update the database to the latest version. While applying the changes, it also records the migrations that have been executed in __EFMigrationsHistory.
The good news is that it's also possible to do this during deployment. In an Azure pipeline you can execute command line tools to grab the SQL for the migrations and apply them to the database. I'll wrap up this article by showing some more model changes and how to apply them to your local database. In the next part you then see how to generate and persist the SQL during the build, and in part 5 and 6 you'll see how to run those scripts against your database to update it to the latest version during the release.
To put the previous list of steps into practice, I'll make a few more changes to my model and update the database.
I started by adding a DateOfBirth column to the database. Since I can't invent birth dates for existing records, it's best to make this column nullable so I added the following to the Person class.
public DateTime? DateOfBirth { get; set; }Next I added a new, required field called HasRegistered to the Person class:
public bool HasRegistered { get; set; }Let's say that for the sake of this discussion previously added people don't need to register anymore. That means that the property HasRegistered should default to false (which it will with the code above), but during the migration you want exiting records to be updated to true. You can implement this by manually changing the code for the migration as you'll see shortly.
And finally, let's say that the max length for first name should be 40 and that of the last name 60. This means you need to update the PersonConfiguration class as follows:
public void Configure(EntityTypeBuilder
builder) { builder.Property(x => x.FirstName).IsRequired().HasMaxLength(40); builder.Property(x => x.LastName).IsRequired().HasMaxLength(60); } - With the code changes in place, I ran Add-Migration "Update Person". This generated a migration file like this:
protected override void Up(MigrationBuilder migrationBuilder)
{
  migrationBuilder.AlterColumn<string>(
    name: "LastName",
    table: "People",
    type: "nvarchar(60)",
    maxLength: 60,
    nullable: false,
    oldClrType: typeof(string),
    oldType: "nvarchar(50)",
    oldMaxLength: 50);
  migrationBuilder.AlterColumn<string>(
    name: "FirstName",
    table: "People",
    type: "nvarchar(40)",
    maxLength: 40,
    nullable: false,
    oldClrType: typeof(string),
    oldType: "nvarchar(50)",
    oldMaxLength: 50);
  migrationBuilder.AddColumn<DateTime>(
    name: "DateOfBirth",
    table: "People",
    type: "datetime2",
    nullable: true);
  migrationBuilder.AddColumn<bool>(
    name: "HasRegistered",
    table: "People",
    type: "bit",
    nullable: false,
    defaultValue: false);
}
Note that when you run this against the existing code, you get the following warning messages:
An operation was scaffolded that may result in the loss of data. Please review the migration for accuracy.
You get this because the first name column went from a max length of 50 to a max length of 40. Any records with a name longer than 40 characters will lose their tail end.
- In order for the existing records to
be updated with HasRegistered set to true, you might be tempted to change the migration code as follows:
migrationBuilder.AddColumn<bool>(
    name: "HasRegistered",
    table: "People",
    type: "bit",
    nullable: false,
defaultValue: true);
This works well for the existing records. However, this also changes the default value for the column in SQL Server. This in turn means that records that are added outside your application (where HasRegistered defaults to false) will have a value of true for this column This is probably not what you want. A better solution is to update the existing records only using some SQL code after all the other migration code has executed. At the end of the Up method, after the code that creates the HasRegistered column, I added this:
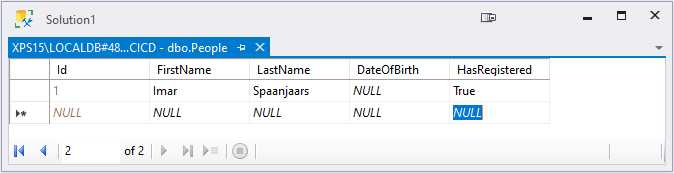
migrationBuilder.Sql("UPDATE People SET HasRegistered = 1");This gives me the best of both worlds; when I now execute Update-Database, the new column is added and all existing records are updated to have a value of true. But new records added without an explicit value for HasRegistered will now be created with a default value of false.
![]()
Making changes to the application
With the model and database updated, the final step is updating the application to use some of these fields. In this demo, I am just adding DateOfBirth to the PersonDto:
public class PersonDto
{
  public int Id { get; set; }
  public string FirstName { get; set; }
  public string LastName { get; set; }
public DateTime? DateOfBirth { get; set; }
}
Next, I updated the code in the controller that maps from a Person to a PersonDto:
public IActionResult Index()
{
  var people = _peopleContext.People.OrderByDescending(x => x.Id).Take(10);
  var data = people.Select(x => new PersonDto
  {
    Id = x.Id,
    FirstName = x.FirstName,
    LastName = x.LastName,
DateOfBirth = x.DateOfBirth
  }).ToList();
  return View(data);
}
and finally I updated the view to ouput the new column.
<span>@person.FirstName @person.LastName @person.DateOfBirth</span><br />
The homepage now displays something like this:
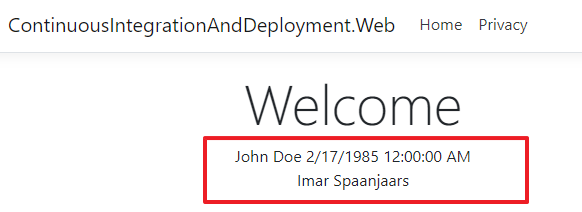
Note how it shows nothing for my date of birth as I didn't add one to the record after adding in the new column. But it does show up for John's record as I added one to the database.
Commiting to Git
The final step is to commit all your changes to git and sync them to GitHub. You can do this at the command prompt or with Visual Studio.
Committing to Git with the command prompt
- Open a command prompt in your solution's folder as you saw how to do earlier.
- Type git status and press Enter. Technically, this isn't needed but I always do this before executing any Git command just to know what the current status is. You should see a list of files that have been added and changed since the last commit.
- Type git add . (that last character is a dot) and press Enter. This adds all pending files to the git staging area.
- Type git commit -m "Updated model" and press Enter. This packages all your changes into a single Git commit.
- Finally, type git push and hit Enter to send the changes to GitHub.
Note: if you're working in a team, before you run git push you want to call git pull to get all the latest changes from other developers from GitHub.
Committing to Git using Visual Studio
You can also commit your changes from within Visual Studio. How exactly you can see which files have changed depends on your setup and configuration, but it should be one of the following:
- Right-click on your solution and then choose Git | Commit or stash changes.
- Choose View | Git changes
- Choose View | Team Explorer. Then click the Home button on the Team Explorer's toolbar and then choose Changes.
Regardless of how you got at the screen with the changed files, you can now enter a commit message and then commit and sync. Here's how it looks for me:
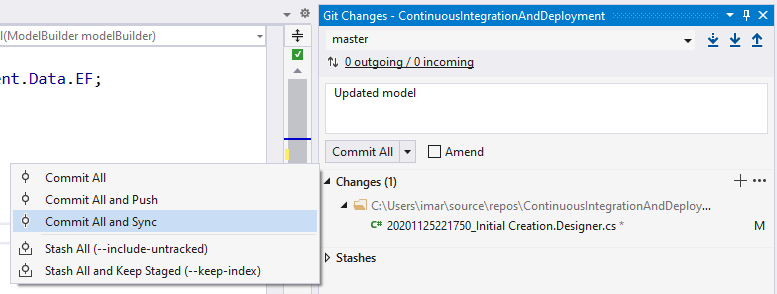
Once it's done with the sync, your changes should show up in GitHub.
Now that the application is done and you can manage changes to the model and code with EF Migrations, Git and GitHub, it's ready for the next step: continous integration using a DevOps build pipeline. This is the topic of the next article in this series.
Where to Next?
Wonder where to go next? You can read existing comments below or you can post a comment yourself on this article.
Links in this Document
| Doc ID | 620 |
| Full URL | https://imar.spaanjaars.com/620/building-and-auto-deploying-an-aspnet-core-application-part-3-dealing-with-change |
| Short cut | https://imar.spaanjaars.com/620/ |
| Written by | Imar Spaanjaars |
| Date Posted | 02/21/2021 15:13 |
Talk Back! Comment on Imar.Spaanjaars.Com
I am interested in what you have to say about this article. Feel free to post any comments, remarks or questions you may have about this article. The Talk Back feature is not meant for technical questions that are not directly related to this article. So, a post like "Hey, can you tell me how I can upload files to a MySQL database in PHP?" is likely to be removed. Also spam and unrealistic job offers will be deleted immediately.
When you post a comment, you have to provide your name and the comment. Your e-mail address is optional and you only need to provide it if you want me to contact you. It will not be displayed along with your comment. I got sick and tired of the comment spam I was receiving, so I have protected this page with a simple calculation exercise. This means that if you want to leave a comment, you'll need to complete the calculation before you hit the Post Comment button.
If you want to object to a comment made by another visitor, be sure to contact me and I'll look into it ASAP. Don't forget to mention the page link, or the Doc ID of the document.