Building and auto-deploying an ASP.NET Core application - Part 2 - Creating the web application
This is part 2 in a series of 7 articles showing you how to build a database-driven ASP.NET Core 5.0 app and deploy it to a remote web server using continuous integration and deployment with GitHub and Azure DevOps. In this part I'll show you how to set up the basic application, add a model that uses Entity Framework Core 5.0 to persist data to the database and how to create to the initial database.
Note: if you like to purchase the entire series now and not wait for the remaining parts to come online, check out this blog post that explains how you can purchase it for only $8.
If you haven't read the first part of this series you're encouraged to do that now. Here's the full list of the articles in the series:
- Introduction
- Creating the web application (you're reading it now)
- Using GitHub and managing change in your application
- Setting up a CI Pipeline in Azure DevOps
- Setting up a CD pipeline: Deploying with web deploy to a Virtual Machine or on-premises server
- Setting up a CD pipeline: Deploying to an Azure App Service
- Improving your builds with a custom build agent and Azure Deployment Slots
Introduction
The app I'll be creating for this article series will be super simple; all it does is show some data from a database on the home page. However, from a setup perspective, I'll try to use as many real-world concepts as possible. For example, I'll place the model and the EF persistence logic in different class libraries. From a separation of concerns point of view, that's a good idea, but it does introduce some challenges when automatically building and testing your application. I'll address these challenges in the remainder of this artice series.
The app I'll build in this and future article looks as follows:

You can also find its full source on GitHub here: https://github.com/Imar/Articles.CICD
In the next sections, you'll see how to do the following:
- Create a basic ASP.NET Core 5.0 web application
- Add class libraries for your data model and database persistence using Entity Framework Core
- Configure your model and database using IEntityTypeConfiguration
- Inject an EF DbContext into your controllers
- How to create and update the database using EF's migration features
- Run the application and confirm it's displaying the data from the database
Note: Since this article series focuses on CI/CD, the application doesn't have many features; the only thing it does is display some data from a database table using an Entity Framework DbContext.
Creating the basic application skeleton
In the following steps you see how to create a basic ASP.NET Core application.
- Fire up Visual Studio 2019 (any edition, including the free Community Edition, is fine). I am using version 16.8.3 which was the most recent released version in December 2020.
-
On the start screen click Create a new project and then create a new, blank solution (search for blank in the Search box). By creating a blank solution you get a bit more control over where files and folders are placed. Give your solution a name and place it in a folder on your local disk. I called mine ContinuousIntegrationAndDeployment and placed it in C:\Users\imar\source\repos:
![]()
-
With the solution created in Visual Studio, right-click it in the Solution Explorer and choose Add | Add new project. Choose ASP.NET Core Web Application and click Next. Give the app a name and place it in a subfolder of the main solution folder called Applications. I called mine ContinuousIntegrationAndDeployment.Web and placed it in C:\Users\imar\source\repos\ContinuousIntegrationAndDeployment\Applications. By placing these projects in a sub folder called Applications it's easier to separate your main application code from other stuff such as unit tests as you'll see later.
-
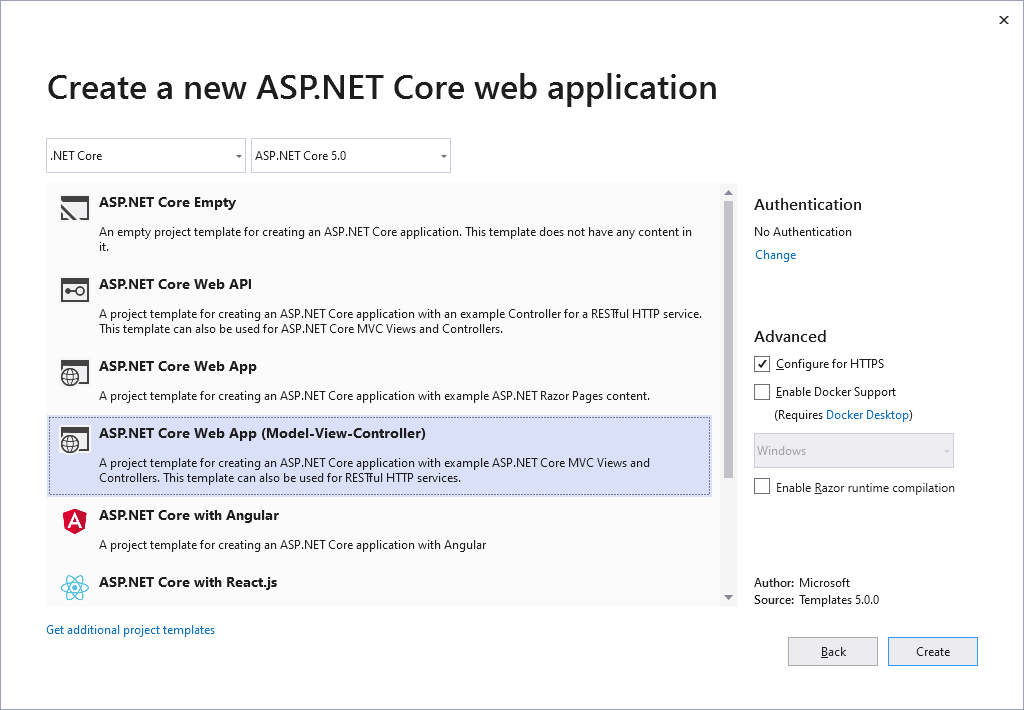
Click Create to go to the Create a new ASP.NET Core web application screen. Choose ASP.NET Core Web App (Model-View-Controller). Make sure that at the top you select .NET Core and ASP.NET Core 5.0 as the selected framework:
![]()
Finally, click Create.
-
You should now have the full application's code in Visual Studio ready to run. To see the app, hit Ctrl+F5 to start without the debugger attached. You see the standard ASP.NET default application show up.
In the next section I'll add new projects to host the model and Entity Framework code. Although I could add this directly to the main Web project, it's a best practice to separate those out in individual projects. This will make managing your solution a lot easier especially when your application grows. And even though this article series focuses on the build and CI/CD process, I want to make the demo project real enough to ensure I run into some challenges later as you'll run into them as well with your own projects.
Adding a Model and Entity Framework
Next you'll see how to add class libraries, packages and code for the application's model and Entity Framework functionality. I won't explain every step in detail so if you feel you're not sure how I did something, check out the code for this project in its GitHub repository.
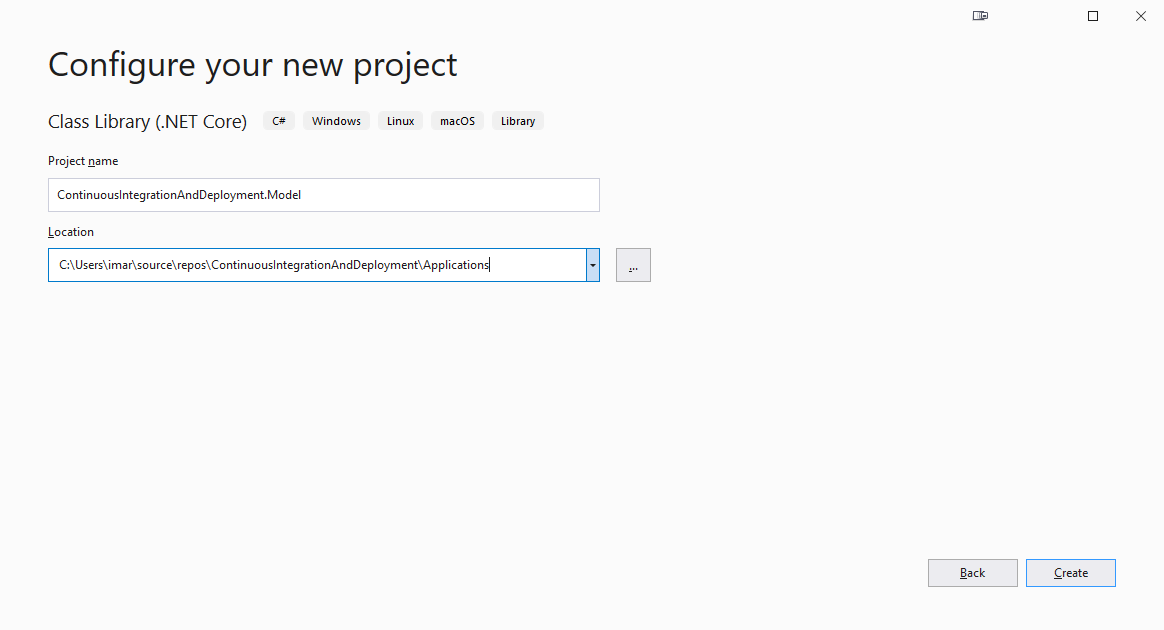
In Visual Studio, right-click your solution, click Add | New Project, choose Class Library (.NET Core), name it ContinuousIntegrationAndDeployment.Model and place it in the Applications folder:
![]()
-
Click Create to create the project on disk and add it to your solution.
-
Right-click the newly added project, choose Properties, and if needed, set the Target framework to .NET 5.0 and then save your changes
![]()
-
Delete the standard file Class1.cs from the project.
-
Repeat the last four steps but now add a project called ContinuousIntegrationAndDeployment.Data.EF. This project will contain the Entity Framework specific code to handle persistence and configuration of your model classes.
-
In the model project add a new C# class file and create a class called Person. Add some properties for an ID, a first name and a last name, like this:
namespace ContinuousIntegrationAndDeployment.Model
{
  public class Person
  {
    public int Id { get; set; }
    public string FirstName { get; set; }
    public string LastName { get; set; }
  }
}
Note: I don't want to repeat myself but it's important to understand this demo is about CI/CD and not about EF or model design in general. In the apps I usually design, I would have a base Entity class that handles stuff like the identity. I would probably also create more DDD-style classes with read-only properties and constructors and methods to deal with those classes. If you want to learn more about the topic of DDD, check out these PluralSight courses:
- Domain-Driven Design Fundamentals
- Domain-Driven Design in Practice
- DDD and EF Core: Preserving Encapsulation
-
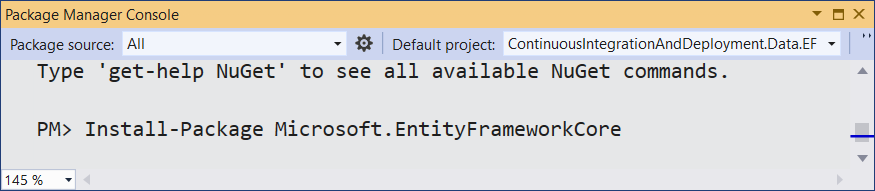
Next it's time to add some EntityFramework packages and a DbContext to the EF project. Open up the Package Manager Console and execute the following commands against the ContinuousIntegrationAndDeployment.Data.EF project:
Install-Package Microsoft.EntityFrameworkCore
Install-Package Microsoft.EntityFrameworkCore.SqlServer // To store the application's data in SQL Server
Install-Package Microsoft.EntityFrameworkCore.Tools     // For PowerShell commands like Add-Migration
Install-Package Microsoft.EntityFrameworkCore.Design    // Design-time components for the Core tools
![]()
-
Next, open the project file for the EF project and add the following highlighted line to the PropertyGroup element:
<PropertyGroup>
  <TargetFramework>net5.0</TargetFramework>
<GenerateRuntimeConfigurationFiles>True</GenerateRuntimeConfigurationFiles>
</PropertyGroup>
You may also have to remove this line from the ItemGroup for the Microsoft.EntityFrameworkCore.Design package (or just comment it out):
<PrivateAssets>all</PrivateAssets>.
You may need these changes to work around some issues with the DB Context being in a different class library. For more information, check out this StackOverlow post or this asp.net forums post. -
Next, still in the ContinuousIntegrationAndDeployment.Data.EF project, add a new class file called PeopleContext and add the following code to it:
using System.Reflection;
using ContinuousIntegrationAndDeployment.Model;
using Microsoft.EntityFrameworkCore;

namespace ContinuousIntegrationAndDeployment.Data.EF
{
  public class PeopleContext : DbContext
  {
    private readonly string _connectionString;

    public PeopleContext(string connectionString)
    {
      _connectionString = connectionString;
    }

    public DbSet<Person> People { get; set; }

    protected override void OnConfiguring(DbContextOptionsBuilder optionsBuilder)
    {
      optionsBuilder.UseSqlServer(_connectionString, b =>
           b.MigrationsAssembly("ContinuousIntegrationAndDeployment.Data.EF"));
    }

    protected override void OnModelCreating(ModelBuilder modelBuilder)
    {
      modelBuilder.ApplyConfigurationsFromAssembly(Assembly.GetExecutingAssembly());
    }
  }
}
This defines a new Entity Framework DB context to work with instances of the Person class created earlier. There are a few things worth calling out:
- The class has a public constructor that takes in a connection string and then uses that to configure SQL Server. You'll see how the connection string is injected later on.
- The class overrides OnConfiguring and then specifies which assembly is being used for EF Migrations. You'll see why this is needed in the next article in the series.
- Finally, the code overrides OnModelCreating and calls ApplyConfigurationsFromAssembly. You'll see why this is next.

Configuring your database
Entity Framework has some really good default conventions to help build a database from your model. For example, with the Person class I showed earlier, you get a database definition that looks like this:
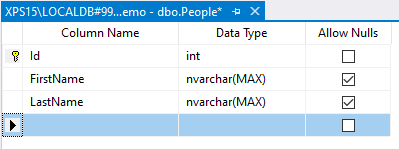
The table is named People (inferred from the DbSet in the DbContext), and Id is created as an int and set as the table's identity as a convention. Other columns, such as the first and last name, are inferred as optional strings with a very large maximum length. That's probably not what you want, so you can control that through code. I often see code examples where this is done directly in the DbContext, in the OnModelCreating method to be exact. Here's a quick example that would rename the table and make first and last name required and give them a maximum length:
protected override void OnModelCreating(ModelBuilder modelBuilder)
{
  var contactsEntity = modelBuilder.Entity<Person>().ToTable("Contacts");
  contactsEntity.Property(x => x.FirstName).IsRequired().HasMaxLength(50);
  contactsEntity.Property(x => x.LastName).IsRequired().HasMaxLength(50);
  ... // Configuration for other entities here.
}
Although this works fine, it becomes messy pretty quickly if you have a large model with many entities. EF Core has a nice way to separate out this logic to individual classes (one per entity) which you can then apply to the context dynamically. All you need to do is create a class that implements the IEntityTypeConfiguration<T> interface where T is your entity type and then add your configuration logic to the Configure method.
In my sample project I have a class called PersonConfiguration (I follow the convention EntityNameConfiguration for these classes) that looks as follows:
using ContinuousIntegrationAndDeployment.Model;
using Microsoft.EntityFrameworkCore;
using Microsoft.EntityFrameworkCore.Metadata.Builders;

namespace ContinuousIntegrationAndDeployment.Data.EF.Configuration
{
  public class PersonConfiguration : IEntityTypeConfiguration<Person>
  {
    public void Configure(EntityTypeBuilder<Person> builder)
    {
      builder.Property(x => x.FirstName).IsRequired().HasMaxLength(50);
      builder.Property(x => x.LastName).IsRequired().HasMaxLength(50);
    }
  }
}
This code accomplishes the same: it makes first and last name required and sets the maximum column length to 50. (It doesn't rename the table as I am fine with the current People name, but I could just as easily have renamed it in the PersonConfiguration class like this:
builder.ToTable("Contacts");To automatically apply all the configurations in the EF project, my DbContext has the following code:
protected override void OnModelCreating(ModelBuilder modelBuilder)
{
  modelBuilder.ApplyConfigurationsFromAssembly(Assembly.GetExecutingAssembly());
}
This picks up all classes that implement IEntityTypeConfiguration<T> and calls their Configure method. If your configurations are located in another assembly or they are spread over multiple assemblies, you can specify that other assembly and/or call ApplyConfigurationsFromAssembly multiple times.
For now, this completes the model and persistence layer. I'll revisit this later in this article when creating the actual database.
Next up is consuming the EF DbContext in the web project.
Setting up the web project
For the web project to use the EF DbContext, a few things are needed:
- A connection string pointing to a SQL Server
- The DbContext needs to be registered as a dependency with the dependency injection (DI) framework
- The DbContext needs to be injected into a controller so it can be used to access data in the database
Adding connection strings
In ASP.NET Core, you can add connection strings to your main appsettings.json file. as follows:
{
  "ConnectionStrings": {
    "ConnectionStringNameHere": "Server=(localdb)\\mssqllocaldb;Database=CICD;
                      Trusted_Connection=True;MultipleActiveResultSets=true",
  },
  ...
}
You can then call GetConnectionString on an IConfiguration instance to retrieve the value from the config file like this Configuration.GetConnectionString("ConnectionStringNameHere"). You'll see a concrete example of this shortly.
The sample application contains the above connection string to point to a local SQL Server instance called (localdb)\mssqllocaldb targeting a database called CICD.
Note: if you're new to the configuration system in ASP.NET Core, check out these links:
- https://docs.microsoft.com/en-us/aspnet/core/fundamentals/configuration/?view=aspnetcore-5.0
- https://www.pluralsight.com/courses/dotnet-core-aspnet-core-configuration-options
Add the PeopleContext to the DI framework
In an ASP.NET application you typically want a single insance of a DbContext per request. This way you can retrieve data from multiple places without the overhead of instantiating multiple contexts. The same is true for updates: by having a single instance throughout the request, you can make multiple updates to your data which would all be saved at once.
To make the DbContext available to your code, for example, in a Controller, follow these steps:
- Right-click the web project, and choose Add | Project reference. Select the project that contains your DbContext (ContinuousIntegrationAndDeployment.Data.EF in my case)
-
Open Startup.cs, locate the ConfigureServices method and add the following line of code, updating the name of your context and connection string as needed:
services.AddScoped(s => new PeopleContext(Configuration.GetConnectionString("PeopleContext")));
I use AddScoped and provide information on how to construct the context with a connection string here. You could also use services.AddDbContext and use the options to specify you want to use SQL Server and specify the connection string like this:
However, I like to call UseSqlServer within my EF Context as I am sure I don't want to switch databases on this project so I like to have the context define which database engine to use.services.AddDbContext<PeopleContext>(s => s.UseSqlServer(Configuration.GetConnectionString("PeopleContext")));
Using the context in the Web project
The next and final step is using the DbContext inside the web application as I'll show next.
Note: I am injecting a DbContext directly into a controller. This works fine in my case, since this is an article about CI/CD and not EF. In some of my applications, I am also fine doing this if the application is small enough. In many other cases though, I would create and use repositories instead. The repositories receive a DbContext in their constructor and save the instance in a private variable for further usage. The controller then accepts the appropriate repository instead of a DbContext directly.
-
To display data from the context on a web page, it's a good idea to create separate DTOs (Data Transfer Objects) that contain the data you want to display. This means you don't have the expose your actual entity which is good for a variety of reasons including code maintainability, performance and security. To display people from the People set, I have created the following PersonDto in the web project's Models folder:
namespace ContinuousIntegrationAndDeployment.Web.Models { public class PersonDto { public int Id { get; set; } public string FirstName { get; set; } public string LastName { get; set; } } } -
I modified the HomeController to accept and receive an instance of my PeopleContext and save it in a private field:
public class HomeController : Controller { private readonly ILogger<HomeController> _logger; private readonly PeopleContext _peopleContext; public HomeController(ILogger<HomeController> logger, PeopleContext peopleContext) { _logger = logger; _peopleContext = peopleContext; } ... } -
And then I can use the context in the Index action method like this:
public IActionResult Index()
{
  var people = _peopleContext.People.OrderByDescending(x => x.Id).Take(10);
  var data = people.Select(x => new PersonDto
  {
    Id = x.Id,
    FirstName = x.FirstName,
    LastName = x.LastName
  }).ToList();
  return View(data);
}
Note: in this example I am manually mapping a Person to a PersonDto. This is OK for simple models, but becomes a maintenance problem really quickly with large models and applications. For your production sites, you're encouraged to look at https://automapper.org/ to handle mapping between entities and DTOs in a much more clever way.
-
Finally, I can update my view to output the data in the browser:
@model List<PersonDto>
@{
  ViewData["Title"] = "Home Page";
}

<div class="text-center">
  <h1 class="display-4">Welcome</h1>
  @foreach (var person in Model)
  {
    <span>@person.FirstName @person.LastName</span><br />
  }
</div>
If you try to run the application now, you're greeted with an exception. The reason for that error is that the database hasn't been created yet. I'll do that next.
Creating the database
Entity Framework comes with a Migrations feature that helps you manage change in your applications. Although I've had tons of problems with migrations in the past, it has gotten a lot better and is now in a state where I use it on more and more projects.
With migrations, you make changes to your application's model in Visual Studio and then use Add-Migration to create C# code with instructions to create database schema such as tables, columns and indexes. Then when the time comes to update the database, you run Update-Database which then executes the migration code and creates the initial database or updates an existing one. Since the Migration commands can be run at a command-line, you can also execute them during the build and release pipelines which means you can generate scripts and deploy them to your remote sites everytime a new build is released. You see how this works in parts 4, 5 and 6 of this series. For now, I'll show you how to run this locally to create a database on your development machine.
-
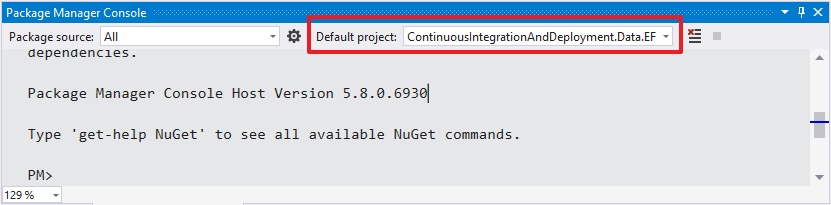
In Visual Studio, open the Package Manager Console and select the Data.EF project as the Default project:
![]()
Run the following command:
Add-Migration "Initial Creation"
The name of the migration - Initial Creation - can be anything; I like to give the migrations descriptive names like Initial Creation for the first setup, and then updates to the model describe my changes (like Add DateOfBirth To Customer, or Implement Account, etc.
If you get this error:
Your startup project 'WebApp' doesn't reference Microsoft.EntityFrameworkCore.Design.
This package is required for the Entity Framework Core Tools to work.
Ensure your startup project is correct, install the package, and try again.
make sure you have removed <PrivateAssets>all</PrivateAssets> from the EF .csproj file for the Microsoft.EntityFrameworkCore.Design package as mentioned earlier:
When the command is done, you should see a C# file with code like the following:<ItemGroup> <PackageReference Include="Microsoft.EntityFrameworkCore" Version="5.0.1" /> <PackageReference Include="Microsoft.EntityFrameworkCore.Design" Version="5.0.1">
<PrivateAssets>all</PrivateAssets><IncludeAssets>runtime; build; native; contentfiles; analyzers; buildtransitive</IncludeAssets> </PackageReference>protected override void Up(MigrationBuilder migrationBuilder) { migrationBuilder.CreateTable( name: "People", columns: table => new { Id = table.Column<int>(type: "int", nullable: false) .Annotation("SqlServer:Identity", "1, 1"), FirstName = table.Column<string>(type: "nvarchar(50)", maxLength: 50, nullable: false), LastName = table.Column<string>(type: "nvarchar(50)", maxLength: 50, nullable: false) }, constraints: table => { table.PrimaryKey("PK_People", x => x.Id); }); }-
Next, to apply the migration and create the database, run the following command:
Update-Database
You use the same command to update the existing database in subsequent migrations where the schema is changed.
-
To confirm the database is there, open SQL Server Management Studio, log in to your SQL Server and expand the database you specified in the connection stirng. Here's how that looked for me:
![]()
- Open the table and add one or more rows of data.
-
Then return to Visual Studio, hit Ctrl+F5 to start the app without debugging and then you should see the data you entered show up in the UI.
![]()

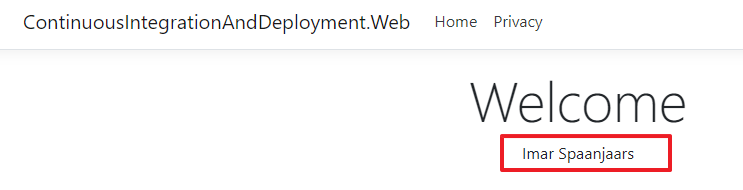
As I warned you before, the app isn't very exciting as all it does is display some columns from a database table. However, it lays a nice foundation to demonstrate setting up Git and CI/CD pipelines as you'll see in the next articles in this series.
Where to Next?
Wonder where to go next? You can read existing comments below or you can post a comment yourself on this article.
Links in this Document
| Doc ID | 619 |
| Full URL | https://imar.spaanjaars.com/619/building-and-auto-deploying-an-aspnet-core-application-part-2-creating-the-web-application |
| Short cut | https://imar.spaanjaars.com/619/ |
| Written by | Imar Spaanjaars |
| Date Posted | 02/03/2021 22:05 |
Talk Back! Comment on Imar.Spaanjaars.Com
I am interested in what you have to say about this article. Feel free to post any comments, remarks or questions you may have about this article. The Talk Back feature is not meant for technical questions that are not directly related to this article. So, a post like "Hey, can you tell me how I can upload files to a MySQL database in PHP?" is likely to be removed. Also spam and unrealistic job offers will be deleted immediately.
When you post a comment, you have to provide your name and the comment. Your e-mail address is optional and you only need to provide it if you want me to contact you. It will not be displayed along with your comment. I got sick and tired of the comment spam I was receiving, so I have protected this page with a simple calculation exercise. This means that if you want to leave a comment, you'll need to complete the calculation before you hit the Post Comment button.
If you want to object to a comment made by another visitor, be sure to contact me and I'll look into it ASAP. Don't forget to mention the page link, or the Doc ID of the document.