ASP.NET N-Layered Applications - Implementing a Web Forms 4.5 Frontend (Part 7)
Note: this is part seven in a series of ten. If you rather read this entire series off-line, you can buy the full series as a convenient PDF document that comes with the full source. Besides the convenience, buying the PDF will also make you feel good as it shows your appreciation for the articles and helps me pay the bills for my server and hosting so I can keep running imar.spaanjaars.com and continue to provide you with great content. For more details, check out this post that shows you how you can buy the entire series right now.
This is Part 7 in a series of 10 that show you how to build N-Layered applications using ASP.NET 4.5 and Entity Framework 5 Code First. In this part you’ll see how to build a Web UI using ASP.NET Web Forms and make use of the model and repository projects I have shown in the first five articles in this series.
If you haven’t read the earlier parts in this series yet, you’re encouraged to do so first. The following list has links to all articles in this series:
- Part 1 - Introduction
- Part 2 - Setting up the Solution in Visual Studio
- Part 3 - Making your Projects Unit Testable
- Part 4 - Implementing a Model
- Part 5 - Implementing a Repository using Entity Framework Code First
- Part 6 - Implementing an ASP.NET MVC 4 Frontend
- Part 7 - Implementing a Web Forms 4.5 Frontend
- Part 8 - Implementing a WCF 4.5 Frontend
- Part 9 – Importing Data Using the API
- Part 10 - Extensions, Tools and Wrapping Up
Introduction
ASP.NET Web Forms has been around for a long time (since early 2002), and it’s the framework of choice for a large number of developers around the world. Partially modeled after desktop applications, ASP.NET Web Forms applications are event driven and use a post back model where each (or at least most) pages post back to themselves.
In this article, I’ll show you how to use the repository and models created in the earlier parts of this series in an ASP.NET Web Forms application. I’ll cover the following topics:
- How to use the new Model Binding capabilities of ASP.NET 4.5 to access a repository.
- How to use the validation functionality of the model in the UI.
- How to use the Unit of Work pattern to save changes to the database as a batch.
- How to centralize creation of the repository and unit of work instances as an alternative to dependency injection you saw in Part 6.
This article is not meant as an introduction to ASP.NET Web Forms. If you’re new to Web Forms, I recommend checking out the following resources:
- Getting Started with Web Forms (http://www.asp.net/web-forms/overview/getting-started)
- My book Beginning ASP.NET 4.5 in C# and VB (Wrox, 2012) - http://www.amazon.com/Beginning-ASP-NET-4-5-C-VB/dp/1118311809/
- Professional ASP.NET 4.5 in C# and VB (Gaylord et. al. Wrox, 2013) - http://www.amazon.com/Professional-ASP-NET-4-5-C-VB/dp/1118311825/
In Part 2 of this article series you saw how to add the Web Forms project to the solution. I used the ASP.NET Web Forms Application template as the starting point which gives you a bunch of pages, a master file and some content files that define the global look and feel of the site. To make it easy to see what’s going on, I haven’t changed much in the original layout files that ship with a new ASP.NET Web Forms project. I made a few minor changes to align the design with the one from the ASP.NET MVC sample application, but that’s it. If you’re familiar with the ASP.NET Web Forms standard project, you’ll feel right at home.
In Part 1, I’ve provided a brief overview of the sample application and showed you a few screenshots. Here’s a brief recap of what the application can do. Remember: the purpose of this article series and this demo web site is to show you how to design an application from an architecture point of view. The demo does not feature a complete feature set (such as a fancy UI) as you would normally build in real-world web sites.
NOTE: these screenshots are similar to the ones from the article about ASP.NET MVC. I implemented the exact same functionality in both applications so you can see how to make use of the repositories in each application type.
When you start up the application you see the home screen with a short welcome text. When you click the People menu, you see all the contact people in the system with links to edit and delete them, and to manage their contact data:
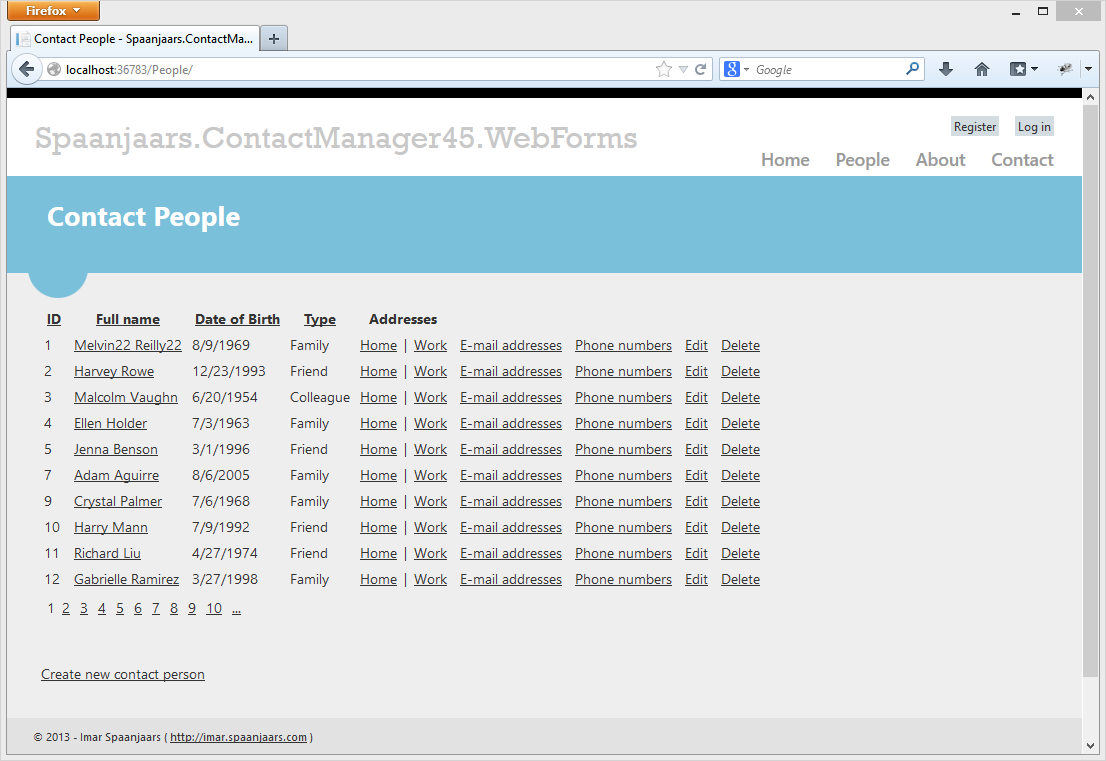
Figure 7-1 The Web Forms Site Showing all Contact People (click to enlarge)
When you click Edit for a contact person, you see the following page:
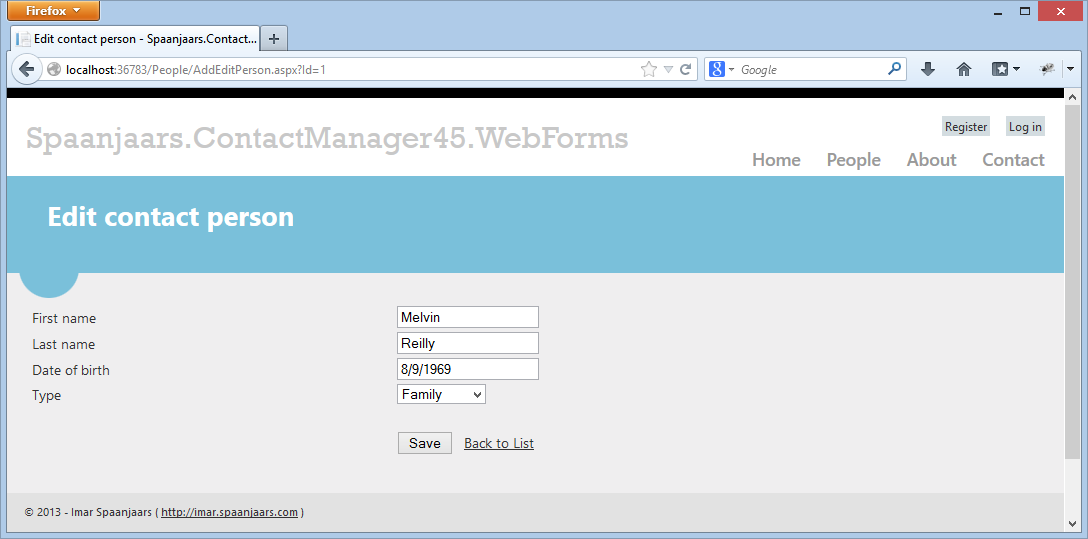
Figure 7-2 Editing a Single Contact Person (click to enlarge)
When you click one of the address links on the main People page (shown in Figure 7-1), you see a screen that lets you manage address details. In this case, the user already pressed the Save button and the validation (from the Address class in the Model project) kicked in:
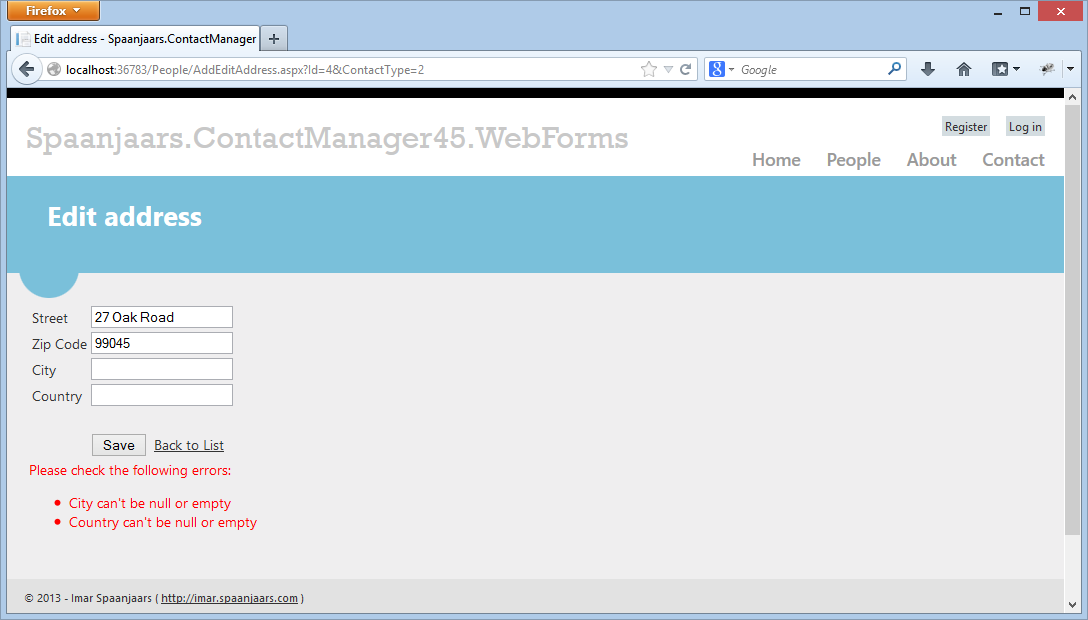
Figure 7-3 Validation at Work when Editing an Address (click to enlarge)
When you click the Email addresses or Phone numbers link in the main list of People (shown in Figure 7-1), you see a list of associated contact records for that person:

Figure 7-4 Managing E-mail Addresses (click to enlarge)
From here, you can manage the existing data (edit and delete) as well as create new e-mail addresses for this user.
The About page provides more background on the application and the Contact page can be used to get in touch with me. The Register and Login links at the top come from the standard Web Forms template. They are fully functional, but not used in the sample application.
Under the hood, this Web Forms application uses the PeopleRepository targeting the Entity Framework for all data access. The list of people is retrieved using FindAll, a details page uses FindById, the insert pages use Add, and so on. To see how it all fits together, here’s the architecture diagram showing the Web Forms frontend application and how it’s related to the other components in the system:
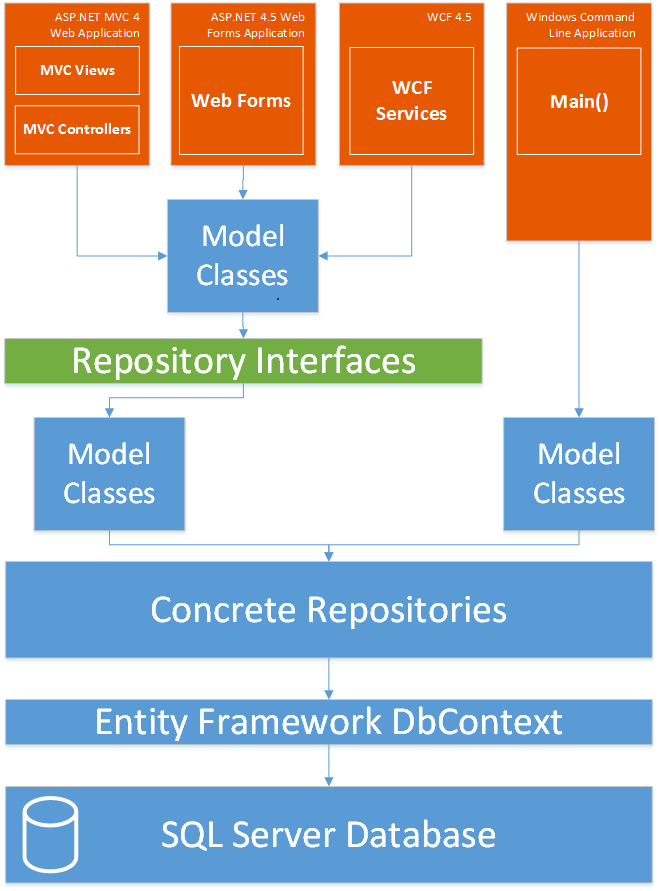
Figure 7-5 The Architecture Diagram (click to enlarge)
Since it’s pretty difficult today to unit test your ASP.NET Web Forms pages, I won’t attempt to decouple the Entity Framework based versions of the PeopleRepository and UnitOfWork and the Web Forms. However, I will centralize the creation of these classes using a factory method so you only have one place where these classes are instantiated. This makes it easy to use another repository implementation if you choose so.
I’ll use the new Model Binding capabilities introduced in ASP.NET 4.5 for all my data access as you’ll see in the next section.
Building the Pages to Manage Contact People and Related Data
If you’ve worked with model binding in ASP.NET 4.5 Web Forms before, the following sections will look very familiar to you. If you’re new to model binding, be sure to check out the following resources first:
- http://blogs.msdn.com/b/webdev/archive/2013/03/28/tutorial-series-on-model-binding-with-asp-net-web-forms.aspx
- http://www.codeguru.com/csharp/.net/net_asp/controls/using-model-binding-in-asp.net-data-controls.htm
With model binding, you don’t use the traditional data source controls to get data from a database and hand it over to a data-bound control. Instead, you create one or more methods to handle CRUD operations in your code behind, and then link your data-bound control to these methods using properties of the control. Here’s the markup of a rather simplified example that displays people in a GridView and lets you edit them:
<asp:GridView ID="GridView1" runat="server" DataKeyNames="Id"
     ItemType="Spaanjaars.ContactManager45.Model.Person" SelectMethod="FindAll"
     UpdateMethod="UpdatePerson" DeleteMethod="DeletePerson">
  <Columns>
    <asp:CommandField ShowDeleteButton="True" ShowEditButton="True" />
  </Columns>
</asp:GridView>
<asp:DetailsView ID="DetailsView1" runat="server"
     ItemType="Spaanjaars.ContactManager45.Model.Person" SelectMethod="FindAll"
     InsertMethod="InsertPerson" DefaultMode="Insert">
  <Fields>
    <asp:CommandField ShowInsertButton="True" />
  </Fields>
</asp:DetailsView>
Notice how the GridView and DetailsView together have four methods configured to support all CRUD operations: SelectMethod, UpdateMethod, DeleteMethod and InsertMethod.
These four methods are configured in the code behind and could look like this:
public IEnumerable<Person> FindAll()
{
  return RepositoryHelpers.GetPeopleRepository().FindAll();
}

public void InsertPerson()
{
  var person = new Person();
  TryUpdateModel(person);
  using (RepositoryHelpers.GetUnitOfWorkFactory().Create())
  {
    RepositoryHelpers.GetPeopleRepository().Add(person);
  }
}

public void UpdatePerson(int id)
{
  using (RepositoryHelpers.GetUnitOfWorkFactory().Create())
  {
    var person = RepositoryHelpers.GetPeopleRepository().FindById(id);
    TryUpdateModel(person);
  }
}

public void DeletePerson(int id)
{
  using (RepositoryHelpers.GetUnitOfWorkFactory().Create())
  {
    RepositoryHelpers.GetPeopleRepository().Remove(id);
  }
}
Each method works with the PeopleRepositiory (retrieved from the RepositoryHelpers class which you’ll see shortly) to get data from the database, and send changes back.
Note: this code serves only as an example; it’s missing some real-world validation and exception handling (although the model still takes care of the validation before entities are saved to the database) so you shouldn’t use this as-is. Instead, read on to see how to improve the situation with only a minimum amount of code.
The Web Forms project contains a People folder that has web forms to manage contact people and their associated contact details. Figure 7-6 shows the Solution Explorer for the project:
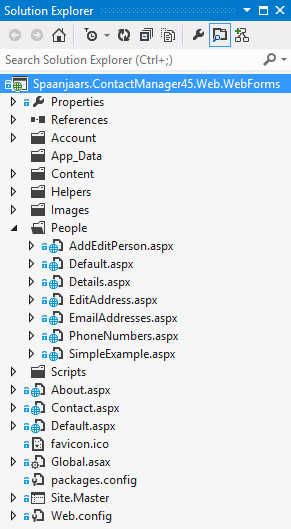
Figure 7-6 Solution Explorer for the Web Forms project
I’ll discuss the files in this folder in the next few sections.
List
As you saw at the beginning of the article, the application’s main page has a list of all the contact people in the system. The list is shown using the following code (inside /People/Default.aspx):
<asp:GridView ID="categoriesGrid" runat="server" AutoGenerateColumns="false"
    AllowSorting="true" AllowPaging="true" PageSize="10"
    ItemType="Spaanjaars.ContactManager45.Model.Person"
    SelectMethod="ListPeople" DeleteMethod="DeletePerson" GridLines="None"
    CellSpacing="5" EmptyDataText="No contact people found.">
  <Columns>
    <asp:BoundField DataField="Id" HeaderText="ID" SortExpression="Id" />
    <asp:HyperLinkField DataNavigateUrlFields="Id" HeaderText="Full name"
      SortExpression="FirstName" DataNavigateUrlFormatString="Details.aspx?Id={0}"
      DataTextField="FullName"></asp:HyperLinkField>
    <asp:BoundField DataField="DateOfBirth" HeaderText="Date of Birth"
         SortExpression="DateOfBirth" DataFormatString="{0:d}" />
    <asp:BoundField DataField="Type" HeaderText="Type" SortExpression="Type" />
    <asp:TemplateField HeaderText="Addresses">
      <ItemTemplate>
        <asp:HyperLink runat="server" NavigateUrl='
 <%# string.Format("EditAddress.aspx?Id={0}&ContactType=2", Item.Id) %>' Text="Home">
        </asp:HyperLink>
        |
        <asp:HyperLink ID="HyperLink1" runat="server" NavigateUrl='
 <%# string.Format("EditAddress.aspx?Id={0}&ContactType=1", Item.Id) %>' Text="Work">
        </asp:HyperLink>
      </ItemTemplate>
    </asp:TemplateField>
    <asp:HyperLinkField DataNavigateUrlFields="Id" HeaderText=""
       DataNavigateUrlFormatString="EmailAddresses.aspx?Id={0}" Text="E-mail addresses">
    </asp:HyperLinkField>
    <asp:HyperLinkField DataNavigateUrlFields="Id" HeaderText=""
       DataNavigateUrlFormatString="PhoneNumbers.aspx?Id={0}" Text="Phone numbers">
    </asp:HyperLinkField>
    <asp:HyperLinkField DataNavigateUrlFields="Id" HeaderText=""
       DataNavigateUrlFormatString="AddEditPerson.aspx?Id={0}" Text="Edit">
    </asp:HyperLinkField>
    <asp:CommandField ShowDeleteButton="True" />
  </Columns>
</asp:GridView>
There are a few important details in this code. First, the GridView is set up to get its data using ListPeople in its SelectMethod attribute. Likewise, DeletePerson will be called whenever a contact person needs to be deleted. Furthermore, the GridView is set up to use sorting and paging by the attributes AllowSorting and AllowPaging. Since the SelectMethod returns an IQueryable<T>, the control is able to figure how to do (efficient) paging and sorting, by executing the correct Skip, Take and OrderBy methods for you.
Note the attribute ItemType that is set to Spaanjaars.ContactManager45.Model.Person. This attribute is also new in ASP.NET 4.5 and enables you to strongly type your GridView to a specific model type. This allows you to do cool stuff like this:
<asp:HyperLink runat="server" NavigateUrl='
  <%# string.Format("EditAddress.aspx?Id={0}&ContactType=2", Item.Id) %>' Text="Home">
</asp:HyperLink>
Notice how this code refers to Item.Id to append the ID of the contact person to the navigation URL. You’ll get full IntelliSense support because Item – in this example – is a real Person type. This makes it a lot easier to configure your controls and make fewer mistakes. Item has BindItem as its counterpart for insert and update behavior as you’ll see later.
In the code behind, you find the ListPeople method that looks like this:
public IQueryable<Person> ListPeople()
{
  var repo = RepositoryHelpers.GetPeopleRepository();
  return repo.FindAll().OrderBy(x => x.Id);
}
This code retrieves a PeopleRepository from the RepositoryHelpers class. It then calls FindAll followed by a call to OrderBy to do an initial sort of the data. This is required because Entity Framework doesn’t support calling Skip and Take (which is what the GridView will call to support paging) on an unsorted set of data. The RepositoryHelpers is another poor men’s implementation of Dependency Injection and its code looks like this:
public static class RepositoryHelpers
{
  public static IPeopleRepository GetPeopleRepository()
  {
    return new PeopleRepository();
  }

  public static IUnitOfWorkFactory GetUnitOfWorkFactory()
  {
    return new EFUnitOfWorkFactory();
  }
}
I wrote this class to abstract the creation of instances of the IPeopleRepository and IUnitOfWorkFactory interfaces. The calling code (my ASPX pages) doesn’t know of the existence of concrete implementations like PeopleRepository in the EF project. All it needs to understand is the IPeopleRepository abstraction. This makes it easy to swap your EF PeopleRepository for another one (using NHibernate or some other data access technology): just reference the new type, change the type returned from the two methods inside the RepositoryHelpers class, and you’re done.
Since deleting entities is done in the same page, I’ll discuss that next.
Delete
For the GridView to support deleting using your repositories, all you need is a DeleteMethod in the code behind and a CommandField with its ShowDeleteButton property set to true. Then when you click the Delete link for an entity in the GridView, this code in the Code Behind is executed:
public void DeletePerson(int id)
{
  using (RepositoryHelpers.GetUnitOfWorkFactory().Create())
  {
    RepositoryHelpers.GetPeopleRepository().Remove(id);
  }
}
The GridView automatically passes the person’s ID to the method so deleting the entity is as simple as creating an instance of UnitOfWork, and then calling Remove on the PersonRepository.
If you look at the code for the GridView you see that the Full Name column links to a Details page. This page is discussed next.
Details
The frontend part of Details.aspx is pretty simple. I used an old skool <table> element to present some details of the person. Here’s an example of the row that shows the last name:
<tr>
  <td>Last name</td>
  <td>
    <asp:Label ID="LastName" runat="server"></asp:Label>
  </td>
</tr>
In code behind, these controls are given a value with this code:
public partial class Details : System.Web.UI.Page
{
  private int _personId;
  protected void Page_Load(object sender, EventArgs e)
  {
    string personIdAsString = Request.QueryString.Get("Id");
    if (string.IsNullOrEmpty(personIdAsString) || !int.TryParse(personIdAsString, out _personId))
    {
      Response.Redirect("~/");
    }
    LoadPerson();
  }

  private void LoadPerson()
  {
    var peopleRepository = RepositoryHelpers.GetPeopleRepository();
    var person = peopleRepository.FindById(_personId);
    if (person != null)
    {
      FirstName.Text = person.FirstName;
      LastName.Text = person.LastName;
      DateOfBirth.Text = person.DateOfBirth.ToString("d");
      Type.Text = person.Type.ToString();
    }
  }
}
The code in Page_Load ensures there is an ID for a person in the Query String and that it can be converted to an integer. If either condition fails, the user is sent back to the root of the site.
In the LoadPerson method, the code accesses the RepositoryHelpers to get a repository and then uses the familiar FindById method to find the requested person. If the person is found, its properties are used to populate the various controls on the page.
There’s no action for the situation where the person is not found, but it’s easy to add. Depending on your requirements, you could redirect to the list of people page, show an error page, or simply tell the user you can’t find the requested person by updating a Label or so. In the last case, you also want to send out a HTTP 404 (not found) error code to tell search engines to stop indexing the page:
Response.Status = "404 Not Found";
Response.StatusCode = 404;
Response.TrySkipIisCustomErrors = true;
With the list and details pages done, the next step is creating and editing contact people.
Create, Edit and Building DropDownList Controls from Enums
To create contact people, I chose a different implementation than for the contact records. For the contact people, I chose a concept I refer to as “hand coding data access”. It comes down to a bunch of regular input controls (text boxes, drop down lists etc.) whose values are used to fill an instance of, in this case, a Person. I prefer this solution over data-bound controls such as the DetailsView for complex pages. Rather than messing with the various insert and edit templates, you can have a single page that handles both. In the case of the contact manager, the page AddEditPerson.aspx looks like this:
<%@ Page Title="ContactManager" Language="C#" MasterPageFile="~/Site.Master"
AutoEventWireup="true" CodeBehind="AddEditPerson.aspx.cs"
Inherits="Spaanjaars.ContactManager45.Web.WebForms.People.AddEditPerson" %>
<asp:Content ID="Content1" ContentPlaceHolderID="HeadContent" runat="server">
<style type="text/css">
.auto-style1 {
width: 100%;
}
</style>
</asp:Content>
<asp:Content ID="Content2" ContentPlaceHolderID="FeaturedContent" runat="server">
</asp:Content>
<asp:Content ID="Content3" ContentPlaceHolderID="MainContent" runat="server">
<table class="auto-style1">
<tr>
<td>First name</td>
<td>
<asp:TextBox ID="FirstName" runat="server"></asp:TextBox>
</td>
</tr>
<tr>
<td>Last name</td>
<td>
<asp:TextBox ID="LastName" runat="server"></asp:TextBox>
</td>
</tr>
<tr>
<td>Date of birth</td>
<td>
<asp:TextBox ID="DateOfBirth" runat="server"></asp:TextBox>
</td>
</tr>
<tr>
<td>Type</td>
<td>
<asp:DropDownList ID="Type" runat="server" SelectMethod="GetTypes"
DataValueField="Value" DataTextField="Text">
</asp:DropDownList>
</td>
</tr>
<tr>
<td> </td>
<td>
<asp:Button ID="Button1" runat="server" OnClick="Button1_Click" Text="Save" />
<a href="Default.aspx">Back to List</a></td>
</tr>
</table>
<asp:ValidationSummary ID="ValidationSummary1" runat="server" ForeColor="Red"
ShowModelStateErrors="true" HeaderText="Please check the following errors:" />
</asp:Content>
This is pretty standard ASP.NET code: a table for layout (again, an old skool solution but fine for this demo) with standard ASP.NET controls. At the bottom of the table you see a DropDownList with a SelectMethod called GetTypes which you’ll see in a minute. The ValidationSummary at the end is used to show model errors that may occur when saving an entity.
In the Code Behind, Page_Load has the same defensive code as Details.aspx. However, this time it’s OK when no ID is passed to the page, as that means the page is used to create a new Person instead of editing an existing one. When there’s an ID, LoadPerson gets the person and fills the controls like this:
private void LoadPerson()
{
  var peopleRepository = RepositoryHelpers.GetPeopleRepository();
  var person = peopleRepository.FindById(_personId);
  if (person != null)
  {
    FirstName.Text = person.FirstName;
    LastName.Text = person.LastName;
    DateOfBirth.Text = person.DateOfBirth.ToString("d");
    Type.DataBind();
    var item = Type.Items.FindByValue(((int)person.Type).ToString());
    if (item != null)
    {
      item.Selected = true;
    }
  }
}
This is more or less the same as in the details page, except for the code that selects the person’s Type. In order to ensure the DropDownList for the type has all its items, the code first calls the DataBind method on the DropDownList for the Type property. This forces it to call the GetTypes method that looks like this:
public IEnumerable<ListItem> GetTypes()
{
  return Helpers.EnumToListItems<PersonType>();
}
The EnumToListItems method looks like this:
internal static IEnumerable<ListItem> EnumToListItems<T>()
{
  Type type = typeof(T);
  var result = new List<ListItem>();
  var values = Enum.GetValues(type);

  foreach (int value in values)
  {
    string text = Enum.GetName(type, value);
    result.Add(new ListItem(text, value.ToString().PascalCaseToSpaces()));
  }
  return result;
}
I have taken a slightly simpler approach than in the ASP.NET MVC version of the site. The code gets the type of the generic T parameter and feeds it into Enum.GetValues. This returns an array with the available options that the code loops over. I used the PascalCaseToSpaces method again to split and pascal case values and add spaces. I duplicated that code in both projects. In a real-world project, I would probably add another class library to the project, called Spaanjaars.Toolkit for example, move all this shared code into that project and then reference it from both UI projects.
When the Save button is clicked, the following code is executed:
protected void SaveButton_Click(object sender, EventArgs e)
{
  try
  {
    using (RepositoryHelpers.GetUnitOfWorkFactory().Create())
    {
      var repository = RepositoryHelpers.GetPeopleRepository();
      Person person;
      if (_personId == 0)
      {
        person = new Person();
        repository.Add(person);
      }
      else
      {
        person = repository.FindById(_personId);
      }

      person.FirstName = FirstName.Text;
      person.LastName = LastName.Text;
      person.DateOfBirth = Convert.ToDateTime(DateOfBirth.Text);
      person.Type = (PersonType)Enum.Parse(typeof(PersonType), Type.SelectedValue);
    }
    Response.Redirect("Default.aspx");
  }
  catch (ModelValidationException mvex)
  {
    foreach (var error in mvex.ValidationErrors)
    {
      ModelState.AddModelError(error.MemberNames.FirstOrDefault() ?? "",
                      error.ErrorMessage);
    }
  }
}
This code gets an existing person or creates a new one and adds it to the underlying data context using the repository’s Add method. It then gets the values from the controls and assigns them to the properties of the Person instance.
In this example, I am relying on model validation completely. So, only when EF rejects the values does the code show errors to the user. If you wanted to, you could call Validate on the Person and manually add validation errors to the ModelState object. You would need to do this outside the unit of work to avoid the changes being submitted to the database even though you know they are valid. Alternatively, you could call the Undo method on the unit of work to cancel all open changes.
The Create and Edit pages for e-mail addresses and phone numbers are implemented differently. Because the data is quite simple, I used the standard data-bound controls along with model binding. (Note: I could just as easily have applied the same principles as used for the AddEditPerson.aspx page; but I chose the built-in data controls to show you different ways to implement data-driven pages).
As an example, take a look at the InsertPhoneNumber method in the Code Behind of PhoneNumbers.aspx:
public void InsertPhoneNumber([QueryString("Id")] int personId, PhoneNumber phoneNumber)
{
  if (ModelState.IsValid)
  {
    try
    {
      using (RepositoryHelpers.GetUnitOfWorkFactory().Create())
      {
        var repo = RepositoryHelpers.GetPeopleRepository();
        var person = repo.FindById(personId, x => x.PhoneNumbers);
        var userNumber = new PhoneNumber { OwnerId = personId };
        TryUpdateModel(userNumber);
        person.PhoneNumbers.Add(userNumber);
      }
    }
    catch (ModelValidationException mvex)
    {
      foreach (var error in mvex.ValidationErrors)
      {
        ModelState.AddModelError(error.MemberNames.FirstOrDefault() ?? "",
               error.ErrorMessage);
      }
    }
  }
}
Although the phoneNumber parameter in the method isn’t used in the code, it’s important to have it there. Without it, model validation isn’t triggered and ModelState.IsValid returns true. With the parameter there, the model binder fills in the values coming from the form which in turn updates the IsValid state. So, if you omit the number or the type, the code in the if block won’t attempt to add the phone number to the user’s PhoneNumbers collection and shows the validation errors to the user with the ValidationSummary control. An alternative solution is to remove the parameter from the method’s signature and then rely on TryUpdateModel to set the value for IsValid. In this case, it’s important to carry out this check before you enter the using block of the unit of work or call the Undo method, otherwise the unit of work will still try to apply your changes.
The code also uses a try/catch block to catch and display any validation exceptions that may have been triggered by the EF data context.
Most of this code is pretty straightforward and similar to how you would do it without a repository and regular model binding. There’s one area that needs a bit more attention though: handling the enums in the GridView. To implement enum support in the GridView, you need the following steps:
- Create a TemplateField in the GridView for the ContactType.
- Inside the ItemTemplate, write out the text representation of the enum.
- Inside the EditItemTemplate, create a DropDownList control that shows the available options and preselects the correct item
- When the item is being saved, retrieve the value from the DropDownList and assign it to the item.
You’ll find the details of these steps in the next sections:
Create a TemplateField in the GridView for the ContactType.
This is simple to do: just remove the BoundField for the ContactType property and replace it with something like this:
<asp:GridView ID="PhoneNumbersGrid" runat="server" AutoGenerateColumns="False"
     ... Other code here. OnRowUpdating is used in step 4.
     OnRowUpdating="PhoneNumbersGrid_RowUpdating">
  <Columns>
    <asp:BoundField DataField="Id" HeaderText="ID" SortExpression="Id" ReadOnly="True" />
    ... Other fields here

    <asp:TemplateField HeaderText="ContactType" SortExpression="ContactType">

      ... templates go here

    </asp:TemplateField>

    ... Other fields here
  </Columns>
</asp:GridView>
Inside the ItemTemplate, Write Out the Text Representation of the Enum.
Inside the ItemTemplate, you can display the ContactType for an e-mail address with a Label. The following code does the trick:
<asp:TemplateField HeaderText="ContactType" SortExpression="ContactType">
  <ItemTemplate>
    <asp:Label ID="Label1" runat="server" Text='<%# Bind("ContactType") %>'></asp:Label>
  </ItemTemplate>
</asp:TemplateField>
When called, this displays the string representation of the enum, so it would display something like Personal or Business.
Inside the EditItemTemplate, Create a Drop-Down lList
The EditItemTemplate is a little trickier. When using plain integer values you would probably do something like this:
<EditItemTemplate>
  <asp:DropDownList runat="server" ID="ContactType"
     SelectedValue='<%# BindItem.ContactType) %>' SelectMethod="GetContactTypes"
     DataValueField="Value" DataTextField="Text">
  </asp:DropDownList>
</EditItemTemplate>
Unfortunately, this doesn’t work. The enum has a value (such as 0, 1, 2) which is different from the text that gets displayed. In the example above, the code would try to preselect an item by its text (like Personal) rather than by its value. My next attempt was to cast the value to an int. However, that means you can no longer use BindItem. For BindItem to work in two directions (to display and to edit a value) you need to use BindItem as-is. The final solution I came up with is this:
<EditItemTemplate>
  <asp:DropDownList runat="server" ID="ContactType"
     SelectedValue='<%# (int)(Item.ContactType) %>'
     SelectMethod="GetContactTypes" DataValueField="Value"
     DataTextField="Text"></asp:DropDownList>
</EditItemTemplate>
Notice how I am using Item rather than BindItem. Item is only used to display the value and does not try to bind the value again when the item is being edited. The cast to an int then ensures that the numeric value of the ContactType is returned which is exactly what’s needed to preselect the item in the DropDownList control. The effect of this is that the GridView is no longer able to use this data after a postback when the item needs to be changed. However, it’s easy to manually do this as you see next.
When the item is being saved, retrieve the value from the DropDownList and assign it to the item.
When the GridView is about to call the Update method, it fires its Updating event first. You can hook into this event, find the selected value of the ContactType DropDownList and assign it to the NewValues collection like this:
protected void EmailAddressesGrid_RowUpdating(object sender, GridViewUpdateEventArgs e)
{
  var typeDropDown = (DropDownList)
         EmailAddressesGrid.Rows[e.RowIndex].FindControl("ContactType");
  e.NewValues["ContactType"] = (ContactType)Convert.ToInt32(typeDropDown.SelectedValue);
}
The value you assign to the NewValues collection carries over to the data in the model binder, so by the time UpdateEmailAddress gets called, this value is available and assigned to the e-mail address that is about to be saved in the database.
This concludes the implementation of the ASP.NET 4.5 Web Forms site. There’s more code in the project than I have discussed here, but it’s either standard ASP.NET code that falls outside the scope of this article, or it is code similar to the code that I did present in this article.
Summary
In this article you saw how to implement a data-driven web site built with ASP.NET 4.5 Web Forms with model binding (new to ASP.NET 4.5) and using the repository and model projects created in earlier articles in this series. As you saw, it’s pretty straight forward to implement these pages using either the built-in data-bound controls, or using a more custom code oriented approach where you have more control over the code as shown in the AddEditPerson.aspx page.
Most of the code needed is standard ASP.NET code. In the Code Behind of the pages the various model binding methods make use of the repository and unit of work classes. To avoid instantiating these classes over and over again in all your ASPX pages, the RepositoryHelper class contains two factory methods that return an instance of the requested type. Should you ever want to use another repository (with a NHibernate or other ORM implementation for example), then all you need to update are these two helper methods.
Although MVC and Web Forms are probably the two most likely frontend implementations for an ASP.NET framework like this, there are other options as well. In the next article, you see how to expose (some of) your repository methods over a WCF service. In the article that follows you see how to build a command line tool to import existing data from other sources, such as a CSV file.
Stuff I Like to Do
- I only use the data-bound controls for simple data structures. E-mail addresses and phone numbers are good candidates as they only have a few properties. And even then you saw how difficult it can be to do relatively simple stuff as using an enum for one of the object’s properties. I use the “hand coded data access” pages for complex types such as Person. You recover the time spent on creating the initial UI controls by having to spend less time on duplicating the code in the Item and EditItem templates and on handling the many events of the data-bound and data source controls.
- Although not shown in this project, it’s easy (and recommended) to use UI frameworks like jQuery UI or Kendo UI. These frameworks make it easy to create good-looking UIs with little effort.
- I like to group files in the project by their type. In the sample project, I stored the two helper classes in the Helpers folder and all the Web Forms for managing contact people in the People folder. Although you could theoretically store everything in the root or pretty much anywhere else, I find that a structure like this makes it easier to find your files and maintain the application.
Downloads
Where to Next?
Wonder where to go next? You can post a comment on this article.
Links in this Document
| Doc ID | 579 |
| Full URL | https://imar.spaanjaars.com/579/aspnet-n-layered-applications-implementing-a-web-forms-45-frontend-part-7 |
| Short cut | https://imar.spaanjaars.com/579/ |
| Written by | Imar Spaanjaars |
| Date Posted | 10/22/2013 20:01 |
Comments
Talk Back! Comment on Imar.Spaanjaars.Com
I am interested in what you have to say about this article. Feel free to post any comments, remarks or questions you may have about this article. The Talk Back feature is not meant for technical questions that are not directly related to this article. So, a post like "Hey, can you tell me how I can upload files to a MySQL database in PHP?" is likely to be removed. Also spam and unrealistic job offers will be deleted immediately.
When you post a comment, you have to provide your name and the comment. Your e-mail address is optional and you only need to provide it if you want me to contact you. It will not be displayed along with your comment. I got sick and tired of the comment spam I was receiving, so I have protected this page with a simple calculation exercise. This means that if you want to leave a comment, you'll need to complete the calculation before you hit the Post Comment button.
If you want to object to a comment made by another visitor, be sure to contact me and I'll look into it ASAP. Don't forget to mention the page link, or the Doc ID of the document.