ASP.NET N-Layered Applications - Making your Projects Unit Testable (Part 3)
Note: this is part three in a series of ten. If you rather read this entire series off-line, you can buy the full series as a convenient PDF document that comes with the full source. Besides the convenience, buying the PDF will also make you feel good as it shows your appreciation for the articles and helps me pay the bills for my server and hosting so I can keep running imar.spaanjaars.com and continue to provide you with great content. For more details, check out this post that shows you how you can buy the entire series right now.
This is Part 3 in a series of 10 that show you how to build N-Layered applications using ASP.NET 4.5 and Entity Framework 5 Code First. In this part you’ll see how to make your solution unit testable. In addition, you’ll see how to setup a project for Integration tests which work similar to unit tests but that target the database directly.
If you haven’t read the earlier parts in this series yet, you’re encouraged to do so first. The following list has links to all articles in this series:
- Part 1 - Introduction
- Part 2 - Setting up the Solution in Visual Studio
- Part 3 - Making your Projects Unit Testable
- Part 4 - Implementing a Model
- Part 5 - Implementing a Repository using Entity Framework Code First
- Part 6 - Implementing an ASP.NET MVC 4 Frontend
- Part 7 - Implementing a Web Forms 4.5 Frontend
- Part 8 - Implementing a WCF 4.5 Frontend
- Part 9 – Importing Data Using the API
- Part 10 - Extensions, Tools and Wrapping Up
Note: as mentioned in Part 1, this article (and the previous) will contain a lot of hands-on, step by step instructions that show you how to setup a solution like the Spaanjaars.ContactManager application. You can use these instructions pretty much as-is for your own applications. The remaining parts in the series analyze the working code for the Spaanjaars.ContactManager application. I’ll show a lot of the code in detail, and explain how it works, but you won’t find detailed step by step instructions on how to add the code and files to the various projects.
Making Your Projects Unit Testable
To ensure a better quality of your software, it’s highly recommended to add unit tests to your projects. This way, you can test your code during development, minimizing the chance of introducing issues and finding and fixing them before they ever make it into production code. This article does not explain the need for unit testing in detail nor does it explain how to write good unit tests. For a good introduction into unit testing, check out the following references:
- The Art of Unit Testing (Roy Osherove, Manning Publications, 2009: http://www.amazon.com/Art-Unit-Testing-Examples-Net/dp/1933988274)
- http://msdn.microsoft.com/en-us/library/bb385902%28v=vs.90%29.aspx
- http://msdn.microsoft.com/en-us/library/hh694602.aspx
- http://geekswithblogs.net/thomasweller/archive/2011/02/21/an-introductory-presentation-about-testing-with-mstest-visual-studio-and.aspx
This article does, however, show you how to differentiate your types of tests (using different Test Projects in Visual Studio) and how to configure the solution so that the test projects can see the relevant assemblies in the solution. In many previous solutions I built, I use more than one test project, described in the following table:
| Type | Suggested name suffix | Description |
Unit |
Tests.Unit |
This project contains all the unit tests that don’t have a dependency on a database or the UI. In the sample application, it contains tests for model entity properties, model validation, and more. |
Integration |
Tests.Integration |
This test project contains integration tests that have dependencies to other components of the system, such as a database. In the sample project you find tests that use the Repositories.EF project to interact with a SQL Server database directly. |
Frontend |
Tests.Frontend.Mvc |
This test project contains tests that target the presentation layer. It could contain Coded UI tests and tests targeting the ASP.NET MVC controller framework. In the sample application you only find unit tests for MVC controllers but you could easily add more tests to this project. |
Frontend |
Tests.Frontend.Wcf |
This test project contains tests for the various service methods inside the WCF service project. |
In the next steps you’ll see how to add these four Test Projects to the solution. I am showing you how to add all four; one for each frontend application added to the solution in the previous article. If, however, your solution has fewer frontend implementations, only add the test projects for your particular frontend(s).
In order to better organize my solution, I prefer to group all my test projects in a Solution Folder called Tests. This is not required, but it makes it easier to get access to all your test projects at once, or hide them when you’re working on the actual code for the project.
- To add a Solution Folder for the tests, right-click the Solution in the Solution Explorer and choose Add | New Solution Folder. Name the folder Tests.
- Right-click this new Tests folder and choose Add | New Project. Select your preferred programming language and then, from the Test category, select Unit Test Project. Name the project Spaanjaars.ContactManager45.Tests.Unit and change the Location for the project to C:\Projects\Spaanjaars.ContactManager45\Main\Tests. By storing your test projects in the Tests folder you separate them from the actual implementation projects that are stored in the Applications folder. In the Target Framework drop-down list make sure .NET Framework 4.5 is selected.
This project is going to contain the core unit tests for the Contact Manager application.
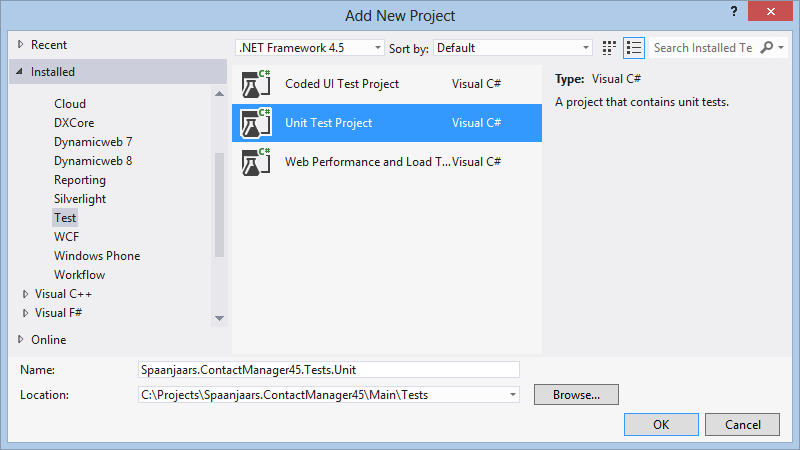
Figure 3-1 The Add New Project Dialog (click to enlarge)
- Click OK to add the project to the solution.
- Add another Unit Test Project to the Tests Solution Folder, name it Spaanjaars.ContactManager45.Tests.Integration and make sure it’s saved in the folder C:\Projects\Spaanjaars.ContactManager45\Main\Tests as well. This project will contain tests that are going to access the database directly.
- Add another Unit Test Project to the Tests Solution Folder, name it Spaanjaars.ContactManager45.Tests.Frontend.Mvc and make sure it’s saved in the folder C:\Projects\Spaanjaars.ContactManager45\Main\Tests. This project will contain tests that target the ASP.NET MVC 4 project.
- Add another Unit Test Project to the Tests Solution Folder, name it Spaanjaars.ContactManager45.Tests.Frontend.Wcf and make sure it’s saved in the folder C:\Projects\Spaanjaars.ContactManager45\Main\Tests. This project will contain tests that target the WCF service project.
- In these four new test projects, add references to the following projects in your solution:
| Project | References |
Tests.Unit |
|
Tests.Integration |
|
Tests.Frontend.Mvc |
|
Tests.Frontend.Wcf |
|
Your Solution Explorer should now look like this:
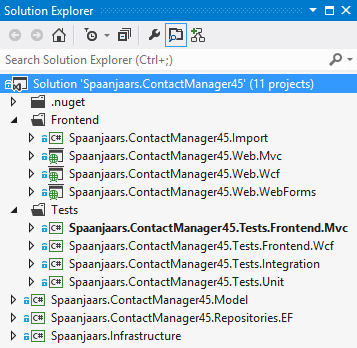
Figure 3-2 The Solution Explorer with the new Unit Test Projects
On disk your Solution should look like this in File Explorer:
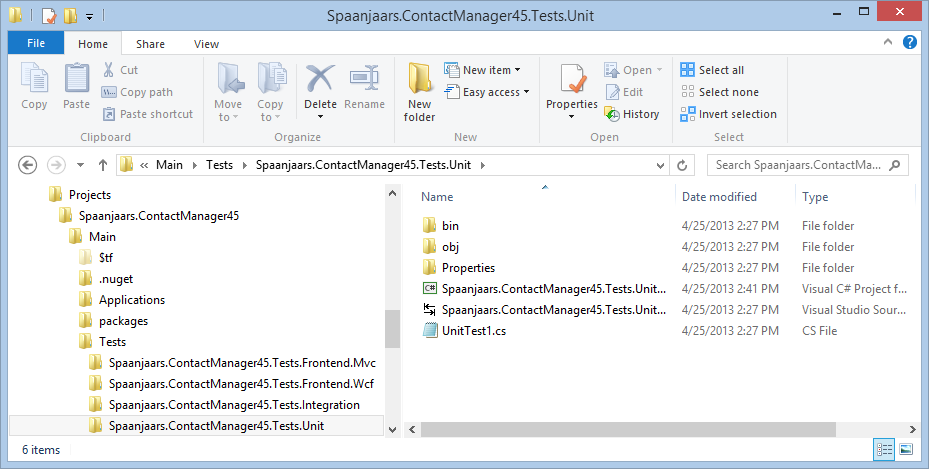
Figure 3-3 File Explorer Showing the new Unit Test Projects (click to enlarge)
- Finalize the configuration of your projects. For example, you can delete the existing default Unit Test files (called UnitTest1.cs inside each project). You can also add additional packages such as FluentAssertions (for which you’ll find instructions later in this article) or references to external libraries.
- Finally, do a full rebuild of the entire solution to ensure everything is set up correctly and resolve any compilation errors you may have.
In the next section you’ll see how to add a simple test to three of the four Unit Test projects in order to ensure your projects, including the Infrastructure, Model and Repositories.EF projects as well as the Unit Test projects itself, have been set up correctly. In order for this to work, I’ll also add a few classes to the core projects with some temporary implementation. That code will be expanded or replaced in later articles.
- In the Model project, add a new public class called Person and give it an automatically implemented property of type int called Id. You should end up with code like this:
namespace Spaanjaars.ContactManager45.Model
{
  public class Person
  {
    public int Id { get; set; }
  }
}
- In the project Spaanjaars.ContactManager45.Tests.Unit add a new Unit Test file called PersonTests.cs and modify the code as follows.
using Microsoft.VisualStudio.TestTools.UnitTesting;
using Spaanjaars.ContactManager45.Model;

namespace Spaanjaars.ContactManager45.Tests.Unit
{
  [TestClass]
  public class PersonTests
  {
    [TestMethod]
    public void NewPersonHasEmptyId()
    {
      var person = new Person();
      Assert.AreEqual(0, person.Id);
    }
  }
}
- Run all the tests (there’s only one at the moment) in the solution by pressing Ctrl+R, followed by an A (Ctrl+R, A) or by choosing Tests | Run | All Tests from the main menu. Then check the Test Explorer (which you can open using Test | Windows | Test Explorer). You should see that the test has passed:
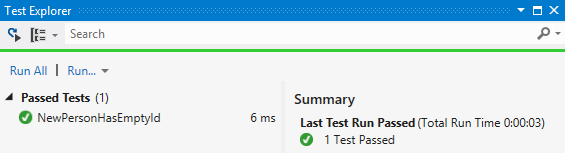
Figure 3-4 Test Explorer Showing SuccessNote: You would normally write a test that fails first, to avoid ending up with false positives. You would then implement some code to make the test pass. In this case, the test is so simple (and not really meant to test the functionality of the Person class, but rather the setup of the test project itself) that I decided to write a "green test" directly.
- Next, add a new public class called PeopleRepository.cs to the Spaanjaars.ContactManager45.Repositories.EF project. Don’t forget to add public in front of the class or it’ll default to internal. There’s no need to add any code to the class for now.
- In the project Spaanjaars.ContactManager45.Tests.Integration, add a new Unit Test file, call it PeopleRepositoryTests.cs and modify the code as follows:
using Microsoft.VisualStudio.TestTools.UnitTesting;
using Spaanjaars.ContactManager45.Repositories.EF;

namespace Spaanjaars.ContactManager45.Tests.Integration
{
  [TestClass]
  public class PeopleRepositoryTests
  {
    [TestMethod]
    public void CanInstantiatePeopleRepository()
    {
      var peopleRepository = new PeopleRepository();
      Assert.IsNotNull(peopleRepository);
    }
  }
}
Note: this is a pretty useless test. You should have other tests that implicitly check whether you can instantiate a new PeopleRepository class and then work with that instance. However, for now this test is useful to make sure that the Integration project has the correct references to the Repositories.EF project.
- Press Ctrl+R, A again. Both tests should pass.
- In the test project Spaanjaars.ContactManager45.Tests.Frontend.Mvc add a new Unit Test file called HomeControllerTests.cs and modify its code as follows:
using System.Web.Mvc;
using Microsoft.VisualStudio.TestTools.UnitTesting;
using Spaanjaars.ContactManager45.Web.Mvc.Controllers;

namespace Spaanjaars.ContactManager45.Tests.Frontend.Mvc
{
 [TestClass]
 public class HomeControllerTests
  {
    [TestMethod]
    public void IndexHasNoModel()
    {
      var controller = new HomeController();
      var result = controller.Index() as ViewResult;
      Assert.AreEqual(null, result.Model);
    }
  }
}
- Press Ctrl+R, A once more. All three tests should now pass, as shown in Figure 3-5:

Figure 3-5 Test Explorer Showing Green Tests
For now, these tests are really simple and only serve to verify the setup and relationships between the various projects. I skipped the tests for the WCF service as the current project doesn’t have any code files and adding a WCF service requires more background which I’ll cover in Part 8 of this series.
I’ll be adding more tests to the test projects as I progress through this article series. I won’t show you the code for all of the tests though; I’ll only highlight some of the more important ones. You’re encouraged to check out the source code that comes with this article series to see all the tests.
Using Fluent Assertions
There are a number of open source frameworks available that make unit tests easier to read and more obvious. One of those frameworks is FluentAssertions created by Dennis Doomen. This framework allows you write the assertions for your test in a fluent way. E.g. rather than writing something like this:
Assert.AreEqual(3, id);
You can now write something like this:
id.Should().Be(3);
Although you may need to get used to this new syntax at first, I generally find it more intuitive to read. It’s very useful to quickly see what your tests do but more importantly, non-technical people involved in a project can now more or less read unit tests too. This enables them to help you write the proper tests.
Under the hood, the various FluentAssertions methods check your values and raise exceptions when a condition is not met. This exception is eventually caught by MS test or another test framework you may be using.
In order to change your test projects to use FluentAssertions, follow these steps:
- Inside Visual Studio, open up the Package Manager Console by choosing Tools | Library Package Manager | Package Manager Console.
- Select your Integration test project from the Default project drop-down (called Spaanjaars.ContactManager45.Tests.Integration if you’re following along with the walkthroughs in this article series).
- In the Package Manager Console type Install-Package FluentAssertions and hit enter.
- Repeat step 2 and 3, three more times, but now add FluentAssertions to the Unit tests project, the Frontend.Mvc project and the Frontend.Wcf project.
- Open up the PersonTests class in the Unit Tests project and at the top of the file add the following using statement:
using FluentAssertions;
- Change the last line of the NewPersonHasEmptyId test to the following:
With this change, the code almost reads like English; the ID of the new person created in code should be zero.
person.Id.Should().Be(0);
- Next, run your test(s) to see if everything still works. If they pass (and they should), you should see a nice green checkmark in the Unit Test Explorer:
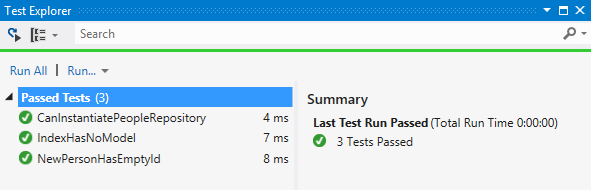
Figure 3-6 Test Explorer Showing Green Tests
You can find out more about FluentAssertions on the project’s site at CodePlex.com: http://fluentassertions.codeplex.com/.
Stuff I Like to Do
Here’s a quick list of things I like to do when it comes to unit testing:
- Use FluentAssertions, as just explained. It’s one of the first things I add to a Visual Studio test project.
- Write a base class for all your tests and let your test classes inherit from it. Even if you don’t add any behavior yet, it’s useful to have all your test classes inherit a common base class to which you can add shared functionality as you go. In the code download you’ll find a base class in each of the four test projects. In the Integration tests project the base class is used to initialize the database (generated by EF) for each set of tests. You’ll see more of this in Part 5 when the database initializer is discussed.
- Set up an automated build in TFS to run all your tests whenever code is checked in. This is a great way to ensure your code is always in a valid state. For more details, see:
- Professional Team Foundation Server 2012 (Ed Blankenship et al., Wrox, 2013, http://www.wrox.com/WileyCDA/WroxTitle/Professional-Team-Foundation-Server-2012.productCd-1118314093.html)
- http://msdn.microsoft.com/en-us/library/ms181716.aspx
- Consider getting a Unit Test runner such as the ones supplied by ReSharper or CodeRush. Although the test runner in Visual Studio 2012 has improved somewhat since Visual Studio 2010, I find the third party runners easier and more powerful to work with. More details can be found here:
- Unit Testing with CodeRush (http://www.devexpress.com/Products/Visual_Studio_Add-in/Coding_Assistance/unit_test_runner.xml)
- Unit Testing with ReSharper (http://www.jetbrains.com/resharper/webhelp/Unit_Testing__Index.html)
Summary
In this article you saw how to add a number of different unit test projects to your solution and how to set them up. While you could technically add all your tests to a single unit test project, I prefer to create separate projects for different types of tests. This allows me to decide when to run which tests. For example, because Integration tests generally run slower than plain unit tests (because they access databases and other slow resources), I could decide to run my unit tests after each build while the integration tests are only run when I check in code into TFS.
At this point, each test project contains a simple unit test that is used purely to check if the test projects were setup correctly. In later parts in this article series you’ll see how to add more useful tests to the different test projects.
With all the “plumbing” done, the next step is to start building the model. In the next part in this article series you’ll see how to set up the model using POCO – Plain Old CLR Objects - classes. That model is then used in Part 5 that describes how to build a repository that targets Entity Framework 5 Code First to interact with the database. In the articles following Part 5 I’ll show you how to use the model and the repositories to build various frontend applications.
Downloads
Where to Next?
Wonder where to go next? You can post a comment on this article.
Links in this Document
| Doc ID | 575 |
| Full URL | https://imar.spaanjaars.com/575/aspnet-n-layered-applications-making-your-projects-unit-testable-part-3 |
| Short cut | https://imar.spaanjaars.com/575/ |
| Written by | Imar Spaanjaars |
| Date Posted | 07/30/2013 20:44 |
Comments
Talk Back! Comment on Imar.Spaanjaars.Com
I am interested in what you have to say about this article. Feel free to post any comments, remarks or questions you may have about this article. The Talk Back feature is not meant for technical questions that are not directly related to this article. So, a post like "Hey, can you tell me how I can upload files to a MySQL database in PHP?" is likely to be removed. Also spam and unrealistic job offers will be deleted immediately.
When you post a comment, you have to provide your name and the comment. Your e-mail address is optional and you only need to provide it if you want me to contact you. It will not be displayed along with your comment. I got sick and tired of the comment spam I was receiving, so I have protected this page with a simple calculation exercise. This means that if you want to leave a comment, you'll need to complete the calculation before you hit the Post Comment button.
If you want to object to a comment made by another visitor, be sure to contact me and I'll look into it ASAP. Don't forget to mention the page link, or the Doc ID of the document.