Migrating to ASP.NET 2 - Part 2 - Setup and Master Pages
This is the second part of a (long running) article series about migrating a .NET 1.x Web site to ASP.NET 2. This installment focuses on the general setup of the new web site and the Master Page I am going to use.
Read Part 1 - Introduction
Read Part 2 - Setup and Master Pages
Read Part 3 - Business Logic, Content Pages and User Controls
Read Part 4 - Implementing Custom Providers for Membership, Role Management and Profiles
Read Part 5 - It's the little things...
Introduction
This part of the series discusses the general setup of the site and Master Pages. A master page serves as a template that other pages in your site can be based upon. This ensures a consistent look and feel, while at the same time it greatly decreases development time and enhances the maintainability of your site.
I think Master Pages are one of the coolest of all the new ASP.NET 2 features, mainly because it was so hard to implement in ASP.NET 1.x. Many, many articles, blog entries, forum posts and code have been written about templates in ASP.NET 1.x. If you have the time (as in a couple of long winter nights) check out this long lasting thread at the ASP.NET Web site. It introduces a couple of different approaches for a template based architecture in ASP.NET 1.x. The thread started in June 2002 and people contributed to the thread until late 2004.
How Things Used to Be in my 1.x Website
For my current ASP.NET 1.x site I use a slightly modified approach originally developed by Jonathan Goodyear, which basically came down to this:
- I created a new class called PageTemplate that inherited from System.Web.UI.Page
- In this new class I defined some regions (HtmlGenericControls) for the main site elements, like the Main Menu, Site menu and so on.
- The Page_Load event of this class always loaded the controls into the Main Menu and QuickStuff area.
- Each page in my site inherited from the PageTemplate class:
public class MyPage : PageTemplate { - On a page by page basis, I could overwrite the various sections defined in the template, or I could add additional content to each of the sections. For example, to load a voting control for a Content Item, I used the following code:
SideBarVoting mySideBarItem = (SideBarVoting)
                    LoadControl("/Controls/SideBarVoting.ascx");
mySideBarItem.ContentId = contentId;
mySideBarItem.SiteContentType = siteContentType;
mySideBarItem.CategoryId = categoryId;
SideBar.Controls.Add(mySideBarItem)
This templating solution had quite a number of issues. First of all, there were problems with post backs and control state. (Some of these issues were fixed with a later version of the template solution. However, this approach used separate controls for each page used in the site, making it hard to apply the new template to existing pages).
Another big problem with templates in ASP.NET 1.x is designer support. The Visual Studio .NET Design View was not able to display the content that came from the template. Depending on the template solution you chose, you couldn't even use the Design View anymore.
Finally, because the template code was inside a base class, you needed to recompile your application anytime you wanted to make a change to the template. This isn't a very big problem, but I have wished for the possibility to make minor tweaks to a template on a production server a couple of times.
How Things Are Now in my 2.0 Website
Fortunately, all these issues are gone now. The new Visual Studio 2005 supports Master Pages in the Design View, allowing you to preview your page while you work with it. By changing a single .Master file you can influence the entire look and feel of your site. There is no need to recompile the entire application or the Class Library that holds the PageTemplate class.
If you need more in-depth information and examples about Master Pages in .NET, check out the links at the end of the article in the References section.
Creating the Master Page
In the next section I'll walk you through creating a new Web site and a master page with Visual Studio 2005. I am using the full version of Visual Studio, and not the Web Developer Express Edition. I also use C# as the main language for these articles, as my site is currently written in C#. I'll indicate how things look in Visual Basic .NET when there are large differences.
I'll show you how I migrated the look and feel from my current site to the new ASP.NET framework, and how I configured my site and pages to use Master Pages.
- Start by creating a new Web site in Visual Studio 2005. This is now very easy as there is no longer a notion of Projects, Solutions and Web applications that need to run under IIS. All you need to do is choose File | New | Web Site..., point to a folder on your local hard disk and you're set. Alternatively, you can create a new application using ftp, or you can point to a new or existing Web site using the http protocol. The latter works pretty much the same way as it did in Visual Studio .NET 2002 and 2003. It allows you to point to an URL like http://localhost and Visual Studio will create an application for you. Since debugging and previewing is done with a tiny web server that integrates with Visual Studio, you no longer need to have IIS installed on your local development workstation. If you want to deploy your application you still need IIS of course.
- Once the new site has been created, delete the default page Default.aspx.
- With the basic site set up, create a new master page by right-clicking the site in the Solution Explorer and choosing Add New Item... Name the master page MainMasterPage.master, select C# as the language and make sure Place code in separate file is checked. Once you click the Add button, you'll be presented with a nice and clean, XHTML compatible ASPX page.
- The next step is to define the layout for your site. In my case, things were very simple as I just needed to copy the contents of one of my current pages to this new master page, and remove the page specific stuff I didn't want in my master page. I took an empty page from my current Web site, and removed all the stuff I didn't need. All I left in was the <head> section with links to external style sheets and JavaScript files, and my basic <div> based page structure.
In your case, you may need to think a bit about page design, navigation structure, look and feel (colors, images, fonts etc) and how you set up the various sections in your page (using HTML tables, or a more modern <div> based approach). Either way, don't be afraid to make mistakes. It's very easy to change the master page at a later stage and automatically have the changes applied to all pages that use the master page.
After a bit of prototyping, I ended up with the following basic page layout:
<%@ Master Language="C#" AutoEventWireup="true" CodeFile="MasterPage.master.cs" Inherits="Spaanjaars.Imar.Web.MasterPages_MasterPage" %> <%@ Register Src="~/Controls/MainMenu.ascx" TagName="MainMenu" TagPrefix="isp" %> <!DOCTYPE html PUBLIC "-//W3C//DTD XHTML 1.0 Transitional//EN" "http://www.w3.org/TR/xhtml1/DTD/xhtml1-transitional.dtd"> <html xmlns="http://www.w3.org/1999/xhtml"> <head id="Head1" runat="server"> <title>Imar.Spaanjaars.Com</title> <link rel="stylesheet" type="text/css" href="~/Css/Core.css" /> <link rel="stylesheet" type="text/css" href="~/Css/Styles.css" /> <link rel="stylesheet" type="text/css" href="~/Css/PrintStyles.css" media="print" /> <script type="text/javascript" src="/JavaScripts/ClientScripts.js"> </script> </head> <body> <form id="form1" runat="server"> <div id="PageWrapper"> <div id="Logo"> <div id="ImageLogo"> <a href="~/" runat="server" id="lnkLogoHome"> <img src="~/Images/Logo.jpg" runat="server" alt="Spaanjaars.Com logo" /> </a> </div> Quick Stuff Here </div> <div id="MainMenu" class="MainMenu" runat="server"> <isp:MainMenu ID="MainMenu1" runat="server" /> </div> <div id="SubMenu"> Sub Menu Here </div> <div id="SideBar"> <asp:ContentPlaceHolder ID="SideBarPlaceHolder" runat="server" /> </div> <div id="MainContent"> <asp:ContentPlaceHolder ID="MainContentPlaceholder" runat="server" /> </div> </div> </form> </body> </html> - What's good to know up front are the various "parts" of your site, like menus and content areas. In my site I have 6 different sections as you can see from the following figure:
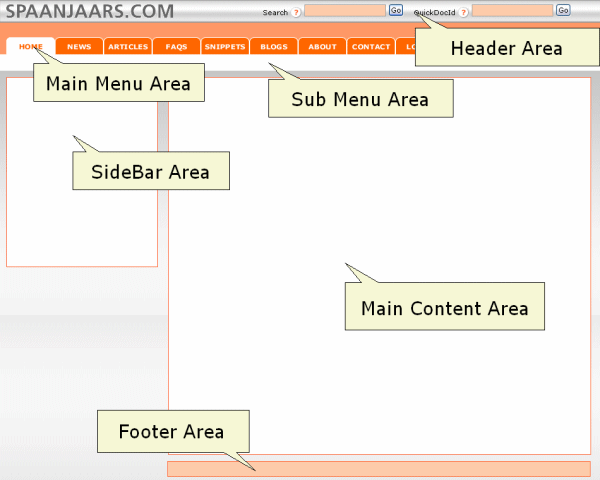 Figure 1: Important Sections in the Page Layout
Two of these areas can be modified by the pages that implement this master page. The SideBar and the Main Content area are both sections that are likely to change on a page by page basis. The other four can be implemented as User Controls. Although their content is likely to change to reflect the content being displayed, it's convenient to implement these as static controls that don't need to be changed by the final page. I am going to make the User Controls "aware of their environment", so they are able to display and select the right menu items. I'll discuss this in a future installment of this article series.
To enable pages based on the master page to change the content of these two areas, you'll need to add a ContentPlaceHolder for each of these areas. To do this, drag a ContentPlaceHolder control from the Toolbox (under Standard) and drop it at the location where you want the area to start. In my case, this is between the <div> tags that make up the SideBar and the MainContent areas. Rename the ID of the control to something more logical. In my case, I ended up with this code:
<div id="SideBar"><asp:ContentPlaceHolder
ID="SideBarPlaceHolder" runat="server"></asp:ContentPlaceHolder></div>
<div id="MainContent"><asp:ContentPlaceHolder ID="MainContentPlaceholder" runat="server"></asp:contentplaceholder></div> - Once you have added the ContentPlaceHolders, you can switch to Design View and see how things end up. In my case, the Design View looked like this:
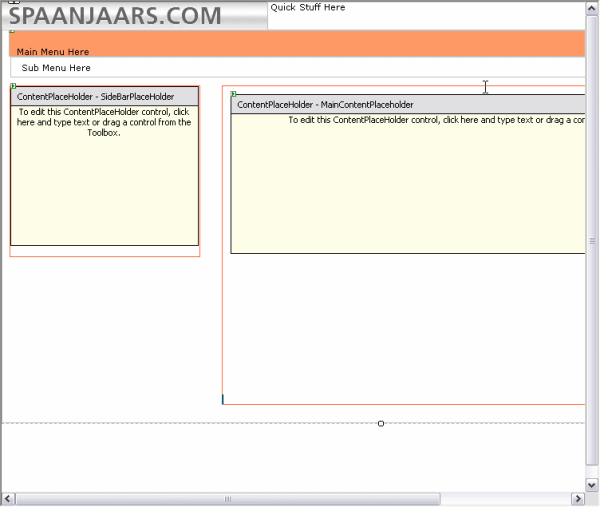 Figure 2: Design View of the Master Page
The two yellow areas are the ContentPlaceHolders that can be overridden by pages implementing this master page.
By default, these ContentPlaceHolders are empty, but you can add any default content you want (including ASP.NET controls). -
For now, that's all I am going to put in the master page. The other four sections, including the menus, will be filled by loading user controls into the respective site areas. This will be discussed in part 3 of this article series.
Using the Master Page
With the master page done, it's time to actually use it. To tell one or more pages in your site to use a specific master page, you have a couple of methods available:
| Method | Description |
| Page Based |
On each page that uses the Master Template you can set set the MasterPageFile attribute of the Page directive, for example: This attribute overrides any master page set for the site in the Web.Config file. |
| Application Based | Through the Web.Config file you can apply a specific master page to all pages in your site. To do so, you'll need to add a <pages> node to the <system.web> section of the config file and set the masterPageFile attribute to the master page you want to use like this:<pages masterPageFile="~/MainMasterPage.master" /> Note that, just like all other settings in the Web.Config file, the masterPageFile attribute is case-sensitive. |
| Programmatically | In the OnPreInit event you can override (or set) the master page with the following code:protected override void OnPreInit(EventArgs e)
{
this.MasterPageFile = "~/GreenMasterPage.master";
base.OnPreInit(e);
}
|
In most circumstances, I would stick to method 1 and not use method 2 and 3. While they give you a great deal of flexibility, they are also likely to give you some trouble if you don't fully understand their implications. For an ASPX page to implement a master page, it has to have Content controls with IDs that match with those found in the master page. So when you have a content page that was initially created for master page A, and then at run time (through the Web.config file or programmatically) use master page B, it's likely you'll end up with a run-time error about ContentPlaceHolders that cannot be found.
You also loose design support when you don't explicitly specify the master page in the content page.
IMO, it's better to specify the master page on each content page and keep the other solutions for some rare occasions you might need them. If you are going to apply the master page to the entire site or programmatically anyway, make sure you know what you're doing and check and double check that each master page uses the same ContentPlaceHolders so the master pages are interchangeable.
So, how do we apply the master page explicitly? This is very easy as Visual Studio allows you to select a master page when you add a new content page to your site. Follow these steps to add a new file and select the master:
- Right-click your site in the Solution Explorer and choose Add New Item...
- Choose Web Form from the Visual Studio installed templates section and give the page a name. Make sure Place code in separate file and Select master page are both checked and click Add.
-
Once you click Add, you get the chance to select the master page for this file. Select MainMasterPage.master from the list on the right and click OK. The page will be added to your web site. To see that the master page has been applied choose View | Designer to switch to the Design View. You'll see the layout you defined in the master page grayed out, while the Content areas are editable:
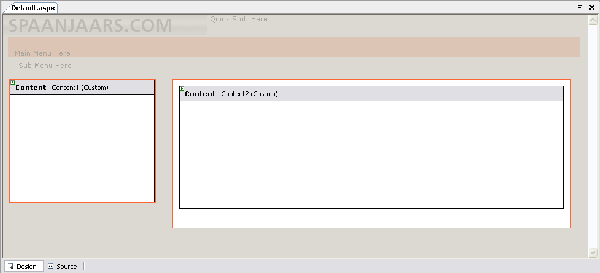 Figure 3: A Content Page using the MainMasterPage master
 -
Add some content to the Content placeholders. You can add anything you like, from static text to ASP.NET controls that you can drag from the Toolbox into the Content regions. Once you're happy with the page layout, press Ctrl+F5 to view the page in the browser. In my case, I ended up with something like this:
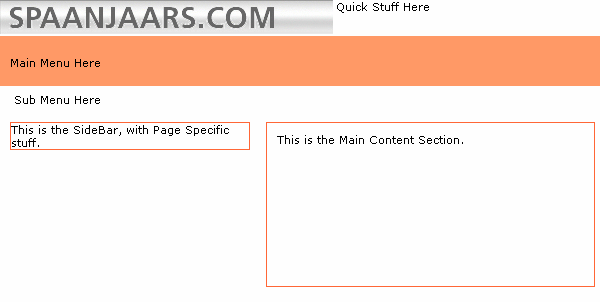 Figure 4: The Content Page in the browser.
It's still a bit boring right now and the page doesn't do much, but it's a nice start.
-
If you look at the code for the page you can see how Visual Studio hooked up the Content page to the master page:
The MasterPageFile attribute points to the master page that you chose in step 3. If you want to change the master page at a later stage, click somewhere between the quotes for the master page file and press Ctrl+Space. This brings up a menu from which you can choose Pick Master... and then browse to a new master page in your site. Alternatively, you can click somewhere in the <%@ Page directive and then use the Property grid to browse to a new master page.<%@ Page Language="C#" MasterPageFile="~/MasterPages/MasterPage.master" AutoEventWireup="true" CodeFile="Default.aspx.cs" Inherits="Spaanjaars.Imar.Web._Default" Title="Imar.Spaanjaars.Com" %>
Generic BasePage
In addition to the useful MasterPage to define general look and feel, I also created a base page that inherits from System.Web.UI.Page. All my content pages in turn then inherit from this custom BasePage class. Currently, the BasePage class is still empty, but during future modifications of the site, I can easily add properties and methods that apply to each and every page in my site. The code download that comes with this article shows how this works; you find BaseClass.cs in the special App_Code folder. In ASP.NET 1.x, inheriting from a custom BasePage was possible as well, but it meant broken design time capabilities and a host of other problems. In ASP.NET 2.0, this is now both very easy to do, and implemented very well, providing you with a great design-time experience, including full IntelliSense for the base page class.
Conclusion
Master Pages are a great new feature of ASP.NET 2.0. They are very easy to work with, yet they are very powerful. The current master page doesn't do very much; all it does is provide the general layout for pages that use this master. In a future article in this series I'll enhance my master page by loading User Controls for the QuickStuff, Main Menu and Sub Menu areas. Stay tuned....
References
- Master Pages in ASP.NET 2.0
- Understanding ASP.NET Master Pages
- Dynamically Varying Master Pages By Browser Type
Download Files
Source Code for this Article(Note that the user control is implemented rather messy; haven't had the time to clean it up)
Where to Next?
Wonder where to go next? You can post a comment on this article.
Links in this Document
| Doc ID | 349 |
| Full URL | https://imar.spaanjaars.com/349/migrating-to-aspnet-2-part-2-setup-and-master-pages |
| Short cut | https://imar.spaanjaars.com/349/ |
| Written by | Imar Spaanjaars |
| Date Posted | 01/23/2005 14:46 |
| Date Last Updated | 01/08/2006 16:03 |
| Date Last Reviewed | 05/24/2006 20:51 |
| Listened to when writing | It Began In Afrika by The Chemical Brothers (Track 2 from the album: Come With Us) |
Comments
Talk Back! Comment on Imar.Spaanjaars.Com
I am interested in what you have to say about this article. Feel free to post any comments, remarks or questions you may have about this article. The Talk Back feature is not meant for technical questions that are not directly related to this article. So, a post like "Hey, can you tell me how I can upload files to a MySQL database in PHP?" is likely to be removed. Also spam and unrealistic job offers will be deleted immediately.
When you post a comment, you have to provide your name and the comment. Your e-mail address is optional and you only need to provide it if you want me to contact you. It will not be displayed along with your comment. I got sick and tired of the comment spam I was receiving, so I have protected this page with a simple calculation exercise. This means that if you want to leave a comment, you'll need to complete the calculation before you hit the Post Comment button.
If you want to object to a comment made by another visitor, be sure to contact me and I'll look into it ASAP. Don't forget to mention the page link, or the Doc ID of the document.