ASP.NET N-Layered Applications - Extensions, Tools and Wrapping Up (Part 10)
Note: this is part ten in a series of ten. If you rather read this entire series off-line, you can buy the full series as a convenient PDF document that comes with the full source. Besides the convenience, buying the PDF will also make you feel good as it shows your appreciation for the articles and helps me pay the bills for my server and hosting so I can keep running imar.spaanjaars.com and continue to provide you with great content. For more details, check out this post that shows you how you can buy the entire series right now.
This is Part 10 in a series of 10 that show you how to build N-Layered applications using ASP.NET 4.5 and Entity Framework 5 Code First. In this part I’ll discuss a few miscellaneous topics that I haven’t touched in previous articles in the series.
If you haven’t read the earlier parts in this series yet, you’re encouraged to do so first. The following list has links to all articles in this series:
- Part 1 - Introduction
- Part 2 - Setting up the Solution in Visual Studio
- Part 3 - Making your Projects Unit Testable
- Part 4 - Implementing a Model
- Part 5 - Implementing a Repository using Entity Framework Code First
- Part 6 - Implementing an ASP.NET MVC 4 Frontend
- Part 7 - Implementing a Web Forms 4.5 Frontend
- Part 8 - Implementing a WCF 4.5 Frontend
- Part 9 – Importing Data Using the API
- Part 10 - Extensions, Tools and Wrapping Up
Possible Extensions
In this section I’ll discuss a few possible extensions to the sample application. I may update this section in the future if I get questions from readers asking how to implement specific functionality.
Implementing Security
In my previous article series on building N-Layered applications with ASP.NET I spent an entire article on the topic of security. In the new series I haven’t touched on this subject at all. The reason for this is that not much has changed and most of the concepts discussed in that article still apply.
Note that when you’re using MVC as your frontend, you can also make use of the authorization attributes such as Authorize and AllowAnonymous, to control access to the action methods in your controllers.
For more details, check out the following links:
- http://blogs.msdn.com/b/rickandy/archive/2012/03/23/securing-your-asp-net-mvc-4-app-and-the-new-allowanonymous-attribute.aspx
- http://www.davidhayden.me/blog/asp.net-mvc-4-allowanonymous-attribute-and-authorize-attribute
Implementing Concurrency
Although not implemented in the sample code, implementing concurrency handling is relatively straightforward. Here’s a high-level description of the steps involved to implement concurrency handling in the MVC frontend:
- Add a Version property to your entity of type byte[].
- Configure EF to treat that property as the row version of your entity.
- Modify the View Models and views to support the Version property. When you’re editing an entity, you need to store the row version in a hidden field. Then when the page is posted back, you get the version number from the hidden field and assign it to the entity that is being edited. Then when the changes are saved, EF will use that number and compare it against the version in the database and throw a concurrency exception when the two values don’t match. There’s a caveat you need to be aware of when assigning the row version as you’ll see in the description of step 5.
- When saving changes to an existing entity, make sure it uses the correct version number.
- Handle the error in the UI.
I’ll describe each of these steps in more detail next.
Add a Version Property to Your Entity
You can add the property to each individual entity, or to the base class DomainEntity. I usually add it to individual entities as not all my entities need concurrency handling. I also create an IHandlesConcurrency interface so I can tell whether an entity handles concurrency or not. This is useful in step 3 as you’ll see soon. For the Person entity, I could end up with something like this:
public interface IHandlesConcurrency
{
  byte[] Version { get; set; }
}

...

public class Person : DomainEntity<int>, IDateTracking, IHandlesConcurrency
{
  // Other members go here
  public byte[] Version { get; set; }
}
Configure EF to Treat that Property as the Row Version of Your Entity
Again, this is simple to do as the Fluent API has a handy IsRowVersion method. Inside my PersonConfiguration class I can add the following code:
public class PersonConfiguration : EntityTypeConfiguration<Person>
{
  public PersonConfiguration()
  {
    Property(x => x.Version).IsRowVersion();
    // Other code here
  }
}
Modify the View Models and Views to Support the Version Property
First, you need to add a Version property to the CreateAndEditPerson class.
You then need to store the value of the Version property in the view. Here’s an example from the Edit view:
@using (Html.BeginForm())
{
  ... Other code here
  @Html.HiddenFor(model => model.Version)
  ... Other code here
}
When Saving Changes to an Existing Entity, Make Sure it Uses the Correct Version Number
This is a bit of a weird step. When you configure the Version property as the RowVersion, EF treats this field as “store generated”. That means that when it needs to send its value to the database, it will use the original value, not the value that has been retrieved from the hidden form field (even though that has been assigned as the new value for the Version property when mapping from a CreateAndEditPerson to a Person instance in the Edit action method). To work around this, you can tell EF to use the current value rather than the original value. Here’s where the IHandlesConcurrency interface comes in handy. In SaveChanges you can find all entities that implement this interface and then reassign the Version number:
if (item.State == EntityState.Modified)
{
  var supportsConcurrency = item.Entity as IHandlesConcurrency;
  if (supportsConcurrency != null)
  {
    item.Property("Version").OriginalValue = item.Property("Version").CurrentValue;
  }
}
This way, the version retrieved from the form is used in the concurrency check.
Handle the Error in the UI
Finally, you need to handle the error in the UI. How you do this is up to you; you can intercept the problem by using a catch block for a DbUpdateConcurrencyException. Then inside that block you can tell the user what went wrong and offer them a chance to reload the changes from the database or force their new values to be submitted to the database.
Using Red Gate’s SQL Data Generator to Generate Relevant Sample Data and Find Performance Issues
When building an application like this, it’s useful to have good sample data. While you certainly can (and should) insert data using unit tests, there are times where you need more data. For example, when doing performance testing or profiling, it really helps to stuff your tables with tens of thousands of rows to reveal any issues with indexes etc. One solution is to use the Seed method of your database initialization class. Writing a quick loop that adds a lot of entities is easily done.
Another alternative that I often use is Red Gate’s SQL Data Generator. Using this tool you can generate sample data for your database. The price for the tool as a stand-alone version is €220 but it also comes bundled in the SQL Developer Bundle and the SQL Toolbelt packages. What I like about this tool is that it can generate data that looks as real as possible. The tool has smarts built-in to recognize columns by their name and type and then recommends the appropriate sample data. For example, when using the tool to generate data for the People table, it recognizes the FirstName and LastName column (and many others as well) and suggests to fill them with sample data contain names. Figure 10-1 shows an example:
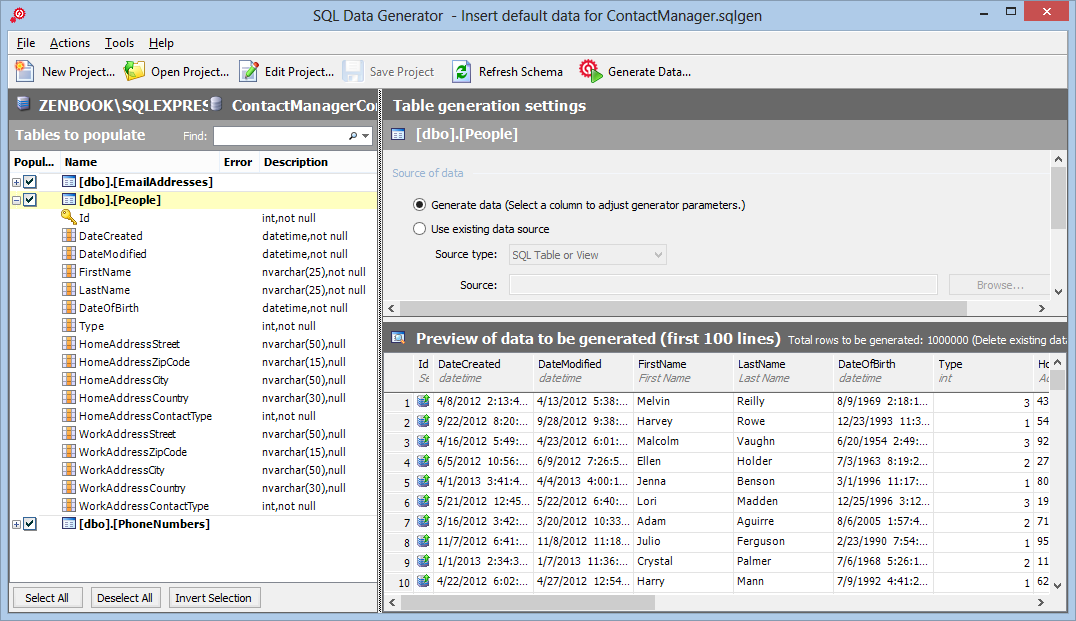
Figure 10-1 Red Gate’s SQL Data Generator (click to enlarge)
Using this tool, inserting a million rows in the People table takes less than a minute. With this large amount of sample data, I was able to find a few areas where I could improve performance. For example, if you sort the grid with all the people based on their ID, you’ll notice this is really fast as the ID has been set up as a (clustered) index as it’s also the primary key. However, when you try to sort on the full name of date of birth columns you’ll notice performance is not great. In this example it was easy to guess what the solution is - (add indexes for the first name, last name and date of birth columns to the database) but for more advanced scenarios having a good and large data set will help you find issues in your code and database. To make sure these indexes get added to the database even when it is regenerated after the model changes, you can execute the following code from a custom database initializer’s Seed method:
public class MyInitializer : DropCreateDatabaseIfModelChanges<ContactManagerContext>
{
  protected override void Seed(ContactManagerContext context)
  {
    context.Database.ExecuteSqlCommand(@"
       CREATE NONCLUSTERED INDEX [NonClusteredIndex-20130505-160821] ON [dbo].[People]
        (
        [DateOfBirth] ASC
        )WITH (PAD_INDEX = OFF, STATISTICS_NORECOMPUTE = OFF, SORT_IN_TEMPDB = OFF,
            DROP_EXISTING = OFF, ONLINE = OFF, ALLOW_ROW_LOCKS = ON,
            ALLOW_PAGE_LOCKS = ON)");

    context.Database.ExecuteSqlCommand(@"
       CREATE NONCLUSTERED INDEX [NonClusteredIndex-20130505-160727] ON [dbo].[People]
        (
               [FirstName] ASC,
               [LastName] ASC
        )WITH (PAD_INDEX = OFF, STATISTICS_NORECOMPUTE = OFF, SORT_IN_TEMPDB = OFF,
             DROP_EXISTING = OFF, ONLINE = OFF, ALLOW_ROW_LOCKS = ON,
             ALLOW_PAGE_LOCKS = ON)");
Now whenever the database is recreated two indexes for the first name, last name and date of birth columns are created automatically.
For more advanced scenarios you can also use SQL Server’s query plan analyzer to figure out how to best optimize your database.
For more information about setting up Red Gate’s Data Generator, check out these resources:
- http://imar.spaanjaars.com/523/avoiding-the-works-on-my-machine-syndrome
- http://documentation.red-gate.com/display/SDG20/SQL+Data+Generator+2.0+documentation
Using Entity Framework Profiler from Hibernating Rhinos
Another great tool to help you with performance problems is the Entity Framework Profiler from Hibernating Rhinos. This tool gives you “valuable insight and perspective into [the] usage of Entity Framework” by analyzing your queries during run-time. It can help you find common problems like Select N+1 and it provides tips to help you solve them. The tool costs $287.00 for a yearly subscription or $389.00 for a standard license. Entity Framework Profiler is also available in the Uber Profiler that contains profilers for other ORMs as well.
Using Entity Framework Profiler is straightforward and involves a few simple steps:
- Download the Entity Framework Profiler.
- Add a reference to one of the application’s assemblies.
- Write some startup code in your application’s Gobal.asax file (or other startup file for non-web projects).
- Start the profiler.
- Analyze the results.
I’ll describe each of these steps in the following sections.
Download the Entity Framework Profiler
You can download the Entity Framework Profiler from its products page at http://www.hibernatingrhinos.com/products/EFProf. Once you’ve downloaded the application you can request a trial key from this page: http://www.hibernatingrhinos.com/products/efprof/trial which will be sent to you by e-mail. You don’t need to install anything, all you need to do is extract the ZIP file to a convenient location such as C:\Tools\EFProf.
Add a Reference to one of the Application’s Assemblies
In order to see profiling data in the tool, you need to add a reference to the HibernatingRhinos.Profiler.Appender.dll assembly (from the EF Profiler directory) to the application you’re profiling. This can for example be your MVC or Web Forms project or your Integration tests project. See the file How to use.txt in the application’s main folder for more details about using the profiler in a production environment.
Write Code in your Application’s Startup File
Next, you need a single line of code to start the profiling. For a web project you need to add the following line of code to the Application_Start handler in Global.asax:
HibernatingRhinos.Profiler.Appender.EntityFramework.EntityFrameworkProfiler.Initialize();
If you’re profiling your integration tests, you could add this code to the constructor of the IntegrationTestBase class.
Start the Profiler and Your Application
Next, from the EF Profiler folder, startup EFProf.exe. Then start up your application (browse to a web project or run the unit tests) to see the results in the profiler as shown in Figure 10-2:
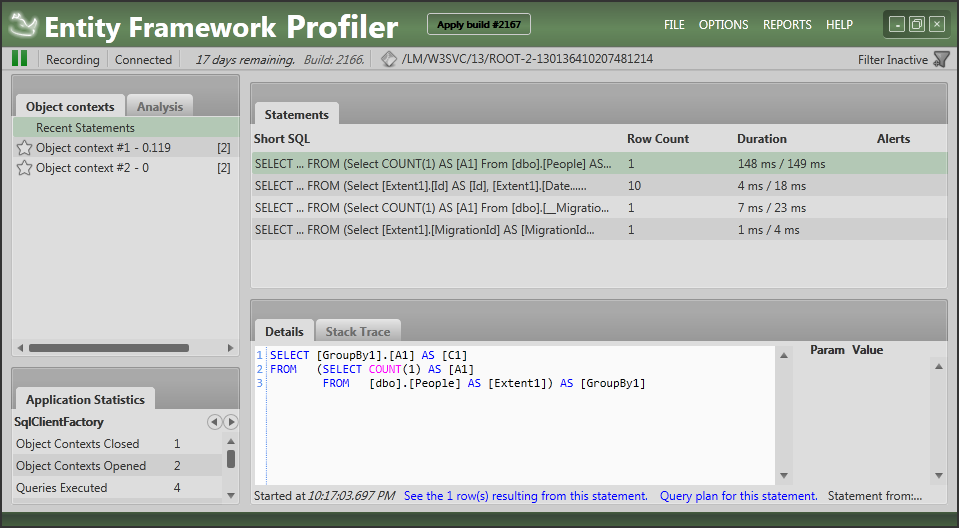
Figure 10-2 Entity Framework Profiler (click to enlarge)
Analyze the results
In Figure 10-2 you can see the results from browsing to the main list of people. The Alerts column on the right is empty which means that the EF Profiler hasn’t found any problematic queries. However, to show you how this works, let’s introduce an issue in the FindById method in the base Repository<T> class. It currently looks like this:
public virtual T FindById(int id, params Expression<Func<T, object>>[] includeProperties)
{
  return FindAll(includeProperties).SingleOrDefault(x => x.Id == id);
}
In order to introduce a (major) issue, I changed the code to this:
public virtual T FindById(int id, params Expression<Func<T, object>>[] includeProperties)
{
  return FindAll(includeProperties).ToList().SingleOrDefault(x => x.Id == id);
}
Notice the inclusion of ToList, a common mistake made by developers. ToList causes an immediate execution of the query which means that all rows are retrieved from the database into EF. The SingleOrDefault method is then executed against the in-memory collection of objects, not on the database. You won’t notice this with a few rows in the database, but this surely breaks or causes bad performance with thousands or more rows. EF Profiler flags this issue as follows:
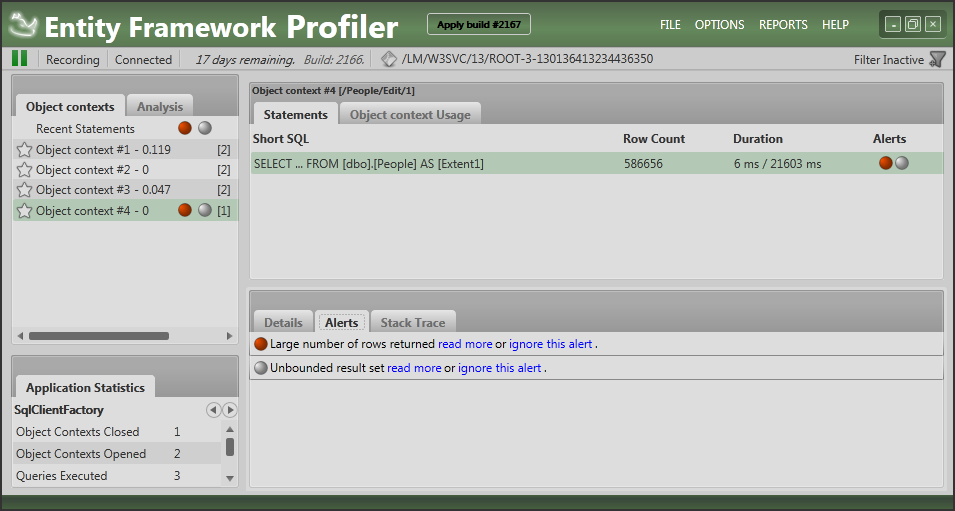
Figure 10-3 Entity Framework Profiler Highlighting Issues (click to enlarge)
The profiler is flagging two issues. It has noticed that your query uses an unbounded result set and that a large number of rows are returned. The first issue is caused by the ToList method. This executes a query against the database without a WHERE clause, which means all rows are returned from the database. In this case, the second issue is a directly related to the first: since the table contains many rows and there is no restrictive WHERE clause, a large number of rows are returned to the calling application. You may also see these alerts independent of each other: if you query a large table with a WHERE clause that’s not very restrictive (for example Id > 1) you would still see the first alert. A small table that is being queried without a WHERE clause would cause the second alert to appear in the tool’s Alerts column.
While these tools are great to help figure out problems in the code and setup of your application, you may also have the need to find out issues in your application while it’s running in production. To gain more information about what your site does at run-time you can implement a logging strategy, discussed next.
Using NLog for Extensive Logging
It’s not uncommon that one of your applications in production suddenly doesn’t behave as expected. With the many layers in a layered application it may not always be easy to figure out what’s going. Imagine you have an external application that accesses your WCF service but receives null when asking for a specific contact person. On a production server, it may be difficult to track down what’s going on. Is the calling application making a mistake by passing in an ID that doesn’t represent an existing person? Or maybe the person is deleted from the database while it shouldn’t have been? Or maybe someone accidentally deployed a web.config file that targets the staging server instead of the production server. Investigating an issue like this can be quite time consuming.
You can take out a lot of the guesswork if your application logs its activities into a log file. Then whenever something unexpected occurs, you can check the log file to see what’s going on. Logging is really easy to do using an existing logging framework such Log4Net, the logging framework that’s part of the Microsoft Enterprise Library, NLog or others. For a feature by feature comparison of some these frameworks, check out http://www.dotnetlogging.com/comparison/. Note: the information you find here is biased a bit, as this site is owned by Gurock Software, the company that makes the commercial SmartInspect logging framework. Take it with a grain of salt.
The option I usually choose is NLog. It’s free to use (it’s licensed under a BSD license), it’s easy to configure and yet it’s powerful enough to fulfil all of your logging needs. I usually reference the NLog library directly in my application (I set it up using NuGet) and write code directly against the Logger classes in the NLog namespace. Although this creates a dependency between my application and NLog, I am usually OK with that. It doesn’t interfere with Unit Testing (as you’ll see soon) and I usually don’t have the need to swap out NLog for another framework. If you do have that need, you could create (or use an existing) interface for your logging methods and then inject a concrete log implementation at runtime using your DI tool of choice. More information can be found here:
- http://netcommon.sourceforge.net/
- http://stackoverflow.com/questions/5646820/logger-wrapper-best-practice
Configuring and using NLog is easy as you’ll see in the next section. In addition, since configuration can be done in the application’s config file, it’s easy to use config transformations to have different settings for development, test and production environments. This makes it easy to turn on and off logging completely for your unit tests for example. In the next steps, you see how I can add logging to my WCF service project and then configure the web.config file to log minimal information in production and lots of data during development. If you ever have the need to diagnose a problem at run-time, just modify the configuration code and specify a different log level.
- I started by installing NLog in my WCF service project using the following NuGet command:
Install-Package NLog
- I then added the following line of code at the top of the ContactManagerService class to declare and instantiate a logger object:
namespace Spaanjaars.ContactManager45.Web.Wcf
{
  public class ContactManagerService : IContactManagerService
  {
    private static readonly Logger Logger = LogManager.GetCurrentClassLogger();
    // Other code here
  }
}
- Using the Logger instance I can now log with NLog using a single line of code. Note that NLog has multiple methods for logging such as Warn, Trace, Error and more. Check out the documentation at https://github.com/nlog/NLog/wiki for more information. The following code block shows some of the log messages you could add to your service methods:
public class ContactManagerService : IContactManagerService
{
  private readonly IPeopleRepository _peopleRepository;
  private readonly IUnitOfWorkFactory _unitOfWorkFactory;

  private static readonly Logger Logger = LogManager.GetCurrentClassLogger();

  public ContactManagerService(IPeopleRepository peopleRepository,
              IUnitOfWorkFactory unitOfWorkFactory)
  {
    if (peopleRepository == null)
    {
      Logger.Error("peopleRepository is null.");
      throw new ArgumentNullException("peopleRepository", "peopleRepository is null.");
    }
    if (unitOfWorkFactory == null)
    {
      Logger.Error("unitOfWorkFactory is null.");
      throw new ArgumentNullException("unitOfWorkFactory", "unitOfWorkFactory is null.");
    }
    _peopleRepository = peopleRepository;
    _unitOfWorkFactory = unitOfWorkFactory;
  }

  public PersonModel GetPerson(int id)
  {
    Logger.Trace("Getting person: {0}", id);
    var person = _peopleRepository.FindById(id);
    Logger.Trace("Person with ID: {0} is {1}null.", id, person == null ? "" : "not ");
    return Mapper.Map(person, new PersonModel());
  }
}
In this sample code I am using the Error method to log exception cases, and Trace to log additional information. This way, an error like a missing repository can always be logged while the additional information is only logged when you configure NLog to log trace message as well.
- The next step is to add config information to the application to tell NLog what to log and where. NLog supports three main ways to configure it: through its API (https://github.com/nlog/nlog/wiki/Configuration-API), through an external config file and with configuration code embedded in the application’s main file. For the latter two solutions, check out https://github.com/nlog/nlog/wiki/Configuration-file. I prefer to embed the code in my main configuration file as it makes it easier to use Web Config Transformations to generate different versions of the file for different deployment targets. To enable logging, you can add something like the following to the top of the config file
<configSections>
  <section name="nlog" type="NLog.Config.ConfigSectionHandler, NLog" />
</configSections>

<nlog xmlns=http://www.nlog-project.org/schemas/NLog.xsd
                     xmlns:xsi="http://www.w3.org/2001/XMLSchema-instance">
  <targets>
    <target name="file" xsi:type="File" fileName="${basedir}/App_Data/Log.txt"
      layout="${longdate} ${callsite} ${level} ${message} ${exception:format=tostring}" />
  </targets>
  <rules>
    <logger name="*" minlevel="Trace" writeTo="file" />
  </rules>
</nlog>
If you now call one of the service methods (for example, GetPerson) you’ll see something like this in the log file:
2013-05-06 17:18:02.3084 Spaanjaars.ContactManager45.Web.Wcf.
       ContactManagerService.GetPerson Trace Getting person: 40
2013-05-06 17:18:02.3535 Spaanjaars.ContactManager45.Web.Wcf
       ContactManagerService.GetPerson Trace Person with ID: 40 is not null.
Since no exceptions are raised, you only see the Trace messages, If you disable that trace level by setting the minLevel to Info, you won’t see anything at all in the log file for normal operations, Exceptions are still logged though; this is a great setting for a production server:
<logger name="*" minlevel="Info" writeTo="file" />
- If you want to use the log file from your unit test project as well you need to add the NLog configuration code to the unit test project’s app.config file. In addition, because of the way unit tests are executed, you need to supply an absolute path to the log file, like so:
<configuration>
  <configSections>
    <section name="nlog" type="NLog.Config.ConfigSectionHandler, NLog" />
  </configSections>
  <nlog xmlns=http://www.nlog-project.org/schemas/NLog.xsd
             xmlns:xsi="http://www.w3.org/2001/XMLSchema-instance">
    <targets>
      <target name="file" xsi:type="File"
     fileName="C:\Projects\Spaanjaars.ContactManagerV45\Main\Logs\WcfTests.txt"
  layout="${longdate} ${callsite} ${level} ${message} ${exception:format=tostring}" />
    </targets>
    <rules>
      <logger name="*" minlevel="Trace" writeTo="file" />
    </rules>
  </nlog>
</configuration>
The final tool I often use when building database-driven web applications is Red Gate’s SQL Compare, discussed next.
Using Red Gate’s SQL Compare to Update your Live Database
Earlier in this series I mentioned that I usually don’t use EF migrations in a production environment. Often DBAs won’t grant permissions to your application to modify the database schema at run-time. Instead, when doing a deployment, they typically want you to supply a SQL file with DDL (Data Definition Language) statements that update the database to the latest schema. While you could use the command line options of EF Migrations to create those scripts, I usually find it easier to compare the latest development database with the production environment using a tool like SQL Compare from Red Gate. Just like Data Generator, SQL Compare is a commercial tool with a price that starts around €295. It also comes bundled in the SQL Developer Bundle and the SQL Toolbelt packages.
In order to compare the databases, you need access to both the source and target database from the machine that runs SQL Compare. For a production environment that may not be feasible. In that case, it’s recommended to restore a backup of production on your local or networked machine and use that for the compare operations.
To explain how to use SQL Compare, I added a new property called NickName to the Person class in the EF model:
public string NickName { get; set; }
I then ran my unit tests which in turn recreated the database so the Person table now also has a NickName column.
To perform a compare operation and script the changes, I started SQL Compare and then configured the source and target databases. In Figure 10-4 you can see I am comparing two databases running on my local machine.
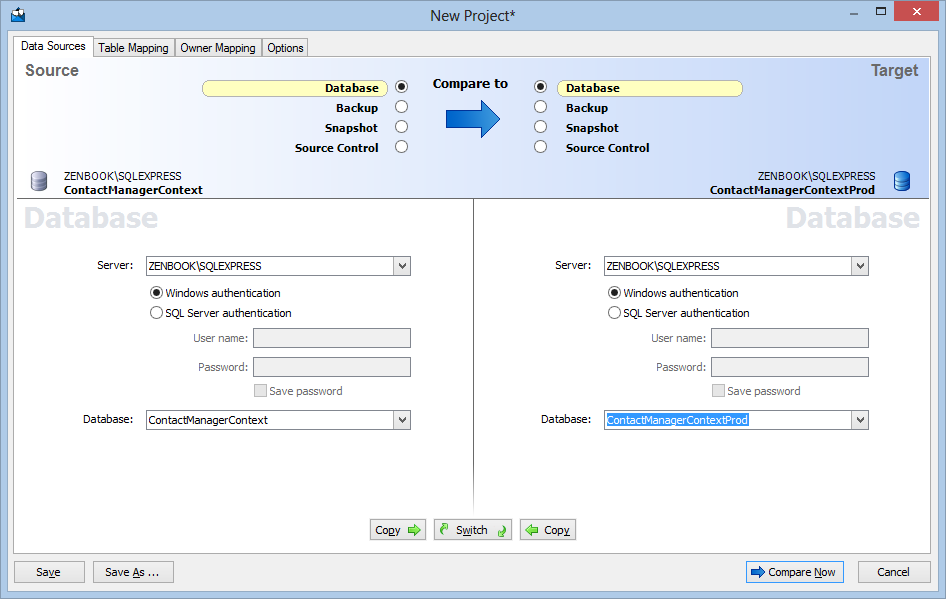
Figure 10-4 Red Gate SQL Compare – Configure Databases (click to enlarge)
By clicking Compare Now, SQL Compare will analyze both databases and then displays a window with the results, shown in Figure 10-5:
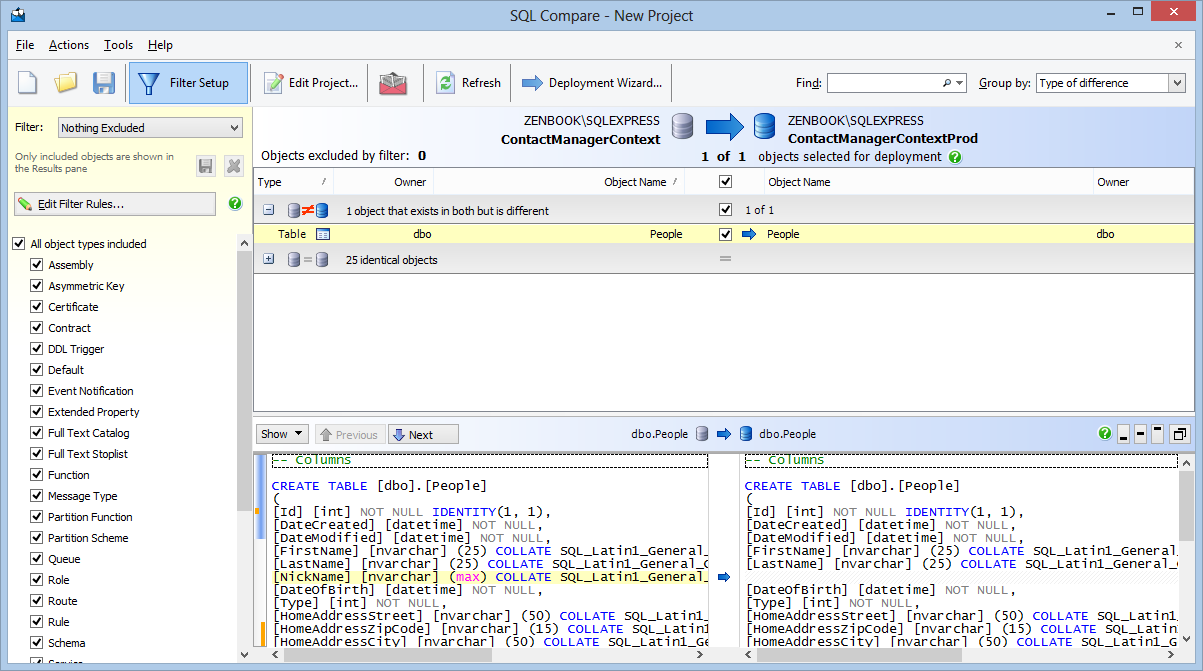
Figure 10-5 Red Gate SQL Compare – Results (click to enlarge)
Notice how it picked up the new column, highlighted in the T-SQL section at the bottom. Next, I selected the People table and then clicked Deployment Wizard on the main toolbar. This triggers a dialog that lets you choose between generating a .sql script file (that can be used to update the target database at a later stage) or immediately update the target database. The former case is useful if you need to run the SQL script on another database or on multiple databases, or if you don’t have direct access to the target database. The Deploy Using SQL Compare option will directly modify the target database, bringing the two databases in sync.
This example is somewhat contrived as it’s a relatively simple change to the database. You won’t be able to make some complex changes such as adding a non-nullable column to an existing table as SQL Compare currently has no way to specify a default value to use in the upgrade process. As a solution you could add a default value to the column in the source database and then run the Deployment Wizard. Alternatively, you can let the tool generate the SQL file for the update process and then manually update it to supply a default value. Hopefully Red Gate adds support for scenarios like this to SQL Compare in a future release.
Summary
In this article you’ve seen a number of extensions you could add to the sample application as well as number of tools and frameworks that I often use when building database-driven, N-layered web applications.
Although I’ve tried to make the sample solution as rich as possible, there are a number of features I did not include. In this article, I briefly mentioned a few and provided pointers on how to implement them yourself.
The article then discussed a few tools to create a great set of sample data (Data Generator), profile your Entity Framework queries (Entity Framework Profiler) and generate scripts to update production databases (SQL Compare). I also discussed the NLog framework that enables you to log information from your application during run-time in order to find and diagnose issues with your application.
This article also includes the series Building N-Layered Applications with ASP.NET 4.5. Over the past 10 articles, you’ve seen how to build an N-layered application using Visual Studio 2012 and (ASP).NET 4.5. In the first five articles you’ve seen how to design and set up your solution, how to make your solution unit testable, how to design your application’s domain model and how to build an entity framework implementation of the IRepository interface to work with data from a SQL Server database in the frontend application.
Article 6 to 9 discussed various ways to implement a frontend. These articles showed you how to build ASP.NET MVC 4 and ASP.NET Web Forms 4.5 frontends, as well as a WCF service application and a command line tool to import existing data. Each of these frontends have their own requirements and challenges which results in different implementations of using the same repository layer in the solution.
The series closed off with a quick look at some of the tools that come in handy when building database driven applications.
I hope you enjoyed reading the series as much as I enjoyed writing it. During the writing process I learned a ton of new things on all the different technologies I am describing in these articles which in turn enabled me to refine the processes and techniques I am using in my clients’ applications. I do realize that this article and concepts are just a “point in time”. The software landscape changes rapidly so concepts that make sense today might be outdated tomorrow. I won’t be updating this series (much) over the coming time but I do look forward to writing an updated series in a year or two, using techniques and technologies that are current by then.
If you have any comments or questions about this article series or the sample solution, post them at the end of the article that deals with your question or get in touch with me through the Contact page.
Thanks for reading, and happy N-layering!
Downloads
Where to Next?
Wonder where to go next? You can post a comment on this article.
Links in this Document
| Doc ID | 582 |
| Full URL | https://imar.spaanjaars.com/582/aspnet-n-layered-applications-extensions-tools-and-wrapping-up-part-10 |
| Short cut | https://imar.spaanjaars.com/582/ |
| Written by | Imar Spaanjaars |
| Date Posted | 12/18/2013 17:02 |
Comments
Talk Back! Comment on Imar.Spaanjaars.Com
I am interested in what you have to say about this article. Feel free to post any comments, remarks or questions you may have about this article. The Talk Back feature is not meant for technical questions that are not directly related to this article. So, a post like "Hey, can you tell me how I can upload files to a MySQL database in PHP?" is likely to be removed. Also spam and unrealistic job offers will be deleted immediately.
When you post a comment, you have to provide your name and the comment. Your e-mail address is optional and you only need to provide it if you want me to contact you. It will not be displayed along with your comment. I got sick and tired of the comment spam I was receiving, so I have protected this page with a simple calculation exercise. This means that if you want to leave a comment, you'll need to complete the calculation before you hit the Post Comment button.
If you want to object to a comment made by another visitor, be sure to contact me and I'll look into it ASAP. Don't forget to mention the page link, or the Doc ID of the document.