ASP.NET N-Layered Applications - Setting up the Solution in Visual Studio (Part 2)
Note: this is part two in a series of ten. If you rather read this entire series off-line, you can buy the full series as a convenient PDF document that comes with the full source. Besides the convenience, buying the PDF will also make you feel good as it shows your appreciation for the articles and helps me pay the bills for my server and hosting so I can keep running imar.spaanjaars.com and continue to provide you with great content. For more details, check out this post that shows you how you can buy the entire series right now.
This is Part 2 in a series of 10 that show you how to build N-Layered applications using ASP.NET 4.5 and Entity Framework 5 Code First. The previous article provided some history of the architecture of the Contact Manager application and gave a broad overview of the new architecture. In this installment, things get a bit more concrete when you see how to setup a solution in Visual Studio 2012. The VS solution is going to contain three class libraries: one for the Infrastructure, one for the application’s Model and one to hold the Entity Framework (EF) Repository implementation. I’ll also add four frontend projects (an ASP.NET MVC 4, a Web Forms project, a WCF service project, and a windows command line application) which are discussed in detail in Part 6, 7, 8 and 9 of this series respectively. In the next article in this series I’ll extend the solution with four more projects for unit, integration, UI and service tests.
If you haven’t read Part 1 of this series yet, you’re encouraged to do so first. The following list has links to all articles in this series:
- Part 1 - Introduction
- Part 2 - Setting up the Solution in Visual Studio
- Part 3 - Making your Projects Unit Testable
- Part 4 - Implementing a Model
- Part 5 - Implementing a Repository using Entity Framework Code First
- Part 6 - Implementing an ASP.NET MVC 4 Frontend
- Part 7 - Implementing a Web Forms 4.5 Frontend
- Part 8 - Implementing a WCF 4.5 Frontend
- Part 9 – Importing Data Using the API
- Part 10 - Extensions, Tools and Wrapping Up
Note: as mentioned in Part 1, this article and the next article (Part 3) contain a lot of hands-on, step by step instructions that show you how to setup a solution like the Spaanjaars.ContactManager application. You can use these instructions pretty much as-is for your own applications. The remaining parts in the series analyze the working code for the Spaanjaars.ContactManager application. I’ll show a lot of the code in detail, and explain how it works, but you won’t find detailed step by step instructions on how to add the code and files to the various projects. Instead, you're encouraged to download the code at the end of each article to see how it works.
Naming Conventions
If you’ve read the previous article series, you’ll recognize the naming conventions I use for my projects and root namespaces. For the main projects I use the pattern: Company.Project.Layer where Company is your company’s or your client’s name, Project is the name of the application and Layer specifies the type of project in the stack. I can further divide the layer in specific project types. This gives me names such as Spaanjaars.ContactManager45.Model and Spaanjaars.ContactManager45.Web.Mvc.
My test projects follow the same pattern for the root name and are then further divided in the type of tests (Unit, Integration etc.) leading to names such as Spaanjaars.ContactManager45.Tests.Unit.
Note that the Infrastructure project I introduced in the preceding article is independent of the ContactManager application and can be reused across multiple applications. As such, it’s called Spaanjaars.Infrastrucure rather than Spaanjaars.ContactManager45.Infrastrucure.
Setting up the Solution
In the following section you’ll find detailed instructions on setting up the solution. This is useful if you want to create your own project from scratch. If you just want to see the sample code or run the application, you can skip all these steps and simply open the solution that comes with this article series in Visual Studio 2012. You find a link to the source code at the end of each article.
Note: these steps are heavily borrowing from an earlier article I wrote about setting up a project for team development and TFS. I decided to repeat part of the steps here and make them more specific for the Spaanjaars.ContactManager application.
- Start Visual Studio 2012 and choose File | New Project.
- At the top of the dialog, choose .NET Framework 4.5 from the drop-down list.
- In the Other Project Types category click Visual Studio Solutions and then click Blank Solution. As the name of the Solution, enter Spaanjaars.ContactManager45 and as the Location choose C:\Projects. Note: substitute Spaanjaars and ContactManager with your own company and project names.

Figure 2-1 The New Project Dialog in Visual Studio 2012 (click to enlarge)
- Click OK.
- Close Visual Studio and open the project folder (at C:\Projects\Spaanjaars.ContactManager45) in File Explorer (Windows Explorer on Windows 7 and earlier). Create a new folder called Main and then drag all of the Spaanjaars.ContactManager45.* files from C:\Projects\Spaanjaars.ContactManager45 into this new Main folder. Your structure now looks like this:
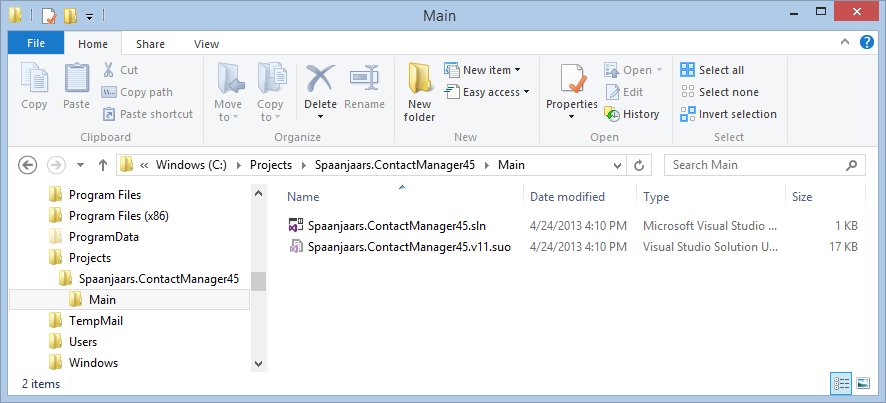
Figure 2-2 File Explorer Showing the Solution (click to enlarge)
This Main folder is used later for Branching in TFS. This all feels a bit clumsy but I see no other way to create the solution with this name and store it in a folder called SolutionName/Main. Fortunately, this is a one-time operation.
- Open the Solution in Visual Studio by double-clicking the .sln file in the Main folder.
- Right-click the Solution in the Solution Explorer and choose Add | New Project.
- In the tree on the left choose your programming language, and then choose Class Library from the Windows category.
- At the top of the dialog, make sure that .NET Framework 4.5 is selected.
- As the name of the project, enter Spaanjaars.ContactManager45.Model.
- As the location for the project enter C:\Projects\Spaanjaars.ContactManager45\Main\Applications:
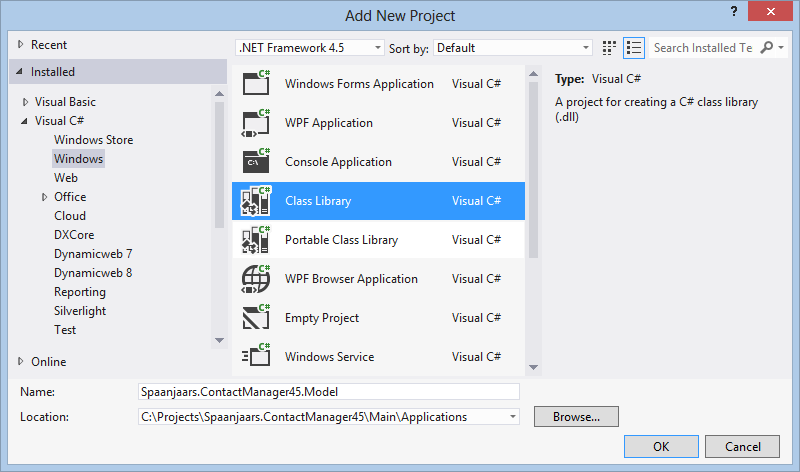
Figure 2-3 The Add New Project Dialog for the Model Project (click to enlarge)
Notice the inclusion of the Applications folder in the path. This way you can group all projects that make up the core application in a single folder. In the next article I’ll use a folder called Tests inside the Main folder to group all Test projects.
- Click OK to add the project.
- On disk, your solution now has the following structure:
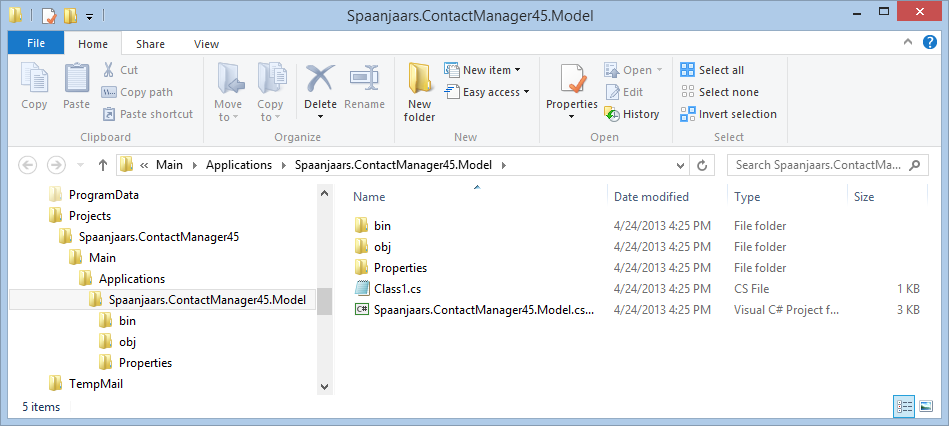
Figure 2-4 File Explorer Showing the Model Project (click to enlarge)
- Back in Visual Studio, delete the default Class1.cs file as you don’t need it.
- Repeat steps 7 through 12 and 14 two more times and add the following Class Library projects:
- Spaanjaars.ContactManager45.Repositories.EF
- Spaanjaars.Infrastructure
Make sure you don’t forget the \Applications part in the project’s location, as VS defaults to the solution’s folder instead.
Note that the Infrastructure project is generic enough to be placed in a namespace which is outside the ContactManager application. This makes it possible to reuse the classes defined in this project in other solutions based on the same model. For this sample application I put the project in the Applications folder, but if you’re reusing it across multiple projects you’ll want to store it elsewhere such as in C:\Projects directly.
In the next section you’ll see how to add four frontend projects to the solution. In your own projects you don’t need all four of them; just pick the one(s) you need. If you want to follow along with this series, just add all four projects.
- Right-click the Solution in the Solution Explorer and choose Add | New Solution Folder. Name the folder Frontend.
- The next steps show you how to add an ASP.NET MVC 4 application to the solution. If you prefer a Web Forms or another type of application instead, skip to step 21 or later. Right-click the new Frontend folder and choose Add | New Project. In the tree on the left, click the Web category and then choose ASP.NET MVC 4 Web Application.
- As the name of the project, enter Spaanjaars.ContactManager45.Web.Mvc.
- As the location for the project enter C:\Projects\Spaanjaars.ContactManager45\Main\Applications.
- Click OK to add the project.
- In the New ASP.NET MVC 4 Project dialog, choose Internet as the template. Make sure Razor is selected as the View Engine and if necessary, clear the checkbox for creating a unit test project. The unit test projects are added separately to the solution in the next article.
- Repeat steps 17 through 20, but this time add a new ASP.NET Web Forms Application and name it Spaanjaars.ContactManager45.Web.WebForms.
- Repeat steps 17 through 20 again, but this time add a new WCF Service Application and name it Spaanjaars.ContactManager45.Web.Wcf.
- Repeat steps 17 through 20 again, but this time add a new Console Application from the Windows category and name it Spaanjaars.ContactManager45.Import.
Tip: if you forget to store one of the projects in the Applications folder, remove the project from the Solution Explorer (right-click the project and choose Remove). Move the project to the Applications folder using File Explorer and then add the project to the solution again using its Add Existing Project option.
- Your Solution Explorer should now look similar to Figure 2-5
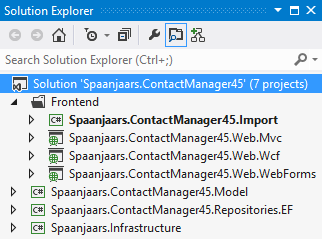
Figure 2-5 The Solution Explorer with all Application Projects
- From the Model project, add a reference to the Infrastructure project. Next, from the Repositories.EF project, add a reference to the Infrastructure and Model projects. Finally, from each of the four frontend projects add a reference to the Infrastructure, Model and Repositories.EF projects.
- Next, right-click the Solution and choose Rebuild Solution. This compiles the application and makes sure that everything is ready for the next steps.
Optimizing the Solution
Here are a few tips to get the Visual Studio solution in a good shape:
- Use NuGet to update all packages that were added by Visual Studio when you created the new projects. Libraries like jQuery, jQuery UI and Entity Framework are updated regularly, and are likely to be outdated when you added them to the solution. To update the packages, right-click the solution and choose Manage NuGet Packages for Solution. Next, click Updates on the left and then update each individual package that has updates.
- Consider enabling NuGet Package Restore. With this feature enabled, Visual Studio downloads missing packages whenever you build your solution. This is useful if you work in a team and use a shared code repository such as TFS, because packages added by one member are downloaded automatically the next time another team member builds the solution. To enable this feature, right-click the Solution and choose Enable NuGet Package Restore. You also need this option to build the sample application that comes with this article. See the Readme.txt file in the download for more details.
- Delete unneeded .cs files and other boilerplate stuff you don’t need. For example, if you haven’t already done so, remove the Class1.cs files from the class library projects. In addition, remove the IService1.cs, Service1.svc and Service1.svc.cs files from the WCF project.
Adding your Solution to TFS
Now that the skeleton for the solution is ready, it’s a good time to add it to your source control system. If you don’t use such a system, you can skip this section (although you should seriously consider using one; you can get a free hosted TFS solution for up to five team members at http://tfs.visualstudio.com/). The following section uses TFS as the source control system, but similar concepts apply to other source control systems.
- Using Team Explorer, connect to your TFS Server.
- On the Solution Explorer, right-click the Solution and choose Add Solution to Source Control.
- Click the appropriate TFS Project.
- As the name for the solution folder, enter Spaanjaars.ContactManager45/Main. The /Main part is not a typo. In fact it's very important as it’ll create an additional folder in TFS which you can set up as main branch later.
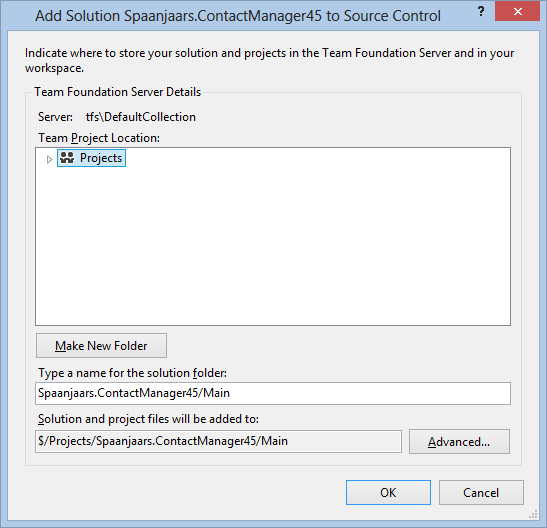
Figure 2-6 The Add Solution to Source Control Dialog
- Click OK.
- Your Source Control Explorer (accessible from the Team Explorer) should now look like this:

Figure 2-7 The Source Control Explorer (click to enlarge)
- Right-click the Main folder in the Source Control Explorer and choose Check In.
- As a comment, enter something like Initial Commit and click Check In.
- Still in the Source Control Explorer, right-click the Main folder and choose Branching and Merging | Convert to Branch.
- Enter a description such as Main Branch and click Convert.
- That’s it. From now on, other developers can get a local copy of this solution simply by opening the .sln file from the Main folder. When they compile the application, Visual Studio will automatically attempt to download the missing packages (provided you enabled NuGet Package Restore as explained earlier) removing the need to store these packages in TFS.
For more information about creating a branch, check out the original article on adding solutions to TFS (http://imar.spaanjaars.com/565/recommendations-for-setting-up-a-visual-studio-solution-for-tfs). In addition, check out the Branching and Merging guide at http://vsarbranchingguide.codeplex.com/.
Stuff I Like to Do
Here are a few tips to keep your solution in great shape, and easy to manage:
- Scan the list of installed packages for each project and remove the ones you don’t need. Adding them back in later is easy to do.
- From time to time, scan the Updates for the installed packages. Then for each package, consider whether you want to upgrade or not. Some updates cause breaking changes or require you to change code first.
- I like to keep a document in my Solution called Readme.txt or Stuff I Learned.txt where I keep a list of interesting blog posts, references to open source projects, sample implementations and more. To add this file, follow these steps:
- In the folder where the .sln file resides on disk (at C:\Projects\Spaanjaars.ContactManager45\Main) create a new folder called Documentation.
- Inside this new folder create a new text file called Readme.txt.
- Switch to Visual Studio, right-click the Solution and choose Add | New Solution Folder. Name the folder Documentation.
- Right-click this new folder and choose Add | Existing Item. Browse for the Readme.txt file in the Documentation folder and click Add to add the file to the solution.
- If you’re using TFS or another source control system, right-click the solution in the Solution Explorer and choose Check in. This enables you to store the solution files and folders in TFS as well.
Summary
In this article, you saw how to set up a Visual Studio solution and a number of projects. By following the recommendations from this article with regards to project naming and their location on disk your solution will be easy to manage for you and anybody else in your team that may need to have access to it. By storing all your projects in folders below the .sln file, opening the application from source control is as easy as double-clicking the .sln file in the Source Control Explorer.
In the next article you’ll see how to add various flavors of unit test projects to the solution. If you’re not interested in unit testing (yet), you can skip directly to Part 4. However, I still encourage you to read Part 3 as it might change your mind on whether unit testing is something for you or not.
Downloads
Where to Next?
Wonder where to go next? You can post a comment on this article.
Links in this Document
| Doc ID | 574 |
| Full URL | https://imar.spaanjaars.com/574/aspnet-n-layered-applications-setting-up-the-solution-in-visual-studio-part-2 |
| Short cut | https://imar.spaanjaars.com/574/ |
| Written by | Imar Spaanjaars |
| Date Posted | 07/12/2013 21:59 |
Comments
Talk Back! Comment on Imar.Spaanjaars.Com
I am interested in what you have to say about this article. Feel free to post any comments, remarks or questions you may have about this article. The Talk Back feature is not meant for technical questions that are not directly related to this article. So, a post like "Hey, can you tell me how I can upload files to a MySQL database in PHP?" is likely to be removed. Also spam and unrealistic job offers will be deleted immediately.
When you post a comment, you have to provide your name and the comment. Your e-mail address is optional and you only need to provide it if you want me to contact you. It will not be displayed along with your comment. I got sick and tired of the comment spam I was receiving, so I have protected this page with a simple calculation exercise. This means that if you want to leave a comment, you'll need to complete the calculation before you hit the Post Comment button.
If you want to object to a comment made by another visitor, be sure to contact me and I'll look into it ASAP. Don't forget to mention the page link, or the Doc ID of the document.