ASP.NET N-Layered Applications - Importing Data Using the API (Part 9)
Note: this is part nine in a series of ten. If you rather read this entire series off-line, you can buy the full series as a convenient PDF document that comes with the full source. Besides the convenience, buying the PDF will also make you feel good as it shows your appreciation for the articles and helps me pay the bills for my server and hosting so I can keep running imar.spaanjaars.com and continue to provide you with great content. For more details, check out this post that shows you how you can buy the entire series right now.
This is Part 9 in a series of 10 that show you how to build N-Layered applications using ASP.NET 4.5 and Entity Framework 5 Code First. In this part you’ll see how to build a command line application to import data from an external source (a CSV file in this case), using the application’s repository and model classes. Although this article is not related to ASP.NET directly, many ASP.NET developers may still benefit from it as importing data from an external resource is a common activity for ASP.NET developers.
If you haven’t read the earlier parts in this series yet, you’re encouraged to do so first. The following list has links to all articles in this series:
- Part 1 - Introduction
- Part 2 - Setting up the Solution in Visual Studio
- Part 3 - Making your Projects Unit Testable
- Part 4 - Implementing a Model
- Part 5 - Implementing a Repository using Entity Framework Code First
- Part 6 - Implementing an ASP.NET MVC 4 Frontend
- Part 7 - Implementing a Web Forms 4.5 Frontend
- Part 8 - Implementing a WCF 4.5 Frontend
- Part 9 – Importing Data Using the API
- Part 10 - Extensions, Tools and Wrapping Up
Introduction
Quite often when you build data-driven applications like the Spaanjaars ContactManager, you don’t always start with a green field project. It’s quite likely you already have an existing system with its own database that contains data you have to use in the new application. To get that data into your new application, you could import directly into SQL Server, or you could use the application’s API. The advantage of using the API is that you get all the type checking and validation that has been built into the model classes. Using the by now familiar repositories and model classes, you can quickly import data from any data source that .NET can communicate with and ensure only data that matches your application’s rules makes it into the system.
In this article, I’ll show you how to import data from a CSV file using a third-party library called FileHelpers. You can use the exact same techniques for other data sources such as databases (SQL Server, Oracle, Access, other OLEDB and ODBC databases and so on), XML files, web services and more.
In this article, I’ll cover the following topics:
- How to read a CSV file line by line using the FileHelpers library.
- How to deal with invalid or incomplete data in an import application.
- How to ensure a great performance of the application.
Importing from a CSV File
In the sample application that comes with this article, you find a project called Spaanjaars.ContactManager.Import in the Frontend folder. It’s a C# Console Application designed to read a CSV file from disk, extract data from that file, transfer that data into contact people and contact details and insert them in the database using the repository and model classes you’ve seen in the first five articles in this series. Here’s how the application looks in the Solution Explorer:
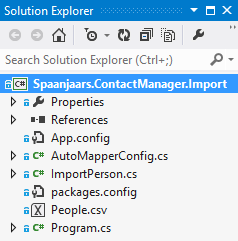
Figure 9-1 Solution Explorer for the Spaanjaars.ContactManager.Import application
I’ll discuss the three code files later in this article, and the CSV file called People.csv in the next section.
Introducing the CSV File
To make things as realistic as possible, I created a CSV file that is not error-free or optimal and contains a number of issues that need to be resolved during the import. The following table lists the available columns in the file and the possible problems the data in those columns can have.
| Name | Type | Description |
First name |
string |
The person’s first name. Always present. |
Last name |
string |
The person’s first name. Always present. |
Date of birth |
DateTime |
The person’s date of birth in the format M/d/yyyy. The date is always present. |
Type |
int |
The type of the person; matches the values in the PersonType enum. |
Address 1 |
string |
These four columns contain the home address of the person. Not every field is always filled. Some fields contain the text NULL to indicate a null value. |
Zip 1 |
string |
|
City 1 |
string |
|
Country 1 |
string |
|
Address 2 |
string |
These four columns contain the work address of the person. Not every field is always filled. Some fields contain the text NULL to indicate a null value. |
Zip 2 |
string |
|
City 2 |
string |
|
Country 2 |
string |
|
string |
The person’s e-mail address. Some e-mail addresses are in an invalid format. This field can be null in which case it contains the text NULL. |
|
Email type |
string |
The type of e-mail address. Can be PRIVATE or COMPANY or can be NULL when the e-mail address is null. Note that these don’t match the enum values directly and thus need to be converted into the proper enum type. |
Phone number |
string |
The person’s phone number. Since no type is present in the file, the application imports these as ContactType.Business. |
Here’s an example row:
Crystal,Palmer,7/6/1968,2,113 East Old Road,63867,30 New St.,Togo,55 Milton Road,
      28027,93 West White Hague Road,Macao,cmxcuksv.oqovynknfv@beuvqc.org,COMPANY,(845) 121-3652
The CSV file is copied to the application’s Bin folder whenever it changes, and the application will use that file if you’re not explicitly specifying a full path to a file as an argument at the command line.
When the application is running, it will report the number of rows that have been imported successfully and the number of rows that failed. It also reports the number of rows that are processed per second. Figure 9-2 shows the application while running:
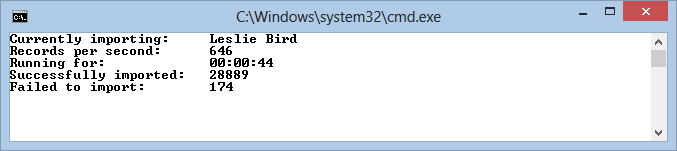
Figure 9-2 The Command Line Application Importing Contact Data (click to enlarge)
If you wonder if I know that many people, the answer is no. I generated a huge amount of sample data in the SQL Server database using Red Gate’s Data Generator and then exported that to a CSV file. Part 10 has more details on this tool.
Introducing the FileHelpers
You have a couple of different options when it comes to parsing a CSV file. You could write your own custom code to do it, you can use the TextFieldParser that is part of the Microsoft.VisualBasic assembly, or you can use one of the existing third party libraries such as CsvHelper (https://github.com/JoshClose/CsvHelper), CsvReader (http://www.codeproject.com/Articles/9258/A-Fast-CSV-Reader) or FileHelpers (http://filehelpers.sourceforge.net/). I have used FileHelpers a number of times in real-world projects in the past and it has served me well, so I’ll use it in this article again.
Importing a CSV file with FileHelpers is really easy and is typically a three-step process:
- Install the FileHelpers library using NuGet.
- Define a custom class that can hold the data for an individual row. Each field in the class maps to a column in the source file. You must define the fields in the order they appear in the source file. You can use .NET types like string, int and DateTime and the FileHelpersEngine will correctly populate them. You can use various attributes to define the conversion from the source to the target to handle special cases.
- Finally, you can loop over the individual rows in the source file using the FileHelperEngine. In my example, I am using the FileHelperAsyncEngine class which lets you process rows as they are being read by the engine. The alternative is the FileHelperEngine class which loads all rows at once which may consume more memory when reading large files.
I’ll show you each step in detail in the next sections.
Installing FileHelpers using NuGet
Once again, this is easy. Just execute Install-Package FileHelpers from the Package Manager Console window. Make sure your import application is selected in the Default project drop-down list.
Define a Custom Class to Hold the Imported Data
My custom data class looks more or less like the CSV file I described earlier. For each column in the source file I create a field. I also used .NET types for columns such as the DateOfBirth (a DateTime) and the Type (an int in this example). Here’s the full class (found in ImportPerson.cs):
[DelimitedRecord(",")]
public class ImportPerson
{
  public string FirstName;
  public string LastName;
  [FieldConverter(ConverterKind.Date, "M/d/yyyy")]
  public DateTime DateOfBirth;
  public int Type;
  public string Address;
  public string Zip;
  public string City;
  public string Country;
  public string Address2;
  public string Zip2;
  public string City2;
  public string Country2;
  public string Email;
  public string EmailType;
  public string PhoneNumber;
}
As you can see, all you need to do is define a class, add a few fields, and then apply some attributes. The DelimitedRecord attribute tells the engine that each column value is separated by a comma. The FieldConverter attribute helps to convert source data to the target. In this example, I am also specifying the date format as it appears in the source file. For more information on the attributes, take a look at the FileHelpers web site at: http://filehelpers.sourceforge.net/.
Processing Contact Rows
Once the data class is setup, reading a CSV file and getting instances of ImportPerson back is really simple. Here’s the minimum amount of code you need to write:
using (var importEngine = new FileHelperAsyncEngine<ImportPerson>())
{
  importEngine.BeginReadFile(_fileName);
  foreach (ImportPerson importPerson in importEngine)
  {
    // Work with importPerson here.
  }
  importEngine.Close();
}
For the sample application, the foreach loop contains code like this (there’s more, but most of it has to do with error handling and writing the progress to the screen). You find this code in Program.cs inside the Main method.
var person = new Person();
Mapper.Map(importPerson, person); // Maps the ImportPerson to a person using AutoMapper.

TryAddEmailAddress(importPerson, person);
TryAddPhoneNumber(importPerson, person);

FixAddress(person.HomeAddress, changeMissingDataToNull: false);
FixAddress(person.WorkAddress, changeMissingDataToNull: false);

if (!person.Validate().Any())
{
  PeopleRepository.Add(person);
  // Todo: Commit changes
}
This code creates a Person instance that is eventually added to the repository if it’s completely valid. I am using AutoMapper again to go from an ImportPerson to a Person. Since the four properties of each address come from separate columns in the source file, I needed some trickery to tell AutoMapper how to take those fields and turn them into an Address. Here’s the code for the AutoMapper configuration (inside AutoMapperConfig.cs):
Mapper.CreateMap<ImportPerson, Person>()
    .ForMember(x => x.Id, x => x.Ignore())
    .ForMember(x => x.DateCreated, x => x.Ignore())
    .ForMember(x => x.DateModified, x => x.Ignore())
    .ForMember(x => x.EmailAddresses, x => x.Ignore())
    .ForMember(x => x.PhoneNumbers, x => x.Ignore())
    .ForMember(x => x.HomeAddress, x => x.ResolveUsing(ip => new Address(ip.Address,
          ip.City, ip.Zip, ip.Country, ContactType.Personal)))
    .ForMember(x => x.WorkAddress, x => x.ResolveUsing(ip => new Address(ip.Address2,
          ip.City2, ip.Zip2, ip.Country2, ContactType.Business)));
Mapper.AssertConfigurationIsValid();
ResolveUsing uses a lambda expression that receives an instance of the ImportPerson and returns an instance of Address. Within the function body I can access the relevant fields to construct a new Address. I really like this as it enables me to define all mapping in a central location so my core application is free from stuff like this.
I am taking a slightly different approach with the TryAddEmailAddress and TryAddPhoneNumber methods. Here’s the code for the first of these two methods:
private static void TryAddPhoneNumber(ImportPerson importPerson, Person person)
{
  if (!string.IsNullOrEmpty(importPerson.PhoneNumber) && importPerson.PhoneNumber != "NULL")
  {
    person.PhoneNumbers.Add(importPerson.PhoneNumber, ContactType.Business);
  }
}
When the column for the phone number does not contain an empty string or the word NULL, I add a phone number to the Person’s PhoneNumbers collection. As a contact type I am hardcoding ContactType.Business as the source file contains no relevant information to determine the real type. This is just an implementation choice. How you handle exceptions like these depends entirely on the source file and the business requirements of your application.
Note that earlier I said that the source file contains invalid data for the addresses and e-mail addresses. For example, an address may not be complete and one or more columns may contain the value NULL. Once again, how you handle that depends on your requirements. As an example, I wrote two methods that can set the address properties to null or to <Unknown> when they contain invalid data:
private static Address FixAddress(Address address, bool changeMissingDataToNull)
{
  string street = SetValueToNullOrUnknown(address.Street, changeMissingDataToNull);
  string zipCode = SetValueToNullOrUnknown(address.ZipCode, changeMissingDataToNull);
  string city = SetValueToNullOrUnknown(address.City, changeMissingDataToNull);
  string country = SetValueToNullOrUnknown(address.Country, changeMissingDataToNull);
  return new Address(street, city, zipCode, country, address.ContactType);
}

private static string SetValueToNullOrUnknown(string value, bool changeMissingDataToNull)
{
  string temp = changeMissingDataToNull ? null : "<Unknown>";
  return string.IsNullOrEmpty(value) || value == "NULL" ? temp : value;
}
The value <Unknown> will eventually make it to the database, but null may be rejected if at least one of the other three properties of Address does have a value (remember: it’s all or nothing. No value for all properties is considered null, but at least one value means the Validate method of Address requires all values to be set).
Right before the code tries to add the Person instance to the repository, it calls Validate. When the Person, or any of its properties contain invalid data, the person is not added to the repository. What you do in this case depends on your business requirements. You can log the error and write the line number to a file for later processing or you could try to automatically fix problems as I did with the Addresses.
Once the person is added to the repository, the final thing to do is save the changes to the database. For the import application that deals with many entities at the same time, this works a bit differently as you’ll see in the next section.
Ensuring Great Performance
When saving the changes in the repository to the database, you have a couple of options. For example you could try to save all changes at once, with code like this:
using (var uow = new EFUnitOfWorkFactory().Create())
{
  foreach (ImportPerson importPerson in engine)
  {
    ...
    PeopleRepository.Add(person);
  }
}
For every valid row in the CSV file, a new Person is added to the repository. As you’ve seen in Part 5 of this series, at the end of the using block the UnitOfWork automatically calls SaveChanges which submits the changes to the database. In testing I found this to be quite a slow method when dealing with many entities. The reason for this is that inserts in an EF DbContext become slower when the context already contains other entities. You won’t notice this with a few rows, but it becomes quite obvious with hundreds or thousands of rows in the source file.
An alternative to solution to this problem looks like this:
foreach (ImportPerson importPerson in engine)
{
  using (var uow = new EFUnitOfWorkFactory().Create())
  {
    ...
    PeopleRepository.Add(person);
  }
}
In this example a new UnitOfWork is created for each individual person (inside the foreach loop) which is then saved to the database. This also doesn’t perform well, because of all the overhead of instantiating data contexts and SQL Server connections. I found that saving the people entities every 30 rows or so gave me the best performance. For that to work, I had to make two changes. First, I needed to keep track of the number of new people being added using the success variable.
Secondly, I had to call Commit on the IUnitOfWork on every 30 rows and pass true to have it clear out the existing data context. The final solution looks like this:
PeopleRepository.Add(person);
if (success % 30 == 0)
{
  uow.Commit(true);
}
The Commit method saves the changes in the DbContext by calling SaveChanges:
public void Commit(bool resetAfterCommit)
{
  DataContextFactory.GetDataContext().SaveChanges();
  if (resetAfterCommit)
  {
    DataContextFactory.Clear();
  }
}
The resetAfterCommit parameter clears the existing data context which gets rid of the previously saved Person entities. On the next call to GetDataContext, a new instance is created and returned.
The remaining records that are not saved by calling Commit are saved automatically at the end of the using block.
This import implementation actually drove part of the design of the IUnitOfWork interface and concrete implementations. Initially, I did not design a Commit method as committing would happen automatically. For most web applications where you only have a few entities that need to be saved at the same time, that works really well. However, for bulk inserts like this one, I really needed a better solution, and a Commit method to send the changes to the database explicitly as well as a means to clear out the existing data context turned out to be the best solution.
I tested the performance of the various alternatives by inserting 30,000 rows from a CSV file for each option. The table below shows the performance numbers for each alternative:
| Strategy | Number of items per second | Time |
1 Unit of work for the entire CSV file |
10 |
~ 40 minutes |
1 Unit of work per line in the CSV file |
A few |
A few hours |
Save every 10 rows |
546 |
54 seconds |
Save every 30 rows |
671 |
44 seconds |
Save every 100 rows |
551 |
54 seconds |
When using one unit of work per line in the CSV file, performance degraded up to a point where less than a row per second was processed. I canceled the import after almost an hour at which time it had processed around 20 percent of the rows.
Saving every 30 rows seemed to give the best performance on my machine and for my application. It’s important to test out settings like this yourself, as a lot of it depends on the specifics of your application. If raw speed is very important you could also consider alternative solutions such as bulk copy, or disabling features like validation and change tracking on the DbContext. More details can be found here:
- http://elegantcode.com/2012/01/26/sqlbulkcopy-for-generic-listt-useful-for-entity-framework-nhibernate/
- http://stackoverflow.com/questions/5940225/fastest-way-of-inserting-in-entity-framework/5942176#5942176
- http://stackoverflow.com/questions/6107206/improving-bulk-insert-performance-in-entity-framework
When I disabled validation and change tracking I was able to insert around 960 items a second; a performance improvement of over 40 percent compared to the best performing solution. If you decide to use this feature, be sure to make it configurable so only tools like the Importer use it and other code still uses the default validation and change tracking mechanisms. I haven’t implemented this in the sample application as I feel it may not be necessary in the majority of the cases and should be treated as a “one-off” implementation.
Stuff I Like to Do
- With an import tool like this one, I am not overly concerned with testing or dependency injection. Most of the testing comes down to integration testing anyway (where you import real source files and validate them directly in a real database) since the import code is pretty straightforward (and thus testing mainly comes down to making sure the data lands where it should). This means I don’t mind instantiating classes like PeopleRepository directly in the Main method.
- I do use AutoMapper for applications like this, as it makes it really easy to convert from one type to another. In this example, I could have used methods like ResolveUsing to fix the problem with the non-matching contact type column. I chose not to do this to show you another alternative. However, using AutoMapper for the conversion would be similar to how the Address objects were filled with data from the ImportPerson class.
- I do like to keep an eye on performance. Often these applications are used only once to do the final import and then it doesn’t really matter if it takes 20, 30 or 120 minutes to complete. However, by analyzing the performance of the application you may find areas that can be improved for other scenarios as well, leading to a better overall performance.
Summary
In this article you saw how to import contact data from a CSV file using the repository and model classes introduced in earlier parts of this article series as well as an external library called FileHelpers. With FileHelpers, importing a CSV file is really straightforward. All you need to do is define a data class that will hold the data coming from each row, and then write some code to loop over all the rows in the source file using the FileHelperEngine and FileHelperAsyncEngine classes. I use AutoMapper to convert the imported type into a Person model instance which I can then feed into my repository.
At the end I discussed a few performance implications that come to light with an import application like this one. Performance issues may go unnoticed when dealing with only a few entities, but they become more apparent when dealing with thousands of them.
Downloads
Where to Next?
Wonder where to go next? You can post a comment on this article.
Links in this Document
| Doc ID | 581 |
| Full URL | https://imar.spaanjaars.com/581/aspnet-n-layered-applications-importing-data-using-the-api-part-9 |
| Short cut | https://imar.spaanjaars.com/581/ |
| Written by | Imar Spaanjaars |
| Date Posted | 12/04/2013 22:02 |
Comments
Talk Back! Comment on Imar.Spaanjaars.Com
I am interested in what you have to say about this article. Feel free to post any comments, remarks or questions you may have about this article. The Talk Back feature is not meant for technical questions that are not directly related to this article. So, a post like "Hey, can you tell me how I can upload files to a MySQL database in PHP?" is likely to be removed. Also spam and unrealistic job offers will be deleted immediately.
When you post a comment, you have to provide your name and the comment. Your e-mail address is optional and you only need to provide it if you want me to contact you. It will not be displayed along with your comment. I got sick and tired of the comment spam I was receiving, so I have protected this page with a simple calculation exercise. This means that if you want to leave a comment, you'll need to complete the calculation before you hit the Post Comment button.
If you want to object to a comment made by another visitor, be sure to contact me and I'll look into it ASAP. Don't forget to mention the page link, or the Doc ID of the document.