ASP.NET N-Layered Applications - Implementing a Model (Part 4)
Note: this is part four in a series of ten. If you rather read this entire series off-line, you can buy the full series as a convenient PDF document that comes with the full source. Besides the convenience, buying the PDF will also make you feel good as it shows your appreciation for the articles and helps me pay the bills for my server and hosting so I can keep running imar.spaanjaars.com and continue to provide you with great content. For more details, check out this post that shows you how you can buy the entire series right now.
This is Part 4 in a series of 10 that show you how to build N-Layered applications using ASP.NET 4.5 and Entity Framework 5 Code First. In this part you’ll see how to build a model using POCO classes – Plain Old CLR Objects – that have no dependencies to external frameworks (such as a requirement to inherit from an Entity Framework base class). In addition, you will see how to create unit tests for your POCO classes as well as lay a foundation for validation of these classes.
If you haven’t read the earlier parts in this series yet, you’re encouraged to do so first. The following list has links to all articles in this series:
- Part 1 - Introduction
- Part 2 - Setting up the Solution in Visual Studio
- Part 3 - Making your Projects Unit Testable
- Part 4 - Implementing a Model
- Part 5 - Implementing a Repository using Entity Framework Code First
- Part 6 - Implementing an ASP.NET MVC 4 Frontend
- Part 7 - Implementing a Web Forms 4.5 Frontend
- Part 8 - Implementing a WCF 4.5 Frontend
- Part 9 – Importing Data Using the API
- Part 10 - Extensions, Tools and Wrapping Up
Introduction
In Part 1 of this article series you saw a brief overview of the functionality of the ContactManager application version 4.5. Most of the functionality is very similar to the design presented in the 2.0 and 3.5 versions of my N-Layered architecture articles.
Because the functionality is so similar, I’ll skip the “requirements gathering” phase. Normally, when you start a new project you don’t know up front how your application and model should look. To figure out the type of application, the underlying model and the functionality, you typically have workshops with your client to gather all the requirements. These requirements then drive the design of the application and the model, which is a representation of the objects in your domain that your application is going to work with. In the 2.0 version of this series I wrote about the requirements for the ContactManager application. You’re encouraged to check out the Design - Gathering Requirements section in the original article to find out more about the model for that application. In the new series, the model I use is pretty similar, as you’ll see in the following sections.
To learn more about how to gather requirements to design your applications and models, check out the following publications:
- http://imar.spaanjaars.com/416/building-layered-web-applications-with-microsoft-aspnet-20-part-1#gatheringrequirements
- Practicing Domain-Driven Design (Scott Millett, under development: https://leanpub.com/Practicing-DDD)
- Implementing Domain-driven Design (Vaughn Vernon, 2013, http://www.amazon.com/Implementing-Domain-Driven-Design-Vaughn-Vernon/dp/0321834577/)
Based on the model from the previous article series, the application needs the following classes:
| Class Name | Description |
Person |
This class represents a contact person used to keep track of your contacts. |
Address |
This class represents a physical address that can be associated with a person. |
EmailAddress |
This class represents an e-mail address of a person. |
PhoneNumber |
This class represents a phone number of a person. |
In addition to these classes, the model also needs the following types:
| Type Name | Type | Description |
PersonType |
Enum |
Defines the type of a person, such as Friend, Family or Colleague. |
ContactType |
Enum |
Defines the type of the e-mail addresses and phone numbers, such as Business or Personal. |
People |
Class |
These classes are created to hold a collection of each of the main entities in the model. While you could use more generic collections such as List<T>, I prefer to create separate collections for each main type. You will see how to create these collections later. |
The following diagram shows all of these types. Later sections of this article describe the various types in more detail, including their underlying code and place in the application.
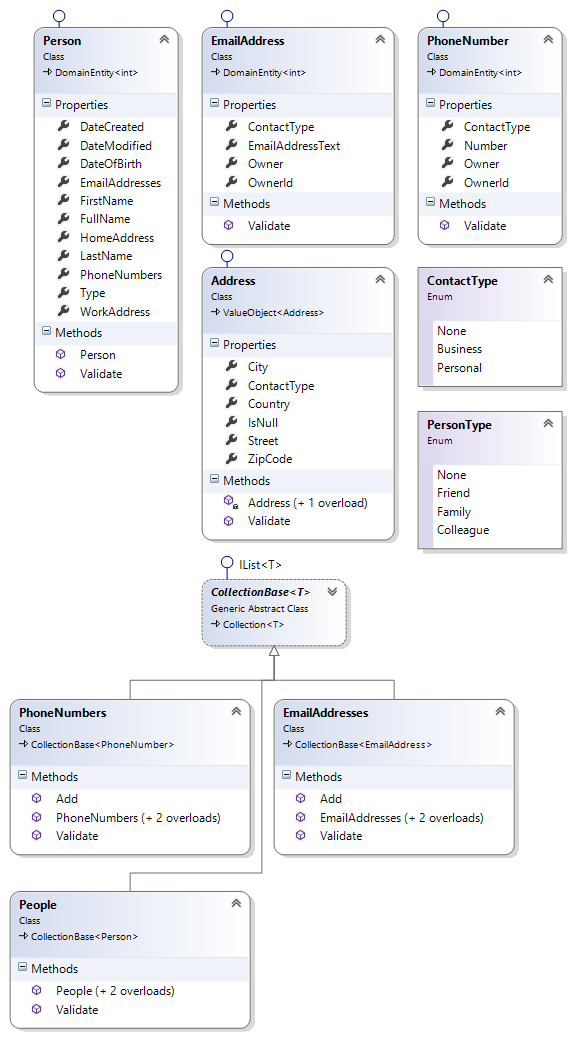
Figure 4-1 The Class Diagram for the Model project(click to enlarge)
If you look carefully at the list of types in the diagram, you’ll notice the collection class for Address is missing. The reason for this is that the current application doesn’t need it. The person class has two properties of type address called HomeAddress and WorkAddress respectively. This is a change from the original design where a contact person could have a collection of addresses as well. I’ve done this to show you the concept of Value Objects which are discussed next. Entity Framework (EF) doesn’t work well with collections of Value Objects and thus I decided to add the Address class as singular properties directly on the Person class.
Where Does the Model Fit In?
The classes defined in the Model layer flow between the concrete repositories and the user interface. The UI should preferably not know anything, or at least as little as possible about the concrete repositories and should work with the repository interfaces instead. If you think back about the architecture diagram from Part 1, the Model classes would be placed between the concrete repositories and the associated interfaces and between the repository interfaces and the UI. Figure 4-2 shows the updated diagram:
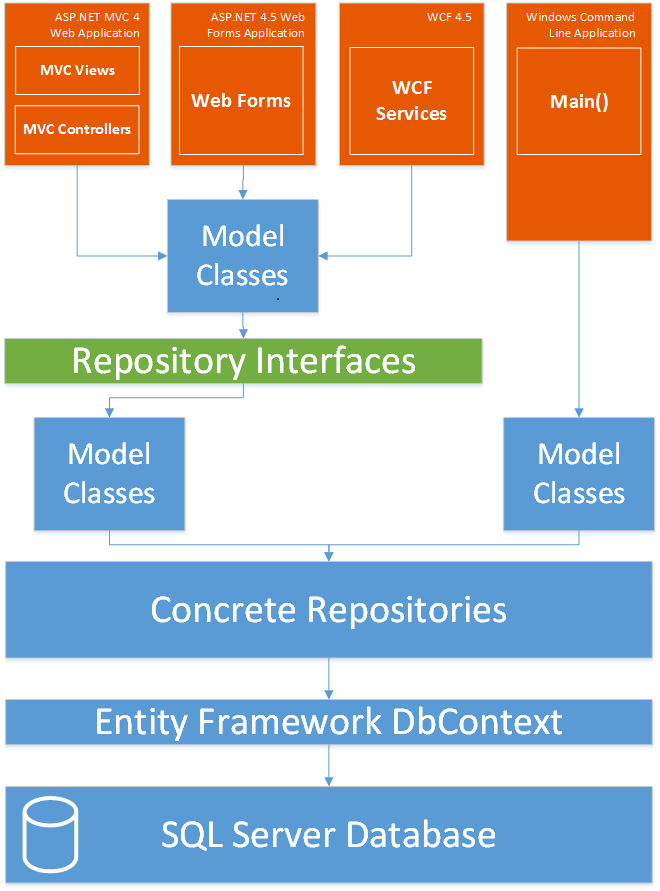
Figure 4-2 Model Classes in the Architecture Diagram (click to enlarge)
Defining Your Types
Once you’ve identified the core types for your application, the next step is to place them in one of two groups: Entities or Value Objects, two terms that come from the Domain Driven Design language. A lot has been written about the differences between the two (see the links at the end of this section), so I won’t repeat the complete discussion here. Instead, I’ll summarize the differences and explain what the differences mean for the ContactManager application.
An Entity is an object that is identified by a unique ID, rather than by the value it represents. The canonical example is the Person class. If two Person instances have the same name, do you consider them to represent the same person? Most likely not, as the name would not uniquely identify the person, and there’s a high probability that even though these instances contain the same name they refer to two different people in the real world.
A Value Object on the other hand is identified by its properties and the values they contain. The canonical example here is Address: two instances of Address that contain the data “327 Washington Blvd Venice, California 90291” are most likely considered the same; they don’t have (or need) an identity on their own.
You can read more about the differences between Entities and Value Objects in the following articles:
- http://stackoverflow.com/questions/75446/value-vs-entity-objects-domain-driven-design
- http://lostechies.com/jimmybogard/2008/05/21/entities-value-objects-aggregates-and-roots/
- http://devlicio.us/blogs/casey/archive/2009/02/13/ddd-entities-and-value-objects.aspx
To make the distinction in your code between these two types, it’s a good idea to create two base classes that your entities can inherit from. You see how to do this next.
Creating the Infrastructure
In this section you see how to implement the Infrastructure project by creating two base classes: one for an Entity and one for a Value Object.
Note: I’ll show the implementation of a number of types step by step. That means that the code you see may not be the final code in the project.
Creating Base Classes for Entities and Value Types
A base class for an Entity requires at least an identity property which is typically called Id, although, you’re free to make up another name. Since the base class should be reusable across multiple type definitions, it’s a good idea to make the type of this Id column generic so that classes that inherit this base class can determine the actual type (for example, an int or a Guid). The class could also have an IsTransient method that determines if the object is new (has not been assigned an ID by the underlying database) or not. To implement this base class, I added a new class file to the Spaanjaars.Infrastructure project, called it DomainEntity.cs and added the following code:
namespace Spaanjaars.Infrastructure
{
  public abstract class DomainEntity<T>
  {
    /// <summary>
    /// Gets or sets the unique ID of the entity in the underlying data store.
    /// </summary>
    public T Id { get; set; }

    /// <summary>
    /// Checks if the current domain entity has an identity.
    /// </summary>
    /// <returns>True if the domain entity is transient (i.e. has no identity yet),
    /// false otherwise.
    /// </returns>
    public bool IsTransient()
    {
      return Id.Equals(default(T));
    }
  }
}
Here’s the class diagram for the complete base class from the sample project. I’ll discuss the members for comparison and validation later.
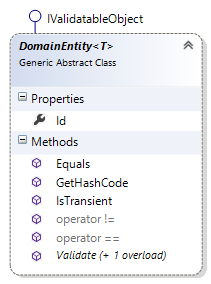
Figure 4-3 The DomainEntity<T> class
With the base class defined, I can now modify the Person class so it inherits DomainEntity and sets the type of Id to an int. To implement that change, I modified Person in the Model project as follows:
using Spaanjaars.Infrastructure;
namespace Spaanjaars.ContactManager45.Model
{
  public class Person : DomainEntity<int>
  {
  }
}
Notice how I used DomainEntity<int> to define the type of the Id property as an int. I also removed the Id property from the Person class as it now inherits that from the DomainEntity base class.
With the Person class done, I could now modify the NewPersonHasEmptyId test method so it now uses the IsTransient method instead of checking for a hard-coded value of zero:
[TestMethod]
public void NewPersonHasEmptyId()
{
  var person = new Person();
  person.IsTransient().Should().BeTrue();
}
In the sample project that comes with this article series you’ll also see implementation code for validation inside the DomainEntity<T> class. This is discussed later in the series.
Implementing a ValueObject base class is simpler as it doesn’t require an identity. I added the following class – called ValueObject – to the Spaanjaars.Infrastructure project:
public abstract class ValueObject<T> where T : ValueObject<T>
{
}
Note the constraint on this type using the where clause. Although it seems to state the obvious, or even may cause a circular reference, this code makes sure that a class that inherits ValueObject<T> can only pass itself for the T parameter. In other words, the following is valid:
public class Address : ValueObject<Address>
because the Address type passed for the T parameter does inherit ValueObject<Address>.
The following is invalid because int does not inherit ValueObject<int>:
public class Address : ValueObject<int>
Here’s how the complete ValueObject class looks like:
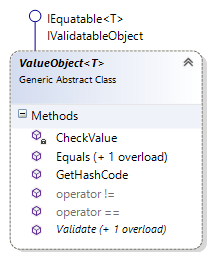
Figure 4-4 The ValueObject<T> class
I’ll explain the other members of this class in this and later parts in the series when I discuss modifying these classes to implement equality comparison and validation.
Adding Properties to the Person Class
With the base class done, it’s time to add a few basic properties to the Person class such as a name, a type and date of birth. Later in this article I’ll modify Person once more when I add properties for the various contact details.
Before I show you the new Person class, first take a look at the two enumerations that I introduced in the beginning of this article to define the type of a person and of a contact record. I added two new enums to a new Enums folder inside the Model project and completed them with the following code:
namespace Spaanjaars.ContactManager45.Model
{
 /// <summary>
 /// Determines the type of a contact person.
 /// </summary>
 public enum PersonType
 {
   /// <summary>
   /// Indicates an unidentified value.
   /// </summary>
   None = 0,

   /// <summary>
   /// Indicates a friend.
   /// </summary>
   Friend = 1,

    /// <summary>
   /// Indicates a family member.
   /// </summary>
   Family = 2,

    /// <summary>
   /// Indicates a coworker.
   /// </summary>
   Colleague = 3
 }
}

namespace Spaanjaars.ContactManager45.Model
{
 /// <summary>
 /// Determines the type of a contact record.
 /// </summary>
 public enum ContactType
 {
   /// <summary>
   /// Indicates an unidentified value.
   /// </summary>
   None = 0,

    /// <summary>
   /// Indicates a business contact record.
   /// </summary>
   Business = 1,

    /// <summary>
   /// Indicates a personal contact record.
   /// </summary>
   Personal = 2
 }
}
Enum support for Entity Framework Code First has been added in version 5. It’s a very useful (and much needed) addition to the framework, as using enums is quite common. The cool thing about enums in EF is that it “just works.” You don’t have to define any special behaviors for your enums to roundtrip to the database correctly.
With the enums done, I completed the Person class as follows:
using System;
using Spaanjaars.Infrastructure;

namespace Spaanjaars.ContactManager45.Model
{
  public class Person : DomainEntity<int>
  {
    public string FirstName { get; set; }
    public string LastName { get; set; }
    public DateTime DateOfBirth { get; set; }
    public PersonType Type { get; set; }
  }
}
Here's how its Class Diagram looks:
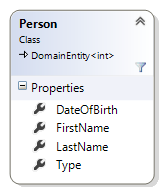
Figure 4-5 The Person Class
NOTE: throughout the model classes you’ll find attributes on properties like this:
[Required]
public string FirstName { get; set; }
This marks the first name of a person as being required. These attributes are supported by EF, but it also has an alternative available in the form of the Fluent API that enables you to configure your business rules like a required field, a maximum length and so on, at the DbContext level rather than at the entity level. This way you can centralize your business rules and keep the entity classes really clean. This is just a preference though; many of the validation rules set by the API can just as well be applied using data annotation attributes such as the Required attribute. Since the Fluent API requires a DbContext, you need to create one first. The sections “Building the Object Context” and “Configuring your model’s business rules” in Part 5 will have more details. I typically apply low level attributes like Required at the class level, and define database specific information (such as the length of a field) in the configuration of EF.
Notice how the name of the person consists of a first name and a last name. In many places in the application the full name of the user is displayed, so it makes sense to make a (read-only) property for that. Before I implemented the property, I first wrote the following unit tests in the PersonTests class in the Unit Tests project:
[TestMethod]
public void FirstAndLastNameResultsInFullName()
{
  var person = new Person() { FirstName= "Imar", LastName= "Spaanjaars" };
  person.FullName.Should().Be("Imar Spaanjaars");
}

[TestMethod]
public void EmptyFirstNameReturnsLastName()
{
  var person = new Person() { LastName = "Spaanjaars" };
  person.FullName.Should().Be("Spaanjaars");
}

[TestMethod]
public void EmptyLastNameReturnsFirstName()
{
  var person = new Person() { FirstName = "Imar" };
  person.FullName.Should().Be("Imar");
}

[TestMethod]
public void AllEmptyReturnsEmpty()
{
  var person = new Person();
  person.FullName.Should().Be(string.Empty);
}
I did not write all tests before I added the FullName property. I initially wrote the first test, and then used my refactoring tool to implement the FullName property and have it throw a NotImplementedException. I then completed all the other tests and implemented the property. Finally, I ran all tests to make sure they ran successfully. I needed a few refactoring steps before the code was working as expected.
In your own projects, the order of tests and implementation may vary from topic to topic. I am not a strict test driven developer and sometimes write the implementation first, followed by a bunch of tests to validate my code works correctly. However, it can often be very beneficial to write tests before you write implementation, so you can focus on the What (the public API of your code) rather than on the How (the actual implementation).
These tests ensure that the FullName property returns logical data, even if one of the fields (or both) is missing. Since a completely empty name doesn’t make a lot of sense, you’ll want to make one of these (or both) a required field. You’ll see later how it is done in Part 5 of this series.
With the unit tests done, I implemented the property as follows:
public string FullName
{
  get
  {
    string temp = FirstName ?? string.Empty;
    if (!string.IsNullOrEmpty(LastName))
    {
      if (temp.Length > 0)
      {
        temp += " ";
      }
      temp += LastName;
    }
    return temp;
  }
}
Since this is a read-only property, EF will ignore it and it won’t be persisted in the database.
With the basics of the Person class done, the next step is to add classes for the contact detail records. Once those are done, I’ll revisit the Person class again and add properties for addresses, phone numbers and e-mail addresses.
Adding the Contact Detail Classes
As you saw earlier in this article, the Person class has a few properties that contain contact information. For the contact data, the project needs the following three classes:
- Address
- PhoneNumber
- EmailAddress
For this article series, I implemented Address as a ValueObject and the other two as entities. You could argue that PhoneNumber and EmailAddress are great candidates for Value Objects and I would fully agree. However, I want to implement these types as collections (so you can have multiple instances of each attached to a contact person). To implement this one to many relationship in EF, the other end (i.e. the PhoneNumber and the EmailAddress) needs to have its own identity (e.g. an Id property). That conflicts with the absence of an identity in a ValueObject, and as such PhoneNumber and EmailAddress are implemented as entities. For these three classes, the sample project contains the following code:
// PhoneNumber
using Spaanjaars.Infrastructure;

namespace Spaanjaars.ContactManager45.Model
{
  public class PhoneNumber : DomainEntity<int>
  {
    [Required]
    public string Number { get; set; }
    public ContactType Type { get; set; }
    public Person Owner { get; set; }
    public int OwnerId { get; set; }
  }
}

// EmailAddress
using Spaanjaars.Infrastructure;

namespace Spaanjaars.ContactManager45.Model
{
  public class EmailAddress : DomainEntity<int>
  {
    [Required]
    [EmailAddressAttribute]
    public string EmailAddressText { get; set; }
    public ContactType Type { get; set; }
    public Person Owner { get; set; }
    public int OwnerId { get; set; }
  }
}

// Address
using Spaanjaars.Infrastructure;

namespace Spaanjaars.ContactManager45.Model
{
  public class Address : ValueObject<Address>, IValidatableObject
  {
    private Address() { }

    public Address(string street, string city, string zipCode,
                    string country, ContactType contactType)
    {
      Street = street;
      City = city;
      ZipCode = zipCode;
      Country = country;
      ContactType = contactType;
    }

    public string Street { get; private set; }
    public string ZipCode { get; private set; }
    public string City { get; private set; }
    public string Country { get; private set; }
    public ContactType { get; private set; }

    public bool IsNull
    {
      get
      {
        return (string.IsNullOrEmpty(Street) && string.IsNullOrEmpty(ZipCode)
                && string.IsNullOrEmpty(City) && string.IsNullOrEmpty(Country));
      }
    }
  }
}
EmailAddress and PhoneNumber participate in a one to many relationship: one Person can have zero to many instances of type EmailAddress and PhoneNumber. To create the relationship, I added the Owner property to these two classes. This way you can assign a person to these classes and link back to the Person from an EmailAddress or PhoneNumber. Besides the Owner property, I also added an OwnerId property of type int. EF supports "foreign key properties" which let you assign one entity to another simply by using its ID. So for example, rather than doing this:
var emailAddress = new EmailAddress { ... };
emailAddress.Owner = _personRepository.FindById(123);
you can assign the ID directly like this:
var emailAddress = new EmailAddress { ... };
emailAddress.OwnerId = 123;
This could save you from an additional call to the database when you only have the person's ID available (for example, when creating a new EmailAddress in a Web Form where the ID of the person is passed in the query string).
Obviously, you can still assign the Owner property a value if you happen to have a valid instance of Person.
The class diagram for the three classes with contact details looks as follows:

Figure 4-6 The Address, EmailAddress and PhoneNumber classes
Note: The IHasOwner interface and Validate methods are discussed later in this article.
EmailAddress and PhoneNumber inherit DomainEntity<int> which gives them an Id property of type int. Address inherits ValueObject<Address> which makes it a value object. For value objects, it’s a good practice to make them immutable. That means that once you’ve created an instance of an object and filled it with data through the constructor, you shouldn’t be able to change it anymore. This is easily accomplished with a constructor that has parameters for all properties of the class, like this:
public Address(string street, string city, string zipCode,
                 string country, ContactType contactType)
{
  Street = street;
  City = city;
  ZipCode = zipCode;
  Country = country;
  ContactType = contactType;
}
In addition, the setters of the properties have been marked private so they are only accessible from within the class:
public string Street { get; private set; }
And finally, in order for the Entity Framework to create instances of Address, it needs a parameterless constructor. This breaks the POCO requirements somewhat as you must implement this constructor to support EF. However, the constructor can be made private, so it’s not accessible by regular external code.
private Address() { }
Personally, I am fine with this requirement as I feel it doesn’t break my model design.
Dealing with Collections
When dealing with collections and Entity Framework, there’s something to be aware off. When you add entities to a collection that is tracked by Entity Framework (for example, because the parent of the collection has been added to the context) they are automatically added to the context and thus to the database. Consider this example:
var person = new Person();
person.EmailAddresses.Add(new EmailAddress { EmailAddressText = "imar@spaanjaars.com" });
myContext.People.Add(person);
myContext.SaveChanges();
When this code executes, EF inserts two new records: one in the Person table and one in the EmailAddresses table. The row in the EmailAddresses table will have a foreign key pointing to the Person table (if this is all new to you, don’t worry yet; I’ll dig deeper into this in Part 5).
However, if you try to remove an EmailAddress, things work a bit differently. Consider this code:
var person = myContext.People.First(x => x.Id = id);
person.EmailAddresses.Clear();
myContext.SaveChanges();
This code retrieves an existing person, clears the EmailAddresses collection and then saves the changes. What you might expect to happen is that the e-mail addresses that were previously assigned to the person are actually deleted from the database. This is, however, not the case. The only thing that happens is that EF clears the foreign key that points to the person. In other words, the e-mail address itself is not deleted from the database; it just no longer points to the Person row.
If you Google for this problem you find many solutions that show you how to mark the EmailAddress objects as deleted by setting their EntityState property to Deleted. However, as you’ll see later, you won’t have direct access to the EF data context from the locations where you’re removing e-mail addresses from the Person’s EmailAddresses collection. This is, however, relatively easy to fix in the DbContext itself as you’ll see in Part 5. In order for the DbContext to understand which objects it should remove, you can let these entities implement a custom interface that you can detect in the DbContext and take the appropriate action. Again, Part 5 shows how to implement the code in the DbContext so for now I’ll just show you the interface that the removable objects implement:
public interface IHasOwner
{
  /// <summary>
  /// The Person instance this object belongs to.
  /// </summary>
  Person Owner { get; set; }
}
public class EmailAddress : DomainEntity<int>, IHasOwner
{
}

public class PhoneNumber : DomainEntity<int>, IHasOwner
{
}
The interface is implemented by the Owner property (shown earlier) in each of the two classes. You’ll see this interface again in Part 5.
If you look in the sample code that comes with this article series, you’ll notice that these classes contain more code. Most of that code is related to validation, which is discussed in Part 5.
With the classes added to the project, I could write a few simple unit tests that demonstrate I can instantiate these classes and set their properties. However, most of that would come down to testing the .NET framework (do property getters and setters work for example) rather than testing my own code. I’ll write unit and integration tests for these classes later to test concepts like validation, which should implicitly cover instantiating and using these objects. Therefore, I am not adding any more tests for now.
Implementing Equality Comparison
When working with a model, you’re going to need the ability to compare two instances of a class in your model with each other. You could have an instance of a Person that you want to compare with an existing instance that is being submitted to your application using a WCF service for example. Or you may want to see if a person’s personal address is the same has her business address.
The default implementation for comparison of classes in .NET is to use reference equality; in other words, .NET checks if two references are pointing to the same object. Consider this example (which you find in the PersonTests class inside the Unit Tests project):
[TestMethod]
public void TwoPeopleWithSameIdAreTheSame()
{
  var person1 = new Person { Id = 1, FirstName = "Imar", LastName = "Spaanjaars" };
  var person2 = new Person { Id = 1, FirstName = "Imar", LastName = "Spaanjaars" };
  (person1 == person2).Should().BeTrue();
}
When you run this test now, it fails. The variables person1 and person2 are referring to two different instances of Person. This means that the equality check (==) returns false.
However, it would make perfect sense if the check returned true since Person is an Entity whose identity and uniqueness is defined by the Id property. Both Person instances have the same ID, so from an application perspective, they should be considered the same.
In contrast, two Addresses (implemented as Value Types) should be considered the same when the values for all of their properties match. Consider this test (that I added to the AddressTests class inside the Unit Tests project):
[TestMethod]
public void TwoIdenticalAddressesShouldBeTheSame()
{
  var address1 = new Address("Street", "City", "ZipCode", "Country", ContactType.Business);
  var address2 = new Address("Street", "City", "ZipCode", "Country", ContactType.Business);
    (address1 == address2).Should().BeTrue();
}
Again, when you run this test it would fail. The variables address1 and address2 each refer to a different instance. The default of the == operator for objects is to check reference equality, and so these two objects are not considered the same.
To fix these issues, and have .NET consider your entities to be the same if they have the same ID and consider your Value Objects to be the same when all of their properties match, you need to override Equals and the equality and inequality operators (== and !=).
For both implementations, I borrowed code from the Domain Oriented N-Layered .NET 4.0 Sample App (formerly at http://microsoftnlayerapp.codeplex.com/ but now unpublished as Microsoft considers the application as outdated; you can read more about it here.), a sample application and reference guide for implementing N-Layered applications in .NET. While there is some overlap between this guide and mine, you’ll find the Microsoft version is more complex and extensive, and much more geared towards large enterprise-scale applications.
Their sample application contains an implementation to compare Value Objects that uses reflection if necessary. Implementing their code into my ValueObject<T> class results in the following code:
public abstract class ValueObject<T> :
               IEquatable<T> where T : ValueObject<T>, IValidatableObject
{
  public abstract IEnumerable<ValidationResult> Validate(
               ValidationContext validationContext);

  public IEnumerable<ValidationResult> Validate()
  {
    var validationErrors = new List<ValidationResult>();
    var ctx = new ValidationContext(this, null, null);
    Validator.TryValidateObject(this, ctx, validationErrors, true);
    return validationErrors;
  }

  private bool CheckValue(PropertyInfo p, T other)
  {
    var left = p.GetValue(this, null);
    var right = p.GetValue(other, null);
    if (left == null || right == null)
    {
      return false;
    }

    if (typeof(T).IsAssignableFrom(left.GetType()))
    {
      return ReferenceEquals(left, right);
    }
    return left.Equals(right);
  }

  public bool Equals(T other)
  {
    if ((object)other == null)
    {
      return false;
    }

    if (ReferenceEquals(this, other))
    {
      return true;
    }

    //compare all public properties
    PropertyInfo[] publicProperties = GetType().GetProperties();

    if (publicProperties.Any())
    {
      return publicProperties.All(p => CheckValue(p, other));
    }
    return true;
  }

  public override bool Equals(object obj)
  {
    if ((object)obj == null)
    {
      return false;
    }

    if (ReferenceEquals(this, obj))
    {
      return true;

    }
    var item = obj as ValueObject<T>;

    if ((object)item != null)
    {
      return Equals((T)item);
    }
    return false;
  }

  public override int GetHashCode()
  {
    int hashCode = 31;
    bool changeMultiplier = false;
    int index = 1;

    PropertyInfo[] publicProperties = this.GetType().GetProperties();

    if (publicProperties.Any())
    {
      foreach (var item in publicProperties)
      {
        object value = item.GetValue(this, null);

        if ((object)value != null)
        {
          hashCode = hashCode * ((changeMultiplier) ? 59 : 114) + value.GetHashCode();
          changeMultiplier = !changeMultiplier;
        }
        else
        {
          hashCode = hashCode ^ (index * 13);
                       //only for support {"a",null,null,"a"} <> {null,"a","a",null}
        }
      }
    }
    return hashCode;
  }

  public static bool operator ==(ValueObject<T> left, ValueObject<T> right)
  {
    if (Equals(left, null))
    {
      return (Equals(right, null)) ? true : false;
    }
    return left.Equals(right);
  }

  public static bool operator !=(ValueObject<T> left, ValueObject<T> right)
  {
    return !(left == right);
  }
}
This code contains a version of Equals that checks if the value compared against is null. If it’s not, it then checks if both sides are referring to the same instance, and if that’s not the case, it uses reflection to compare each individual property. It also overrides the == (equals) and != (not equals) operators by calling the Equals method. Finally, it overrides GetHashCode to generate a value for the object used in hash tables, again using reflection.
If you don’t like the reflection implementation, you can always override Equals (object obj) in the Address class (or any other class that inherits ValueObject) and compare its properties directly.
The DomainEntity base class requires a slightly different approach: it only needs to compare the IDs of the two objects, taking nullability and a transient state into account as well. Here’s the full implementation of that class:
public abstract class DomainEntity<T> : IValidatableObject
{
  public T Id { get; set; }

  public bool IsTransient()
  {
    return Id.Equals(default(T));
  }

  public override bool Equals(object obj)
  {
    if (obj == null || !(obj is DomainEntity<T>))
    {
      return false;
    }

    if (GetType() != obj.GetType())
    {
      return false;
    }

    if (ReferenceEquals(this, obj))
    {
      return true;
    }

    var item = (DomainEntity<T>)obj;

    if (item.IsTransient() || IsTransient())
    {
      return false;
    }
    return item.Id.Equals(Id);
  }

  public override int GetHashCode()
  {
    if (!IsTransient())
    {
      return Id.GetHashCode() ^ 31;
    }
    return base.GetHashCode();
  }

  public static bool operator ==(DomainEntity<T> left, DomainEntity<T> right)
  {
    if (Equals(left, null))
      return (Equals(right, null)) ? true : false;
    else
      return left.Equals(right);
  }

  public static bool operator !=(DomainEntity<T> left, DomainEntity<T> right)
  {
    return !(left == right);
  }

  public abstract IEnumerable<ValidationResult> Validate(
                          ValidationContext validationContext);

  public IEnumerable<ValidationResult> Validate()
  {
    var validationErrors = new List<ValidationResult>();
    var ctx = new ValidationContext(this, null, null);
    Validator.TryValidateObject(this, ctx, validationErrors, true);
    return validationErrors;
  }
}
Again, Equals checks if the other side is null or not a DomainObject<T> (in which case they should never be considered the same). It also checks if the two references are not actually the same instance. If that’s not the case, the code checks if one of the objects (or both) is in a transient state:
if (item.IsTransient() || IsTransient())
{
  return false;
}
If one of them (or both) is transient, the code assumes they are not equal. This is necessary when creating new objects. Without that check, all new objects that haven’t saved in the database would be considered equal which of course is not correct.
If none of the conditions above are met, the code checks the Id property of both objects. If they are the same, the objects are considered equal. Otherwise they are considered to be different.
The following set of Unit Tests demonstrate the behavior of this implementation. These are just a few samples to show the general concept; the code that comes with this article has other tests to cover additional scenarios.
The following piece of code shows some of the tests for the DomainEntity classes:
[TestClass]
public class DomainEntityTests
{
  #region Nested helper classes

  internal class PersonWithIntAsId : DomainEntity<int>
  { }

  internal class PersonWithGuidAsId : DomainEntity<Guid>
  { }

  #endregion

  [TestMethod]
  public void TransientLeftIsNotEqual()
  {
    var personLeft = new PersonWithIntAsId();
    var personRight = new PersonWithIntAsId { Id = 1 };
    personLeft.Equals(personRight).Should().BeFalse();
  }

  [TestMethod]
  public void TwoTransientsAreNotEqual()
  {
    var personLeft = new PersonWithIntAsId();
    var personRight = new PersonWithIntAsId();
    personLeft.Equals(personRight).Should().BeFalse();
  }

  [TestMethod]
  public void NewPersonWithIntAsIdIsTransient()
  {
    var person = new PersonWithIntAsId();
    person.IsTransient().Should().BeTrue();
  }

  [TestMethod]
  public void PersonWithIntAsIdWithValueIsNotTransient()
  {
    var person = new PersonWithIntAsId { Id = 4 };
    person.IsTransient().Should().BeFalse();
  }

  [TestMethod]
  public void NewPersonWithGuidAsIdIsTransient()
  {
    var person = new PersonWithGuidAsId();
    person.IsTransient().Should().BeTrue();
  }

  [TestMethod]
  public void PersonWithGuidAsIdWithValueIsNotTransient()
  {
    var person = new PersonWithGuidAsId { Id = Guid.NewGuid() };
    person.IsTransient().Should().BeFalse();
  }

  [TestMethod()]
  public void EntitiesWithSameIdentityShouldBeEqual()
  {
    var entityLeft = new PersonWithIntAsId { Id = 1 };
    var entityRight = new PersonWithIntAsId { Id = 1 };

    bool resultOnEquals = entityLeft.Equals(entityRight);
    bool resultOnOperator = entityLeft == entityRight;

    resultOnEquals.Should().BeTrue();
    resultOnOperator.Should().BeTrue();
  }
}
Similarly, I have tests for the ValueObject class. In the examples below, I use the Address class (that inherits ValueObject) but in the code download you find a few other tests as well.
[TestClass]
public class AddressTests
{
  [TestMethod]
  public void TwoIdenticalAddressesShouldBeTheSame()
  {
    var address1 = new Address("Street", "City", "ZipCode", "Country", ContactType.Business);
    var address2 = new Address("Street", "City", "ZipCode", "Country", ContactType.Business);
   (address1 == address2).Should().BeTrue();
  }

  [TestMethod]
  public void DifferentAddressesShouldNotBeTheSame()
  {
    var address1 = new Address("Some other street", "City", "ZipCode", "Country",
                      ContactType.Business);
    var address2 = new Address("Street", "City", "ZipCode", "Country", ContactType.Business);
   (address1 != address2).Should().BeTrue();
  }

  [TestMethod]
  public void InstanceOfValueObjectDoesNotEqualNull()
  {
    var address1 = new Address();
    address1.Equals(null).Should().BeFalse();
  }

  [TestMethod]
  public void ReferenceEqualsIsEqual()
  {
    var address1 = new Address("Street", "City", "ZipCode", "Country", ContactType.Business);
    Address address2 = address1;
    address1.Equals(address2).Should().BeTrue();
  }
}
With the tests added to the Unit Test project, the next step is modelling collections.
Creating Collections
When modelling collections, you have a few different options. For example, it’s quite common to use a List<T> class to store collections of objects. Using that class, you could give Person access to a collection of EmailAddress instances like this:
public class Person : DomainEntity<int>
{
  public string FirstName { get; set; }

  // Other properties here

  public List<EmailAddress> EmailAddresses { get; set; }
}
You can then add instances of EmailAddress to the EmailAddresses collection like this:
var person = new Person();
person.EmailAddresses.Add(new EmailAddress {ContactType = ContactType.Business,
               EmailAddressText = "someone@example.com"});
While this works great, it’s generally not recommended to expose List<T> in the public API of a class. List<T> is designed for performance, and not meant for inheritance. This means you can’t override any of its members that change the way the class behaves when it comes to adding, finding and removing members. This makes it impossible to add specialized behavior to your collection; something you often want to do. More information about this guideline can be found here:http://msdn.microsoft.com/en-us/library/ms182142%28v=vs.110%29.aspx
It is recommended that you implement a class that inherits Collection<T> instead, which is what I have done in the sample project. The downside of inheriting that class is that you miss out on some of the useful functionality that List<T> has. For example, Collection<T> does not have a method to sort the data, or to quickly add a range. However, that behavior is easy to add to a base class, so the other collections in your project can get it for free. In the Spaanjaars.ContactManager application, I have added the following CollectionBase<T> class:
public abstract class CollectionBase<T> : Collection<T>, IList<T>
{
  protected CollectionBase() : base(new List<T>()) { }

  protected CollectionBase(IList<T> initialList) : base(initialList) { }

  protected CollectionBase(CollectionBase<T> initialList) : base(initialList) { }

  public void Sort(IComparer<T> comparer)
  {
    var list = Items as List<T>;
    if (list != null)
    {
      list.Sort(comparer);
    }
  }

  public void Sort()
  {
    var list = Items as List<T>;
    if (list != null)
    {
      list.Sort();
    }
  }

  public void AddRange(IEnumerable<T> collection)
  {
    if (collection == null)
    {
      throw new ArgumentNullException("collection", "Parameter collection is null.");
    }
    foreach (var item in collection)
    {
      Add(item);
    }
  }
}
The class is marked as abstract which means you can’t create instances of it directly. Its sole purpose is to serve as a base class for other collections. It inherits Collection<T> as per the recommendation which gives it virtual members such as InsertItem, RemoveItem, SetItem and ClearItems. Notice that Collection<T> implements the IList<T> interface so you can pass instances of classes that inherit Collection<T> to any member that expects an IList<T>.
The class has three constructors that all call the base constructor with an initial list. Notice how the default constructor calls the base constructor with a new instance of List<T>:
protected CollectionBase()
  : base(new List<T>())
{ }
Although you shouldn’t expose members of List<T> in your public API, it’s perfectly OK to use one internally.
Besides the constructors, the class exposes two methods to sort the underlying data and a method to add ranges of instances with a single call:
public void Sort(IComparer<T> comparer)
{
  var list = Items as List<T>;
  if (list != null)
  {
    list.Sort(comparer);
  }
}

public void Sort()
{
  var list = Items as List<T>;
  if (list != null)
  {
    list.Sort();
  }
}

public void AddRange(IEnumerable<T> collection)
{
  if (collection == null)
  {
    throw new ArgumentNullException("collection", "Parameter collection is null.");
  }
  foreach (var item in collection)
  {
    Add(item);
  }
}
This base class is used by all collections in the project: for People, EmailAddresses, and PhoneNumbers. Here’s an example of the EmailAddresses collection:
namespace Spaanjaars.ContactManager45.Model.Collections
{
  public class EmailAddresses : CollectionBase<EmailAddress>
  {
    public EmailAddresses() { }

    public EmailAddresses(IList<EmailAddress> initialList)
      : base(initialList)
    { }

    public EmailAddresses(CollectionBase<EmailAddress> initialList)
      : base(initialList)
    { }
  }
}
With this class in the project, the Person class can now be rewritten like this:
public class Person : DomainEntity<int>
{
  public Person()
  {
    EmailAddresses = new EmailAddresses();
  }

  public string FirstName { get; set; }

  // Other properties here

  public EmailAddresses EmailAddresses { get; set; }
}
Notice how the code for the property now refers to EmailAddresses twice: the first reference is the collection’s type, the second one the name of the property. I also instantiate a new instance of this class in the Person's constructor so it's ready for use.
Adding instances of EmailAddress remains the same:
var person = new Person();
person.EmailAddresses.Add(new EmailAddress {ContactType = ContactType.Business,
           EmailAddressText = "someone@example.com"});
What I like about this setup is that it’s now very easy to add specialized behavior to these collections. Rather than forcing users of your API to manually construct and initialize an EmailAddress, you could add a convenience method for Add on the EmailAddresses collection like this:
public void Add(string emailAddressText, ContactType contactType)
{
  Add(new EmailAddress { ContactType = contactType, EmailAddressText = emailAddressText });
}
Adding an e-mail address can now be as simple as this:
Person person = new Person();
person.EmailAddresses.Add("imar@spaanjaars.com", ContactType.Business);
Once I added the collection classes to the project, I was able to write tests like the following to verify the behavior of the AddRange and Sort methods:
using System;
using System.Collections.Generic;
using System.Linq;
using FluentAssertions;
using Microsoft.VisualStudio.TestTools.UnitTesting;
using Spaanjaars.ContactManager45.Model;
using Spaanjaars.ContactManager45.Model.Collections;

namespace Spaanjaars.ContactManager45.Tests.Unit
{
  [TestClass]
  public class CollectionBaseTests
  {
    [TestMethod]
    public void NewCollectionUsingNewListsAddsValues()
    {
      var collection = new IntCollection(new List<int> { 1, 2, 3 });
      collection.Count.Should().Be(3);
    }

    [TestMethod]
    public void NewCollectionUsingExistingCollectionAddsValues()
    {
      var collection1 = new IntCollection(new List<int> { 1, 2, 3 });
      var collection2 = new IntCollection(collection1);
      collection2.Count.Should().Be(3);
    }

    [TestMethod]
    public void UsingAddRangeAddsValues()
    {
      var collection1 = new IntCollection(new List<int> { 1, 2, 3 });
      var collection2 = new IntCollection();
      collection2.AddRange(collection1);
      collection2.Count.Should().Be(3);
    }

    [TestMethod]
    public void SortPeopleWithSpecifiedComparerSortsCorrectly()
    {
      var people = new People();
      people.Add(new Person { FirstName = "John", LastName = "Doe" });
      people.Add(new Person { FirstName = "Imar", LastName = "Spaanjaars" });
      people.Add(new Person { FirstName = "Jane", LastName = "Doe" });

      people.Sort(new PersonComparer());

      people[0].FullName.Should().Be("Imar Spaanjaars");
      people[1].FullName.Should().Be("Jane Doe");
      people[2].FullName.Should().Be("John Doe");
    }

    [TestMethod]
    public void SortIntsSorts()
    {
      var ints = new IntCollection { 3, 2, 1 };
      ints.Sort();
      ints[0].Should().Be(1);
      ints[1].Should().Be(2);
      ints[2].Should().Be(3);
    }
  }

  internal class IntCollection : CollectionBase<int>
  {
    public IntCollection()
    { }

    public IntCollection(IList<int> initialList)
      : base(initialList)
    { }

    public IntCollection(CollectionBase<int> initialList)
      : base(initialList)
    { }
  }

  public class PersonComparer : IComparer<Person>
  {
    public int Compare(Person x, Person y)
    {
      return x.FullName.CompareTo(y.FullName);
    }
  }
}
Most of this is pretty straight forward, and by looking at the test name and implementation you should be able to see what the code is testing. I added a helper class called IntCollection to test the Sort behavior for classes that implement IComparable (which makes it possible to sort a collection of a type without specifying a special Comparer classes).
The thing that may be new to you is the PersonComparer, a class dedicated to defining how instances of Person should be sorted. In this implementation, they are sorted on their FullName property, but you could of course change that if you want by changing the implementation of the Compare method or by implementing a completely different Comparer class altogether. Using this implementation of PersonComparer, you can sort a collection of people like this:
var people = new People();
people.Add(new Person { FirstName = "John", LastName = "Doe" });
people.Add(new Person { FirstName = "Imar", LastName = "Spaanjaars" });
people.Add(new Person { FirstName = "Jane", LastName = "Doe" });
people.Sort(new PersonComparer());
After this code has run, the collection now contains the people ordered by their full name, which means my name is listed first, followed by Jane and Joe.
The final thing I like to implement in my model is the ability to automatically keep track of the date and time objects were created and modified. You’ll see how I implemented this in the model next, while the article on building an Entity Framework repository shows how to automatically update these dates and save them in the database.
Automatic Tracking of Creation and Modification Dates
It’s common that you want to keep track of the date and time an object was created and last modified. To this end, you could add two DateTime properties to each class that you want to track like this:
public class Person : DomainEntity<int>
{
  // Other properties here.
  public DateTime DateCreated { get; set; }
  public DateTime DateModified { get; set; }
}
Then whenever you create a new instance of Person, you can fill in the DateCreated using a constructor:
public class Person : DomainEntity<int>, IDateTracking
{
  public Person()
  {
    DateCreated = DateTime.Now;
  }
}
In addition, whenever you’re modifying an instance of Person, you can update the DateModified property:
myPerson.DateModified = DateTime.Now;
However, this gets repetitive and boring after a while and because you need to do this every time you make a change to a person, there’s a fair chance you forget to implement this code.
I prefer a different solution to the problem that works like this:
- I create an interface called IDateTracking that defines two read/write properties for the date and time an object was created and last modified.
- I let each of the objects I want to track implement this interface and add the two properties to the class to satisfy the contract specified by this interface.
- In my Entity Framework DbContext that saves new and modified objects to the database, I detect objects that implement this interface and then automatically update the correct properties with the current date and time.
Implementing step 1 and 2 is really easy; you’ll see how to do this next. Step 3 is discussed in the next article in this series when the EF DbContext is discussed.
Here’s the code for the interface I added to the Model project and namespace:
using System;

namespace Spaanjaars.ContactManager45.Model
{
  /// <summary>
  /// Defines an interface for objects whose creation and modified
  /// dates are kept track of automatically.
  /// </summary>
  public interface IDateTracking
  {
    /// <summary>
    /// Gets or sets the date the object was created.
    /// </summary>
    DateTime DateCreated { get; set; }

    /// <summary>
    /// Gets or sets the date the object was last modified.
    /// </summary>
    DateTime DateModified { get; set; }
  }
}
This interface defines two read/write properties for the creation and modification dates. Implementing this interface in an entity is straightforward as well. Here’s the code for the Person class:
public class Person : DomainEntity<int>, IDateTracking
{
  // Other code here

  public DateTime DateCreated { get; set; }
  public DateTime DateModified { get; set; }
}
You can now assign DateCreated a value in the constructor to keep track of the date an object was created. When an existing data is retrieved from the database, that property is overwritten with the value from the database, giving you the correct date and time. You can now also manually set the DateModified property whenever you change the object. However, as you’ll see in the next article, you can let EF automatically manage these two properties for you.
Putting it All Together
So far you’ve seen the code for some simple classes that mostly consist of just a number of straightforward automatically implemented properties. However, in order to make the model more useful, you should create relationships between the various classes. For example, a Person should be given collection classes for the various contact details such as EmailAddress and PhoneNumber classes. Also, Person needs properties for address details such as HomeAddress and WorkAddress. To make the API easier to work with, all these properties should be instantiated in the constructor so you can access them immediately after you constructed a new Person.
Here’s the revised code for the Person class with the new properties and constructor code. Note: the code that comes with the article has full XML comments on all public members.
using System;
using System.Collections.Generic;
using Spaanjaars.ContactManager45.Model.Collections;
using Spaanjaars.Infrastructure;

namespace Spaanjaars.ContactManager45.Model
{
  public class Person : DomainEntity<int>, IDateTracking
  {
    public Person()
    {
      EmailAddresses = new EmailAddresses();
      PhoneNumbers = new PhoneNumbers();
      HomeAddress = new Address(null, null, null, null, ContactType.Personal);
      WorkAddress = new Address(null, null, null, null, ContactType.Business);
    }

    [Required]
    public string FirstName { get; set; }
    [Required]
    public string LastName { get; set; }
    public DateTime DateOfBirth { get; set; }
    public PersonType Type { get; set; }
    public Address HomeAddress { get; set; }
    public Address WorkAddress { get; set; }
    public EmailAddresses EmailAddresses { get; set; }
    public PhoneNumbers PhoneNumbers { get; set; }

    public string FullName
    {
      get
      {
        string temp = FirstName ?? string.Empty;
        if (!string.IsNullOrEmpty(LastName))
        {
          if (temp.Length > 0)
          {
            temp += " ";
          }
          temp += LastName;
        }
        return temp;
      }
    }
  }
}
With this setup, you can now write tests that confirm the properties have been set up correctly (and that demonstrate the usage of the API quite nicely):
[TestMethod]
public void CanAddEmailAddressToNewPerson()
{
  var person = new Person();
  person.EmailAddresses.Add(new EmailAddress());
  person.EmailAddresses.Count.Should().Be(1);
}

[TestMethod]
public void CanAddPhoneNumberToNewPerson()
{
  var person = new Person();
  person.PhoneNumbers.Add(new PhoneNumber());
  person.PhoneNumbers.Count.Should().Be(1);
}

[TestMethod]
public void NewPersonHasInstantiatedWorkAddress()
{
  var person = new Person();
  person.WorkAddress.Should().NotBeNull();
}

[TestMethod]
public void NewPersonHasInstantiatedHomeAddress()
{
  var person = new Person();
  person.HomeAddress.Should().NotBeNull();
}
Defining Repository Interfaces
The final code that needs to be added to the Model project is the definition of the interfaces for the repositories. In Part 1 of this series I briefly introduced the IRepository<T, K> interface that defines the contract that a repository class should implement to enable CRUD (Create, Read, Update and Delete) behavior. In my project, I placed the IRepository<T, K> in the Spaanjaars.Infrastructure project, so I can easily reuse it across multiple applications. I then added the following code;
using System;
using System.Linq;
using System.Linq.Expressions;

namespace Spaanjaars.Infrastructure
{
  public interface IRepository<T, K> where T : class
  {
    T FindById(K id, params Expression<Func<T, object>>[] includeProperties);
    IQueryable<T> FindAll(params Expression<Func<T, object>>[] includeProperties);
    IEnumerable<T> FindAll(Expression<Func<T, bool>> predicate,
                          params Expression<Func<T, object>>[] includeProperties);
    void Add(T entity);
    void Remove(T entity);
    void Remove(K id);
  }
}
Notice how this interface uses generics with two type parameters: T and K. T is used for the actual entity type (such as Person) while K is used for its key. The key is usually an int or a Guid. These types are then used in the interface members to define the parameter or return type of each method. You’ll see a more concrete example shortly.
The interface defines the following methods:
| Member name | Description |
Add (returns void) |
Adds an object to the underlying data source. How this is done depends on the underlying framework. The EF implementation adds it to the EF DbContext so it’s added to the SQL Server database whenever the changes are saved. |
FindAll (returns an IQueryable of T or an IEnumerable of T) |
Returns all requested objects in the underlying source. One of its overloads enables you to define a search expression. Both overloads accept a parameter to define which properties you want to eager load, as you’ll see later. |
FindById (returns an instance of T) |
Returns an instance of T by its unique ID in case it’s found, or null otherwise. |
Remove (returns void) |
Removes an object from the underlying data source. How this is done depends on the underlying framework. The EF implementation removes it from the EF DbContext so it’s also removed from the SQL Server database whenever the changes are saved. |
By implementing the Add and Remove methods of this interface you can add and remove items from the underlying data source. The Remove method has an overload that accepts the unique ID of the object to make it easy to remove an entity without having a full instance at hand. Selecting is done using FindById (that returns a single instance) and FindAll (that returns a collection). Both methods accept a params array called includeProperties. This is used to dynamically include related entities (such as PhoneNumbers when accessing a person.) You see how this works in the next part in this series when the EF repository is explored. The overload of FindAll that returns an IEnumerable<T> has a parameter called predicate that looks like this: Expression<Func<Person, bool>>. Although it looks pretty scary with the nested generics, using it is pretty simple. As an example, here’s how you could search for all contact people of a specific type:
var colleagues = repository.FindAll(x => x.Type == PersonType.Colleague);
You can also use multiple criteria at the same time. For example:
var friendsNameMaryJane = repository.FindAll(
            x => x.FirstName == "Mary Jane" && x.Type == PersonType.Friend);
You’ll see more of the repository implementation later. For now all that’s important to realize is that the FindAll method lets you specify complex search criteria.
Finally, updating is done by retrieving one or more existing items, and then updating the object’s properties. When saving the changes using an EF DbContext, EF will automatically persist the changes into the database.
For the ContactManager application, I have one class that implements this interface: a PersonRepository to manage contact people. Rather than implementing this interface directly in my repositories, I created another interface that inherits IRepository<T, K>, like this:
public interface IPeopleRepository : IRepository<Person, int>
{
}
Although I haven’t added any members to this interface yet (other than those it inherits from the generic repository interface), it lays a nice foundation for future updates. Imagine I want to add a FindByLastName method to the PeopleRepository. I could add that member to IRepository instead, forcing my concrete implementations to implement this member as well. However, that method would have no meaning to other repositories you may add to your system. So by adding an intermediate interface you get the best of both worlds: IPeopleRepository can do anything IRepository can, but it’s still open to be expanded with methods that only make sense to a PeopleRepository.
My concrete PeopleRepository implements this interface as you’ll see in Part 5. Note that I am closing the generic type by explicitly specifying an int for the K type parameter. The Person class has been set up to use an int for the Id property as well (public class Person : DomainEntity<int>, IDateTracking) so it makes sense to make the repositories specific for an int as well.
With these interfaces, a method on an actual concrete repository to manage people in the system could look like this:
public Person FindById(int id,
            params Expression<Func<Person, object>>[] includeProperties)
{
  // Implementation here
}
The method accepts an int for the ID (as specified by the int type on the IPeopleRepository) and returns a Person because IPeopleRepository specifies Person as the type of the T type parameter which is used as the return type of the FindById method in the generic IRepository interface. As you’ll see in the next article, the actual implementation is slightly different because FindById is implemented in a generic repository.
The actual code (such as an MVC controller, a Web Forms page, or a Unit Test) would work with instances of the IPeopleRepository interface to get and update data in the database. Here’s an example of the Delete method of a controller in an MVC application that accepts the ID of the object and deletes it by calling Remove on the concrete repository:
[HttpDelete]
public ActionResult Delete(int id)
{
  using (_unitOfWorkFactory.Create())
  {
    _peopleRepository.Remove(id);
  }
  return RedirectToAction("Index");
}
Here, _peopleRepository is an object that implements the IPeopleRepository interface. In the MVC project, this instance is injected using StructureMap but you can of course also instantiate an object yourself.
The UnitOfWorkFactory code is explained in the next article in this series, and you’ll find full details on implementing an MVC frontend in Part 6 and details on a Web Forms implementation in Part 7 of this series.
Stuff I Like to Do
Just as in the previous article in this series, I’ll provide a quick list of things I like to do when building a model. Again, I won’t be providing a lot of detail, but instead mention a few items I like or consider best practices.
- Implement a base class for collections. This way you can centralize the behavior for all your collections.
- Let your custom collections inherit from the collection base class and don’t use List<T> in the public API of your object model.
- Write extensive unit tests for your model classes. The Model project is now still relatively small, so you should be able to achieve great code coverage. Once you start expanding the model project it’ll be relatively easy to maintain a high code coverage. However, the lower the coverage, the less inclined you’ll be to catch up later.
- Document the public members of your API using XML comments (http://msdn.microsoft.com/en-us/library/b2s063f7.aspx). For example, members in the various interfaces and classes should be documented to make it easier to work with them later in the project. You can force the compiler to generate an XML file with the comments as well as list all items you forgot to document as compilation warnings by checking off the XML documentation file checkbox on the Build category of the project’s Properties dialog, shown in Figure 4.7:
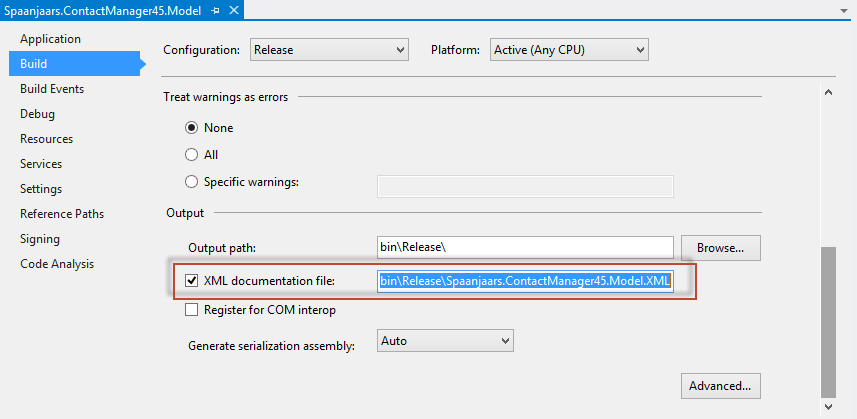
Figure 4-7 The Project Properties Dialog (click to enlarge)
I typically only do this for the release build so I am not cluttering the list with compile warnings too much during development.
Summary
In this article you saw how to build up the model for the application. If you’re familiar with previous versions of my N-Layer Design article series, you’ll recognize a lot of stuff. Even if you’re unfamiliar with those articles, the code in the Model project should be easy to follow: most of it comes down to simple POCO classes like Person, and a bunch of collection classes to support collections of the POCO classes. The most complex code is probably the equality comparer code in the two base classes in the Infrastructure project. However, this is plumbing code you only need to write once, and not maintain during normal development of your application.
In previous versions of this article series targeting .NET 2 and 3.5, the class design part of this setup was pretty easy to implement. All you had to do was creating the class and add the relevant properties for the types to them. However, it was the database part that was really hard to set up and required a lot of manually written code, stored procedures and testing. Fortunately, with EF Code First this is now really easy to implement as you’ll see in the next installment of this article series.
Downloads
Where to Next?
Wonder where to go next? You can post a comment on this article.
Links in this Document
| Doc ID | 576 |
| Full URL | https://imar.spaanjaars.com/576/aspnet-n-layered-applications-implementing-a-model-part-4 |
| Short cut | https://imar.spaanjaars.com/576/ |
| Written by | Imar Spaanjaars |
| Date Posted | 08/14/2013 11:52 |
Comments
Talk Back! Comment on Imar.Spaanjaars.Com
I am interested in what you have to say about this article. Feel free to post any comments, remarks or questions you may have about this article. The Talk Back feature is not meant for technical questions that are not directly related to this article. So, a post like "Hey, can you tell me how I can upload files to a MySQL database in PHP?" is likely to be removed. Also spam and unrealistic job offers will be deleted immediately.
When you post a comment, you have to provide your name and the comment. Your e-mail address is optional and you only need to provide it if you want me to contact you. It will not be displayed along with your comment. I got sick and tired of the comment spam I was receiving, so I have protected this page with a simple calculation exercise. This means that if you want to leave a comment, you'll need to complete the calculation before you hit the Post Comment button.
If you want to object to a comment made by another visitor, be sure to contact me and I'll look into it ASAP. Don't forget to mention the page link, or the Doc ID of the document.