ASP.NET N-Layered Applications - Implementing a Repository using EF Code First (Part 5)
Note: this is part five in a series of ten. If you rather read this entire series off-line, you can buy the full series as a convenient PDF document that comes with the full source. Besides the convenience, buying the PDF will also make you feel good as it shows your appreciation for the articles and helps me pay the bills for my server and hosting so I can keep running imar.spaanjaars.com and continue to provide you with great content. For more details, check out this post that shows you how you can buy the entire series right now.
This is Part 5 in a series of 10 that show you how to build N-Layered applications using ASP.NET 4.5 and Entity Framework 5 Code First. In this part you’ll see how to build a concrete implementation of the repository that was introduced in the preceding article. I’ll show you how to create a data access layer that targets the Entity Framework (EF) and implements the repository interface in a clean and maintainable way.
If you haven’t read the earlier parts in this series yet, you’re encouraged to do so first. The following list has links to all articles in this series:
- Part 1 - Introduction
- Part 2 - Setting up the Solution in Visual Studio
- Part 3 - Making your Projects Unit Testable
- Part 4 - Implementing a Model
- Part 5 - Implementing a Repository using Entity Framework Code First
- Part 6 - Implementing an ASP.NET MVC 4 Frontend
- Part 7 - Implementing a Web Forms 4.5 Frontend
- Part 8 - Implementing a WCF 4.5 Frontend
- Part 9 – Importing Data Using the API
- Part 10 - Extensions, Tools and Wrapping Up
Note: this article uses the Entity Framework as that’s my ORM of choice. However, you can use many of these principles using a different ORM such as NHibernate. The applications in the presentation layer wouldn’t know the difference; they are just programmed to consume the various interfaces without ever knowing the underlying data access technology. There’s a small exception to this rule when it comes down to configuring Dependency Injection which I’ll point out in Part 6.
Introduction
In the preceding articles in this series, you’ve seen how to build the foundation of a data driven application. You saw how to setup the application, enable it for unit and integration testing, and how to design and build a rich object model that supports hierarchies, collections and object comparison that can easily be extended with validation. In this article you will see how to build a data access layer that can persist the objects in the model in a SQL Server database and how to query and retrieve your objects from that same database. As mentioned in the introduction of this article series, I’ll be using Entity Framework 5 Code First, Microsoft’s ORM framework to work with POCO (Plain Old CLR Objects) classes. A lot has already been written on the Entity Framework, so this article won’t be an introduction to EF or EF Code First. If you’re new to EF, you’re encouraged to check out the following resources:
- Programming Entity Framework (Julie Lerman, 2010, http://www.amazon.com/Programming-Entity-Framework-Building-Centric/dp/0596807260/)
- Programming Entity Framework: Code First (Julie Lerman and Rowan Miller, 2011, http://www.amazon.com/Programming-Entity-Framework-Code-First/dp/1449312942/)
- Programming Entity Framework: DbContext (2012, Julia Lerman and Rowan Miller, http://www.amazon.com/Programming-Entity-Framework-Julia-Lerman/dp/1449312969/)
This article focuses on implementing EF in a reusable and easy configurable way for your N-Layered applications. It’ll cover a number of topics, including:
- Adding EF to your project using NuGet.
- Building the DbContext class that provides access to the data in the EF model.
- Building a context storage mechanism that defines the life span of the DbContext.
- Configuring your model’s business rules (i.e. validation).
- Dealing with database initialization.
- Implementing a base repository class to implement common queries.
- Implementing a concrete repository to manage contact people in the system.
- Implementing a Unit of Work.
- Managing relationships.
- Implementing IDateTracking.
- Improving error messages generated by the DbContext.
In the following sections you’ll see how to implement this functionality in the Spaanjaars.ContactManager45.Repositories.EF project. First, I’ll show you how to enable EF in the project and create a simple class that inherits DbContext that exposes properties of type DbSet<T> for querying access. You’ll also see a way to centralize the storage of the DbContext so you can use an instance of it per web request.
The next step in the process is to set up the business rules. You see how to use the context’s OnModelCreating method and special EntityTypeConfiguration classes to define your rules such as whether or not a field is required, the names of columns and tables in the database, the length of fields and so on. You’ll also see how to define an initialization strategy that defines how the initial database is created, and whether or not it can be recreated automatically.
A large part of the article is then spent on building repositories. You will see how to build a generic repository that can serve as the base class for other concrete repositories. You will also see how to create the PeopleRepository and how to write integration tests to make sure they work correctly. Finally, at the end of the article you will see how to implement the automatic tracking of the creation and modification dates using the IDateTracking interface and how to improve the error messages that are returned from the DbContext.
The final result is a data access layer that is ready to be used in your UI and other project as you’ll see in later articles in this series.
Adding EF to Your Project using NuGet
The first step in building the data access layer is to enable Entity Framework 5 Code First in the project Spaanjaars.ContactManager45.Repositories.EF. Once again, this is easy to do using NuGet. Open up the Package Manager Console in Visual Studio 2012 (choose Tools | Library Package Manager | Package Manager Console) and select the project Spaanjaars.ContactManager45.Repositories.EF in the Default project drop-down list. Then enter the following command and hit enter:
Install-Package EntityFramework
After a short time, you should see that EF is added to the project correctly:
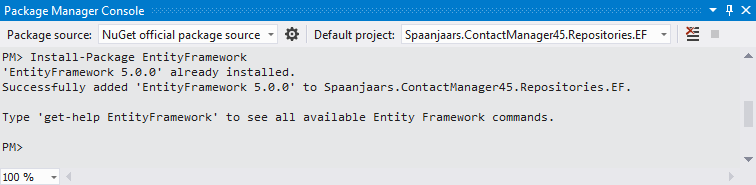
Figure 5-1 Installing EF Using the Package Manager Console (click to enlarge)
To enable integration tests that target the DbContext, you also need to install Entity Framework in the Spaanjaars.ContactManager45.Tests.Integration project. To add EF, switch back to the Package Manager Console, choose Spaanjaars.ContactManager45.Tests.Integration from the Default project drop-down, press the Up arrow to add the last executed command back on the command line and hit enter. This executes the Install-Package command again and installs EF in the test project.
With the projects prepared, it’s now time to add the DbContext class to the project.
Building the DbContext
When using Entity Framework 5 Code First, the core object you interact with is the DbContext, a class designed to query the underlying database and to group together changes that are written back to the data store in a single unit. To work with DbContext, you create a class that inherits from this class, and then for each aggregate root you add a property of type DbSet<T>.
In “Domain-driven Design: Tackling Complexity in the Heart of Software”, Eric Evans described an aggregate root as follows:
“An AGGREGATE is a cluster of associated objects that we treat as a unit for the purpose of data changes. Each AGGREGATE has a root and a boundary. The boundary defines what is inside the AGGREGATE. The root is a single, specific ENTITY contained in the AGGREGATE. The root is the only member of the AGGREGATE that outside objects are allowed to hold references to, although objects within the boundaries may hold references to each other.”
For the ContactManager application that would mean only Person is an aggregate root, and contact details such as e-mail addresses and phone numbers are retrieved through the Person. If the application was bigger and had more aggregate roots, I would create separate DbSet<T> properties (and later on, repositories) for those as well.
In its most simple form, an implementation of DbContext for the Contact Manager application could look like this:
namespace Spaanjaars.ContactManager45.Repositories.EF
{
  public class ContactManagerContext : DbContext
  {
    public DbSet<Person> People { get; set; }
  }
}
However, with this code, the database that is generated is named after the full type of the DbContext, including its long namespace. I prefer a shorter name with just the context name, which you can accomplish by adding a parameterless constructor that calls the base constructor and passes in the desired name:
namespace Spaanjaars.ContactManager45.Repositories.EF
{
  public class ContactManagerContext : DbContext
  {
    public ContactManagerContext() : base("ContactManagerContext") { }
    public DbSet<Person> People { get; set; }
  }
}
This is the minimum amount of code you need to interact with contact people in the database. However, as you’ll see later, it’s common to add more code to the DbContext class to configure business rules and intercept the saving process.
Now that the class is ready, I could write a quick unit test in the Integration Tests project to confirm that everything works as expected. Here’s an example:
using System;
using Microsoft.VisualStudio.TestTools.UnitTesting;
using Spaanjaars.ContactManager45.Model;
using Spaanjaars.ContactManager45.Repositories.EF;

namespace Spaanjaars.ContactManager45.Tests.Integration
{
  [TestClass]
  public class ContactManagerContextTests
  {
    [TestMethod]
    public void CanAddPersonUsingContactManagerContext()
    {
      var person = new Person {FirstName = "Imar", LastName = "Spaanjaars",
          DateOfBirth = new DateTime(1971, 8, 9), DateCreated = DateTime.Now,
          DateModified = DateTime.Now, Type = PersonType.Colleague,
          HomeAddress = Helpers.CreateAddress(),
          WorkAddress = Helpers.CreateAddress()};
      var context = new ContactManagerContext();
      context.People.Add(person);
      context.SaveChanges();
    }
  }
}
Helpers.CreateAddress is a simple helper method that creates and returns a populated Address instance.
After I ran the test, I ended up with a database called ContactManagerContext that contains a few tables. The People table had the person row inserted by the unit test:
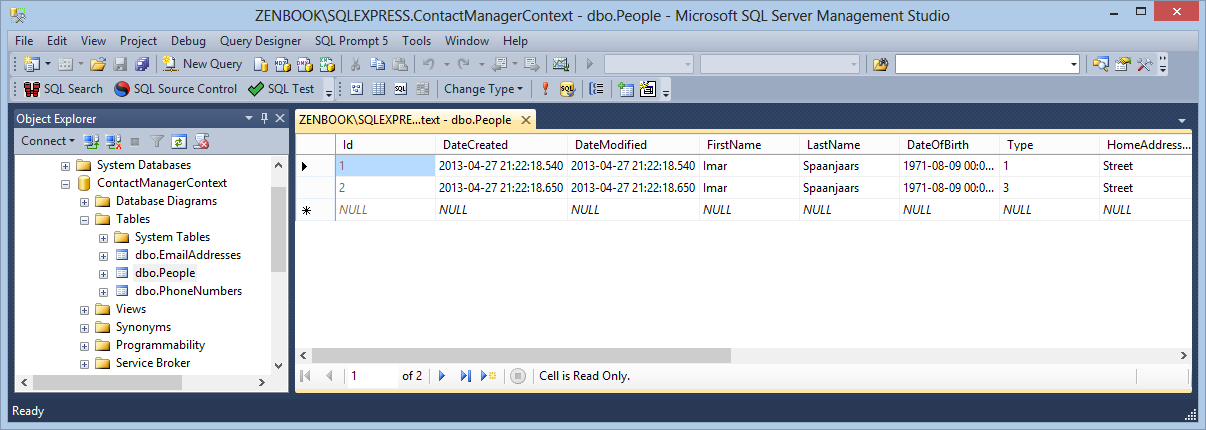
Figure 5-2 The Generated Database with the People Table (click to enlarge)
This test uses the ContactManagerContext class directly. The code first creates a new instance of this class, accesses its People property (that I defined in the code earlier), adds a new person and finally calls SaveChanges to submit the changes to the underlying SQL Server database.
Note that you don't see any connection strings defined in the various sample application's config files. So where is the data stored that this test generated? If you don't specify a connection string explicitly, EF will infer one for you. By default EF tries to use SQL Express if it is installed. Otherwise, it will use the new Local DB version that gets installed with VS 2012. It's important to realize that EF determines the presence of SQL Server Express when you add the package to the project, not at runtime. It then adds the appropriate code to the application to target the database server it found. In order to make sure the sample application works as-is on your machine, I configured it to use Local DB by default. Since Local DB is installed along with Visual Studio 2012, I can be fairly sure you have it on your system. SQL Server Express is a separate installation so you may not have it on your system. To tell EF to use Local DB by default, I added the following code to the various start up places of the sample applications (Global.asax for the web applications, the constructor of the IntegrationTestBase class for the test project and in the constructor of the Program class in the import command line application):
// Use LocalDB for Entity Framework by default
Database.DefaultConnectionFactory = new SqlConnectionFactory(
      "Data Source=(localdb)\\v11.0; Integrated Security=True; MultipleActiveResultSets=True");
You can still override the connection string that is used at runtime by specifying one in the configuration file. The following connection string (which should be named after the name you pass to the base class of the ContactManagerContext in its constructor) overrides the default connection string and targets an unnamed SQL Server instance running on the local machine:
<add name="ContactManagerContext" connectionString="Data Source=.;
       Initial Catalog=ContactManagerContext;Integrated Security=SSPI;"
    providerName="System.Data.SqlClient" />
For more information about connection strings in EF and Local DB, check out these resources:
- http://odetocode.com/blogs/scott/archive/2012/08/15/a-troubleshooting-guide-for-entity-framework-connections-amp-migrations.aspx
- http://thedatafarm.com/blog/data-access/update-to-ef5-and-dblocal-default-in-config/
- http://msdn.microsoft.com/en-us/data/jj556606.aspx
As you learned earlier, this application uses repositories to encapsulate all data access. This means that external code - such as code in the Presentation layers - shouldn’t create or access the ContactManagerContext directly. Instead, ContactManagerContext should be wrapped by the various repositories. In addition, to implement a unit of work (that enables you to make multiple changes to your data and submit them to the database all at once), the repositories shouldn’t create instances of ContactManagerContext themselves in each public method. Instead, it would be useful to have a centralized context factory class that can create instances for you. The sole purpose of that class would be to create instances of another class; hence the name factory. For more information on the factory design pattern, take a look at this article: http://www.oodesign.com/factory-pattern.html.
Additionally, it would be very useful if the same ContactManagerContext instance was used for the entire HTTP request. This way, you can share the same instance across multiple pieces of code running in the same request, minimizing the overhead needed to create new instances and giving you the opportunity to treat multiple database updates as a single unit. You see how this works next.
Building a Context Storage Mechanism
Note: the following section and code is based directly on the work by Scott Millett. I first saw this in his book Professional ASP.NET Design Patterns (Wrox, 2010, http://www.amazon.com/Professional-ASP-NET-Design-Patterns-Millett/dp/0470292784). I modified Scott’s example and made most classes generic so they can store any type of object, but other than that, the core concepts are the same.
To implement a factory class that can create and return instances of ContactManagerContext and store them in an appropriate location, the sample project contains the following five types:
| Type Name | Description |
DataContextFactory |
A static class with a static GetDataContext method that returns an instance of the ContactManagerContext class. Under the hood, it creates an instance of a class that inherits IDataContextStorageContainer to store the data context so it’s accessible for multiple calls. You see how this works shortly. |
DataContextStorageFactory |
A static class with a static CreateStorageContainer method that returns an instance of a class that inherits IDataContextStorageContainer that is used to store the ContactManagerContext. When HttpContext is available, the instance returned is HttpDataContextStorageContainer that stores the data context in the HttpContext.Curent.Items collection. Otherwise, the method returns an instance of ThreadDataContextStorageContainer that stores the data context in the current thread’s Items collection. |
IDataContextStorageContainer |
An interface with methods to return, create and clear a data context. |
HttpDataContextStorageContainer |
A concrete implementation of IDataContextStorageContainer which stores the data context in the HttpContext. This version is used in all web-related projects. |
ThreadDataContextStorageContainer |
A concrete implementation of IDataContextStorageContainer which stores the data context in the current thread. This version is used in desktop applications and in unit test projects. |
The following figure shows these five types and their members:

Figure 5-3 The Class Diagram for the Data Context Storage Classes (click to enlarge)
I added DataContextFactory to the Repositories.EF project as it contains references to the actual data context class which is specific to the ContactManager application. The other four are not tied to any concrete implementation and are thus added to the Infrastructure project. This makes them easy to reuse across your projects.
To implement this factory, I created a new folder called DataContextStorage to the Spaanjaars.Infrastructure project. I then added a new interface file, called IDataContextStorageContainer and added the following code:
namespace Spaanjaars.ContactManager45.Repositories.EF
{
  public interface IDataContextStorageContainer<T>
  {
    T GetDataContext();
    void Store(T objectContext);
    void Clear();
  }
}
This interface defines the contract to get, store and clear the ContactManagerContext. Next, I added two classes, called HttpDataContextStorageContainer and ThreadDataContextStorageContainer and added the following code:
using System.Web;

namespace Spaanjaars.Infrastructure.DataContextStorage
{
  public class HttpDataContextStorageContainer<T> :
                   IDataContextStorageContainer<T> where T : class
  {
    private const string DataContextKey = "DataContext";

    public T GetDataContext()
    {
      T objectContext = null;
      if (HttpContext.Current.Items.Contains(DataContextKey))
      {
        objectContext = (T)HttpContext.Current.Items[DataContextKey];
      }
      return objectContext;
    }

    public void Clear()
    {
      if (HttpContext.Current.Items.Contains(DataContextKey))
      {
        HttpContext.Current.Items[DataContextKey] = null;
      }
    }

    public void Store(T objectContext)
    {
      if (HttpContext.Current.Items.Contains(DataContextKey))
      {
        HttpContext.Current.Items[DataContextKey] = objectContext;
      }
      else
      {
        HttpContext.Current.Items.Add(DataContextKey, objectContext);
      }
    }
  }
}

using System;
using System.Collections;
using System.Threading;
namespace Spaanjaars.Infrastructure.DataContextStorage
{
  public class ThreadDataContextStorageContainer<T> :
                    IDataContextStorageContainer<T> where T : class
  {
    private static readonly Hashtable StoredContexts = new Hashtable();

    public T GetDataContext()
    {
      T context = null;

      if (StoredContexts.Contains(GetThreadName()))
      {
        context = (T)StoredContexts[GetThreadName()];
      }
      return context;
    }

    public void Clear()
    {
      if (StoredContexts.Contains(GetThreadName()))
      {
        StoredContexts[GetThreadName()] = null;
      }
    }

    public void Store(T objectContext)
    {
      if (StoredContexts.Contains(GetThreadName()))
      {
        StoredContexts[GetThreadName()] = objectContext;
      }
      else
      {
        StoredContexts.Add(GetThreadName(), objectContext);
      }
    }

    private static string GetThreadName()
    {
      if (string.IsNullOrEmpty(Thread.CurrentThread.Name))
      {
        Thread.CurrentThread.Name = Guid.NewGuid().ToString();
      }
      return Thread.CurrentThread.Name;
    }
  }
}
Both classes solve the same problem: they enable you to store, clear and retrieve an instance of a class. In the sample application, this class is a ContactManagerContext but you could also use this code to work with other data types. The HTTP version stores its data in the Items collection of the HttpContext, while the thread version stores the object in a static collection indexed by the thread’s name. The Clear method is primarily used for unit test scenarios so you can force a clean context on every test, rather than storing a single context for the life time of the thread that runs the unit tests. You see how this works later in this article.
The final class in the Spaanjaars.Infrastructure project is DataContextStorageFactory and its code looks like this:
using System.Web;

namespace Spaanjaars.Infrastructure.DataContextStorage
{
  public static class DataContextStorageFactory<T> where T : class
  {
    private static IDataContextStorageContainer<T> _dataContextStorageContainer;

    public static IDataContextStorageContainer<T> CreateStorageContainer()
    {
      if (_dataContextStorageContainer == null)
      {
        if (HttpContext.Current == null)
        {
          _dataContextStorageContainer = new ThreadDataContextStorageContainer<T>();
        }
        else
        {
          _dataContextStorageContainer = new HttpDataContextStorageContainer<T>();
        }
      }
      return _dataContextStorageContainer;
    }
  }
}
This static class has a single method called CreateStorageContainer that returns an instance of one of the two storage containers you saw earlier. The method checks whether or not HttpContext is null or not. When it’s not (which should be the case in web applications such as a Web Forms or an MVC application), it returns a new HttpDataContextStorageContainer. Otherwise, it returns a new ThreadDataContextStorageContainer. What’s cool about this method and the way it is implemented is that it runs anywhere, and does the right thing based on the context. If you run this in a web application, the data context is stored in HttpContext. This means that it’s available throughout a single request; whether that’s in an MVC controller, an ASPX page, or a user control; as long as they all execute in the same HttpContext, they use the same data context.
With this code in the Infrastructure project, the implementation in the Repositories.EF project is now pretty simple. All you need is this class:
using Spaanjaars.Infrastructure.DataContextStorage;

namespace Spaanjaars.ContactManager45.Repositories.EF
{
  public static class DataContextFactory
  {
    public static void Clear()
    {
      var dataContextStorageContainer =
              DataContextStorageFactory<ContactManagerContext>.CreateStorageContainer();
      dataContextStorageContainer.Clear();
    }

    public static ContactManagerContext GetDataContext()
    {
      var dataContextStorageContainer =
           DataContextStorageFactory<ContactManagerContext>.CreateStorageContainer();
      var contactManagerContext = dataContextStorageContainer.GetDataContext();
      if (contactManagerContext == null)
      {
        contactManagerContext = new ContactManagerContext();
        dataContextStorageContainer.Store(contactManagerContext);
      }
      return contactManagerContext;
    }
  }
}
The GetDataContext method retrieves an instance of an IDataContextStorageContainer from the DataContextStorageFactory class. It then checks if it already contains a ContactManagerContext. If that isn’t the case, a new instance is created and stored in the container using the Store method. At the end the method returns the ContactManagerContext instance.
The Clear method uses the same code to retrieve a container and then calls Clear to clear the DbContext from HttpContext or from the current thread, depending on the type of the container.
Although this seems like a lot of work, I find it worthwhile to implement it like this. First of all, most of the code is in the shared Infrastructure project so you need to only write this once. Secondly, once this is setup, using the data context is now super easy. Whenever you need an instance of the ContactManagerContext, all you need to do is call this:
DataContextFactory.GetDataContext()
So, for example, if you want to retrieve contact people from the database and use the EF Data Context, you can execute a query like this:
var people = DataContextFactory.GetDataContext().People.Where(x => x.LastName == lastName);
A more complete example can be found in the ContactManagerContextTests class in the Integration test project:
TestMethod]
public void CanExecuteQueryAgainstDataContext()
{
  string lastName = Guid.NewGuid().ToString();
  var context = DataContextFactory.GetDataContext();
  var person = new Person
               {
                 FirstName = "Imar", LastName = lastName,
                 DateOfBirth = new DateTime(1971, 8, 9), DateCreated = DateTime.Now,
                 DateModified = DateTime.Now, Type = PersonType.Colleague,
                 HomeAddress = Helpers.CreateAddress(),
                 WorkAddress = Helpers.CreateAddress()
               };
  context.People.Add(person);
  context.SaveChanges();
  var personCheck = context.People.Single(x => x.LastName == lastName);
  personCheck.Should().NotBeNull();
}
To close off the discussion on the context storage mechanism, here’s a run-down of the process that takes place when you call DataContextFactory.GetDataContext():
- This method first creates a new storage container by calling DataContextStorageFactory<ContactManagerContext>.CreateStorageContainer(). In a web project, this code returns an HttpDataContextStorageContainer and in unit tests (or other applications where HttpContext is not available), it returns a ThreadDataContextStorageContainer.
- It then calls GetDataContext on the container. That method checks its underlying storage mechanism to see if an instance of the ContactManagerContext exists and then returns it, or it returns null.
- When the ContactManagerContext is null, a new instance is created and then stored by calling Store on the container. Again, the respective context containers use their underlying storage mechanism to store the ContactManagerContext.
- Finally, the ContactManagerContext is returned to the calling code.
You’ll see more concrete examples of GetDataContext in this and later articles.
Back in Part 4, I said you needed a DbContext to set up business rules using the API. Now that the data context is done, it’s time to look at that in more detail.
Configuring your Model’s Business Rules
Entity Framework has great support for validation built in. When you add an object to the context or edit an existing one and then try to save the changes, EF ensures the object is in a valid state. If it’s not valid, an exception is thrown, and the entity is not saved in the database. The validation mechanism that EF supports enable you to implement both property level validation (to validate things like a required field, a maximum length and so on) as well as object level validation (for example, to compare two fields with each other, or use other business logic to determine validity.) The next sections dig deeper into these topics.
Implementing Property Level Validation Using Attributes
Property level validation is probably the easiest concept to grasp. A property is either valid or it’s not. What makes it valid or invalid depends on the rules you write for it. To do this, you have two options: attributes and the fluent API.
When you use the attribute approach, you use attributes from the System.ComponentModel.DataAnnotations namespace and place them on a property. The following example shows a FirstName property that is required (cannot be null or an empty string) and that has a maximum length of 25 characters.
[Required, MaxLength(25)]
public string FirstName { get; set; }
Likewise, if you wanted to ensure an integer value falls between a certain range, you can use the Range attribute as follows:
[Range(0,130)]
public int Age { get; set; }
More information about the various attributes can be found at the following pages:
- http://msdn.microsoft.com/en-us/library/system.componentmodel.dataannotations.aspx
- http://www.dotnetattributes.com/System/ComponentModel/DataAnnotations
- http://msdn.microsoft.com/en-us/data/jj591583.aspx
While the attribute-based approach works fine (and is very similar to what I used in the previous version of my layered design), EF offers a cleaner way to do this: by configuring your entities on the DbContext class.
NOTE: you’ll see a mix of both solutions in the sample project. I have added a few simple Required attributes to the entities in the Model project for properties I really want to be required such as names of a person and the text of an e-mail address. This in turn enables me to write some quick unit tests to make validation works correctly. If you don’t like this because it pollutes the model, simply remove the attributes and replace them with the fluent API methods as you’ll see shortly. This will break some of the unit tests so you need to either remove them from the project or rewrite them as integration tests using an Entity Framework context.
Implementing Property Level Validation using the Fluent API
When EF initializes its model the first time, it fires a method called OnModelCreating on the DbContext class. This is the place where you can write your business rules for your entities. As a parameter, the method accepts an instance of a DbModelBuilder class that in turn has a generic Entity method (among other members) that lets you specify your rules. The following code is equivalent to the previous sample that used a Required and a MaxLength attribute.
modelBuilder.Entity<Person>().Property(x => x.FirstName).IsRequired().HasMaxLength(25);
Notice how the configuration code uses a lambda expression to specify the FirstName property. It can access this property because the Entity method has a type argument of type Person. Once you have a reference to a property, you can call methods like IsRequired and HasMaxLength. Notice how this is a fluent API, where each call returns an object on which other methods can be called.
The Entity method has more members that let you specify the table name (ToTable), specify keys (HasKey) and configure relationships (HasMany, HasOptional and HasRequired). You see some of these at work later, but for an in-depth look at configuring EF using the Fluent API, check out:
Programming Entity Framework: Code First, Julia Lerman, 2011 (http://www.amazon.com/Programming-Entity-Framework-Code-First/dp/1449312942/)
If you have many entities in your model with many rules per entity, the OnModelCreating method may become unwieldy pretty quickly. While you could move some code to separate methods, EF has a better alternative: the EntityTypeConfiguration class.
The EntityTypeConfiguration class is designed to configure your EF entities using the Fluent API. To use it, you create a class that inherits from it and specify an entity in its generic type parameter. This way, each EntityTypeConfiguration is for a specific entity. Once you create that class, you can specify all the configuration code in its constructor. Finally, you need to add an instance of this class to the ModelBuilder’s Configurations property. You see how to implement each of these steps next.
To configure the Person class, I created a new class called PersonConfiguration in the Configuration folder of the Repositories.EF project. I then added the following code:
using System.Data.Entity.ModelConfiguration;
using Spaanjaars.ContactManager45.Model;

namespace Spaanjaars.ContactManager45.Repositories.EF.Configuration
{
  public class PersonConfiguration : EntityTypeConfiguration<Person>
  {
    public PersonConfiguration()
    {
      //Todo Configure business rules here
    }
  }
}
Notice how the class inherits from EntityTypeConfiguration<Person> to make it strongly typed for the Person class. This then enables you to write your configuration code in the constructor like this:
public PersonConfiguration()
{
  Property(x => x.FirstName).IsRequired().HasMaxLength(25);
}
This code is very similar to the previous example directly in the OnModelCreating method. However, it’s now much easier to see how an entity is configured: just look at its associated EntityTypeConfiguration class. You’re not limited to configuring properties. Just like the ModelBuilder, you can configure things like the table name, relationships, data types, column names, and more.
To add the configuration class to the model, you use the same OnModelCreating override in the ContactManagerContext class but now add an instance of EntityTypeConfiguration to the Configurations collection:
protected override void OnModelCreating(DbModelBuilder modelBuilder)
{
  modelBuilder.Configurations.Add(new PersonConfiguration());
}
In this example, only one config class is added, but you can add more by calling Add multiple times, each time passing in an instance for a different entity type. In the sample code you see classes being added for Person, EmailAddress and PhoneNumber.
The EntityTypeConfiguration class for Person in the sample application also contains code to rename the columns for the home and work addresses. The default of EF is to name the columns of complex types after the main property name and its own sub properties, each separated by an underscore. This would result in properties like WorkAddress_Street in the People table. I don’t like the underscores, so I specified the new column names like this:
Property(x => x.WorkAddress.Street).HasColumnName("WorkAddressStreet").HasMaxLength(50);
Property(x => x.WorkAddress.City).HasColumnName("WorkAddressCity").HasMaxLength(50);
Property(x => x.WorkAddress.ZipCode).HasColumnName("WorkAddressZipCode").HasMaxLength(15);
Property(x => x.WorkAddress.Country).HasColumnName("WorkAddressCountry").HasMaxLength(30);
Property(x => x.WorkAddress.ContactType).HasColumnName("WorkAddressContactType");
NOTE: setting column names isn’t about validation, but rather configuration of your application and database. However, since EF uses the same mechanism to do both, I decided to discuss it in this section.
While property level validation gets you a long way in specifying your business rules, you typically have validation rules that can’t be expressed with property level validation. For example, what if you want to compare two properties with each other? This is useful if you want to ensure that, say, an EndDate is greater than a StartDate (unless you’re modelling software for a time travel machine of course). Likewise, you may want to reject a date that is outside an allowed range, or you may want to make certain members of an enumeration invalid options. So how do you implement these business rules? Enter object level validation.
Implementing Object Level Validation
In the previous version of my N-Layer design article series object level validation was implemented in the ValidationBase class with the Validate method that returned a list of broken rules. This method would still work in the new design. However, there’s now a much better solution for this. In the System.ComponentModel.DataAnnotations namespace there’s an interface called IValidatableObject. It has a single method called Validate that returns an IEnumerable<ValidationResult>. Inside this method, you can validate your object and then return any validation error you may detect.
The cool thing about this solution is that other areas of the .NET Framework such as Entity Framework and ASP.NET MVC are aware of this interface too. This means that if you implement this interface in your objects, they automatically benefit from the validation features these .NET features have to offer. For EF, it means Validate is called before an attempt is made to save the object in the database. In ASP.NET MVC, this interface helps drive the model validation features.
So, it sounds like IValidatableObject is the way to go, and I think it really is. To make sure all my entities support it, I added the IValidatableObject interface to the DomainEntity<T> and ValueObject<T> classes and implemented the required Validate method as abstract so inheriting types are forced to write an implementation for it. Here’s the relevant code from DomainEntity<T>:
public abstract class DomainEntity<T> : IValidatableObject
{
 ...
  public abstract IEnumerable<ValidationResult> Validate(ValidationContext validationContext);
 ...
}
There’s only one minor problem with the Validate method on this interface: it expects an instance of ValidationContext which is used to determine the context in which validation takes place. EF and MVC automatically pass in this context, but for your own code it’s a bit awkward. Fortunately, it’s easy to create a parameterless overload of Validate that calls the other version and passes in a reference to itself (the entity being validated). To make the method available to all domain entities, I added it to the DomainEntity and ValueObject classes in the Spaanjaars.Infrastructure project like this:
public IEnumerable<ValidationResult> Validate()
{
  var validationErrors = new List<ValidationResult>();
  var ctx = new ValidationContext(this, null, null);
  Validator.TryValidateObject(this, ctx, validationErrors, true);
  return validationErrors;
}
Whenever this method is called on an instance of your object it eventually also calls the version that expects a ValidationContext. That method is the place where you need to write your own validation code, if any. Here’s an example from the Person class:
public override IEnumerable<ValidationResult> Validate(ValidationContext validationContext)
{
  if (Type == PersonType.None)
  {
    yield return new ValidationResult("Type can't be None.", new[] { "Type" });
  }

  if (DateOfBirth < DateTime.Now.AddYears(Constants.MaxAgePerson * -1))
  {
    yield return new ValidationResult("Invalid range for
       DateOfBirth; must be between today and 130 years ago.", new[] { "DateOfBirth" });
  }

  if (DateOfBirth > DateTime.Now)
  {
    yield return new ValidationResult("Invalid range for
       DateOfBirth; must be between today and 130 years ago.", new[] { "DateOfBirth" });
  }

  foreach (var result in PhoneNumbers.Validate())
  {
    yield return result;
  }

  foreach (var result in EmailAddresses.Validate())
  {
    yield return result;
  }

  foreach (var result in HomeAddress.Validate())
  {
    yield return result;
  }

  foreach (var result in WorkAddress.Validate())
  {
    yield return result;
  }
}
Notice how the method needs to return an IEnumerable<ValidationResult>. In C# (and since .NET 4.5 also in VB.NET) you can use the yield return keywords to return a new ValidationResult for each error in your model. Calling code can then simply use a foreach loop to access all the errors. If you don’t have the need to implement validation in one or more of your entities, simply return yield break, like this:
public override IEnumerable<ValidationResult> Validate(ValidationContext validationContext)
{
  yield break;
}
Since the Validate method is called for the entire instance, it’s now easy to implement object level validation with dynamic rules. For example, take a look at how Person makes sure the DateOfBirth is smaller than today:
if (DateOfBirth > DateTime.Now)
{
  yield return new ValidationResult(
      "Invalid value for DateOfBirth; must between today and 130 years ago.", new [] { "DateOfBirth" });
}
You wouldn’t be able to do this using attributes alone as the validation rules can only express constant values, and not something as dynamic as the current date.
Note how I am also calling Validate on the two addresses and the two contact data collections. Inside the EmailAddresses and PhoneNumbers classes you find code like this:
public IEnumerable<ValidationResult> Validate()
{
  var errors = new List<ValidationResult>();
  foreach (var number in this)
  {
    errors.AddRange(number.Validate());
  }
  return errors;
}
This code loops over the collection of addresses (using the this reference) and then calls Validate on each individual instance, storing the result in a temporary list which is returned at the end. If you don’t feel like duplicating this code in each collection you could create a class called ValidatableCollectionBase that in turn inherits CollectionBase. You can then implement the behavior there once, and let PhoneNumbers and EmailAddresses inherit this new collection.
It’s important to realize that your custom Validate method is not called as long as one of the Required or other validation attributes or property-based rules set using the Fluent API are causing the object to be invalid. So for instance with this code:
Person person = new Person { DateOfBirth = DateTime.Now.AddDays(10) };
var brokenRules = person.Validate();
the brokenRules collection will only contain two ValidationResult instances for FirstName and LastName (both are required), and not for the DateOfBirth. Once you assign FirstName and LastName a value, then the custom Validate method is called and the DateOfBirth is rejected:
Person person = new Person { FirstName = "Imar", LastName = "Spaanjaars",
                   DateOfBirth = DateTime.Now.AddDays(10) };
var brokenRules = person.Validate(); // Now contains two results, for Type and for DateOfBirth
The Validation method of Address looks a bit different. It’s a ComplexType which can’t be null by itself, and therefore nullability is determined by looking at all the individual properties using IsNull:
public bool IsNull
{
  get
  {
    return (string.IsNullOrEmpty(Street) && string.IsNullOrEmpty(ZipCode) &&
                  string.IsNullOrEmpty(City) && string.IsNullOrEmpty(Country));
  }
}

public override IEnumerable<ValidationResult> Validate(ValidationContext validationContext)
{
  if (!IsNull)
  {
    if (ContactType == ContactType.None)
    {
      yield return new ValidationResult("ContactType can't be None.", new[] { "ContactType" });
    }
    if (string.IsNullOrEmpty(Street))
    {
      yield return new ValidationResult("Street can't be null or empty", new[] { "Street" });
    }
    if (string.IsNullOrEmpty(ZipCode))
    {
      yield return new ValidationResult("ZipCode can't be null or empty", new[] { "ZipCode" });
    }
    if (string.IsNullOrEmpty(City))
    {
      yield return new ValidationResult("City can't be null or empty", new[] { "City" });
    }
    if (string.IsNullOrEmpty(Country))
    {
      yield return new ValidationResult("Country can't be null or empty", new[] { "Country" });
    }
  }
}
When all properties are null, the class is considered valid (that is, it’s interpreted as no address is supplied which is a valid situation for this application). However, if at least one property has a value, all of them must have a value. For more information on complex types and nullability, check out this blog:
Also note that I haven’t written code to validate zip codes or addresses. However, it’s relatively simple to implement this. You’ll find many regular expressions on-line for zip codes which you could combine with the selected country.
With the validation implemented, I could now update my test projects and add a bunch of tests to test the validation in the various entities. For example, here are a few tests from the PersonTests class in the Unit Tests project:
[TestMethod]
public void FirstNameIsRequired()
{
  Person person = new Person();
  person.Validate().Count(x => x.MemberNames.Contains("FirstName")).Should().BeGreaterThan(0);
}

[TestMethod]
public void LastNameIsRequired()
{
  Person person = new Person();
  person.Validate().Count(x => x.MemberNames.Contains("LastName")).Should().BeGreaterThan(0);
}

[TestMethod]
public void PersonWithTypeNoneIsInvalid()
{
  Person person = CreatePerson();
  person.Type = PersonType.None;
  person.Validate().Count(x => x.MemberNames.Contains("Type")).Should().BeGreaterThan(0);
}
The CreatePerson method is a simple helper method that returns an instance of a Person:
public static Person CreatePerson()
{
  return new Person { FirstName = "Imar", LastName = "Spaanjaars",
        Type = PersonType.Friend, DateOfBirth = DateTime.Now.AddYears(-20) };
}
Dealing with Database Initialization
During initial development of the application it’s common that your model changes quite a bit between runs of your application and integration tests. That means that at some point you’ll run into this error:

Figure 5-4 Error Running a Unit Test (click to enlarge)
The error message says that the model has changed and is no longer in sync with the database. There are a couple of ways to solve this problem:
- Using Database Initializers like DropCreateDatabaseIfModelChanges and DropCreateDatabaseAlways. These initializers will drop the database and then recreate it. The first one does this only when the model has changed while the second one will do it every time the object context is instantiated for the first time within an application domain.
- Using EF Migrations. With Migrations you can script the differences between model versions and use that information to update the target database through code or SQL statements.
- Manually update the production database with SQL Scripts that you can generate by comparing the production database with the development database. Tools like Red Gate’s SQL Compare come in really handy here. You'll find more information about this tool in Part 10.
I’ve used Migrations in a couple of my projects and it works well. However, I don’t always find it a good solution to update the database at runtime for production environments as the account used to access the database then also needs DDL permissions. So, instead I use a combination of option 1 and 3 like this:
- I am using a specialized version of DropCreateDatabaseIfModelChanges at development time. Using this class, I can drop and recreate the database when needed. Using an override of Seed, I can also insert some default data that I might need for my integration tests or create additional database objects such as indexes on tables.
- At production time, I turn off the database initializer. This means the model is not checked when the application starts up. This in turn means you may end up with errors when a column or table isn’t found; a column is now required or when the data type for the column has changed. However, using diff scripts you can quickly bring the production database in sync, so I am typically willing to take this risk.
- I add a static class (called ContactManagerContextInitializer in the sample application) to my EF Project that has an Init method that sets a database initializer, or turns it off. The code in the Repositories.EF project looks like this:
public static class ContactManagerContextInitializer
{
  public static void Init(bool dropDatabaseIfModelChanges)
  {
    if (dropDatabaseIfModelChanges)
    {
      Database.SetInitializer(new MyDropCreateDatabaseIfModelChanges());
      using (var db = new ContactManagerContext())
      {
        db.Database.Initialize(false);
      }
    }
    else
    {
      Database.SetInitializer<ContactManagerContext>(null);
    }
  }
}
Based on the value of dropDatabaseIfModelChanges, this code either sets the initializer to MyDropCreateDatabaseIfModelChanges or it turns it off by passing null. In the second case, the database is not checked for compatibility with the model and it’s up to you to make sure the database is up to date. You can override the Seed method of the MyDropCreateDatabaseIfModelChanges class and insert default records like this:
public class MyDropCreateDatabaseIfModelChanges :
                    DropCreateDatabaseIfModelChanges<ContactManagerContext>
{
  protected override void Seed(ContactManagerContext context)
  {
    var person = new Person
    {
      FirstName = "Imar",
      LastName = "Spaanjaars",
      DateOfBirth = new DateTime(1971, 8, 9),
      Type = PersonType.Friend
    };
    person.HomeAddress = CreateAddress();
    person.WorkAddress = CreateAddress();
    context.People.Add(person);
  }

  private static Address CreateAddress()
  {
    return new Address("Street", "City", "ZipCode", "Country", ContactType.Business);
  }
}
This way you have default data present in the database that you might need for other integration tests. In the Contact Manager application no data is needed, but this could be useful for scenarios where you want to prefill some lookup tables like countries or states for example.
From the integration tests project in the Contact Manager application, I call the Init method like this (in the constructor of IntegrationTestBase that all my integration test classes inherit from):
public class IntegrationTestBase
{
  public IntegrationTestBase()
  {
    ContactManagerContextInitializer.Init(true);
  }
}
In my production applications, such as the MVC project, I could call Init like this (for example, in Global.asax):
protected void Application_Start()
{
  ...
  ContactManagerContextInitializer.Init(false);
  ...
}
However, this makes it a bit hard to test the presentation projects during development because you then often do want the database to be generated automatically for you so it’s up to date. Fortunately, EF lets you enable or disable the database initializers through the web.config as well. This in turn means it’s easy to have different settings in development, production and other environments by using Web.config Transformations. My web.config for production could look like this:
<entityFramework>
  <contexts>
    <context type="Spaanjaars.ContactManager45.Repositories.EF.ContactManagerContext,
     Spaanjaars.ContactManager45.Repositories.EF" disableDatabaseInitialization="true" />
  </contexts>
</entityFramework>
This disables the database initialization completely; leaving it up to you to make sure the database is in a valid state.
At development time, I could use this configuration code instead:
<entityFramework>
  <contexts>
    <context type="Spaanjaars.ContactManager45.Repositories.EF.ContactManagerContext,
      Spaanjaars.ContactManager45.Repositories.EF" disableDatabaseInitialization="false">
      <databaseInitializer type="
         Spaanjaars.ContactManager45.Repositories.EF.MyDropCreateDatabaseIfModelChanges,
         Spaanjaars.ContactManager45.Repositories.EF" />
    </context>
  </contexts>
</entityFramework>
This configures the MyDropCreateDatabaseIfModelChanges to be used as the database initializer during development, which is very helpful as I get a new database automatically whenever the model has changed.
More info on database initializers and web.config transformations can be found here:
- http://www.codeguru.com/csharp/article.php/c19999/Understanding-Database-Initializers-in-Entity-Framework-Code-First.htm
- http://msdn.microsoft.com/en-us/data/gg194002.aspx (video)
- http://blog.oneunicorn.com/category/entity-framework/database-initializers/
- http://msdn.microsoft.com/en-us/library/dd465318%28v=vs.100%29.aspx
- http://www.codeproject.com/Tips/559849/Transform-Web-Config-when-Deploying-a-Web-Applicat
- http://www.asp.net/web-forms/tutorials/deployment/deployment-to-a-hosting-provider/deployment-to-a-hosting-provider-web-config-file-transformations-3-of-12
Implementing a Base Repository Class to Centralize Common Queries
At this point, a lot of the plumbing for the application has been done. To recap and see where we are, here’s the current state of the application:
- A new model has been created that contains the application’s core entities.
- There’s an Infrastructure project that contains base types for your entities and other objects.
- The model implements property and object level validation, using attributes from the DataAnnotations namespace and the fluent EF API.
- There’s a DbContext class with a property called People that can be used by calling code to query the underlying database.
- There are unit and integration tests to make sure everything works as expected.
With this setup, you could now start to create instances of ContactManagerContext directly and query the People collection to get at the data in your database and create new entities. However, this isn’t recommended because it’ll make your code harder to reuse and test. Suppose you have some code in an MVC Controller or the Code Behind of a Web Form that retrieves a Person from the database by its ID. This is very common code and it’s likely you’ll need this code more often. Without a way to centralize this behavior, you’ll be copying and pasting your code all over the place, making your application harder to understand and maintain. In addition, your code is now tied to a concrete instance of the ContactManagerContext (which in turns is tightly coupled to the database), making it much harder to unit test your controllers.
As a solution to this problem, you should create a Repository. Under Martin Fowler’s definition, a repository “mediates between the domain and data mapping layers using a collection-like interface for accessing domain objects.”
A Repository enables you to centralize all your data access methods revolving around an entity in a single, centralized class per entity. Quite often, a repository is based on a generic IRepository<T> interface that in turn implements members such as FindById (to find an instance based on its unique key in the database), FindAll to get access to all objects of a specific type, Add (to add new instances to the underlying database) and Remove to delete items from the database.
Note: the application makes use of the Repository pattern. For alternatives to this pattern, see:
- http://lostechies.com/jimmybogard/2012/09/20/limiting-your-abstractions/
- http://lostechies.com/jimmybogard/2012/10/08/favor-query-objects-over-repositories/
You already saw the design of the generic repository in Part 4, but here's a quick recap. I started implementing the repository pattern in the ContactManager with the following IRepository interface in the Infrastructure project:
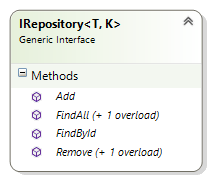
Figure 5-5 The IRepository Interface
From a code perspective, the interface looks like this:
public interface IRepository<T, K> where T : DomainEntity<K>
{
  T FindById(K id, params Expression<Func<T, object>>[] includeProperties);
  IQueryable<T> FindAll(params Expression<Func<T, object>>[] includeProperties);
  IEnumerable<T> FindAll(Expression<Func<T, bool>>
           predicate, params Expression<Func<T, object>>[] includeProperties);
  void Add(T entity);
  void Remove(T entity);
  void Remove(K id);
}
The interface has two generic type parameters: one for the actual entity (T, which can be a type such as Person) and one for its key type (K, which is always an int in the Contact Manager Application but it could be something else like a Guid).
The interface definition uses a where clause to limit the type of T to a DomainEntity<K> so you can’t accidentally create a repository on an unrelated type. In addition, within the Repository you then know the base class of the type you’re dealing with which you can use in methods like FindById as you’ll see later.
Most of this should look relatively straightforward; FindById expects a K (such as an int, the ID of a Person) and returns a T (such as a Person). FindAll returns an IQueryable<T> which means your code can further query the resulting set of objects. Add and Remove each expect a T that is added to or removed from the database, respectively. Remove also has a convenient overload that expects just the ID of the entity you want to remove, making it easier to delete an object for which you only have its ID.
Both FindById and FindAll have a funky parameter called includeProperties: a params parameter (which means you can specify an arbitrary number of values) of type Expression<Func<T, object>>[]. This parameter enables you to specify the properties you want to include when retrieving an entity from the database. Consider this example:
Person person = repository.FindById(123);
string firstEmailAddress = person.EmailAddresses[0].EmailAddressText;
Depending on how you set things up, this may either result in a lazy loaded call to the database to fetch the e-mail addresses for this person, or in a null reference exception. To force eager loading, you can specify the properties you want EF to return when it goes out to the database to fetch the requested Person. With the includeProperties parameter and some concrete implementation in the Repository base class that you’ll see shortly, you can now execute something like this:
Person person = repository.FindById(123, p => p.EmailAddresses);
string firstEmailAddress = person.EmailAddresses[0].EmailAddressText;
The lambda expression in the call to FindById indicates that you want to eager-load the EmailAddresses collection. This means that when the Person is fetched, all its associated e-mail addresses are fetched as well in the same SQL call, minimizing execution time and network overhead, thus improving application performance. All other complex properties that are not specified, such as PhoneNumbers are not fetched. If you want to load multiple properties, simply provide them in a comma separated list:
Person person = repository.FindById(123, p => p.EmailAddresses, p => p.PhoneNumbers);
With the interface for the repository out of the way, the next step is to implement a repository class based on it. Until recently, I would create a new Repository class for each of my aggregate roots. The repository classes would then implement the IRepository interface directly. Something like this would have worked;
public class PersonRepository : IRepository<Person, int>
{
  public Person FindById(int id,
            params Expression<Func<Person, object>>[] includeProperties)
  {
    IQueryable<Person> people = DataContextFactory.GetDataContext().People;
    if (includeProperties != null)
    {
      foreach (var includeProperty in includeProperties)
      {
        people = people.Include(includeProperty);
      }
    }
    return people.SingleOrDefault(x => x.Id == id);
  }

  // Other methods go here
}
This code does a few important things; first, it uses the GetDataContext method to fetch the application’s data context so it can access its People property to get access to that DbSet. It then loops over the properties that need to be included, calling Include on EF’s DbSet. This information eventually gets passed to the database where it’s used to query the Person and its related data.
The final line of code queries the requested Person from the database and returns it when it exists. If it doesn’t, the code returns null.
While this code works fine, it gets boring to write after a while. Once you write your second or third repository, you’ll notice that most of it is the same, except for the type (Person in this case) of the entity and the collection in the data context that is being queried (People in this case). If you want to implement a base class repository that other classes can inherit from and that centralizes the code that is the same for each repository, you’ll need to overcome these two differences.
The first issue is simple to solve: simply use generics. Here’s a (non-functional) example of how you could implement this:
public abstract class Repository<T> : IRepository<T, int> where T : DomainEntity<int>
{
  public virtual T FindById(int id, params Expression<Func<T, object>>[] includeProperties)
  {
    IQueryable<T> items = DataContextFactory.GetDataContext().??????;
    if (includeProperties != null)
    {
      foreach (var includeProperty in includeProperties)
      {
        items = items.Include(includeProperty);
      }
    }
    return items.SingleOrDefault(x => x.Id == id);
  }

  // Other code here
}
Notice how each occurrence of Person has been replaced with T, making the class applicable for any DomainEntity<T>. Using this base class, you could now create a concrete PersonRepository with only a few lines of code:
public class PeopleRepository : Repository<Person>, IPeopleRepository
{
}
The only problem that needs to be solved is getting the right collections of items, marked with ?????? in the highlighted in the code block above. One solution would be to build in a switch statement that would access the proper collection (e.g. People), based on the type of T. However, that would be a bit lame as a solution and would easily break as you add new types. After some research, I found out that DbContext (on which ContactManagerContext is based) has a generic Set method that returns an IQueryable for any given type it supports. This turned out to be the solution to the problem; I can use this method in my generic repository like this:
public abstract class Repository<T> : IRepository<T, int> where T : DomainEntity<int>
{
  public virtual T FindById(int id, params Expression<Func<T, object>>[] includeProperties)
  {
    IQueryable<T> items = DataContextFactory.GetDataContext().Set<T>;
    if (includeProperties != null)
    {
      foreach (var includeProperty in includeProperties)
      {
        items = items.Include(includeProperty);
      }
    }
    return items.SingleOrDefault(x => x.Id == id);
  }
  // Other code here
}
Voila: a fully generic, and type safe method that returns an instance of T from the database. I wrote similar code for the other methods in the repository to implement basic CRUD operations for all core types in the application. Since I made all methods virtual, they only serve as a base implementation. If you have a reason to write a different implementation in one of your repositories, simply override the relevant method and change the implementation.
Implementing Search
In Part 4 of this series you saw that the IRepository (and thus the concrete repositories that are based on it) have an overload of FindAll that accepts a predicate parameter used for searching. In the interface, the method looks like this:
IEnumerable<T> FindAll(Expression<Func<T, bool>> predicate,
             params Expression<Func<T, object>>[] includeProperties);
The concrete implementation looks like this:
public IEnumerable<T> FindAll(Expression<Func<T, bool>> predicate,
              params Expression<Func<T, object>>[] includeProperties)
{
  IQueryable<T> items = DataContextFactory.GetDataContext().Set<T>();
  if (includeProperties != null)
  {
    foreach (var includeProperty in includeProperties)
    {
      items = items.Include(includeProperty);
    }
  }
  return items.Where(predicate);
}
Notice how the predicate parameter is forwarded to the Where method that uses it to build up the correct search expressions. What’s really cool about this is that the search criteria are forwarded to the database, so filtering takes place at the database level. Consider this concrete example:
var friendsWithATattoo = repository.FindAll(
            x => x.FirstName == "Goo" && x.Type == PersonType.Friend);
The SQL code for this LINQ query looks like this:
SELECT
  [Extent1].[Id] AS [Id],
  [Extent1].[DateCreated] AS [DateCreated],
  [Extent1].[DateModified] AS [DateModified],
  [Extent1].[FirstName] AS [FirstName],
  [Extent1].[LastName] AS [LastName],
  [Extent1].[DateOfBirth] AS [DateOfBirth],
  [Extent1].[Type] AS [Type],
  [Extent1].[HomeAddressStreet] AS [HomeAddressStreet],
  [Extent1].[HomeAddressZipCode] AS [HomeAddressZipCode],
  [Extent1].[HomeAddressCity] AS [HomeAddressCity],
  [Extent1].[HomeAddressCountry] AS [HomeAddressCountry],
  [Extent1].[HomeAddressContactType] AS [HomeAddressContactType],
  [Extent1].[WorkAddressStreet] AS [WorkAddressStreet],
  [Extent1].[WorkAddressZipCode] AS [WorkAddressZipCode],
  [Extent1].[WorkAddressCity] AS [WorkAddressCity],
  [Extent1].[WorkAddressCountry] AS [WorkAddressCountry],
  [Extent1].[WorkAddressContactType] AS [WorkAddressContactType]
FROM
  [dbo].[People] AS [Extent1]
WHERE
  (N'Goo' = [Extent1].[FirstName]) AND (1 =  CAST( [Extent1].[Type] AS int))
With this code, the database filters the rows based on the requested values for the first name and the type, resulting in optimal performance.
I’ll use this generic repository base class again in the following section when I show you how to implement concrete repositories.
Implementing Concrete Repositories to Manage Contact People in the System
Implementing a concrete repository is now super simple: just inherit from this generic Repository<T> class and you get all the CRUD functionality for free. Also, as discussed earlier, the repository should implement an interface that defines this specific repository. Here’s an example of the PeopleRepository:
public class PeopleRepository : Repository<Person>, IPeopleRepository
{
}
Whenever you have the need for specialized methods for behavior that is specific for that repository, you can add them to each repository interface (such as IPeopleRepository) and then implement them in the concrete repository. Here’s an example of a method that finds all contact people by their last name:
public interface IPeopleRepository : IRepository<Person, int>
{
  IEnumerable<Person> FindByLastName(string lastName);
}

…

public class PeopleRepository : Repository<Person>, IPeopleRepository
{
  public IEnumerable<Person> FindByLastName(string lastName)
  {
    return DataContextFactory.GetDataContext().Set<Person>().Where(
                   x => x.LastName == lastName).ToList();
  }
}
Your UI code (such as the MVC project) programs against the interface and thus sees this new method automatically, ready to be used.
With the model and the repository layer almost done, there are a few small tasks that need to be completed. In the next section you see how to let the model and EF layer automatically track the creation and modification dates of your entities. In the final section you see how to improve the error messages that the ContactManagerContext raises to make debugging easier.
Implementing a Unit of Work
If you’ve been looking at the code for the repository and the DbContext, you may be wondering how on earth you can save changes to the DbContext. The repositories (such as PersonRepository) are hiding the fact that a DbSet is being used under the hood. In addition, no SaveChanges method is defined on IRepository or any of the other repository types. While you could add this method to the IRepository interface and implement it in Repository<T> for example (and have it call return DataContextFactory.GetDataContext().SaveChanges(); ), there are better ways to implement it.
With a unit of work, you typically want to execute one or more updates to the data context, and then save them to the database at once. Here’s an example:
var repository = new PeopleRepository();
var person1 = CreatePerson();
repository.Add(person1);
var person2 = CreatePerson();
repository.Add(person2);
repository.SaveChanges(); // Doesn't work because SaveChanges doesn't exist.
With the implementation of a unit of work in the sample project, you can change this code to this:
using (new EFUnitOfWorkFactory().Create())
{
  var repository = new PeopleRepository();
  var person1 = CreatePerson();
  repository.Add(person1);
  var person2 = CreatePerson();
  repository.Add(person2);
}
At the end of the closing bracket }, SaveChanges is called automatically. So how does this work? You may remember that a using block in .NET works on objects that implement IDisposable. Under the hood, .NET expands such a block to a try / finally block and calls Dispose in the finally block. In order to make this code unit testable, you don’t want to hard code a Unit of Work that works with the Entity Framework only. Instead, the sample application has two interfaces, both located in the Infrastructure project: the IUnitOfWorkFactory and an IUnitOfWork. The IUnitOfWorkFactory and IUnitOfWork interfaces work together to determine the scope of a unit of work enabling you send a batch of changes to the database as a single action. The Create method of the factory returns an instance of a type that inherits IUnitOfWork. This interface in turn inherits IDisposable which forces inheriting types to implement this method. In the EFUnitOfWork class the Dispose method is used to save the changes to the DbContext. The IUnitOfWork interface also has Commit and Undo methods to explicitly commit changes to the database, or to get rid of them. Here’s the code for the two interfaces:
namespace Spaanjaars.Infrastructure
{
  public interface IUnitOfWorkFactory
  {
    IUnitOfWork Create();
    IUnitOfWork Create(bool forceNew);
  }

  public interface IUnitOfWork : IDisposable
  {
    void Commit(bool resetAfterCommit);
    void Undo();
  }
}
In the Repositories.EF project you find the following concrete implementations:
namespace Spaanjaars.ContactManager45.Repositories.EF
{
  public class EFUnitOfWorkFactory : IUnitOfWorkFactory
  {
    public IUnitOfWork Create()
    {
      return Create(false);
    }

    public IUnitOfWork Create(bool forceNew)
    {
      return new EFUnitOfWork(forceNew);
    }
  }

  public class EFUnitOfWork : IUnitOfWork
  {
    public EFUnitOfWork(bool forceNewContext)
    {
      if (forceNewContext)
      {
        DataContextFactory.Clear();
      }
    }

    public void Dispose()
    {
      DataContextFactory.GetDataContext().SaveChanges();
    }

    public void Commit(bool resetAfterCommit)
    {
      DataContextFactory.GetDataContext().SaveChanges();
      if (resetAfterCommit)
      {
        DataContextFactory.Clear();
      }
    }

    public void Undo()
    {
      DataContextFactory.Clear();
    }
  }
}
Notice how the Create method of the factory class forwards the value of the forceNew parameter to the constructor of EFUnitOfWork. This value is then used to determine if the context should be cleared or not. Remember the DataContextStorage I showed earlier? The Clear method ensures that the current DbContext is cleared, so a new one is created the next time GetDataContext is called. I typically use the parameterless version of Create in production code while I use the second overload in integration testing. By ensuring that any data context is cleared when you run an integration test, you make sure that a problem caused in one test is not causing other tests to fail. This in turn makes it easier to find issues in your tests and fix them.
To see how the changes are saved, take a look at the Dispose method:
public void Dispose()
{
  DataContextFactory.GetDataContext().SaveChanges();
}
When Dispose is called, SaveChanges is called on the same DbContext that the repository has been using.
To see how it all fits together, take another look at the same code:
using (new EFUnitOfWorkFactory().Create())
{
  var repository = new PeopleRepository();
  var person1 = CreatePerson();
  repository.Add(person1);
  var person2 = CreatePerson();
  repository.Add(person2);
}
Because of the using block, .NET expands this to the following (pseudo code):
var uow = new EFUnitOfWorkFactory().Create();
try
{
  var repository = new PeopleRepository();
  var person1 = CreatePerson();
  repository.Add(person1);
  var person2 = CreatePerson();
  repository.Add(person2);
}
finally
{
  uow.Dispose();
}
The IUnitOfWork interface also exposes a Commit method and an Undo method. Commit calls SaveChanges as well and can be used if you want to explicitly save the changes without relying on the automatic save behavior of the unit of work. You see this method at work in Part 9 of this series which discusses a command line import tool. Undo can be used to undo any pending changes which can be useful if you change your mind about the data (for example, when an entity is in an invalid state) while in a unit of work. Undo simply clears the DbContext from the container which means a new DataContext instance is created the next time GetDataContext is called.
The code in the try block creates a new PeopleRepository and adds two people to them. The Add method uses DataContextFactory.GetDataContext() under the hood to get a reference to the DbContext stored in HttpContext or the current thread. When the finally block is hit, Dispose is called which gets a reference to the same DbContext and then calls SaveChanges on it to send all the updates to the database.
Because the unit of work is based on interfaces, it’s easy to use them in unit testable environments. For example, you could use them as follows in an MVC controller:
public class HomeController : Controller
{
  private readonly IPeopleRepository _peopleRepository;
  private readonly IUnitOfWorkFactory _unitOfWorkFactory;

  public HomeController(IPeopleRepository peopleRepository,
            IUnitOfWorkFactory unitOfWorkFactory)
  {
    _peopleRepository = peopleRepository;
    _unitOfWorkFactory = unitOfWorkFactory;
  }

  [HttpDelete]
  public ActionResult Delete(int id)
  {
    using (_unitOfWorkFactory.Create())
    {
      _peopleRepository.Remove(id);
    }
    return RedirectToAction("Index");
  }
}
In this example, the controller receives an instance of IPeopleRepository and an instance of IUnitOfWorkFactory. Both parameters to the constructor are based on interfaces so it’s easy to pass other types during unit testing. At run-time, in production, a dependency framework injects concrete EF-based versions of the classes that access your production database. You see how to enable dependency injection in the next article in this series.
In the Delete method, the call to Create on _unitOfWorkFactory returns an instance of a class that implements IUnitOfWork. In a production application, that would be an EFUnitOfWork which persists the changes to the database (deleting a Person based on the id parameter) by calling SaveChanges.
Just like other code from this article, this may seem like a lot of work to implement something simple as a call to SaveChanges. However, once again, a lot of it is plumbing code so you only need to write it once. And once the code is written, saving changes in a single step is now as simple as wrapping some code in a using block.
Using the model and repositories presented in this and the previous article makes your application a lot easier to change. In the previous version of my N-Layer design, when you wanted to add a property to a class, you needed to update the following:
- Add the property to the “dumb” data object.
- Modify the DB class and add support for the new property in the Save and FillDataRecord methods.
- Modify multiple stored procedures to include the field in the various select and insert / update procedures.
- Use the field in the UI.
With the new implementation, you can bring this down to two steps:
- Add the property to the model class.
- Use the new field in the UI.
Obviously you may still need to write some code to configure the property and its validation rules, but the fact you don't have to mess with multiple stored procedures (or any data access code at all) is a big time saver.
Managing Relationships
In Part 4 of this series I mentioned a problem with the collections and removal of the contact details. I showed the following example:
var person = myContext.People.First(x => x.Id = id);
person.EmailAddresses.Clear();
myContext.SaveChanges();
Now that the repositories are done, I can rewrite the code as follows:
using (_unitOfWorkFactory.Create())
{
  var person = _peopleRepository.FindById(id, x => x.EmailAddesses);
  person.EmailAddresses.Clear();
}
Both these example have the same problem. When the changes are saved, any e-mail address that belonged to this person is not deleted from the database. Instead, the OwnerId is set to null, effectively orphaning the e-mail address record.
To work around this issue you need to tell EF what to do with these objects. The logic to determine which objects to delete is relatively simple: e-mail addresses and phone numbers that no longer have an owner. That’s the reason I implemented the IHasOwner interface which you can use for entities that are owned by other entities, and which should be removed from the database whenever they are removed from the parent collection. Once you’ve found the objects you want to delete, setting their State to EntityState.Deleted is then enough for EF to delete them from the database. The best place to implement this code is in an override of SaveChanges on the ContactManagerContext which is called by EF whenever it saves the changes. Here’s the code from the sample application:
public override int SaveChanges()
{
  var orphanedObjects = ChangeTracker.Entries().Where(
    e => (e.State == EntityState.Modified || e.State == EntityState.Added) &&
      e.Entity is IHasOwner && e.Reference("Owner").CurrentValue == null);

  foreach (var orphanedObject in orphanedObjects)
  {
    orphanedObject.State = EntityState.Deleted;
  }

  ... Other code here
}
This code finds all entities that are either modified or added in the current session. It then tries to cast them to an IHasOwner which will only work for EmailAddress and PhoneNumber instances. It also checks the reference called Owner to see if it’s null (and thus an orphaned entity). I don’t like the hardcoded string of “Owner” much, but since the interface IHasOwner guarantees that the related entities have a property called Owner, I am OK with this magic string. Finally, the code sets the State of all entities found to Deleted.
You can find the article I used to come up with this solution here: http://www.phdesign.com.au/programming/delete-dependent-entities-when-removed-from-ef-collection/ while an alternative solution using a attribute can be found here: http://wimpool.nl/blog/DotNet/extending-entity-framework-4-with-parentvalidator.
With these changes, the objects are now deleted from their associated tables in the database. For more details about this solution, check out this blog post: http://www.phdesign.com.au/programming/delete-dependent-entities-when-removed-from-ef-collection/.
Note that for this to work correctly, the related entities must be loaded into the Person instance. Entities that weren’t loaded when you call Clear() won’t be deleted from the database.
If you prefer to have an IHasOwner interface that you can reuse across multiple entities (with a type other than Person), you can make the interface generic:
public interface IHasOwner<T>
{
  /// <summary>
  /// The object instance this object belongs to.
  /// </summary>
  T Owner { get; set; }
}passing Person for the type parameter:
public class PhoneNumber : DomainEntity<int>, IHasOwner<Person> { ... }
public class EmailAddress : DomainEntity<int>, IHasOwner<Person> { ... }
types instead of non-generic IHasOwner interfaces:
var orphanedObjects = ChangeTracker.Entries().Where(
      e => (e.State == EntityState.Modified || e.State == EntityState.Added) &&
      e.Entity.GetType().GetInterfaces().Any(x => x.IsGenericType &&
      x.GetGenericTypeDefinition() == typeof(IHasOwner<>)) &&
      e.Reference("Owner").CurrentValue == null);

foreach (var orphanedObject in orphanedObjects)
{
  orphanedObject.State = EntityState.Deleted;
}
The code to find the generic interface is inspired by this SO post: http://stackoverflow.com/questions/503263/how-to-determine-if-a-type-impleme nts-a-specific-generic-interface-type.
You can now easily reuse this interface. For example, on an OrderLine that has an Order as its parent, you can implement the IHasOwner<Order> interface and implement a property called Owner of type Order.
Implementing IDateTracking
As I mentioned earlier, a common requirement in a data driven application like the Contact Manager is to automatically track when an entity was created and when it was last updated. In Part 4 you saw how I created the IDateTracking interface to force entities to implement DateCreated and DateModified properties. While you could manually set these properties, it would be much nicer if they were updated automatically for you.
Using EF, this is pretty simple to implement in the model and data layer, with a minimum amount of code. All you need to do is override SaveChanges in the ContactManagerContext class, find all added and modified entities, update their dates and then let EF save the changes to the database. Here’s how the code in SaveChanges looks (in the sample project it’s wrapped in a try block to improve error messages as you’ll see in the next section of this article):
public override int SaveChanges()
{
  ... Other code here

  var modified = ChangeTracker.Entries().Where(
             e => e.State == EntityState.Modified || e.State == EntityState.Added);

  foreach (DbEntityEntry item in modified)
  {
    var changedOrAddedItem = item.Entity as IDateTracking;
    if (changedOrAddedItem!= null)
    {
      if (item.State == EntityState.Added)
      {
        changedOrAddedItem.DateCreated = DateTime.Now;
      }
      changedOrAddedItem.DateModified = DateTime.Now;
    }
  }
  return base.SaveChanges();
}
This code uses the Entries collection of the built-in ChangeTracker to find all objects that have been added or changed in the latest session (e.g. since the data context was created, or since SaveChanges was called last). The code then loops over these entries and tries to cast them to the IDateTracking interface using the as keyword. If that works, the class implements this interface and the two properties can be set. The code uses the entity’s State property to determine if it’s a new entity or an existing entity that’s being modified. Only in the former case is the DateCreated property set; in both cases the DateModified property is filled with the current date. If you don’t like this and prefer to have new entities that have an empty (null) DateModified, you can change the code in the SaveChanges method and make the property nullable to accommodate for this.
With this change, all entities that implement this interface will now automatically track their creation and modification dates. Figure 5-6 shows the People table in the database with the two new properties:
![]()
Figure 5-6 The People table (click to enlarge)
Improving Error Messages Generated by the DbContext
Whenever an error occurs while saving entities, the Entity Framework throws a rather cryptic error message. For example, when you save an entity that is missing a required field, you get an error like the following:
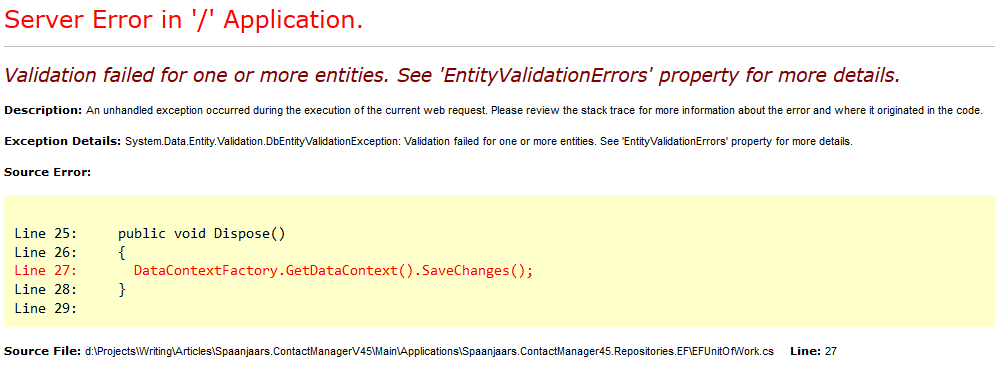
Figure 5-7 The Standard EF Error Message (click to enlarge)
This message tells you nothing about the actual validation error, why validation failed, or which entity was invalid. With a bit of code you can make the error message read as follows:
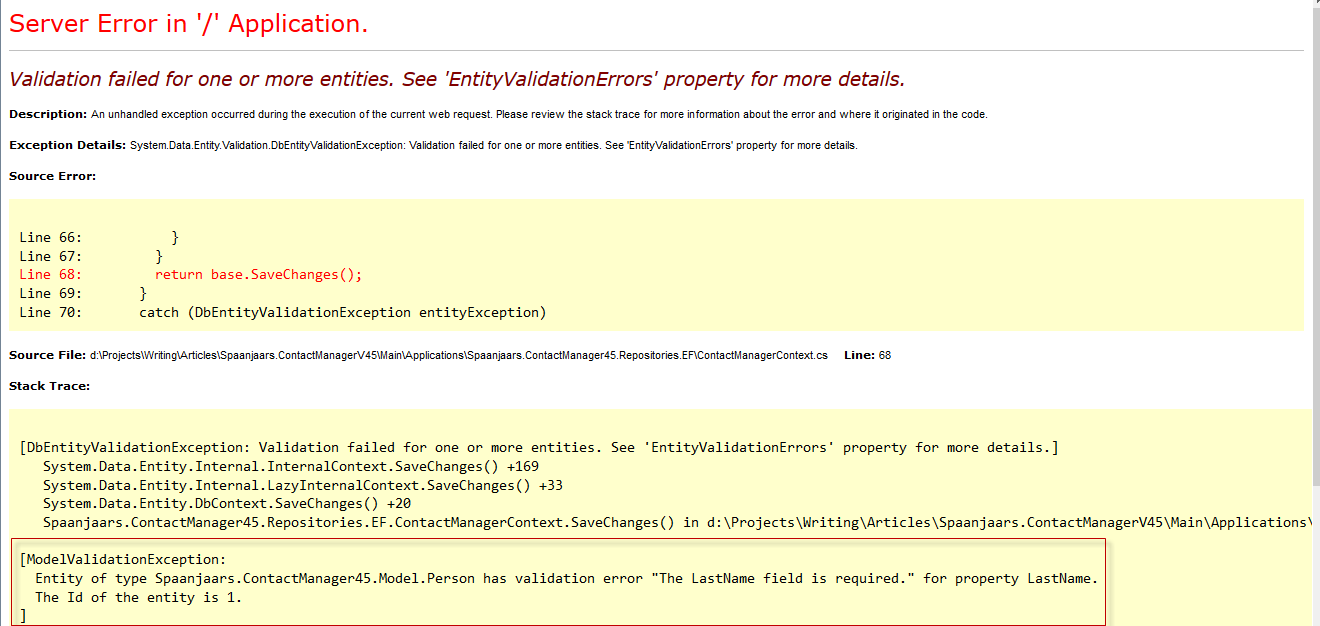
Figure 5-8 Improved Error Messages (click to enlarge)
Notice how the error message now mentions the invalid entity’s type, ID (if it exists) and the reason it was invalid. This becomes even more useful if you’re updating multiple entities at the same time with multiple validation errors:

Figure 5-9 Multiple Error Messages (click to enlarge)
In order to get the more detailed information, I added the following code to the SaveChanges method in the ContactManagerContext class:
public override int SaveChanges()
{
  try
  {
    // Other code here
    return base.SaveChanges();
  }
  catch (DbEntityValidationException entityException)
  {
    var errors = entityException.EntityValidationErrors;
    var result = new StringBuilder();
    var allErrors = new List<ValidationResult>();
    foreach (var error in errors)
    {
      foreach (var validationError in error.ValidationErrors)
      {
        result.AppendFormat("\r\n  Entity of type {0} has validation error \"{1}\" for
                 property {2}.\r\n", error.Entry.Entity.GetType().ToString(),
                 validationError.ErrorMessage, validationError.PropertyName);
        var domainEntity = error.Entry.Entity as DomainEntity<int>;
        if (domainEntity != null)
        {
          result.Append(domainEntity.IsTransient() ? "  This entity was added
              in this session.\r\n" : string.Format("The Id of the entity is {0}.\r\n",
              domainEntity.Id));
        }
        allErrors.Add(new ValidationResult(validationError.ErrorMessage, new[] {
                             validationError.PropertyName }));
      }
    }
    throw new ModelValidationException(result.ToString(), entityException, allErrors);
  }
}
This code uses a try/catch block to catch an EF DbEntityValidationException. It then loops over the validation errors, building up a StringBuilder with the error messages and type information. Notice how it uses the IsTransient method of the DomainEntity base class to determine if the object is new or already existed in the database. In the end, the code raises a new exception of type ModelValidationException, wraps the original exception and provides the detailed error information as the ErrorMessage. The ModelValidationException class is a custom Exception type defined in the Infrastructure project. It’s mostly just a standard Exception but has a constructor overload that accepts an IEnumerable<ValidationResult> and that exposes those again using a read-only property. This property can be queried by calling code to find out what went wrong during a database update. You see a concrete example of this in Part 6 of this series.
Note: Using error handling like this may expose more data than you want. Make sure you never show errors like this on the production server using custom errors or a framework like Elmah. You could also modify this code so it only runs on a developer’s machine, or in debug mode.
Stuff I Like to Do
- Write integration tests for the Repository classes. Even though they are based on a generic base class that I can test separately, it’s still useful to have test methods that ensure you can correctly retrieve data from the database and send it back again.
- Write integration tests that test the behavior of related entities. Setting up an EF model can be tricky especially when multiple related entities are involved. By writing tests that assert that data gets deleted when you expect it helps to ensure the correctness of your model and the interaction with the database.
Summary
This article covered a lot of ground. You’ve seen how to build the data context (that inherits from DbContext) and how to store it in a container appropriate for the type of application (web versus other types of applications). You also saw how to implement validation rules using attributes, the fluent API, and using object level validation using the IValidatableObject interface.
A fair part of this article was spent discussing repositories. You saw how to implement a generic Repository<T> that can be used as a base class, without limiting you in the options to expand your specific repositories with more specialized behavior. You also saw how to implement a Unit of Work to send a batch of changes to the database in one fell swoop.
At the end you saw how to override the SaveChanges method of the DbContext to implement date tracking and improve EF’s error messages.
This is also the end of the part of this article series that deals with the model and repositories; i.e. the part of the application you don’t see but that’s used a lot under the hood of the UI projects. In the following four parts you see how to make use of this framework in an MVC 4 project, a Web Forms 4.5 project, a WCF service project and a Console application.
Downloads
Where to Next?
Wonder where to go next? You can post a comment on this article.
Links in this Document
| Doc ID | 577 |
| Full URL | https://imar.spaanjaars.com/577/aspnet-n-layered-applications-implementing-a-repository-using-ef-code-first-part-5 |
| Short cut | https://imar.spaanjaars.com/577/ |
| Written by | Imar Spaanjaars |
| Date Posted | 09/05/2013 16:00 |
Comments
Talk Back! Comment on Imar.Spaanjaars.Com
I am interested in what you have to say about this article. Feel free to post any comments, remarks or questions you may have about this article. The Talk Back feature is not meant for technical questions that are not directly related to this article. So, a post like "Hey, can you tell me how I can upload files to a MySQL database in PHP?" is likely to be removed. Also spam and unrealistic job offers will be deleted immediately.
When you post a comment, you have to provide your name and the comment. Your e-mail address is optional and you only need to provide it if you want me to contact you. It will not be displayed along with your comment. I got sick and tired of the comment spam I was receiving, so I have protected this page with a simple calculation exercise. This means that if you want to leave a comment, you'll need to complete the calculation before you hit the Post Comment button.
If you want to object to a comment made by another visitor, be sure to contact me and I'll look into it ASAP. Don't forget to mention the page link, or the Doc ID of the document.