ASP.NET N-Layered Applications - Implementing an ASP.NET MVC 4 Frontend (Part 6)
Note: this is part six in a series of ten. If you rather read this entire series off-line, you can buy the full series as a convenient PDF document that comes with the full source. Besides the convenience, buying the PDF will also make you feel good as it shows your appreciation for the articles and helps me pay the bills for my server and hosting so I can keep running imar.spaanjaars.com and continue to provide you with great content. For more details, check out this post that shows you how you can buy the entire series right now.
This is Part 6 in a series of 10 that show you how to build N-Layered applications using ASP.NET 4.5 and Entity Framework 5 Code First. In this part you’ll see how to build a Web UI using ASP.NET MVC 4 and make use of the model and repository projects I have shown in the past five articles.
If you haven’t read the earlier parts in this series yet, you’re encouraged to do so first. The following list has links to all articles in this series:
- Part 1 - Introduction
- Part 2 - Setting up the Solution in Visual Studio
- Part 3 - Making your Projects Unit Testable
- Part 4 - Implementing a Model
- Part 5 - Implementing a Repository using Entity Framework Code First
- Part 6 - Implementing an ASP.NET MVC 4 Frontend
- Part 7 - Implementing a Web Forms 4.5 Frontend
- Part 8 - Implementing a WCF 4.5 Frontend
- Part 9 – Importing Data Using the API
- Part 10 - Extensions, Tools and Wrapping Up
Introduction
In the past couple of years, ASP.NET MVC has become a very popular framework for building web sites on the Microsoft platform. The current version is ASP.NET MVC 4 and it ships with Visual Studio 2012 although you can also download it separately for Visual Studio 2010.
This article is not meant as an introduction to ASP.NET MVC. If you’re new to MVC, I recommend checking out the following resources:
- Getting Started with MVC (http://www.asp.net/mvc)
- Intro to ASP.NET MVC 4 (http://www.asp.net/mvc/tutorials/mvc-4/getting-started-with-aspnet-mvc4/intro-to-aspnet-mvc-4)
- Pro ASP.NET MVC 4, Adam Freeman (Apress, 2013, http://www.amazon.com/Pro-ASP-NET-MVC-Adam-Freeman/dp/1430242361/)
- How to use Dependency Injection to determine the type of the repository at run-time.
- How to use the validation functionality of the model in the UI.
- How to use the Unit of Work pattern to save changes to the database as a batch.
In Part 2 of this article series you saw how to add the MVC 4 project to the solution. I used the Internet application type as the starting point which gives you a bunch of controllers and views that define the global look and feel of the site. To make it easy to see what’s going on, I haven’t changed much in the original layout files that ship with a new ASP.NET MVC 4 Razor project. I made a few minor changes to align the design with the one from the Web Forms sample application but that’s it. If you’re familiar with the ASP.NET MVC 4 standard projects, you’ll feel right at home.
In Part 1, I’ve provided a brief overview of the sample application and showed you a few screenshots. Here’s a brief recap of what the application can do. Remember: the purpose of this article series and this demo web site is to show you how to design an application from an architecture point of view. The demo does not offer a complete feature set as you would normally build in real-world web sites such as a fancy UI.
When you start up the application you see the home screen with a short welcome text. When you click the People menu, you see all the contact people in the system with links to edit and delete them, and to manage their contact data:

Figure 6-1 The People List (click to enlarge)
Using the Edit link you can modify the details of an individual contact person, using the following page:
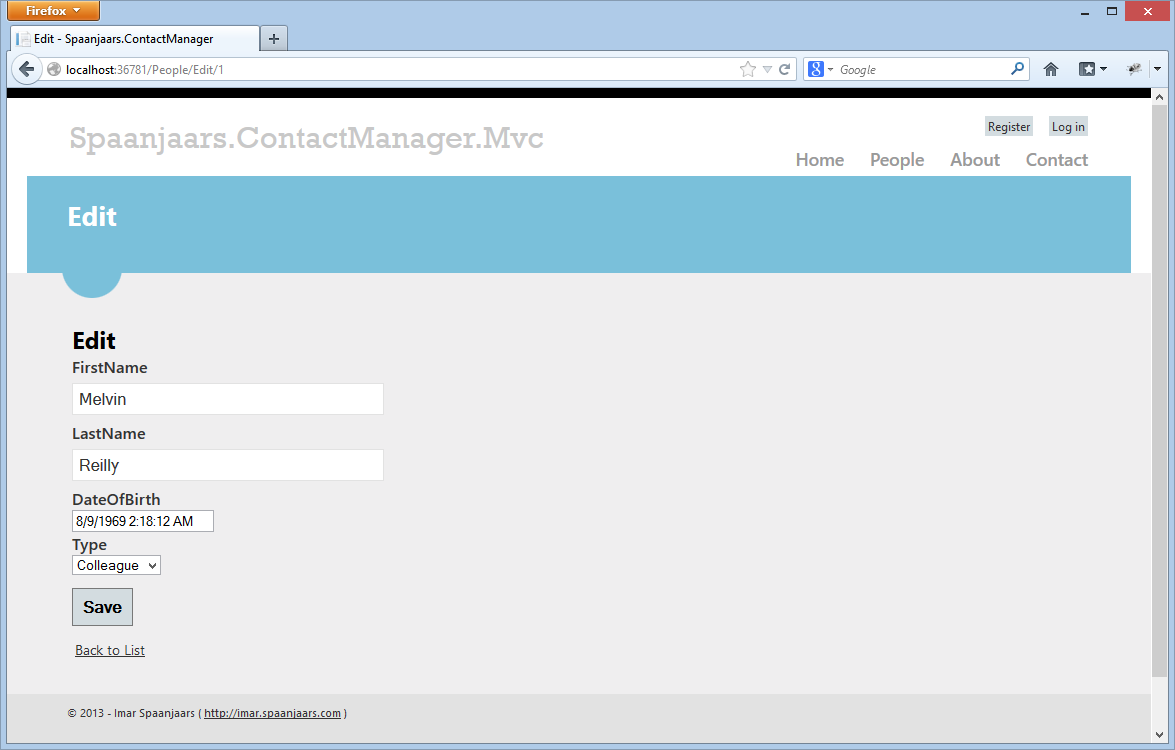
Figure 6-2 Editing a Single Contact Person (click to enlarge)
When you click one of the address links (shown in Figure 6-1), you see a screen that lets you manage address details. In this case, the user already pressed the Save button and the validation (from the Address class in the Model project) kicked in:

Figure 6-3 Validation at Work when Editing an Address (click to enlarge)
When you click the Email addresses or Phone numbers link (shwon in Figure 6-1) you see a list of associated contact records for that user:
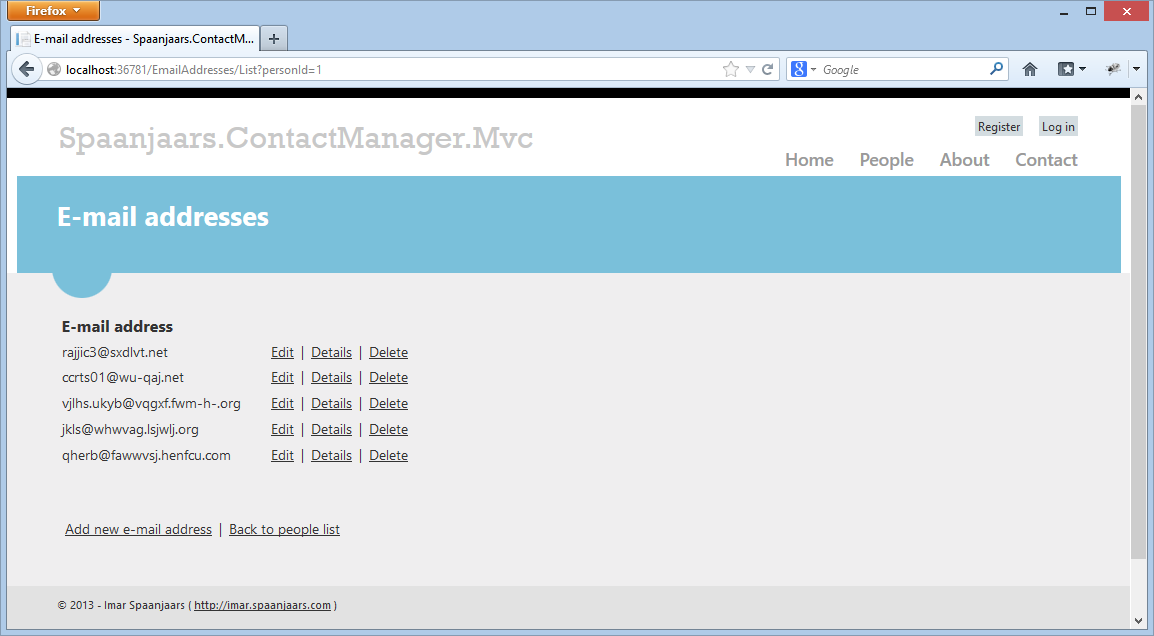
Figure 6-4 Managing E-mail Addresses (click to enlarge)
From here, you can manage the existing addresses (view details, edit and delete) as well as create new addresses for this contact person.
The About page provides more background on the application and the Contact page can be used to get in touch with me. The Register and Login links at the top come from the standard MVC template. They are fully functional, but not used in the sample application.
Under the hood, this MVC application uses the PeopleRepository targeting the Entity Framework for all data access. The list of people is retrieved using FindAll, a details page uses FindById, and the insert pages use Add, and so on. To see how it all fits together, here’s the architecture diagram showing the MVC frontend and how it’s related to the other components in the system:
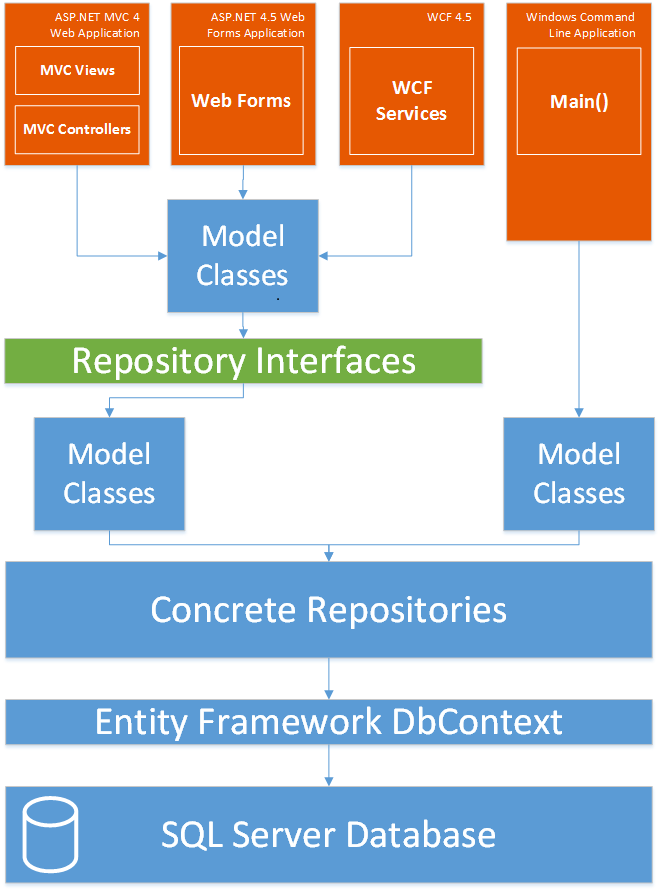
Figure 6-5 The N-Layer Architecture Diagram (click to enlarge)
To make your MVC controllers unit testable, it’s important that none of them have direct ties with the Entity Framework implementation of the PeopleRepository. Direct access from controllers to EF would mean that you need a real database when running the tests which makes things slower and harder to test. The Controller classes in the project should exchange model entities from the Model project through an abstraction (the IPeopleRepository interface) instead, as you see how to do in the next section.
Making your Controllers Testable
To see why you want to work with an abstraction rather than a concrete implementation of the PeopleRepository, consider this (fictitious) action method in the PeopleController:
public ActionResult List(int page = 1, string sort = "Id", string sortDir = "ASC")
{
  IQueryable<Person> allPeople = new PeopleRepository().FindAll().OrderBy(
        BuildOrderBy(sort, sortDir)).Skip((page * pageSize) - pageSize).Take(pageSize);
  return View(allPeople);
}
This method instantiates a PeopleRepository, and then retrieves a sub set of the contact people based on the sorting and paging data. A unit test for this method could look like this:
[TestMethod]
public void ListSortsAndPagesCorrectly()
{
  // Arrange
  var controller = new PeopleController();

  // Act
  var result = controller.List(1, "DateOfBirth", "DESC") as ViewResult;

  // Assert
  IEnumerable<Person> modelData = ((IEnumerable<Person>)result.Model).ToList();
  modelData.Count().Should().Be(10);
  modelData.First().DateOfBirth.Year.Should().Be((2007));
  modelData.First().DateOfBirth.Month.Should().Be((12));
  modelData.First().DateOfBirth.Day.Should().Be((1));
}
At first glance, this may look perfectly reasonable. The code creates a new controller, executes the List method and then asserts that the total number of records is 10 (the default page size for the system) and that the first person in the list (the youngest contact person in the system because the code sorted on DateOfBirth in descending order), is born on December 1st, 2007.
If you ran this test, it might just work. However, it only works under special conditions: you must have a least 10 contact people in your database, and the youngest person must be born on December 1st, 2007. While you could certainly insert default data (using the Seed method of the database initializer, using Red Gate’s Data Generator or in the constructor or method body of the unit test), this is asking for trouble, What if you have other unit tests that test changing the date of birth or deleting all contact people from the system? If those tests were run before ListSortsAndPagesCorrectly, things would surely break.
On top of that, you don’t really care about testing the behavior of the PeopleRepository as you’re doing that elsewhere already (in the Unit and Integration tests projects). What you care about here is the List method: given an IPeopleRepository, you want this method to call FindAll, and then apply the proper sorting and paging settings.
The solution to this problem is to provide a fake repository that provides temporary data. You could have only one for your entire test project, or you could have many, each serving a distinct purpose. Here’s how you could write such an IPeopleRepository:
internal class FakePeopleRepository : IPeopleRepository
{
  public IQueryable<Person> FindAll(
       params System.Linq.Expressions.Expression<Func<Person, object>>[] includeProperties)
  {
    var temp = new List<Person>();
    var youngestPerson = new DateTime(2007, 12, 1);
    for (int i = 0; i < 23; i++)
    {
      temp.Add(new Person { FirstName = i.ToString(), LastName = i.ToString(),
               DateOfBirth = youngestPerson.AddDays(-i) });
    }
    temp.Insert(11, new Person { FirstName = "Youngest", LastName = "Youngest Lastname",
               DateOfBirth = youngestPerson });
    return temp.AsQueryable();
  }

  public void Add(Person entity)
  {
    throw new NotImplementedException();
  }

  public void Remove(Person entity)
  {
    throw new NotImplementedException();
  }

  // Other methods (none of them implemented) go here
}
This fake repository returns a list of 24 people when you call the FindAll method. The youngest person in the list is born on December 1st, 2007; all the other people are slightly older. All the other methods are not implemented as I don’t care about them for this particular test. For other tests, I could implement these methods, or create another fake repository where I only implement the methods used by my test code.
Using this fake PeopleRepository, it’s now much easier to test the List method. And even better: you only test the List method. You no longer have a dependency on the real EF PeopleRepository, nor do you require a database with the correct data in it. This frees you from a lot of unnecessary dependencies, so you can let your test method focus on one thing, and one thing only: the code inside the List method of your MVC controller.
In order for the List method to use this repository, you need a way to pass it to the controller. I’ll show you a quick and dirty way first (referred to as “poor man’s dependency injection”) so you understand the core principles. In a later section you see a better solution by using a dependency injection framework that resolves all dependencies for you automatically.
As I mentioned earlier, the controller needs access to the FakeRepository so you need to find a way to pass it in. Passing it to the List method won’t work as the MVC runtime wouldn’t know how to supply one. You could instantiate one directly in your code inside the action method (just as I did previously with the EF PeopleRepository) but that doesn’t make the situation any better. How would you know when to supply which one? For this to work, you would need a way to differentiate between a regular run-time, and the unit testing run-time which really isn’t the direction you want to take things.
Fortunately, there is a much easier way: simply pass the required dependencies through an overloaded constructor of the controller. In the default constructor (the parameterless version that gets called by the MVC framework) you then instantiate an EF PeopleRepository directly. Something like this would do the trick:
public class PeopleController : Controller
{
  private readonly IPeopleRepository _peopleRepository;

  public PeopleController(IPeopleRepository peopleRepository)
  {
    _peopleRepository = peopleRepository;
  }

  public PeopleController() : this(new PeopleRepository())
  {
  }

  public ActionResult List(int page = 1, string sort = "Id", string sortDir = "ASC")
  {
    IQueryable<Person> allPeople = _peopleRepository.FindAll().OrderBy(BuildOrderBy(
          sort, sortDir)).Skip((page * pageSize) - pageSize).Take(pageSize);
    return View(allPeople);
  }
}
The parameterless version ensures everything keeps working like normal. When a URL like /People/List is requested, the constructor sends a new instance of PeopleRepository into the overloaded constructor which stores that object in the _peopleRepository variable. Then, when List is called, it uses that variable to call the FindAll method which eventually queries the SQL Server database using the Entity Framework.
For your unit test you can now use the overloaded constructor, and pass in your fake repository like this:
[TestMethod]
public void ListSortsAndPagesCorrectly()
{
  // Arrange
  var controller = new PeopleController(new FakePeopleRepository());

  // Act
  var result = controller.List(1, "DateOfBirth", "DESC") as ViewResult;

  // Assert
  IEnumerable<Person> modelData = ((IEnumerable<Person>)result.Model).ToList();
  modelData.Count().Should().Be(10);
  modelData.First().DateOfBirth.Year.Should().Be((2007));
  modelData.First().DateOfBirth.Month.Should().Be((12));
  modelData.First().DateOfBirth.Day.Should().Be((1));
}
Now the controller receives an instance of your FakeRepository. Since you can control the objects returned from FindAll method in the fake repository, it’s easy to set up the correct asserts for things like the data being returned.
This effectively decouples your unit test (and your MVC controller) from the database dependency. This in turn makes life a lot simpler, leading to easier unit testing, and minimizing the chances that your tests fail for the wrong reasons.
In the sample application you see this implemented in a very similar way. Rather than List, the action method is called Index, and its accompanying test method is called IndexSortsAndPagesCorrectly inside the PeopleControllerTests class. The implementation differs in that the controller’s constructor expects another dependency: an IUnitOfWorkFactory. Since that’s not used for this test, the test method simply passes null:
var controller = new PeopleController(new FakePeopleRepository(), null);
You’ll see more of the IUnitOfWorkFactory dependency later.
While the solution with the parameterless constructor that forwards an instance of the EF PeopleRepository is nice, there’s an even better way: you can tell an external framework to provide the concrete instances at runtime for you. You see how this works in the next section.
Injecting Repositories using StructureMap
Manually modifying your constructors to support dependency injection is quite labor intensive, and prone to errors. Every time you add another dependency, you should not forget to update the parameterless constructor. In addition, since you’re testing another constructor than the one that MVC calls, there’s still a slim chance of bugs in your system that go unnoticed in your tests. Fortunately, there’s a solution to the problem: a Dependency Injection (DI) framework.
ASP.NET MVC has been designed with testability in mind and as such it’s pretty easy to plug a DI framework into the runtime. This DI framework then ensures that when a controller has dependencies (such as the IPeopleRepository in the controller’s constructor), they are automatically instantiated. And even cooler, if the dependency itself has another dependency, the framework will ensure proper initialization of that dependency as well. So in the sample application, whenever a controller is instantiated, it automatically receives concrete instances of the IPeopleRepository and IUnitOfWork interfaces. You see how the framework can determine which concrete type to instantiate in a later section.
Many different DI frameworks exist, including Unity, Castle Windsor, StructureMap, Ninject, and AutoFac. For a deep-dive into DI, and the different DI frameworks, check out:
- Dependency Injection in .NET (Mark Seemann, Manning, 2011)
- http://www.asp.net/mvc/tutorials/hands-on-labs/aspnet-mvc-4-dependency-injection
In my sample application, I am using StructureMap as the DI container. I chose it as I find it pretty much hassle-free to work with. However, I could have easily chosen a different framework as the DI requirements for the sample application can be fulfilled by all of the major DI frameworks.
To add and configure StructureMap in an MVC app, you need to do the following:
- Add the StructureMap.MVC4 package to your MVC project using NuGet. This also brings in the dependent StructureMap package.
- Write some code to tell the DI component how to resolve types like IPeopleRepository into their concrete counterparts.
Adding the StructureMap.MVC4 Package using NuGet
To add StructureMap to your MVC project, follow these steps:
- Open up the Package Manager Console by choosing Tools | Library Package Manager | Package Manager Console
- Select your MVC project from the Default project drop-down.
- At the command, type Install-Package StructureMap.Mvc4 and hit enter.
This package makes the following modifications:
- In App_Start it adds StructuremapMvc.cs which is a class that initializes the StructureMap framework and then registers itself as the dependency resolver for the MVC framework.
- It adds the folder DependencyResolution with three code files with code needed to setup StructureMap. Of those three, you only need to modify IoC.cs for your application.
Write Code to Tell the DI Component how to Resolve Types
Whenever the DI container needs to resolve a dependency it needs to understand what to do. For example, when an IPeopleRepository is needed, the container needs to know it should return an instance of the PeopleRepository from the EF project. The exact type to be returned is configurable to give you the greatest flexibility. To see how this works, look in IoC.cs in the DependencyResolution folder that has been added to your project. You should see the following Initialize method:
public static IContainer Initialize()
{
  ObjectFactory.Initialize(x =>
  {
    x.Scan(scan =>
    {
      scan.TheCallingAssembly();
      scan.WithDefaultConventions();
    });
    // x.For<IExample>().Use<Example>();
  });
  return ObjectFactory.Container;
}
Although the code looks a bit cryptic with all the lambdas, it’s relatively straightforward. The call to TheCallingAssembly tells the framework to scan the assembly that is making the call (which by default is the MVC project to which you added StructureMap). The call to WithDefaultConventions means: whenever an ISomething is requested, try to return a Something (that should then implement the ISomething interface). In other words, it tries to find a concrete type named after the interface by dropping the I from the interface name.
This is a good setup if you have all your code inside the MVC project and if all your classes and interfaces follow the default conventions. In the sample application, the concrete types are not located in the MVC assembly, but rather in the one from the Repositories.EF project. You could include that assembly specifically, or for maximum flexibility you can call AssembliesFromApplicationBaseDirectory as you’ll see shortly. Note that IUnitOfWorkFactory is not implemented by a class called UnitOfWorkFactory, but rather by one called EFUnitOfWorkFactory. You can use the For method to explicitly link base types and interfaces to concrete types. My final Initialize method now looks like this:
public static IContainer Initialize()
{
  ObjectFactory.Initialize(scanner =>
  {
    scanner.Scan(scan =>
    {
      scan.AssembliesFromApplicationBaseDirectory();
      scan.WithDefaultConventions();
    });

    scanner.For<IUnitOfWorkFactory>().Use<EFUnitOfWorkFactory>();
  });
  return ObjectFactory.Container;
}
For more information about the scanning process and conventions, check out the documentation for StructureMap: http://docs.structuremap.net/ScanningAssemblies.htm.
With this code in place, I can now simplify the code of the PeopleController so it only has a single constructor:
public class PeopleController : BaseController
{
  private readonly IPeopleRepository _peopleRepository;
  private readonly IUnitOfWorkFactory _unitOfWorkFactory;
  const int pageSize = 10;

  public PeopleController(IPeopleRepository peopleRepository, IUnitOfWorkFactory unitOfWorkFactory)
  {
    _peopleRepository = peopleRepository;
    _unitOfWorkFactory = unitOfWorkFactory;
  }

  public ActionResult Index(int page = 1, string sort = "Id", string sortDir = "ASC")
  {
    // Implementation goes here; uses _peopleRepository
  }
}
Now, whenever a new instance of the PeopleController is needed, StructureMap kicks in and supplies concrete instances of the PeopleRepository and UnitOfWorkFactory.
Note: rather than directly inheriting Controller, this class inherits BaseController which in turn inherits the MVC Controller class. By using a centralized base class for your controllers it’s easy to add behavior that applies to all controllers in your project.
With the dependencies taken care of, the next step is implementing the methods inside the PeopleController as well as the implementation of the views. Again, since this is not an article series about MVC, I won’t dig into each and every method or code sample. You’re encouraged to download and inspect the source for this article series so you get a better understanding of what it does and how.
Building the PeopleController and its Views
In this section you’ll see how I implemented the PeopleController with methods to list, display, create, edit, and delete contact people. The other controllers follow similar patterns, although the exact implementation differs here and there.
Index / List
In this section, I’ll show you different versions of an Index method, each one adding more functionality. At the end, I’ll show the final version that is used in the PeopleController of the sample application. The final action method supports a pageable and sortable display of contact people.
If all you want to show on your List page are all items of a specific type such as people (usually shown using the Index method), implementing the action method would be extremely simple. All you would need is something like this:
public ActionResult Index()
{
  return View(_peopleRepository.FindAll());
}
This would work fine if you only have a few records to show, and if you don’t care about sorting the data. A simple view like the following would suffice:
@model IEnumerable<Spaanjaars.ContactManager45.Model.Person>
@{
  ViewBag.Title = "Index";
}
<h2>@ViewBag.Title</h2>
<p>
  @Html.ActionLink("Create New", "Create")
</p>
<table>
  <tr>
    <th>
      @Html.DisplayNameFor(model => model.FullName)
    </th>
    <th>
      @Html.DisplayNameFor(model => model.DateOfBirth)
    </th>
    <th></th>
  </tr>
  @foreach (var item in Model)
  {
    <tr>
      <td>
        @Html.DisplayFor(modelItem => item.FullName)
      </td>
      <td>
        @Html.DisplayFor(modelItem => item.DateOfBirth)
      </td>
      <td>
        @Html.ActionLink("Edit", "Edit", new { id = item.Id }) |
            @Html.ActionLink("Details", "Details", new { id = item.Id }) |
            @Html.ActionLink("Delete", "Delete", new { id = item.Id })
      </td>
    </tr>
  }
</table>
However, this controller and view have a few issues:
- The view is using the Person entity from the Model project directly, While this works, I typically try to stay away from it as I don’t want my views to know about the actual model; I could be exposing too much data to the view, or the view could be making changes to the entity if it was in an updateable state. Instead, I prefer to create a View Model that has only the fields I want to expose in my view, and then use a mapping framework to automatically convert my entities (such as a Person) into the corresponding View Model (such as a DisplayPerson, dedicated to displaying contact people).
- There is no support for paging; if your database table contains hundreds or thousands or more records, the list becomes really hard to manage and the page will load much slower.
- There is no way to sort data.
To see where View Models are used, consider this architecture diagram that shows the four frontend applications:
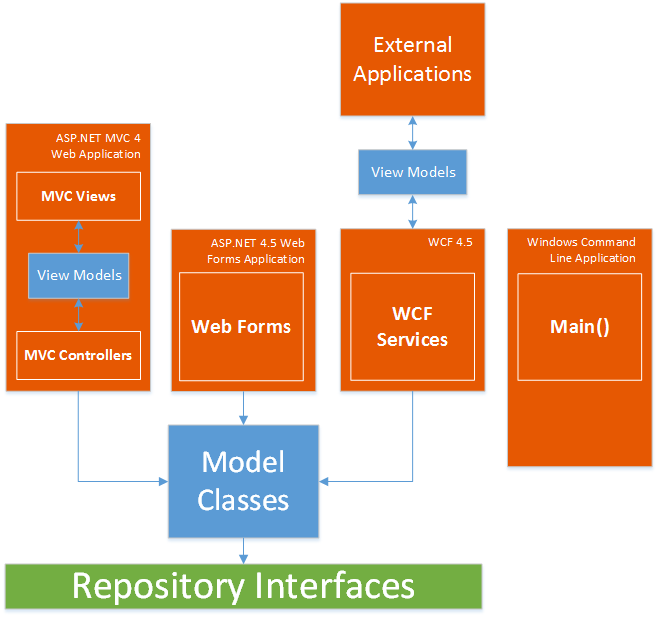
Figure 6-6 View Models in the Architecture Diagram (click to enlarge)
In the MVC project, View Models are used to pass data from the controllers to the views and vice versa. This means that a view never has to know of the existence of one of the Model types; it only needs to know of the View Model types. In the WCF project, View Models are used to exchange data between the service methods and the external system that call the service methods so there is never a direct dependency on the Model types and the external applications. The other two frontend applications don’t use View Models although you could introduce them there as well if you have the need.
You see how to implement View Models in MVC next; the WCF View Models are discussed in Part 8.
Creating a View Model
To determine how a View Model for a specific type needs to look, you need to think about the data you want to expose, and what the View Model is used for. Although you could create one View Model per entity, I prefer to create multiple View Models per entity to support different models for different actions. For example, a View Model used to display a Person has different requirements than a View Model used to create or edit a Person.
When displaying a Person, you most likely want to display the FullName and the DateOfBirth in a list. For a details page, you may also want to display things like the type, the creation and modification dates and more. In a more complex application, you could decide to create two separate models for this. In the sample application, I chose to combine them in single View Model called DisplayPerson:
public class DisplayPerson
{
  public int Id { get; set; }
  public DateTime DateCreated { get; set; }
  public DateTime DateModified { get; set; }
  public string FirstName { get; set; }
  public string LastName { get; set; }
  public string FullName { get; set; }
  public DateTime DateOfBirth { get; set; }
  public PersonType Type { get; set; }
}
Notice how I left out the two collections (EmailAddresses and PhoneNumbers) and the two Address properties as you typically don’t display that information in a list or details page for a Person.
To convert a Person (or even a collection of Person instances) into a DisplayPerson you could write a lot of manual code that instantiates a new DisplayPerson and then copies over the property values one by one. However, this is quite a bit of work, and it’s likely to break when you add new properties to the Person type or the DisplayPerson.
Instead, I prefer to use a framework called AutoMapper. I’ll show the code for the view that displays instances of the DisplayPerson View Model later.
Mapping with AutoMapper
To see what problem AutoMapper solves, imagine you have an entity type called Car, like this:
public class Car
{
  public int Id { get; set; }
  public string Name { get; set; }
  public int NumberOfDoors { get; set; }
  public EngineType { get; set; }
  // Lots of other properties here
}
If you want to display cars in a list, its corresponding View Model could look like this:
public class CarViewModel
{
  public int Id { get; set; }
  public string Name { get; set; }
}
This model is designed to just hold the car’s ID and name. Inside your controller you could map a Car to a CarViewModel like this:
Car car = _carRepository.FindById(id);
CarViewModel carViewModel = new CarViewModel();
carViewModel.Id = car.Id;
carViewModel.Name = car.Name;
return View(carViewModel);
This is pretty straightforward code. A Car instance is retrieved from a repository, a new instance of CarViewModel is created, the values for the members exposed by CarViewModel are copied from the Car instance and finally the View Model is fed to the view. In this example, things are relatively simple because CarViewModel has only two properties, but this gets messy pretty quickly when the View Model has many members. With AutoMapper, this can be changed to this:
Car car = _carRepository.FindById(id);
CarViewModel carViewModel = new CarViewModel();
Mapper.Map(car, carViewModel);
return View(carViewModel);
In this example, you save only one line of code. However, even with complex types with many members, this is all you need, saving you from lots of typing overhead and greatly reducing the risk of errors during the conversion.
AutoMapper is able to automatically map members of two types if they have the same name and type. If your View Model uses different names, or if you want to exclude members from one type or the other, or if you want to change how data is mapped, you can configure AutoMapper using its API. This is code you need to write once for each type and then AutoMapper will use that configuration every time it needs to map a type. To see how this works, you need to add AutoMapper to your project first. Once again, a NuGet project is available to make this dead-simple:
- Open up the Package Manager Console window. In the Default project drop-down select the MVC project.
- At the command prompt, type Install-Package AutoMapper and hit enter.
- For the sample application I also created a code file called AutoMapperConfig inside the App_Start folder and added the following code to map from a Person to a DisplayPerson (as per the code shown earlier):
public static class AutoMapperConfig
{
  public static void Start()
  {
    Mapper.CreateMap<Person, DisplayPerson>();

    // Other mappings go here

    Mapper.AssertConfigurationIsValid();
  }
}
Since all fields of DisplayPerson also exist in Person, this is all I need to add for AutoMapper to figure out the mapping rules. You’ll see a more extensive example later when editing a contact person is discussed.
Notice the call to AssertConfigurationIsValid. This triggers AutoMapper to validate all mappings, and throw an error when it finds unmatched members or other errors in your mappings. This helps to catch errors as soon as possible.
- Finally, I added the following line of code in Global.asax:
protected void Application_Start()
{
  ...
  AutoMapperConfig.Start();
}
With this code, whenever the application starts, AutoMapper is initialized; all mappings are created and then validated. From then on, all you need is a call to Map to have AutoMapper create the mapping.
With AutoMapper setup in the sample project I could now rewrite my Action method like this:
public ActionResult Index()
{
  var people = _peopleRepository.FindAll();
  var model = new List<DisplayPerson>();
  Mapper.Map(people, model);
  return View(model);
}
Just as in the previous example, I get all contact people from the database using FindAll method. What’s different is that I now use AutoMapper to map from a Person instance to a DisplayPerson instance. And not only that, AutoMapper also understands how to deal with collections. So, even though the people variable is actually an IQueryable<Person>, AutoMapper knows how to convert that into a List<DisplayPerson> which is eventually passed to the view.
For more information on AutoMapper, check out the following resources:
- https://github.com/AutoMapper/AutoMapper/wiki/Getting-started
- https://github.com/AutoMapper/AutoMapper/wiki
- http://automapper.org/
Before I show you the code that would be needed for the view, let’s make a few more changes to the Index method to support paging and sorting, as this also effects the View Model.
Sorting Data
LINQ to EF has great support for sorting. Just call OrderBy and OrderByDescending to order a collection based on a lambda expression, For example, this code sorts all people on their birth date:
var sortedPeopleList = _peopleRepository.FindAll().OrderBy(x => x.DateOfBirth);
What LINQ to EF, or actually, LINQ in general is not good at is sorting based on strings. Quite often, in a UI driven application, the sort order comes from a string entered by the user (for example, by clicking the header of a grid). Ideally, you would like to apply sorting as follows:
public ActionResult Index(string sort = "Id", string sortDir = "ASC")
{
  var sortedPeopleList = _peopleRepository
      .FindAll().OrderBy(string.Format("{0} {1}", sort, sortDir));
  // Other code here
}
Out of the box, this won’t work as there is no overload of OrderBy that accepts a string. However, Microsoft developed and released the DynamicQuery library that lets you perform string based ordering, searching and more. And it probably comes as no surprise: it’s available as a NuGet package
Note: if you’re familiar with SQL Injection – a method to attack an application through holes in the way user input is injected into SQL statements – then don’t worry. Under the hood, the sort string is parsed into an expression tree which is eventually converted to the proper SQL statements in the same way as would occur with the lambda-based versions of OrderBy and OrderByDescending. In other words, this does not open up your application to SQL Injection attacks.
To install the DynamicQuery package, execute the following command in the Package Manager Console window:
Install-Package DynamicQuery
Once the package is installed, you need the following using statement to bring the extension methods for sorting into scope:
using System.Linq.Dynamic;
Now you can sort the list of contact people by passing in the proper sort and sortDir parameters as query string values. You can find out more about this package at: http://nuget.org/packages/DynamicQuery.
You’ll see the complete implementation of the Index method with sorting after I discussed paging.
Paging Data
Paging is another important feature for a web application. Trying to display hundreds or thousands or more records at the same time will surely annoy your users and slow down your application. Fortunately, paging is easy using LINQ’s Skip and Take methods.
Combining sorting and paging could give you the following Index method:
public ActionResult Index(int page = 1, string sort = "Id", string sortDir = "ASC")
{
  var allPeople = _peopleRepository.FindAll()
       .OrderBy(string.Format("{0} {1}", sort, sortDir)).Skip((page * PageSize) - PageSize)
       .Take(PageSize);
  var model = new List<DisplayPerson>();
  Mapper.Map(allPeople, model);
  return View(model);
}
You can now pass in the requested page number (one-based) in a query string parameter called page. So, for example, calling something like /People?page=2&sort=Id&sortDir=DESC would give you the second page of the people list, with the records sorted in descending order based on their ID.
The Skip method skips ((page * PageSize) - PageSize) number of records. For page 1 with a page size of 10, that would mean 0 (1x10 – 10 = 0). For the second page, it would skip 10 rows, giving you row 11 to 20, and so on. The Take method then takes the requested number of items, defined by the PageSize constant. In a real world application, you probably want to make the PageSize configurable, or even user-selectable, but for the sample the hardcoded value works fine.
The final Index action method in the sample application looks slightly different. Here’s its full code:
public ActionResult Index(int page = 1, string sort = "Id", string sortDir = "ASC")
{
  int totalRecords = _peopleRepository.FindAll().Count();
  var data = new List<DisplayPerson>();
  IQueryable<Person> allPeople = _peopleRepository.FindAll()
        .OrderBy(BuildOrderBy(sort, sortDir)).Skip((page * PageSize) - PageSize)
        .Take(PageSize);
  Mapper.Map(allPeople, data);
  var model = new PagerModel<DisplayPerson>
        { Data = data, PageNumber = page, PageSize = PageSize, TotalRows = totalRecords };
  return View(model);
}
There are a few twists in this version. First, a count of all records is retrieved using Count(). This returns the total number of people in the system, which is used in the view to build up the proper paging links. Next, the model is different. Rather than just a list of DisplayPerson instances, the View Model now also contains a page number (the currently displayed page), a page size, and the total number of rows. Here’s how the PagerModel looks:
public class PagerModel<T> where T: class
{
  public IEnumerable<T> Data { get; set; }
  public int PageSize { get; set; }
  public int PageNumber {get; set;}
  public int TotalRows {get; set;}
}
Notice that I made it generic, which means you can use it for other View Model types that need to support paging as well.
The final piece of the puzzle is the view that displays the data. In the sample application, I chose to use the MVC WebGrid as it ships with MVC. However, there are many other alternatives such as:
- jQuery UI (http://jqueryui.com/)
- Kendo UI (http://www.kendoui.com/ from Telerik)
- DXTREME (http://www.devexpress.com/Products/HTML-JS/ from Dev Express)
The WebGrid code looks like this:
  var grid = new WebGrid(null, defaultSort: "FirstName", columnNames:
      new[] { "Id", "FullName", "DateOfBirth", "Type" }, rowsPerPage: Model.PageSize);
  grid.Bind(Model.Data, rowCount: Model.TotalRows, autoSortAndPage: false);

  @grid.GetHtml(columns: grid.Columns(
   grid.Column("Id"),
   grid.Column(header: "Full name", columnName: "FullName", format:
        (item) => Html.ActionLink(((string)item.FullName), "Details", new { item.id })),
   grid.Column("DateOfBirth", header: "Date of Birth", format:
        (item) => item.DateOfBirth.ToString("d")),
   grid.Column("Type", canSort: false),
   grid.Column(header: "Addresses", format: item => new HtmlString(
                Html.ActionLink("Home", "Edit", "Addresses", new { personId = item.Id,
            contactType = (int)ContactType.Personal }, null).ToString() + " | " +
                Html.ActionLink("Work", "Edit", "Addresses", new { personId = item.Id,
            contactType = (int)ContactType.Business }, null).ToString())
     ),
   grid.Column(format: (item) => Html.ActionLink("E-mail addresses", "List",
             "EmailAddresses", new { personId = item.id }, null)),
   grid.Column(format: (item) => Html.ActionLink("Phone numbers", "List", "PhoneNumbers",
             new { personId = item.id }, null)),
   grid.Column(format: (item) => Html.ActionLink("Edit", "Edit", new { item.id })),
   grid.Column(format: (item) => Html.ActionLink("Delete", "Delete", new { item.id }))
Notice how I am passing the PageSize (from the View Model) to the constructor, and the actual data and number of rows to the Bind method. The grid then uses that information to display the appropriate number of rows, as well as paging links below the grid. The remainder of the code sets up the various columns for the person’s ID, full name, date of birth, and a bunch of links to edit addresses, e-mail addresses and phone numbers. This results in the following screen:
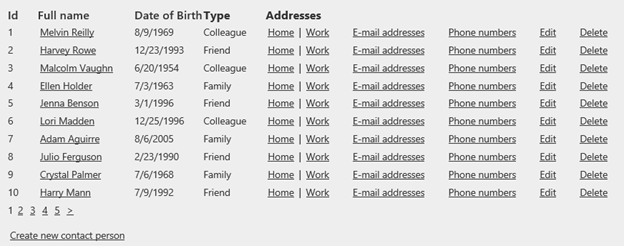
Figure 6-7 The List with Contact People (click to enlarge)
Most of the links in this screenshot are discussed in the remainder of this article.
If you run the sample application, you’ll notice you can click various headers to perform sorting. Most of them are straightforward and sort directly on the property associated with the column. The exception is the FullName column. Since that property only exists in the Model and is not present as a column in the database, sorting will fail. The BuildOrderBy method in the PeopleController takes care of this as follows:
private string BuildOrderBy(string sortOn, string sortDirection)
{
  if (sortOn.ToLower() == "fullname")
  {
    return String.Format("FirstName {0}, LastName {0}", sortDirection);
  }
  return string.Format("{0} {1}", sortOn, sortDirection);
}
When the sortOn parameter equals fullname (which is what the WebGrid sends to the server when you click the Full name column), sorting is done by combining the first name and the last name of the person. Obviously you can modify this any way you want.
For a lot more background information on the MVC WebGrid, check out the following links:
- http://msdn.microsoft.com/en-us/magazine/hh288075.aspx
- http://weblogs.asp.net/andrebaltieri/archive/2010/11/01/asp-net-mvc-3-working-with-webgrid.aspx
- http://weblogs.asp.net/andrebaltieri/archive/2010/11/02/asp-net-mvc-3-working-with-webgrid-part-2.aspx
- http://www.campusmvp.net/blog/webgrid-in-mvc-step-by-step-part-two
With the list of people done, it’s time to take a look at the Details action method.
Details
This method is executed when someone clicks a person’s name in the grid. This requests /People/Details/personId where personId is the ID of a person in the database. The action method is really simple, and it looks like this:
public ActionResult Details(int id)
{
  Person person = _peopleRepository.FindById(id);
  if (person == null)
  {
    return HttpNotFound();
  }
  var data = new DisplayPerson();
  Mapper.Map(person, data);
  return View(data);
}
The method receives an ID of the person on the database which it uses to query the contact person from the _peopleRepository using the FindById method. When that method returns null, the code returns an HttpNotFound ActionResult which eventually results in a 404 – Not Found error message in the client.
If the person does exist, it’s mapped to a DisplayPerson using AutoMapper and sent to the view where it’s displayed using this code:
@model Spaanjaars.ContactManager45.Web.Mvc.Models.DisplayPerson
@{
  ViewBag.Title = "Details";
}
<h2>@ViewBag.Title</h2>
<fieldset>
  <legend>Person</legend>
  <div class="display-label">
    @Html.DisplayNameFor(model => model.FirstName)
  </div>
  <div class="display-field">
    @Html.DisplayFor(model => model.FirstName)
  </div>

  ... Other fields go here

</fieldset>
<p>
  @Html.ActionLink("Back to List", "Index")
</p>
Because the Model type is a DisplayPerson, you can use all the properties of that class in the view. At the bottom there’s a simple action link that takes the user back to the list of people.
Create
In MVC, a Create action method usually has two versions: one that renders an empty form, and one that processes the form after the user sends it back to the server. First, take a look at the action method that renders the view:
public ActionResult Create()
{
  return View();
}
Action methods don’t get any simpler than this. The view then looks as follows:
@using Spaanjaars.ContactManager45.Web.Mvc.Helpers
@model Spaanjaars.ContactManager45.Web.Mvc.Models.CreateAndEditPerson
@{
  ViewBag.Title = "Create new contact person";
}
<h2>@ViewBag.Title</h2>
@using (Html.BeginForm())
{
  @Html.AntiForgeryToken()
  @Html.ValidationSummary(true)

  <fieldset>
    <legend>Person</legend>

    <div class="editor-label">
      @Html.LabelFor(model => model.FirstName)
    </div>
    <div class="editor-field">
      @Html.EditorFor(model => model.FirstName)
      @Html.ValidationMessageFor(model => model.FirstName)
    </div>

    ... Other fields go here

    <div class="editor-label">
      <label>Type</label>
      @Html.ValidationMessageFor(model => model.Type)
    </div>
    <div class="editor-field">
      @Html.EnumDropDownListFor(model => model.Type)
    </div>
    <p>
      <input type="submit" value="Create" />
    </p>
  </fieldset>
}
<div>
  @Html.ActionLink("Back to List", "Index")
</div>

@section Scripts {
  @Scripts.Render("~/bundles/jqueryval")
}
All of this is standard MVC code so hopefully this looks familiar. Notice how the Model type in the view is set to CreateAndEditPerson which I created specifically in the Models folder of the MVC project to create new and edit existing people. Just as with the DisplayPerson, the code leaves out the complex properties of Person as they are handled elsewhere:
public class CreateAndEditPerson : IValidatableObject
{
  public int Id { get; set; }

  [Required, DisplayName("First name")]
  public string FirstName { get; set; }

  [Required, DisplayName("Last name")]
  public string LastName { get; set; }

  [DisplayName("Date of birth")]
  public DateTime DateOfBirth { get; set; }

  public PersonType Type { get; set; }

  // Validation code here
}
Note: in the sample solution, the CreateAndEditPerson View Model implements the IValidatableObject interface to enable complex validation capabilities. You see how this works later.
Notice how the properties have data annotation attributes applied to them. The DisplayName attribute influences the name in the UI, so labels such as “First name” are displayed rather than FirstName. You’ll see the required attributes in the section on validation.
Just as with DisplayPerson, you need a mapping in AutoMapper, but this time in both directions. You need to map from CreateAndEditPerson to a Person in the Create action method when the form is submitted to the server. Mapping in the opposite direction is done by the Edit method as you’ll see in a bit.
Your first attempt at the mapping code might look like this:
Mapper.CreateMap<CreateAndEditPerson, Person>();
Mapper.CreateMap<Person, CreateAndEditPerson>();
However, if you were to run this, AssertConfigurationIsValid would signal the following exception:
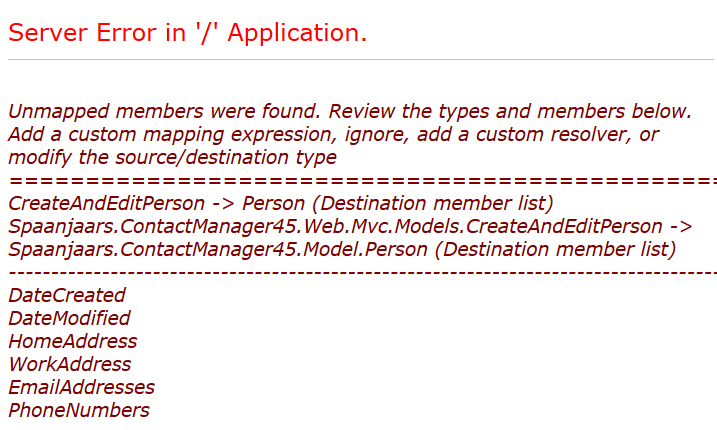
Figure 6-8 An AutoMapper Exception Pointing out Issues with the Mapping Configuration (click to enlarge)
What this error message tells you is that the source type (CreateAndEditPerson) does not supply a value for the six properties listed. In this case, this is exactly what you want. The two date properties are set by EF automatically when saving the entity, and the four contact details are managed elsewhere. You can let AutoMapper know you’re fine with this using the Ignore method, like this:
Mapper.CreateMap<CreateAndEditPerson, Person>()
      .ForMember(d => d.DateCreated, t => t.Ignore())
      .ForMember(d => d.DateModified, t => t.Ignore())
      .ForMember(d => d.EmailAddresses, t => t.Ignore())
      .ForMember(d => d.PhoneNumbers, t => t.Ignore())
      .ForMember(d => d.HomeAddress, t => t.Ignore())
      .ForMember(d => d.WorkAddress, t => t.Ignore());
Notice how the Ignore method is used to indicate you really want these properties ignored. You don’t have to specify these for the reverse mapping because CreateAndEditPerson doesn’t have any properties that Person doesn’t have.
With all of this set up, handling the Create action method is now pretty straight forward:
[HttpPost]
[ValidateAntiForgeryToken]
public ActionResult Create(CreateAndEditPerson createAndEditPerson)
{
  if (ModelState.IsValid)
  {
    try
    {
      using (_unitOfWorkFactory.Create())
      {
        Person person = new Person();
        Mapper.Map(createAndEditPerson, person);
        _peopleRepository.Add(person);
        return RedirectToAction("Index");
      }
    }
    catch (ModelValidationException mvex)
    {
      foreach (var error in mvex.ValidationErrors)
      {
        ModelState.AddModelError(
            error.MemberNames.FirstOrDefault() ?? "", error.ErrorMessage);
      }
    }
  }
  return View();
}
Based on the Model type of the Create view, the model binder in ASP.NET MVC constructs a CreateAndEditPerson instance for you and fills it with the data from the form. If the object is considered valid (e.g. the Required attributes and other validation rules in that View Model are satisfied), the model is mapped to a Person from the Model project and added to the data context using the repository’s Add method. Since the code is wrapped in a using block that creates a unit of work, the changes are saved automatically at the end of the code block.
If updating the database fails, the data context throws a ModelValidationException with the validation errors in its ValidationErrors property. You saw how the data context created and filled the exception in Part 5 that discussed ways to improve the error messages from the data context. Here, I am using those messages to load them in the ModelState so they nicely show up in the UI, even though they are raised somewhere deep down in the EF data layer.
With Create covered, Edit is now pretty easy as it follows the same pattern.
Edit
Edit also consists of two action methods: one for GET and one for POST. Here’s the GET version:
public ActionResult Edit(int id)
{
  Person person = _peopleRepository.FindById(id);
  if (person == null)
  {
    return HttpNotFound();
  }
  var data = new CreateAndEditPerson();
  Mapper.Map(person, data);
  return View(data);
}
Hopefully, this is easy code by now. A Person is retrieved from the database using the PeopleRepository. It’s then mapped into a CreateAndEditPerson View Model and sent off to the view. That view is almost the same as the one for create, except for the field for the ID of the person being edited. Rather than creating two separate, but almost identical views, you can use partial views and extract the part of the views that is the same to a separate view file and reference that from the Create and Edit views. This is the route I have taken for the e-mail addresses and phone numbers (and which the tooling in Visual Studio creates by default), so check out those views if you want to learn more.
On postback, the following Edit method to save the contact person in the database is executed:
[HttpPost]
[ValidateAntiForgeryToken]
public ActionResult Edit(CreateAndEditPerson createAndEditPerson)
{
  if (ModelState.IsValid)
  {
    try
    {
      using (_unitOfWorkFactory.Create())
      {
        Person personToUpdate = _peopleRepository.FindById(createAndEditPerson.Id);
        Mapper.Map(createAndEditPerson, personToUpdate);
        return RedirectToAction("Index");
      }
    }
    catch (ModelValidationException mvex)
    {
      foreach (var error in mvex.ValidationErrors)
      {
        ModelState.AddModelError(error.MemberNames.FirstOrDefault() ?? "", error.ErrorMessage);
      }
    }
  }
  return View();
}
This is almost the same code as the POST version of the Create method. Here, an existing person is retrieved from the database and then updated with the values from the submitted View Model.
The final action method in the PersonController is Delete, discussed next.
Delete
Delete also consists of a GET and a POST version. Here’s the code for both:
public ActionResult Delete(int id)
{
  Person person = _peopleRepository.FindById(id);
  if (person == null)
  {
    return HttpNotFound();
  }
  var data = new DisplayPerson();
  Mapper.Map(person, data);
  return View(data);
}

[HttpPost, ActionName("Delete")]
[ValidateAntiForgeryToken]
public ActionResult DeleteConfirmed(int id)
{
  using (_unitOfWorkFactory.Create())
  {
    _peopleRepository.Remove(id);
  }
  return RedirectToAction("Index");
}
In the GET version, I retrieve the person from the database and convert it into a DisplayPerson. This is useful if you want to show a confirmation screen that lists the details of the entity you’re about to delete.
In the POST version, the ID of the person is submitted which is then fed into the Remove method of the PeopleRepository. This deletes the person from the database, as well as its related contact data such as phone numbers and email records. The changes are saved automatically as the code is wrapped in a using block that creates a unit of work.
Handling Validation
Although you’ve already seen some validation at work, I want to briefly list a few important implementation details. First, take a look at the full code for the CreateAndEditPerson class:
public class CreateAndEditPerson : IValidatableObject
{
  public int Id { get; set; }
  [Required, DisplayName("First name")]
  public string FirstName { get; set; }
  [Required, DisplayName("Last name")]
  public string LastName { get; set; }
  [DisplayName("Date of birth")]
  public DateTime DateOfBirth { get; set; }
  public PersonType Type { get; set; }

  public IEnumerable<ValidationResult> Validate(ValidationContext validationContext)
  {
    if (Type == PersonType.None)
    {
      yield return new ValidationResult("PersonType can't be None", new[] { "Type" });
    }
  }
}
Depending on how you look at things, there may be some stuff you don’t like. For example, the Validate method seems like a replication of a part of the Validate method in the Person class (and it is.) Also, the Required attributes seem duplicated between Person and its CreateAndEditPerson View Model. This is a consequence of the separation using the View Models; if you were using a Person directly, you could directly access its Validate method. In my opinion, the benefits of using separate View Models outweigh any issues associated with it, so I don’t mind duplicating some of the validation. In fact, it turns out that sometimes I have different validation rules in my view model than in my model. For example, when working with a legacy database, the model could have relaxed validation to let old data go in and out without a problem. However, new data entered through an ASP.NET MVC UI needs to stick to stricter rules. This is easily accomplished with a separate View Model for Create and Edit, each with their own validation rules.
Note: the validation at the model level is carried out as well when the entities are saved to the database. This means that View Models never jeopardize the quality of your data; your model always stays in control and has a final say about the data.
In the EditAddress view model that is used to edit Address instances (there is only an Edit model as you can’t create new addresses in the UI), I avoided duplication of validation code by leveraging the Validate method of the associated Address class, like this:
public class EditAddress : IValidatableObject
{
  public int PersonId { get; set; }
  public string Street { get; set; }
  public string ZipCode { get; set; }
  public string City { get; set; }
  public string Country { get; set; }
  public ContactType { get; set; }

  public IEnumerable<ValidationResult> Validate(ValidationContext validationContext)
  {
    return new Address(Street, City, ZipCode, Country, ContactType).Validate();
  }
}
This way, you don’t need to duplicate any code; you just ask Address if it can make a valid instance out of the fields passed to it, and use that to validate the EditAddress instance. I left both concepts in the sample application as I find there’s room for both options.
You’re encouraged to look at the other controllers in the application, along with their View Models and views. Although the implementation is slightly different here and there, a lot of the code is based on the same principles that you’ve just seen.
The final topic that needs to be discussed is how the application is able to display nice drop-down lists based on the various enums in the application. You’ll see how this is done next.
Implementing Drop Down Lists
You may have noticed that when you add a contact person, you get a nice drop-down to select a type:
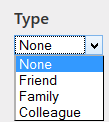
Figure 6-9 A Drop-Down List with Values from an Enum
Neither ASP.NET nor MVC have built in support for converting enums to a drop down list. However, it’s quite easy to implement.
When you look at the Create or Edit view for a Person, you see something like this:
@Html.EnumDropDownListFor(model => model.Type)
A nice and clean implementation using an extension method, as the EnumDropDownListFor method is able to infer the underlying enum type to build the drop down, and use the model’s value to preselect the current value if it exists.
The implementation of EnumDropDownListFor is based on a few articles I found on the Internet, where the following one looked like the most complete and stable implementation:
http://www.jonegerton.com/dotnet/dropdownlist-helper-for-enums/.
For more background, and a way to localize these drop-downs, check out these resources:
- http://blogs.msdn.com/b/stuartleeks/archive/2010/05/21/asp-net-mvc-creating-a-dropdownlist-helper-for-enums.aspx
- http://stackoverflow.com/questions/4656758/mvc3-razor-dropdownlistfor-enums/4
- http://ruijarimba.wordpress.com/2012/02/17/asp-net-mvc-creating-localized-dropdownlists-for-enums/
In my implementation I added the SplitString method (and renamed it to PascalCaseToSpaces) as suggested by Nick in the blog post from Stuart Leeks to change PascalCasedEnumItems to a version with spaces (Pascal Cased Enum Items) in the drop-down list.
Stuff I Like to Do
- Implement a BaseController. Although certainly not required, I find it useful if all my controllers inherit a common and custom base controller (called BaseController in the sample project). This makes it easy at any stage of the application to add behavior to all controllers at once.
- Call Mapper.AssertConfigurationIsValid at the end of your AutoMapper configuration code to ensure all mappings are valid. Without that call, you code appears to run fine, but you may run into problems later when the faulty mapping is used in your code.
- Give your View Models logical names so you can easily find them. I typically use a naming convention like action followed by the type (such as ListPerson to display people in a list) or something like DisplayType, CreateType, EditType or CreateAndEditType, to indicate what they are used for.
- Although not shown in this project, it’s easy (and recommended) to use UI frameworks like jQuery UI or Kendo UI. These frameworks make it easy to create good-looking UIs with little effort.
Summary
In this article you saw how to use the model and repositories developed in earlier parts in the series for an ASP.NET MVC 4 application. In particular, you saw how to use a dependency framework to inject concrete instances of the IPeopleRepository and IUnitOfWork interfaces into the controllers of the project. A good part of the article was then spent discussing the implementation of the PeopleRepository and its methods to implement CRUD (Create, Read, Update and Delete) operations. At the end of the article, you saw how validation is handled and how enums are used to create better looking drop-down lists via extension methods.
In the next article you’ll see how to implement the same frontend UI, this time using ASP.NET 4.5 Web Forms.
Downloads
Where to Next?
Wonder where to go next? You can post a comment on this article.
Links in this Document
| Doc ID | 578 |
| Full URL | https://imar.spaanjaars.com/578/aspnet-n-layered-applications-implementing-an-aspnet-mvc-4-frontend-part-6 |
| Short cut | https://imar.spaanjaars.com/578/ |
| Written by | Imar Spaanjaars |
| Date Posted | 09/28/2013 16:52 |
Comments
Talk Back! Comment on Imar.Spaanjaars.Com
I am interested in what you have to say about this article. Feel free to post any comments, remarks or questions you may have about this article. The Talk Back feature is not meant for technical questions that are not directly related to this article. So, a post like "Hey, can you tell me how I can upload files to a MySQL database in PHP?" is likely to be removed. Also spam and unrealistic job offers will be deleted immediately.
When you post a comment, you have to provide your name and the comment. Your e-mail address is optional and you only need to provide it if you want me to contact you. It will not be displayed along with your comment. I got sick and tired of the comment spam I was receiving, so I have protected this page with a simple calculation exercise. This means that if you want to leave a comment, you'll need to complete the calculation before you hit the Post Comment button.
If you want to object to a comment made by another visitor, be sure to contact me and I'll look into it ASAP. Don't forget to mention the page link, or the Doc ID of the document.