ASP.NET N-Layered Applications - Implementing a WCF 4.5 Frontend (Part 8)
Note: this is part eight in a series of ten. If you rather read this entire series off-line, you can buy the full series as a convenient PDF document that comes with the full source. Besides the convenience, buying the PDF will also make you feel good as it shows your appreciation for the articles and helps me pay the bills for my server and hosting so I can keep running imar.spaanjaars.com and continue to provide you with great content. For more details, check out this post that shows you how you can buy the entire series right now.
This is Part 8 in a series of 10 that show you how to build N-Layered applications using ASP.NET 4.5 and Entity Framework 5 Code First. In this part you’ll see how to build a WCF service that makes use of the model and repository projects I have shown in the first five articles in this series. The WCF service can be used by different types of applications to access contact people and their related data.
If you haven’t read the earlier parts in this series yet, you’re encouraged to do so first. The following list has links to all articles in this series:
- Part 1 - Introduction
- Part 2 - Setting up the Solution in Visual Studio
- Part 3 - Making your Projects Unit Testable
- Part 4 - Implementing a Model
- Part 5 - Implementing a Repository using Entity Framework Code First
- Part 6 - Implementing an ASP.NET MVC 4 Frontend
- Part 7 - Implementing a Web Forms 4.5 Frontend
- Part 8 - Implementing a WCF 4.5 Frontend
- Part 9 – Importing Data Using the API
- Part 10 - Extensions, Tools and Wrapping Up
Introduction
In this article, I’ll show you how to build a WCF service that can expose contact data to calling applications over the internet or local network. WCF is widely accessible from other application types so it’s a great platform to share data with other applications, whether they are based on .NET or not.
In this article, I’ll cover the following topics:
- How to use StructureMap to inject repositories and units of work in your WCF service.
- How to design your service API.
- How to Unit Test your service methods.
- How to return and access data.
This won’t be a very long article as a lot of it has already been discussed, or is based on common WCF functionality. However, I decided to include this part in the series to give you a complete picture of using the repositories and models in a variety of applications.
Under the hood, this WCF service application uses the PeopleRepository, targeting the Entity Framework for all data access. To see how it all fits together, here’s the architecture diagram showing the WCF frontend application and how it’s related to the other components in the system:

Figure 8-1 The N-Layer Architecture Diagram (click to enlarge)
Using StructureMap for Dependency Injection (DI)
Just like in an ASP.NET MVC application, it could be desirable to use Dependency Injection in your WCF services. The biggest benefit is that it makes your services testable. Since a WCF Service is a normal class, you can instantiate it and call its methods, just like any other class. For example, the following WCF Service (found in the Spaanjaars.ContactManager.Web.Wcf project):
public class ContactManagerService : IContactManagerService
{
  private readonly IPeopleRepository _peopleRepository;
  private readonly IUnitOfWorkFactory _unitOfWorkFactory;

  public ContactManagerService(IPeopleRepository peopleRepository,
              IUnitOfWorkFactory unitOfWorkFactory)
  {
    if (peopleRepository == null)
    {
      throw new ArgumentNullException("peopleRepository", "peopleRepository is null.");
    }
    if (unitOfWorkFactory == null)
    {
      throw new ArgumentNullException("unitOfWorkFactory", "unitOfWorkFactory is null.");
    }
    _peopleRepository = peopleRepository;
    _unitOfWorkFactory = unitOfWorkFactory;
  }

  public PersonModel GetPerson(int id)
  {
    var person = _peopleRepository.FindById(id);
    return new PersonModel {FirstName = person.FirstName, Id = person.Id};
  }
}
can be tested like this:
[TestClass]
public class ContactManagerServiceTests : ServiceTestBase
{
  [TestMethod]
  public void ContactManagerServiceRequiresRepository()
  {
    Action act = () => new ContactManagerService(null, new FakeUnitOfWorkFactory());
    act.ShouldThrow<ArgumentNullException>().WithMessage("peopleRepository is null",
               ComparisonMode.Substring);
  }

  [TestMethod]
  public void GetPersonByIdReturnsCorrectPerson()
  {
    var service = new ContactManagerService(new FakePeopleRepository(),
              new FakeUnitOfWorkFactory());
    var person = service.GetPerson(24);
    person.LastName.Should().Be("Youngest Lastname");
    person.Id.Should().Be(24);
  }
}
The first test ensures that the constructor of the service throws an exception if you don’t supply a valid IPeopleRepository. The sample project contains two more tests; one to test the IUnitOfWorkRepository, the other to ensure the constructor does not throw an exception if both objects are supplied correctly. Although your code is likely to crash elsewhere when you don’t supply the correct objects in the constructor, I like these kinds of tests as they clearly enforce “code by contract” and “fail fast” to be implemented in the service, which will avoid problems further down the road.
Note: for more information on testing for exceptions using FluentAssertions, check out the documentation at:
http://fluentassertions.codeplex.com/documentation
The second test, GetPersonByIdReturnsCorrectPerson, checks whether the service method calls the FindById method on the IPeopleRepository that is passed in and then constructs a correct PersonModel based on the return value of FindById. For this to work, I implemented FindById in the fake repository and had it return one of the available persons in the list. You’ll see more of the GetPerson method after I have showed you how to set up Dependency Injection in a WCF project.
To enable DI in a WCF project using StructureMap, follow these steps:
- Install the package StructureMap into your WCF project.
- Add a few code files to the project. Most of these are “boiler plate” files that you can add to any WCF project without modification. You could even add them to the Infrastructure project or other shared class library if you’re willing to reference WCF related libraries such as System.ServiceModel.Activation.
- Write a method that initializes StructureMap, similar to how I did it in the ASP.NET MVC project.
- Modify the markup of your service method so it uses a custom ServiceHostFactory.
You see these steps in detail next.
Install StructureMap
This is easy. Just execute Install-Package StructureMap from the Package Manager Console window. Make sure that the WCF project is selected in the Default project drop-down list.
Add Code Files to the Project to Define a Custom ServiceHostFactory and other Custom Types
In the root of the WCF project in the sample application you find a folder called StructureMap. It has five files, four of which start with StructureMap:
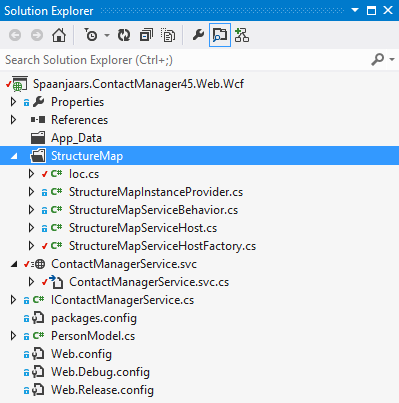
Figure 8-2 Solution Explorer Showing StructureMap files for the WCF project
- http://lostechies.com/jimmybogard/2008/07/30/integrating-structuremap-with-wcf
- http://www.sgriffinusa.com/2011/02/setting-up-wcf-to-use-structuremap.html
You find the slightly modified classes in my sample project or you can refer to the online articles for the original implementation.
Using Jimmy’s and Scott’s work, all I needed to do was add the files to my project, and write a single class that sets up StructureMap.
Write a method that Initializes StructureMap
The configuration code for StructureMap can be found in the Ioc.cs file. It looks like this:
public static class Ioc
{
  public static void Initialize()
  {
    ObjectFactory.Initialize(scanner =>
    {
      scanner.Scan(scan =>
      {
        scan.AssembliesFromApplicationBaseDirectory();
        scan.WithDefaultConventions();
      });
      scanner.For<IUnitOfWorkFactory>().Use<EFUnitOfWorkFactory>();
    });
  }
}
This is almost identical to the code in the ASP.NET MVC project: it tells StructureMap to resolve types using the default conventions (when requested to return an ISomething, StructureMap will try to use the Something type) and to scan all assemblies in the Bin folder. In addition, it sets up EFUnitOfWorkFactory as the type to return when an IUnitOfWorkFactory is requested.
Modify the Markup of the Service
To tell WCF to use another ServiceHostFactory that returns services whose constructors can receive injected types, you need to modify the Markup of the service. You see how to do this in the next section when the actual service is built, but if you want to see the code, here’s how it looks:
<%@ ServiceHost Language="C#" Debug="true"
    Service="Spaanjaars.ContactManager45.Web.Wcf.ContactManagerService"
    CodeBehind="ContactManagerService.svc.cs"
    Factory="Spaanjaars.ContactManager45.Web.Wcf.StructureMap.StructureMapServiceHostFactory" %>
Adding the Service to the WCF Project
To add the service to your WCF project, right-click the project in the Solution Explorer, choose Add | New Item and then choose WCF Service. In my project, I named the service ContactManagerService, giving me the following files:
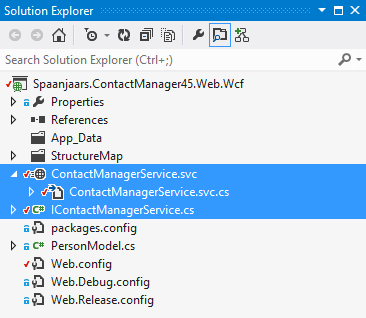
Figure 8-3 Solution Explorer Showing the Service Files
With the service added, I then had to update the Factory attribute in the markup of the .svc file. To do that, I right-clicked ContactManagerService.svc and chose View Markup. Double-clicking the svc file itself won’t work as it will open its code behind file instead. I then added the following Factory attribute to the code after the Code Behind attribute that was already there:
Factory="Spaanjaars.ContactManager45.Web.Wcf.StructureMap.StructureMapServiceHostFactory"
Now that the service is added and configured for DI, the next logical step is defining its public API.
Designing your Service API
A WCF service is typically based on an interface that defines the members that you want to expose publicly. But which members do you want to expose? That all depends on your business requirements. In the sample application I decided to keep things relatively simple, so it’s easier to focus on the design principles rather than on the actual implementation. My service will support the following features:
| Name | Description |
| GetPerson (int id) | Returns a PersonModel based on the incoming ID. Contains the two addresses, but no phone numbers or e-mail addresses. |
InsertPerson(PersonModel personModel) |
Enables you to insert a new person. Does not support inserting phone numbers or e-mail addresses. |
UpdatePerson(PersonModel personModel) |
Enables you to update an existing person. Does not support inserting phone numbers or e-mail addresses. |
DeletePerson(int id) |
Enables you to delete an existing person. |
This leads to the following proposed interface:
public interface IContactManagerService
{
  PersonModel GetPerson(int id);
  int InsertPerson(PersonModel personModel);
  void UpdatePerson(PersonModel personModel);
  void DeletePerson(int id);
}
In WCF, it’s recommended to put attributes on types and members you want to expose through the service, resulting in the following interface:
[ServiceContract]
public interface IContactManagerService
{
  [OperationContract]
  PersonModel GetPerson(int id);

  [OperationContract]
  int InsertPerson(PersonModel personModel);

  [OperationContract]
  int UpdatePerson(PersonModel personModel);

  [OperationContract]
  void DeletePerson(int id);
}
In the sample application the actual return type of InsertPerson and UpdatePerson is different. You’ll see why this is next.
Returning and Accepting Data
In order to build a flexible solution that remains easy to maintain in the future, it’s important that your WCF services don’t return types from your model directly. First of all, you may be exposing too much data, leaking more details than you may want to. But another important reason for not returning model types directly is flexibility. A WCF service serves as a contract between the service and any consuming client application, which means that as long as the service is publicly available, you can’t change the members of the service or the types they return. For example, renaming a property of the Person class would result in a breaking change for all applications consuming your service. If you put a layer of View Models on top of your model types, you can freely change the underlying implementation without breaking the service contract. Figure 8-4 shows how View Models are flowing between the WCF service project and external applications that use the service:
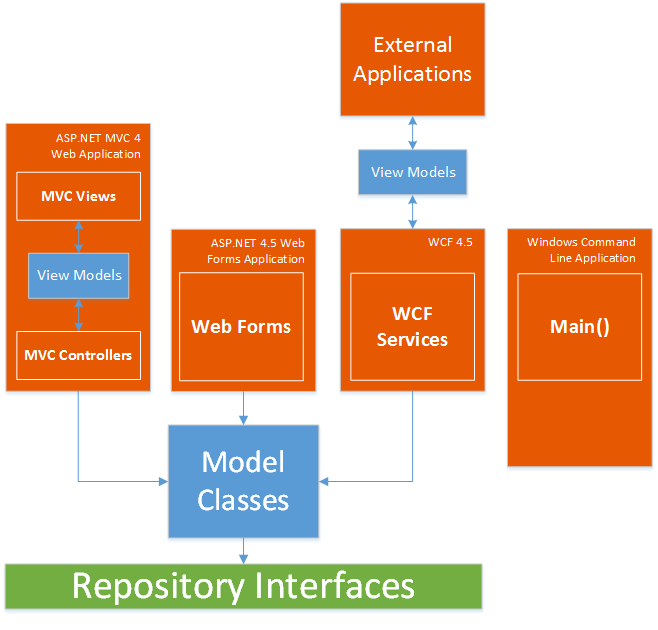
Figure 8-4 View Models in the WCF Service Project (click to enlarge)
In the sample application I created two main View Model types that are returned by the service: PersonModel and AddressModel that look as follows:
[DataContract]
public class PersonModel
{
  [DataMember]
  public int Id { get; set; }
  [DataMember]
  public string FirstName { get; set; }
  [DataMember]
  public string LastName { get; set; }
  [DataMember]
  public DateTime DateOfBirth { get; set; }
  [DataMember]
  public AddressModel HomeAddress { get; set; }
  [DataMember]
  public AddressModel WorkAddress { get; set; }
}

[DataContract]
public class AddressModel
{
  [DataMember]
  public string Street { get; set; }
  [DataMember]
  public string City { get; set; }
  [DataMember]
  public string ZipCode { get; set; }
  [DataMember]
  public string Country { get; set; }
}
For more information about the DataContract and DataMember attributes, check out the following links:
- http://msdn.microsoft.com/en-us/library/ms733127.aspx
- http://stackoverflow.com/questions/4836683/wcf-datacontract
Note that the PersonModel has two properties of type AddressModel. Furthermore, PersonModel does not have properties for the e-mail address and phone number collections. PersonModel is used as the type returned for GetPerson as well as an input parameter for InsertPerson and UpdatePerson. This doesn’t have to be the case and you could easily create different View Models for different methods.
I use AutoMapper to map between the Person and Address on one side and the PersonModel and AddressModel on the other side, with this configuration code that should look very familiar by now:
public static class AutoMapperConfig
{
  public static void Start()
  {
    Mapper.CreateMap<PersonModel, Person>()
         .ForMember(x => x.Type, x => x.Ignore())
         .ForMember(x => x.DateCreated, x => x.Ignore())
         .ForMember(x => x.DateModified, x => x.Ignore())
         .ForMember(x => x.EmailAddresses, x => x.Ignore())
         .ForMember(x => x.PhoneNumbers, x => x.Ignore())
         .ForMember(x => x.HomeAddress, y => y.Condition(src => !src.IsSourceValueNull))
         .ForMember(x => x.WorkAddress, y => y.Condition(src => !src.IsSourceValueNull));
    Mapper.CreateMap<Person, PersonModel>();

    Mapper.CreateMap<AddressModel, Address>()
          .ForMember(x => x.ContactType, x => x.Ignore());
    Mapper.CreateMap<Address, AddressModel>();

    Mapper.CreateMap<ValidationResult, ValidationResultModel>();
    Mapper.AssertConfigurationIsValid();
  }
}
When mapping to a Person, I am ignoring five properties. Just as an example, I am ignoring the Type property. Inside the service, I’ll set this type to a hardcoded value. Obviously, you can include the Type property as well so external code could explicitly set it. I am ignoring the date properties as they are set by the Entity Framework automatically. Finally, I am ignoring the contact data as I decided not to implement them in this service to keep things simple. Note though that it is straight forward to add them; you could implement them as a List<EmailAddressModel> for example and then provide AutoMapper configuration for it.
I am also using IsSourceValueNull to avoid overwriting an existing address with a null value if the calling code has not submitted an address. You see how this is used later in the article.
You see what the mapper code for the ValidationResult is for in the next section that talks about error handling.
Returning Validation Errors
Imagine that the InsertPerson has been implemented, and that you’re calling it from an external client application. If all works out as expected, the calling code receives the ID of the newly created person. So far so good. But what if the validation of the Person instance fails? For example, because the calling code didn’t supply a first name? To handle that situation, your code could throw an exception. However, depending on how you configured your WCF services, those exceptions may never end up at the client, leaving them guessing as to why the insert failed. As an alternative, your method could return a collection of ValidationResult instances. However, you can’t have a method that returns either an int or a collection of errors, unless you change the return type to an object which isn’t really helpful.
The solution to this problem I typically use is to use a generic class that has two properties: the actual data you want to return (as a generic T) and a collection of validation errors. Here’s how the class could look:
[DataContract]
public class ServiceResult<T>
{
  [DataMember]
  public T Data { get; internal set; }

  [DataMember]
  public IEnumerable<ValidationResultModel> Errors { get; internal set; }
}
The type of T is defined when instantiating the class as you’ll see in a moment. The Errors collection is of type IEnumerable<ValidationResultModel>. I had to create the ValidationResultModel class because the ValidationResult class from the DataAnnotations namespace is not marked as serializable and as such cannot be sent back as a result from a WCF service. I am using AutoMapper once again to go from a ValidationResult to a ValidationResultModel.
To return a valid int from a service method using this class, you can use code like this:
return new ServiceResult<int?> { Data = person.Id };
In this case, the Errors property is null. If you need to return errors instead, you can use code like this:
return new ServiceResult<int?> { Errors = Mapper.Map(errors, new List<ValidationResultModel>()) };
Here, the Data property is null, but now the Errors collection is filled. The code uses AutoMapper to convert the collection of errors in the errors variable to a new List of ValidationResultModel.
For this code to work, the method’s signature must be changed to this:
public ServiceResult<int?> InsertPerson(PersonModel personModel)
{
  ...
}
And the calling code can then use the return value as follows:
var personModel = new PersonModel { ... };
var result = wcfClient.InsertPerson(personModel);
if (result.Errors.Any())
{
  // Deal with errors
}
else
{
  int newId = result.Data.Value;
  // Use the new ID of the person somehow
}
Implementing the Service
With all the hard work of creating interfaces, models, return types and mapping code done, implementing the service is now pretty easy. For example, all you need for GetPerson is this:
public PersonModel GetPerson(int id)
{
  var person = _peopleRepository.FindById(id);
  return Mapper.Map(person, new PersonModel());
}
And InsertPerson can be implemented like this:
public ServiceResult<int?> InsertPerson(PersonModel personModel)
{
  var person = new Person();
  Mapper.Map(personModel, person);

  // For demo purposes, let's assume we only accept colleagues.
  // You could easily add Type to the PersonModel and let external code set it
  person.Type = PersonType.Colleague;

  List<ValidationResult> errors = person.Validate().ToList();

  if (errors.Any())
  {
    var result = new ServiceResult<int?>
          { Errors = Mapper.Map(errors, new List<ValidationResultModel>()) };
    return result;
  }
  using (_unitOfWorkFactory.Create())
  {
    _peopleRepository.Add(person);
  }
  return new ServiceResult<int?> { Data = person.Id };
}
I configured AutoMapper to ignore the two address properties on PersonModel when they are null using IsSourceValueNull. That means that existing addresses won’t be overwritten by a null value.
Note that this WCF service will currently only save colleagues as that type is hardcoded in InsertPerson. Obviously, you can change this behavior by making Type a member of PersonModel as well.
UpdatePerson is similar although it calls Undo on the Unit of work to undo any changes when any one of the objects is in an invalid state. Finally, DeletePerson simply forwards the ID of the person to the Remove method on the repository and then exits.
The WCF service now supports all CRUD operations on a contact person: Create, Read, Update, and Delete. Obviously, you can expand this example any way you see fit. You could add support for e-mail addresses and phone numbers, check whether the current user has access to view or modify a contact person (using WCF security or a custom solution) and more, all using the same principles.
Stuff I Like to Do
- I usually write unit tests for my AutoMapper code. Not for all of it but mostly for the exceptions. A test like NullValueInSourceDoesNotOverwriteTarget that you’ll find in the code helps to ensure you’re not accidentally overwriting existing values with null values. This can prevent awkward bugs or data corruption from happening.
- I also write tests for my WCF services. By abstracting external dependencies as you’ve seen in this article, the service methods become very easy to test. Since service methods are often used in machine-to-machine scenarios it’s even more important they behave correctly as it’s less likely your end users will run into them and report them to you.
Summary
In this article you saw how to use the contact manager application’s repository and unit of work to expose application data to the internet, and to accept requests to insert, edit and delete contact people. The article started with an explanation of enabling Dependency Injection in a WCF. Although the code to implement this isn’t very straightforward, it’s pretty much the same code over and over again so it mostly comes down to copying a few existing files into your project and then writing a bit of code to configure StructureMap.
You then saw how to design the API of the service, starting with the design of the interface. Here’s where you define the members of the service such as GetPerson, InsertPerson and so on. To decouple your service layer from your application’s model, the service doesn’t expose your model types directly, but uses View Models instead. Once again, AutoMapper is very helpful to minimize the code you need to write to map from one type to another.
At the end you saw the actual implementation of the service. As an example, I hard coded some of the incoming data in the service; for example, I set the Type of a Person explicitly and fixed the addresses. If you want, you can also fix issues like this in your model, or force calling code to only supply valid data.
Besides a WCF service there’s another common way to get data into an application like the contact manager in an automated way: using a command line tool to import data from an external resource. You see how to do this in the next part in this article series.
Downloads
Where to Next?
Wonder where to go next? You can post a comment on this article.
Links in this Document
| Doc ID | 580 |
| Full URL | https://imar.spaanjaars.com/580/aspnet-n-layered-applications-implementing-a-wcf-45-frontend-part-8 |
| Short cut | https://imar.spaanjaars.com/580/ |
| Written by | Imar Spaanjaars |
| Date Posted | 11/13/2013 22:01 |
Comments
Talk Back! Comment on Imar.Spaanjaars.Com
I am interested in what you have to say about this article. Feel free to post any comments, remarks or questions you may have about this article. The Talk Back feature is not meant for technical questions that are not directly related to this article. So, a post like "Hey, can you tell me how I can upload files to a MySQL database in PHP?" is likely to be removed. Also spam and unrealistic job offers will be deleted immediately.
When you post a comment, you have to provide your name and the comment. Your e-mail address is optional and you only need to provide it if you want me to contact you. It will not be displayed along with your comment. I got sick and tired of the comment spam I was receiving, so I have protected this page with a simple calculation exercise. This means that if you want to leave a comment, you'll need to complete the calculation before you hit the Post Comment button.
If you want to object to a comment made by another visitor, be sure to contact me and I'll look into it ASAP. Don't forget to mention the page link, or the Doc ID of the document.