Modifying the CreateUserWizard Control
The CreateUserWizard control in ASP.NET makes it super easy for your users to sign up for an account. Simply add it to a page, configure it, and you're good to go. In addition, you can control the way it behaves using settings in the web.config file (such as whether or not duplicate e-mails are OK, password lengths and strength, whether or not you want to implement a "security question and answer" and so on). Also, when you don't like its appearance, you can customize the wizard's steps which expands its underlying HTML into your page, so you get full control over the rendering.
However, when you customize the steps, you'll find that the config setting that controls the display of the "security question and answer" no longer works as expected. In this article you see how to set up your control so it still takes the config settings into account.
Customizing the CreateUserWizard Control
If you create a new ASP.NET Web Forms application in Visual Studio 2010, your web.config file is already set up correctly for Membership. It should contain something like this:
<membership>
<providers>
<clear/>
<add name="AspNetSqlMembershipProvider" type="System.Web.Security.SqlMembershipProvider"
connectionStringName="ApplicationServices" enablePasswordRetrieval="false"
enablePasswordReset="true" requiresQuestionAndAnswer="false" requiresUniqueEmail="false"
maxInvalidPasswordAttempts="5" minRequiredPasswordLength="6"
minRequiredNonalphanumericCharacters="0" passwordAttemptWindow="10" applicationName="/" />
</providers>
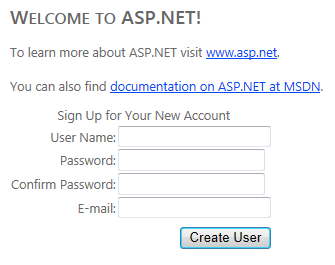
</membership>Notice how requiresQuestionAndAnswer is set to false by default. When you add a CreateUserWizard to a page with these settings, the control ends up like this:
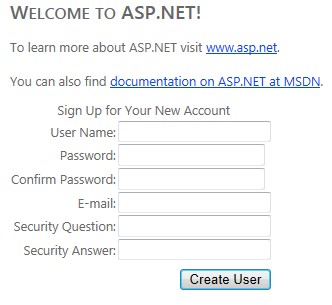
If you change the config setting to true and reload the page, the control ends up like this:
These settings make it easy to influence the behavior of the CreateUserWizard from configuration. However, this model breaks somewhat when you customize the Create User Step. The next section explains why this happens, and how to solve it.
If you want full control over the markup generated by the CreateUserWizard you can customize its steps which you can do as follows:
- Switch the page with the CreateUserWizard into Design View.
- Open the CreateUserWizard's Smart Tasks Panel and choose Customize Create User Step:
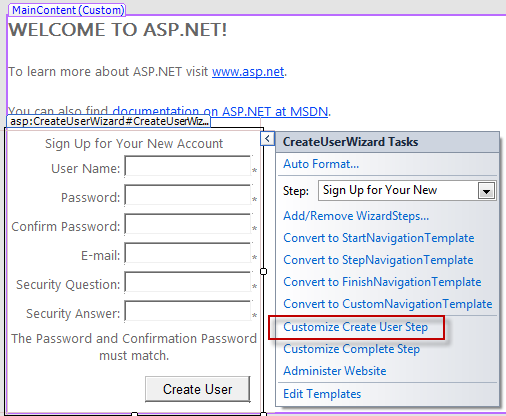
- This adds a lot of HTML to the page which you can now fully tweak to your likings.
If you'd look at the generated HTML and search for the security question controls, you'll find something like this:
<tr>
  <td align="right">
    <asp:Label ID="QuestionLabel" runat="server" AssociatedControlID="Question">
            Security Question:</asp:Label>
  </td>
  <td>
    <asp:TextBox ID="Question" runat="server"></asp:TextBox>
    <asp:RequiredFieldValidator ID="QuestionRequired" runat="server"
       ControlToValidate="Question" ErrorMessage="Security question is required."
       ToolTip="Security question is required." ValidationGroup="CreateUserWizard1">
      *
    </asp:RequiredFieldValidator>
  </td>
</tr>
This is the piece of code that renders the row with the security question. If you now run the page with this control in the browser, with requiresQuestionAndAnswer set to false in the web.config file, you still end up with the security question and answer in your page. By customizing the steps, you lose the possibility to link these controls to the setting in web.config.
To solve this, you have a few options. The easiest one is to simply delete the code that renders the security question and answer from your HTML. However, while this works, you also lose the ability to control these fields from the config file. What if your requirements change and you do need to add the security question and answer back in a week from now? You'd need to manually add the code to your page.
An alternative, and better solution, is to make the visibility of the controls dependent on the setting in web.config. This is really easy and is done with a simple, two-step process:
- Wrap the relevant code in a server-side PlaceHolder you can use to show or hide its contents.
- Control the visibility of the PlaceHolder from Code Behind based on the settings in web.config.
You'll see how to implement this next.
To wrap the security question and answer in a PlaceHolder, modify the code in your page as follows:
<asp:PlaceHolder runat="server" ID="SecurityQuestionAndAnswer">
  <tr>
    <td align="right">
    <asp:Label ID="QuestionLabel" runat="server" AssociatedControlID="Question">
            Security Question:</asp:Label>
    </td>
    <td>
      <asp:TextBox ID="Question" runat="server"></asp:TextBox>
      <asp:RequiredFieldValidator ID="QuestionRequired" runat="server" ControlToValidate="Question"
         ErrorMessage="Security question is required." ToolTip="Security question is required."
         ValidationGroup="CreateUserWizard1">*</asp:RequiredFieldValidator>
    </td>
  </tr>
  <tr>
    <td align="right">
      <asp:Label ID="AnswerLabel" runat="server" AssociatedControlID="Answer">
              Security Answer:</asp:Label>
    </td>
    <td>
      <asp:TextBox ID="Answer" runat="server"></asp:TextBox>
      <asp:RequiredFieldValidator ID="AnswerRequired" runat="server" ControlToValidate="Answer"
          ErrorMessage="Security answer is required." ToolTip="Security answer is required."
              ValidationGroup="CreateUserWizard1">*</asp:RequiredFieldValidator>
    </td>
  </tr>
</asp:PlaceHolder>
Notice how the question and answer controls are now wrapped in an PlaceHolder control. The control has an ID so you can refer to it from Code Behind.
To hide or show the PlaceHolder depending on the security settings for Membership in the web.config file, add the following code to the Page_Load method:
protected void Page_Load(object sender, EventArgs e)
{
  CreateUserWizard1.CreateUserStep.FindControl("CreateUserStepContainer").FindControl(
       "SecurityQuestionAndAnswer").Visible = Membership.Provider.RequiresQuestionAndAnswer;
}
(Note: For the Membership class to be available you need to add a using statement for the System.Web.Security namespace).
This code does a few things. First, FindControl("CreateUserStepContainer") is used to get a reference to the user step that is being rendered. You won't find this control in the generated HTML as it's used internally by the control. I had to use Reflector to figure out the name of this container.
The code then uses FindControl again; this time to find the PlaceHolder control I added earlier.
The final piece of the puzzle is determining the PlaceHolder's visibility. The Membership API exposes its configuration through the Provider property which in turns tells you whether or not a security question and answer is required through its RequiresQuestionAndAnswer property. This property maps directly to the attribute requiresQuestionAndAnswer in the web.config file.
With these changes applied, you get the best of both worlds: you can fully customize the presentation of your CreateUserWizard control, while you can still control the behavior for the security question and answer through the web.config file.
Where to Next?
Wonder where to go next? You can post a comment on this article.
Links in this Document
| Doc ID | 566 |
| Full URL | https://imar.spaanjaars.com/566/modifying-the-createuserwizard-control |
| Short cut | https://imar.spaanjaars.com/566/ |
| Written by | Imar Spaanjaars |
| Date Posted | 01/14/2012 15:57 |
Comments
Talk Back! Comment on Imar.Spaanjaars.Com
I am interested in what you have to say about this article. Feel free to post any comments, remarks or questions you may have about this article. The Talk Back feature is not meant for technical questions that are not directly related to this article. So, a post like "Hey, can you tell me how I can upload files to a MySQL database in PHP?" is likely to be removed. Also spam and unrealistic job offers will be deleted immediately.
When you post a comment, you have to provide your name and the comment. Your e-mail address is optional and you only need to provide it if you want me to contact you. It will not be displayed along with your comment. I got sick and tired of the comment spam I was receiving, so I have protected this page with a simple calculation exercise. This means that if you want to leave a comment, you'll need to complete the calculation before you hit the Post Comment button.
If you want to object to a comment made by another visitor, be sure to contact me and I'll look into it ASAP. Don't forget to mention the page link, or the Doc ID of the document.