Using the Microsoft Access Providers for Membership, Roles and Profile under ASP.NET 4
Back in August 2006 I wrote an article about replacing the built-in Application Services providers (such as the Membership and Roles providers) with a new provider targeting a Microsoft Access database, instead of a SQL Server database. This solution has worked well for many people who didn't have access to SQL Server on their production machine, or couldn't (or didn't want to) spend a lot of money for an extended hosting package that includes SQL Server.
I wrote the article using Visual Studio 2005 and the Microsoft .NET Framework 2.0 which was the bomb at that time. And while you can continue to use the concepts explained in the article in web sites that target ASP.NET 4 today without any modifications (you can easily consume .NET 2.0 DLLs in an ASP.NET 4 web site), you may run into some issues when you also want to compile the Access Providers assembly against .NET 4.
In this article I'll show you how to make the Access Providers work under an ASP.NET 4.0 web site.
To fix or not to fix? That's the question
If you want to use the Access Providers assembly in an ASP.NET 4 web site, you have at least two options to do it:
- Don't do or fix anything. Simply compile the Access Providers against the .NET Framework 2.0 (using Visual Studio 2005 or later) and use the resulting DLL in your ASP.NET 4 web site. This is probably the easiest solution to the problem (it also means that if you're upgrading a web site that uses the Access Providers, you don't have to do anything at all. The Access Providers DLL remains in .NET 2, but can successfully be used in an ASP.NET 4 web site).
- Recompile the Access Providers code against the .NET 4 framework. In order for this to work you need to make some changes to the project.
In the remainder of this article, I'll show you how to make the Access Providers work with an ASP.NET 4 web site.
Keep using the .NET 2 version of the DLL
With this solution, you either reuse an existing .NET 2 version of the Access Providers assembly, or you create a new one targeting this version of the framework. To create a new version of the assembly, you need a copy of Visual Studio 2005, 2008 or 2010 (the Express editions of 2008 and 2010 would work equally well as they enable you to compile class libraries). Then follow the steps explained in the section "Opening, Compiling and Tweaking the Project" of the original article. This gives you a C# Class Library which outputs an assembly (a DLL file) called SampleAccessProviders.dll. To make sure the assembly targets .NET 2.0, right click the Class Library project in the Solution Explorer, choose Properties and switch to the Application category. In the Target Framework drop down, make sure that .NET Framework 2.0 is selected.
You can now follow the remaining steps from the original article and create a new web site targeting ASP.NET 4. The web site can then reference the .NET 2.0 version of the Access Providers assembly and everything continues to work as described in the article. You may want to continue reading this article, as it contains a few tips about configuring your ASP.NET 4 web site with the Access Providers assembly.
Upgrading the Access Providers Assembly to .NET 4
The alternative solution is to upgrade the Class Library project with the Access Providers to .NET 4 as well. If you do this, you'll run into a minor issue. With ASP.NET 4, some types that were previously located in the System.Web assembly have now been moved to their own System.Web.ApplicationServices assembly. This means that if you try to compile the sample code from the Access Providers targeting ASP.NET 4, you'll run into errors like the following:
Error 6 The type name 'MembershipCreateStatus' could not be found. This type has been
forwarded to assembly 'System.Web.ApplicationServices, Version=4.0.0.0, Culture=neutral,
PublicKeyToken=31bf3856ad364e35'. Consider adding a reference to that assembly.
As the error message suggests, the problem can be solved by adding a reference to the System.Web.ApplicationServices assembly. I'll show you how to do this in the following walk through. Additionally, I'll show you how to modify, rather than completely overwrite the web site's web.config (as I showed you how to do in the previous article), to preserve some settings in that file specific to ASP.NET 4. Finally, since even the Visual Web Developer Express editions now support creating class libraries, I'll show you how to create a Visual Studio solution that contains the Access Providers project and your ASP.NET 4 web site so you can manage both from a single Visual Studio solution.
- First, obtain and install a copy of the Microsoft ASP.NET 2.0 Access Providers template for Visual Studio as explained in the section "Obtaining and Installing the Microsoft ASP.NET 2.0 Access Providers" of the original article.
- Next, start Visual Web Developer 2010 Express Edition (or a commercial version of Visual Studio 2010) and choose File | New Project. Switch to the Visual C# | Starter Kits category and double-click the ASP.NET Access Providers template to create a new Class Library project with the Access Providers sample code.
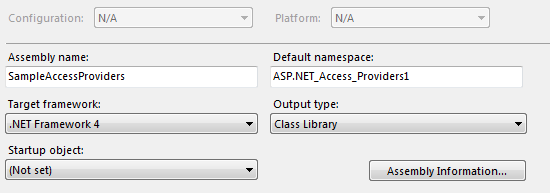
- Right-click the project in the Solution Explorer and choose Properties. In the Application category, change the Assembly Name to SampleAccessProviders. For more details on why you need this, check out the original article.
- In the same Properties category, make sure that Target Framework is set to .NET Framework 4. You should end up with the following screen:

Figure 1: The Project Properties dialog
- If you now try to compile the project, you get the error message mentioned earlier. To fix it, right-click the References node of the Visual Studio project in the Solution Explorer and choose Add Reference. On the .NET tab locate the assembly System.Web.ApplicationServices (you may need to sort the list by name first), select it and click OK.
- Now you can successfully compile the project.
From here, you could follow the steps from the original article. However, one of the steps in that article tells you to overwrite the web.config file in your ASP.NET web site with the one from the Access Providers sample project. If you do that, you wipe out some important ASP.NET 4 settings in that file, reverting your site back to an earlier version of ASP.NET. So, instead of overwriting the web.config file, you need to modify it by following these steps:
- First, make sure the Visual Studio Solution file is visible in the Solution Explorer. Choose Tools | Options, make sure that Show All Settings at the bottom of the Options dialog is checked and then make sure that in the Projects and Solutions category the option Always Show Solution is checked. Click OK to dismiss the Options dialog.
- Next, right-click the Solution in the Solution Explorer (not the Access Provider project) and choose Add | New Web Site. Select the ASP.NET Web Site template (VB or C#; that doesn't matter) and click OK.
- Right-click the newly created web site and choose Add Reference. On the Projects tab of the dialog that appeared, select the Access Providers project and click OK. If you want to create a file reference instead of a project reference (e.g. when you've already compiled the Access providers to an assembly earlier), you can browse to the DLL file using the Browse tab.
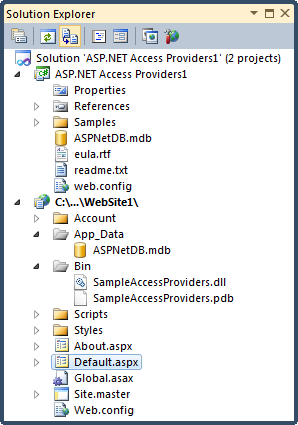
- Click the file ASPNetDB.mdb in the Access Providers project and drag it into the App_Data folder of the web site project. When you're done, your Solution Explorer should look like this:

Figure 2: The Solution Explorer with the two projects
- Open up the web.config file from the sample Access Providers project and copy the elements for membership, roleManager, profile, anonymousIdentification and webParts to the clipboard. Then open the web.config from the project and paste the copied code, overwriting the existing membership, roleManager and profile elements.
- Copy the AccessFileName connection string from the sample project and paste it in the web.config of the web site as well.You should end up with something like this:
<configuration>
  <connectionStrings>
    <add name="ApplicationServices" connectionString="data source=.\SQLEXPRESS;Integrated
        Security=SSPI;AttachDBFilename=|DataDirectory|\aspnetdb.mdf;User Instance=true"
         providerName="System.Data.SqlClient" />
    <add name="AccessFileName" connectionString="~/App_Data/ASPNetDB.mdb"
         providerName="System.Data.OleDb"/>
  </connectionStrings>
You can delete the ApplicationServices connection string from the config file as it's no longer needed. You can check out the download at the end of this article to see how the web.config file should end up.
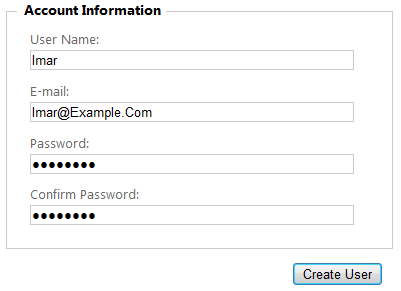
- To test out your provider, right-click Default.aspx in the Solution Explorer and choose View In Browser. At the top of the page click Login in, and the follow the Register link. Sign up for an account by entering your details:

Figure 3: Creating a new user account
- If everything worked correctly, the account is created and you get a confirmation message. You can confirm this by opening the Access database from the App_Data folder in Microsoft Access. You should see records in at least the aspnet_Users and aspnet_Membership tables.
For trouble shooting tips and more background, be sure to read the original article discussing the Microsoft Access Providers.
Summary
You could easily reuse an existing assembly that was compiled against .NET 2.0 in an ASP.NET 4 web site. If you previously used the Access Providers, you can simply keep using the existing DLL. If, however, you want your entire code base upgraded to .NET 4, you need to make a change in the references of the class library project of the Access Providers. Starting with .NET 4, some of the types used by the Application Services have been moved to their own assembly file which you now need to reference. With the reference in place, you can compile the code into a .NET assembly, and continue to use the Access Providers as you previously did.
Downloads
The complete source for the Access Providers and the ASP.NET 4 sample web site.
Where to Next?
Wonder where to go next? You can post a comment on this article.
Links in this Document
| Doc ID | 560 |
| Full URL | https://imar.spaanjaars.com/560/using-the-microsoft-access-providers-for-membership-roles-and-profile-under-aspnet-4 |
| Short cut | https://imar.spaanjaars.com/560/ |
| Written by | Imar Spaanjaars |
| Date Posted | 01/09/2011 11:09 |
Comments
Talk Back! Comment on Imar.Spaanjaars.Com
I am interested in what you have to say about this article. Feel free to post any comments, remarks or questions you may have about this article. The Talk Back feature is not meant for technical questions that are not directly related to this article. So, a post like "Hey, can you tell me how I can upload files to a MySQL database in PHP?" is likely to be removed. Also spam and unrealistic job offers will be deleted immediately.
When you post a comment, you have to provide your name and the comment. Your e-mail address is optional and you only need to provide it if you want me to contact you. It will not be displayed along with your comment. I got sick and tired of the comment spam I was receiving, so I have protected this page with a simple calculation exercise. This means that if you want to leave a comment, you'll need to complete the calculation before you hit the Post Comment button.
If you want to object to a comment made by another visitor, be sure to contact me and I'll look into it ASAP. Don't forget to mention the page link, or the Doc ID of the document.