Automatically Generating Class Diagrams from a Type Using Reflection
Disclaimer
I wrote this sample code because I needed a quick solution to create sample class diagrams. It is in no way optimized for performance, does not use error handling (so you can end up with file locks if something goes wrong), doesn't make use of the IDisposable interfaces that many objects expose (e.g. it's not calling Dispose() and not using using blocks either), is not necessarily showing best coding practices and could be refactored a bit to more cleanly define constants, create reusable blocks of code and work with memory more efficiently. This means you should use this code at your own risk, and don't blame me if it blows up your server during a customer presentation. That all said: it does work fine on my machine and generates good looking class diagrams in no time.
You may also notice that the diagrams generated by this tool are not exactly the same as in Visual Studio. For example, I left out the Fields region as I don't need them. However, it's not too hard to modify the code to accommodate for other object members as well.
Introduction
I figured there would be on-line solutions available to generate class diagrams and after some searching I found the 100% Reflective Class Diagram Creation Tool by Sacha Barber. However, I quickly found the tool a little too complex and feature rich to use in my application. It's very useful as a stand-alone diagramming tool, but I was really looking for a simple API that let me do something like:
WriteClassDiagram(typeof(System.Attribute), "Attribute.png");
Other solutions I found were either not open source and thus not easy to embed in my application or were stand alone application without a public API. Eventually I figured it wouldn't be too hard to create my own solution so I fired up Visual Studio and started coding.
Creating Class Diagrams
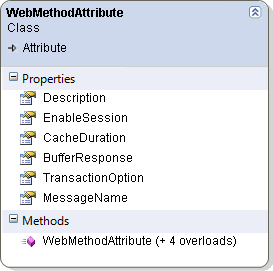
Before I continue, take a look at one of the auto generated diagrams, the one for the WebMethodAttribute from the System.Web.Services namespace:

Figure 1
If you're familiar with Visual Studio's Class Diagram tool you'll notice that this diagram looks similar, but not identical to the ones used by Visual Studio. For my goal just listing the properties and methods of each attribute works well enough.
To actually create the diagram, I thought of a number of solutions. In the end, I've chosen a slightly cheesy, but easy to implement solution. I'll give you a high-level overview of the steps involved first, and then dig deeper into some parts of the code. At the end of this article you find a link to the full source discussed in the application. The sample application is a simple Console Application that contains two lines of code:
Type myType = typeof(Attribute); // Just an example. You can pass any type.
ImageHelpers.GenerateClassDiagram(
                   myType, String.Format("{0}.png", myType.Name), ImageFormat.Png);
Once you run the Console Application you end up with a file called Attribute.png in the Debug or Release folder of the Console Application. I'll discuss how the GenerateClassDiagram method generates the diagram in the remainder of this article.
Steps to Create a Class Diagram
Here's a run-down of the steps involved to create a diagram:
- Use reflection to get information about the properties, methods and constructors in the type passed to the method.
- Calculate the maximum text width of these items using GDI+'s MeasureString. As you can see in Figure 1, I also needed to take overloads into account. In that figure, WebMethodAttribute (+ 4 overloads) is the widest item and its width is used to determine the overall width of the diagram.
- Generate a blank image with the calculated width and a large height.
- Render the header images with the rounded corners and the class name, optionally displaying a base class.
- Fill the entire image down with an image on the left and one on the right to draw the vertical border and the drop shadow on the right.
- Draw the Properties header if applicable.
- Draw each property name with an icon.
- Draw the Methods header if applicable.
- Draw each method and constructor.
- Draw the footer images.
- Crop the image to the combined height of all members, the header and the footer.
- Save the image to disk.
Detailed Steps to Create a Class Diagram
Use reflection to get information about the properties, methods and constructors
You'll find the code for this step in the three helper methods called GetProperties, GetMethods and GetConstructors. The code is quite simple and uses standard reflection techniques to get a list of members. For example, here's how GetProperties looks:
private static PropertyInfo[] GetProperties(Type myType)
{
  return myType.GetProperties(
                                BindingFlags.Instance |
                                BindingFlags.DeclaredOnly |
                                BindingFlags.Public |
                                BindingFlags.Static
                             );
}
Simple, yet effective, this code returns an array of PropertyInfo objects. A PropertyInfo instance in turn contains useful members to get the property's name and whether it can be written to and read from. This latter info is used later to ignore the get and set methods for properties when rendering the type's methods.
Calculate the maximum text width of the members
While this may seem difficult, it's actually quite easy. All you need to do is pass the text and a font to .NET's MeasureString method and it'll tell you the exact width like this:
float currentLength = graphics.MeasureString(methodDescription, myFont).Width;
What made this a little trickier is that I needed to calculate more than just the member name. I also need to take he overloads into account as shown in Figure 1. Using a single LINQ query I can calculate the number of overloads and adjust the member name accordingly. That is, a name like MyMethod with two additional overloads would end up as MyMethod(+ 2 overloads). I then measure the width of this complete string. The code that performs the calculation looks like this:
private static float GetMaxLengthMembers(MemberInfo[] members,
                           Font myFont, Graphics graphics, Type myType)
{
  float maxLength = 0;
  var localMembers = from MemberInfo member in members
                     group member by member.Name into m
                     orderby m.Key
                     select new
                     {
                       Name = m.Key,
                       Count = m.Count()
                     };
  foreach (var item in localMembers)
  {
    string methodDescription = item.Name == ".ctor" ? myType.Name : item.Name;
    if (item.Count > 1)
    {
      methodDescription += string.Format(" (+ {0} overloads)", item.Count - 1);
    }
    float currentLength = graphics.MeasureString(methodDescription, myFont).Width;
    if (currentLength > maxLength)
    {
      maxLength = currentLength;
    }
  }
  return maxLength;
}
The code in the sample application executes this code for all three member types. Additionally it calls a method called GetMaxLength to determine the length of the header text (the class name, and optionally a base class). The maximum width of these 5 items plus some margin on the sides is then used to determine the total width of the image.
Generate a blank image with the calculated width and a large height
The code then creates a Bitmap object width the calculated with and an arbitrary height of 1000 pixels. This should be tall enough to display most types but it's easy to change in case you have some large types.
myTargetBitmap = new Bitmap(maxWidthRounded, 1000);
myGraphics = Graphics.FromImage(myTargetBitmap);
Later when all members have been drawn on the image, the height will be cropped to the actual height.
Render the header images
This is where things get a little cheesy. I am sure it's possible to do this a lot cleaner using the many methods that GDI+ exposes. but I found my solution to be easy and quick to implement. Feel free to ignore my code and write better code yourself if you come up with a better idea.
Basically, at this stage the code knows the image will be, say, 250 pixels wide. To draw the header of the image with the rounded corner on the left and on the right, I use two images:

Figure 2
Again, 400 pixels would be enough to display most types, but it's easy to change the HeaderLeft.png image in case you have types with very long names.
Then I first position HeaderLeft in the top left corner of my Graphics object (at 0,0). I then place HeaderRight at a y position of zero, and an x position of (250 pixels minus the width of HeaderRight) itself. In this example, x would be 222 pixels from the left side of the image. Conceptually, the images would end up like this:

Figure 3
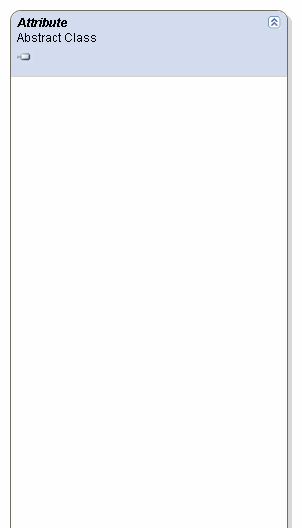
However, since the "viewport" of the image is not wider than 250 pixels, what you actually see is this:

Figure 4
This header then serves as the actual header of the diagram. In later steps, the name of the class and an optional base class is positioned on top of this header.
The two header images (and all the other images used in this application) are embedded in the application (by setting their Build Action to Embedded Resource) and then read with the following code:
Bitmap headerLeft = new Bitmap(Assembly.GetExecutingAssembly().GetManifestResourceStream(
		        "Spaanjaars.GenerateClassDiagrams.Images.HeaderLeft.png"));

Bitmap headerRight = new Bitmap(Assembly.GetExecutingAssembly().GetManifestResourceStream(
                 "Spaanjaars.GenerateClassDiagrams.Images.HeaderRight.png"));
They are then drawn on the canvas like this:
myGraphics.DrawImage(headerLeft, 0, 0);
myGraphics.DrawImage(headerRight, maxWidthRounded - 28, 0);
Once the header images are drawn, the class name is drawn like this:
myGraphics.DrawString(myType.Name, myHeaderFont, myBrush, 5, 5);
myGraphics.DrawString("Class", myFont, myBrush, 5, 20);
myGraphics.DrawImage(inheritanceArrow, 7, 43);
myGraphics.DrawString(myType.BaseType.Name, myFont, myBrush, 21, 40);
Similar code is used to draw the class name in an italic font in case the class is marked as abstract.
Fill the entire image down with a border on the left and right
Again, quite cheesy, but it does the job. Using a loop I paint a left and a right border on the image, knowing I can crop the lower part that I don't need later:
int y = 67; // start off-set from the top
for (int i = 0; i < 50; i++)
{
  myGraphics.DrawImage(middleLeft, 0, y);
  myGraphics.DrawImage(middleRight, maxWidthRounded - 28, y);
  y += 16;
}
If you would save the image at this stage, it would look like this:

Figure 5
Draw the Properties header
In order to display the Properties header bar, I first fill a rectangle with a solid color and then "paste" the properties image on top of it:
myGraphics.FillRectangle(headerBarBrush, 2, y, maxWidthRounded - 7, 23);
myGraphics.DrawImage(propsBar, 2, y);
Draw each property name together with an icon
For this to work, I simply loop through the array of properties, and draw the Properties icon and its name like this:
foreach (PropertyInfo pi in properties)
{
  myGraphics.DrawImage(propertyIcon, 20, y);
  myGraphics.DrawString(pi.Name, myFont, myBrush, x, y);
}
If you look in the full source code you'll see I am also keeping track of the getter and setter methods for each property. I use these names later again to filter out methods in the Methods list that are actually property getter and setter methods.
Draw the Methods header
This is identical to the Properties header; only the methodsBar image is drawn instead of the propsbar image.
Draw each method and constructor together with an icon
Again, this is pretty similar to drawing the properties, except that I am filtering method names that are actually getters and setters:
if (!propertyNames.Contains(mi.Name))
{
  // Draw icon and method name here
  ...
}
Additionally, this code uses a LINQ query to determine the number of overloads for each method and constructor so the image reflects the actual number of overloads.
Draw the footer images
This is identical to how the header images are drawn: there's a large FooterLeft and a small FooterRight positioned at the right location so they end up as a nice, rounded border around the class diagram.
Crop the image to its total height
While displaying each header, property, method or constructor I kept track of the Y location of each item. In the end, I know that Y + something (the footer and some margin) is the actual height of the image. That allows me to crop the image in the end to the final height. Without cropping the image would look like this:

Figure 6
Cropping is pretty easy: just create a new Bitmap with the desired size and then use DrawImage to paint the cropped region in this new area:
Bitmap myBitmapCropped = new Bitmap(maxWidthRounded, y + 18);
myGraphics = Graphics.FromImage(myBitmapCropped);
myGraphics.DrawImage(myTargetBitmap, new Rectangle(
               0, 0, myBitmapCropped.Width, myBitmapCropped.Height), 0, 0,
               maxWidthRounded, y + 18, GraphicsUnit.Pixel);
Save the image to disk
The final step is saving the image to disk which is a single-line operation using the Save method of the Graphics object:
myBitmapCropped.Save(fileName, imageFormat);
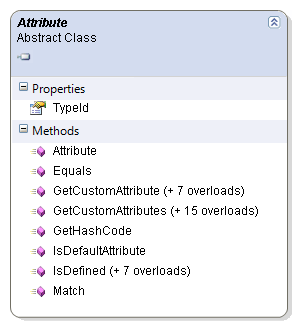
If you open the image in an image editing program, you should see the following Class Diagram:

Figure 7
Conclusion
Creating class diagrams is not too difficult using some reflection and GDI+. Obviously, this is a very simple sample and requires a lot more thought and attention to be used in anything larger or more serious than a throw-away application (which is what I used it for initially). However, the article shows concepts that can be used as-is in other type of diagram-generating software.
While this article discusses most of the important code of the sample application, you're encouraged to check out the full source code that comes with this article. The code is reasonably well documented and should be easy to follow.
Download Files
Where to Next?
Wonder where to go next? You can read existing comments below or you can post a comment yourself on this article.
Links in this Document
| Doc ID | 501 |
| Full URL | https://imar.spaanjaars.com/501/automatically-generating-class-diagrams-from-a-type-using-reflection |
| Short cut | https://imar.spaanjaars.com/501/ |
| Written by | Imar Spaanjaars |
| Date Posted | 09/20/2009 18:17 |
Talk Back! Comment on Imar.Spaanjaars.Com
I am interested in what you have to say about this article. Feel free to post any comments, remarks or questions you may have about this article. The Talk Back feature is not meant for technical questions that are not directly related to this article. So, a post like "Hey, can you tell me how I can upload files to a MySQL database in PHP?" is likely to be removed. Also spam and unrealistic job offers will be deleted immediately.
When you post a comment, you have to provide your name and the comment. Your e-mail address is optional and you only need to provide it if you want me to contact you. It will not be displayed along with your comment. I got sick and tired of the comment spam I was receiving, so I have protected this page with a simple calculation exercise. This means that if you want to leave a comment, you'll need to complete the calculation before you hit the Post Comment button.
If you want to object to a comment made by another visitor, be sure to contact me and I'll look into it ASAP. Don't forget to mention the page link, or the Doc ID of the document.