Building Smarter User Controls
User Controls are very common in today's ASP.NET websites, both in version 1.x as in version 2.0. Many sites use them to reuse content, like a menu, a header or a footer or even for partial page content, like a shop's product catalog.
However, User Controls can be used for more than simply displaying static, repeating content. With a bit of knowledge about how User Controls work, you can teach them a few tricks. By adding public properties to a User Control, they become much more powerful and easier to reuse.
In this article I'll show you how to build a User Control that displays information about an article, like a news item, similar to the Details section that you find at the top of most pages in my site.
Although I am using Visual Studio 2005 and ASP.NET 2.0 in this article, the same principles and code work for Visual Studio .NET 2002 / 2003 and ASP.NET 1.x as well.
Introduction
Before I show you how to build such a control, let's briefly consider the current functionality of the control. On each page on my website, you see one or more "Infopanels" in the left-hand bar. For the page you're viewing right now, the first Infopanel looks similar to this (note that the Modified date and Page views may be slightly different):
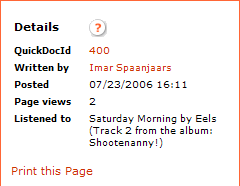
Figure 1 - The Article Details User Control
This info panel shows a number of properties of the article, like my name, the article's QuickDocId and the number of times it has been viewed. Instead of hard coding the Infopanel in a page, it has been wrapped inside a User Control called ArticleDetails. This User Control exposes public properties that allows you to set the values for the article properties like the author's name. These properties are then used to build up the control. You'll see how this works later.
When you design such functionality for your own site, you may be tempted to create this panel in the main page directly. After all, the content for the panel is closely related to the main page you're working with. However, abstracting the functionality away to a separate User Control is a good idea for the following reasons:
- It's much easier to reuse the code in a different page that has similar behavior.
- It's easier to focus on the functionality of the control, because it's not mixed with the host page's content.
- It's easier to change the appearance of the Infopanel; you only need to modify it at one location, instead of skimming through all the pages that display this Info panel.
In the next section, I'll walk you through creating the control and giving it some external properties that are used to fill the labels for QuickDocId, Written by and so on.
Creating the Control Outline
- You should start by adding a new User Control to your website. To do this, right-click your website in Visual Web Developer and choose Add New Item. In the dialog that follows, click Web User Control, name the control ArticleDetails in the Name box and click Add. It doesn't matter what language you choose. Both VB.NET as C# will work fine.
- Switch to Design View and add an HTML table with 6 rows and two columns.
- Add labels to the first column of the table and set their text according to the labels in Figure 1; e.g. Details, Quick Doc Id, Written by and so on.
- Add labels to rows 2 through 6 of the second column, and give them useful names like lblQuickDocId, lblWrittenBy and so on and clear their Text property. You should end up with something like this:
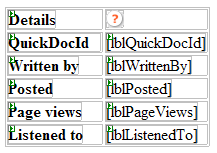
Figure 2 - The Article Details User Control in Design View in VWD
The next step is adding public properties to the control, so the contents of these labels can be filled with the values of these properties. Since every public property needs a private backing variable, you should start off with creating those and then let the refactoring functionality of Visual Studio create the properties for you. (Note, Refactoring is only available for C# and only then in a limited form in Visual Web Developer. For VB.NET, you can use the free Refactor! from Developer Express. Don't worry if you don't have a refactoring menu in Visual Studio; you can always type the code manually.)
- To add the backing variables, switch to the Code View window of the ArticleDetails control and add the following highlighted lines to the class declaration:
C#
public partial class ArticleDetails : System.Web.UI.UserControl
{
private string quickDocId = String.Empty; private string writtenBy = String.Empty; private DateTime posted = DateTime.MinValue; private int pageViews = 0; private string listenedTo = String.Empty;
  protected void Page_Load(object sender, EventArgs e)
  {

  }
}
VB.NET
Partial Class ArticleDetails
  Inherits System.Web.UI.UserControl
  Private _quickDocId As String = String.Empty
  Private _writtenBy As String = String.Empty
  Private _posted As DateTime = DateTime.MinValue
  Private _pageViews As Integer = 0
  Private _listenedTo As String = String.Empty
End Class - Next, when you are using C#, click the variable quickDocId in the code editor and choose Encapsulate Field from the Refactor menu in Visual Studio. You'll be offered to create a property called QuickDocId which is exactly what you want, so you can click OK and then Apply. You'll end up with the following property code:
private string quickDocId = String.Empty;
public string QuickDocId { get { return quickDocId; } set { quickDocId = value; } } - If you are using Visual Basic. you'll need to use the Refactor! plug in, or manually create the property. If you type the code manually, simply type the word property in the text editor and then press Tab. (Sometime you need to press it twice). Visual Studio will add the boiler plate code for a property for you so all you have to do is fill in the blanks. Whatever method you choose, you should end up with code like this:
Private _quickDocId As String
Public Property QuickDocId() As String Get Return _quickDocId End Get Set(ByVal value As String) _quickDocId = value End Set End Property - Repeat steps two and three for each of the private fields. Make sure you create a DateTime and an int (Integer in Visual Basic) property for the Posted and PageViews properties respectively.
The final step you need to perform in the control is to assign the value of these properties to the labels in the markup at run-time. An ideal location for this is inside the Load event of the page. Add the following to the code behind of the page:
C#
protected void Page_Load(object sender, EventArgs e)
{

  lblQuickDocId.Text = quickDocId;
  lblWrittenBy.Text = writtenBy;
  lblPosted.Text = posted.ToString();
  lblPageViews.Text = pageViews.ToString();
  lblListenedTo.Text = listenedTo;

}

VB.NET
Protected Sub Page_Load(ByVal sender As Object, _
      ByVal e As System.EventArgs) Handles Me.Load

	lblQuickDocId.Text = _quickDocId
	lblWrittenBy.Text = _writtenBy
	lblPosted.Text = _posted.ToString()
	lblPageViews.Text = _pageViews.ToString()
	lblListenedTo.Text = _listenedTo

End Sub
This code fills in the various labels defined in the markup when the control is loaded at run-time.
The last step in the process is to create an ASPX page that hosts the control and sets its properties.
- Add a new page to your web project and call it Article.aspx.
- Switch to Design View and then drag the control ArticleDetails.ascx from the Solution Explorer onto the page. You'll end up with something like this:
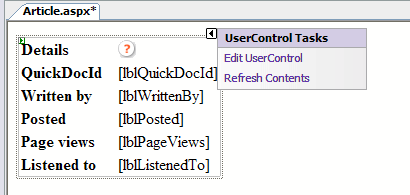
Figure 3 - The User Control ArticleDetails on the host pageWith the User Control on the page, you have three different ways to influence the properties of the ArticleDetails control: directly in the HTML markup, through the control's Property Grid or programmatically in the code behind of the page. Figure 4 shows how the Code Editor is able to display Intelli Sense for the custom properties:
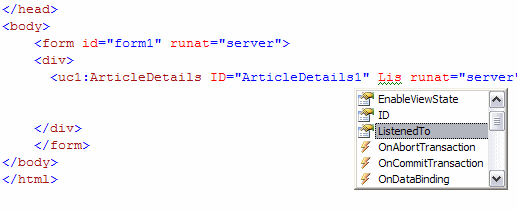
Figure 4 - Intelli Sense Popping Up for the ListenedTo Property of the User Control
Figure 5 shows the Property Grid for the control, with a few properties set: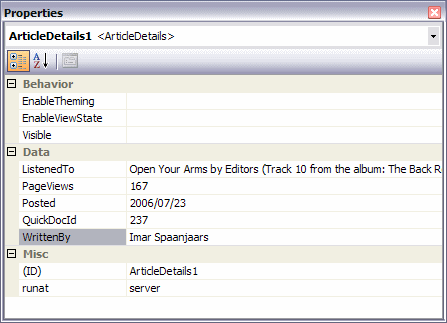
Figure 5 - The Property Grid for the ArticleDetails Control
You can see that the properties are listed under the Data category in the Property Grid. You can assign properties to existing categories (like Behavior and Data) or to new ones you invent yourself by adding a Category attribute to the property, like this:To make this work, you'll need to add a using or Imports statement for the System.ComponentModel namespace.C#
[ Category("Data") ] public string ListenedTo { get { return listenedTo; } set { listenedTo = value; } } VB.NET
<Category("Data")> _ Public Property ListenedTo() As String Get Return _listenedTo End Get Set(ByVal value As String) _listenedTo = value End Set End Property -
Instead of hard-coding the values in the markup of the page, you'll often find yourself setting these kind of properties programmatically at run-time. For instance, you could have a News business object that exposes the relevant properties. The following code snippet shows how you can set the properties at run-time:
C# protected void Page_Load(object sender, EventArgs e) {
ArticleDetails1.QuickDocId = "167"; ArticleDetails1.WrittenBy = "Imar Spaanjaars"; ArticleDetails1.Posted = new DateTime(2006, 7, 23); ArticleDetails1.PageViews = 231; ArticleDetails1.ListenedTo = "Open Your Arms by Editors (Track 10 from the album: The Back Room)";
} VB.NET Protected Sub Page_Load(ByVal sender As Object, _ ByVal e As System.EventArgs) Handles Me.Load ArticleDetails1.QuickDocId = "167" ArticleDetails1.WrittenBy = "Imar Spaanjaars" ArticleDetails1.Posted = new DateTime(2006, 7, 23) ArticleDetails1.PageViews = 231 ArticleDetails1.ListenedTo = "Open Your Arms " & _ "by Editors (Track 10 from the album: The Back Room)" End Sub - When you now save the page and and view it in your browser by pressing Ctrl+F5, you'll see the Article page appear, with the proper values displayed in the ArticleDetails control:
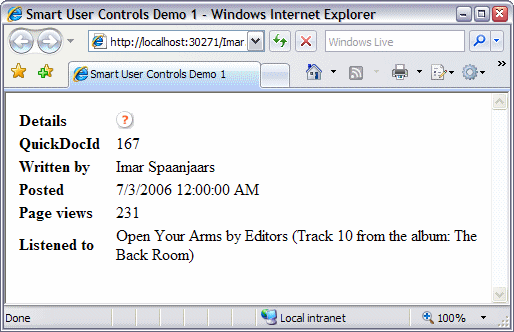
Figure 6 - The ASPX Page with the Contents of the User Control
Summary
As you have seen, building User Controls that can be influenced at run-time is pretty easy. All you need to do is add a number of publicly accessible properties to the User Control in its Code Behind file. These properties then automatically become available in the page hosting the User Control so you can set them declaratively or programmatically.
Download Files
Source Code for this Article http://Imar.Spaanjaars.Com/Downloads/Articles/SmartUserControls/SmartUserControls1.zipWhere to Next?
Wonder where to go next? You can post a comment on this article.
Links in this Document
| Doc ID | 400 |
| Full URL | https://imar.spaanjaars.com/400/building-smarter-user-controls |
| Short cut | https://imar.spaanjaars.com/400/ |
| Written by | Imar Spaanjaars |
| Date Posted | 07/23/2006 16:11 |
| Listened to when writing | Saturday Morning by Eels (Track 2 from the album: Shootenanny!) |
Comments
Talk Back! Comment on Imar.Spaanjaars.Com
I am interested in what you have to say about this article. Feel free to post any comments, remarks or questions you may have about this article. The Talk Back feature is not meant for technical questions that are not directly related to this article. So, a post like "Hey, can you tell me how I can upload files to a MySQL database in PHP?" is likely to be removed. Also spam and unrealistic job offers will be deleted immediately.
When you post a comment, you have to provide your name and the comment. Your e-mail address is optional and you only need to provide it if you want me to contact you. It will not be displayed along with your comment. I got sick and tired of the comment spam I was receiving, so I have protected this page with a simple calculation exercise. This means that if you want to leave a comment, you'll need to complete the calculation before you hit the Post Comment button.
If you want to object to a comment made by another visitor, be sure to contact me and I'll look into it ASAP. Don't forget to mention the page link, or the Doc ID of the document.