How Do I Fix ASP 80004005 errors?
When you're working with ASP or ASP.NET applications and a Microsoft Access database, you're likely to run into an error like this:
The Microsoft Jet database engine cannot open the file 'C:\Inetpub\wwwroot\YourSite\Databases\YourDatabase.mdb'. It is already opened exclusively by another user, or you need permission to view its data.
/YourSite/YourDataAccessPage.asp, line 15
Alternatively, you may get this error instead:
Operation must use an updateable query.
/YourSite/YourDataAccessPage.asp, line 15
Both errors basically mean the same: the account that your Web server is running under does not have the necessary permissions to read from or write to the database.
This article will explain the steps you need to perform to fix this problem. First I will explain how you can find out the current account that the Web server is using to connect to the database. In the second part of the article I'll explain how to change the security settings so the Web server can successfully access the database.
Prerequisites
This article will explain the steps you need to perform on Windows XP Professional. This OS comes with IIS 5.1. as the Web server. For other versions of Windows, like Windows 2000 or Windows Server 2003, the steps will roughly be the same, although the screens may look a little different and the account you need to configure may be different as well. The article also assumes that the hard disk where your Web site resides is formatted with NTFS. If you're using FAT or FAT32 this article does not apply, because these file systems don't support changing the security settings.
Find Out the Account that IIS Runs Under
Before you can change the security settings for your database, it's important to find out which account your Web server, IIS, is running under. By default, for a Web site that allows anonymous access and is running "classic ASP", this account is called IUSR_MachineName where MachineName is the name of your computer. However, when you are using a security mechanism in IIS other than Anonymous Access, you manually changed the account that IIS uses or you're running your Web site "Out Of Process", you're likely to encounter another user account. Also note that when you're running ASP.NET, the account is different as well. Refer to the FAQ that is listed below the following table for more info.
The following table lists the possible user accounts that IIS is using in various scenario's:
| Scenario | Account Used |
| The Web site or Virtual Directory / Application is configured for Anonymous Access |
IUSR_MachineName |
| The Web site or Virtual Directory / Application is configured for Anonymous Access, but runs out of process (The Application Protection is set to High in the Home Directory or Virtual Directory tab of your Web application) |
IWAM_MachineName |
| The Web site or Virtual Directory / Application is configured for Basic Authentication or Integrated Windows Authentication |
The account you used to log on to your Web application |
| The Web site or Virtual Directory / Application is configured for Anonymous Access, but you manually changed the account used for anonymous access |
The account you specified |
For a detailed examination of the actual account used by the web server in ASP and ASP.NET check out the FAQ: How Do I Determine the Security Account that IIS Uses to Run My Web Site?
To find out how your system is configured, follow these steps:
- Start the Internet Information Services management console, which you'll find the under Administrative Tools which in turn you'll find either directly on the Start Menu, or in the Windows Control Panel.
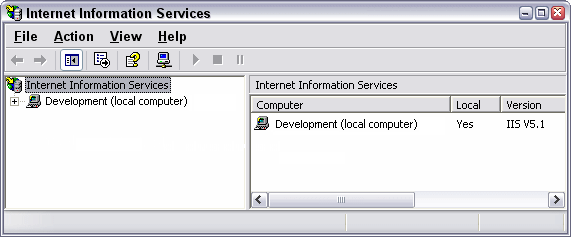
Figure 1 - The IIS Management Console - Expand the tree in the left hand pane until you see Default Web Site. If you're configuring another Web site, or a Virtual Directory / Application, locate that one instead. This article assumes you're configuring the Default Web Site, so make sure you adjust any steps to match your situation if necessary.
- Right-click the Default Web Site in the tree at the left and choose Properties.
- Open the Directory Security tab and then click the Edit... button in the Anonymous access and authentication control section of the dialog. You'll see a screen similar to this one appear:
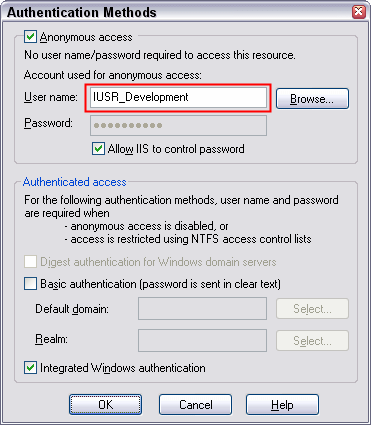
Figure 2 - The Authentication Methods dialog in IIS for the Default Web Site
If Anonymous access is checked (as in the screen shot above), the user name you see in the User name field is the account that IIS is using. If Anonymous access is not checked, and Basic and / or Integrated Windows authentication are checked, the account you use to log on to your Web site is used by IIS. Note that when Anonymous access is enabled, it doesn't really matter whether Basic and or Integrated authentication are checked as well; the account that IIS is using will still be the anonymous, or IUSR_MachineName, account for classic ASP and the ASPNET or Network Service account is used for ASP.NET. - Finally you have to check whether your site is running Out of Process. To do so, close the Authentication Methods dialog, and switch to the Home Directory tab on the Default Web Site Properties dialog:
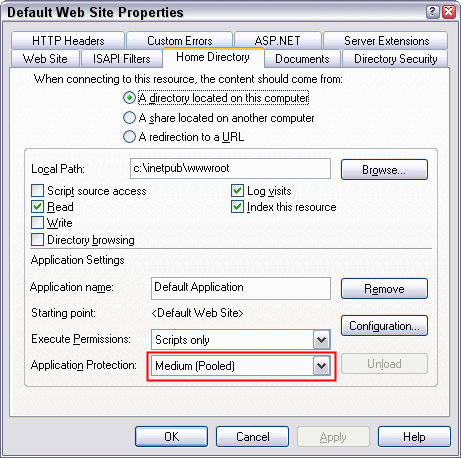
Figure 3 - The Home Directory tab of the Default Web site Properties dialog
If Application Protection is set to High (Isolated ) and you are using Anonymous Access, the account that IIS is using is the IWAM_MachineName account. In all other scenario's, IIS is using the account you determined in the previous step.
If you want to know the account that is used for an ASP.NET application read this FAQ. That article will explain the steps described above for both "classic" ASP as ASP.NET applications.
Changing the Security Settings
Now that you know which account is used to access your database, it's time to change the security permissions for this account. To be able to change the permissions, it's important that your system is set up to allow you to make these changes. You'll need to have a Security tab on the Properties dialog for a file or folder. By default, on a Windows XP computer that is not part of a network, this will not be the case, so you'll need to perform the following steps to make this tab visible:
- Open a Windows Explorer. To do that choose Start | Run..., type explorer and then hit enter.
- Choose Folder Options... from the Tools menu. Click the View tab and then scroll all the way down in the Advanced settings list. Make sure that Use simple file sharing (Recommended) is not checked.
Although Microsoft recommends enabling simple sharing, in this case you can't use it as it prevents you from making fine-grained security changes. Click OK to apply the changes and close the dialog. Keep the Explorer window open because you'll need it in the next step.
With all the preparation taken care off, it's now time to change the security settings for the folder where your Microsoft Access database is stored. It's important to change the permissions for the folder, and not for just the database file. At run time, the Access driver will create temporary lock files (with an .lck extension) to keep track of who is making changes to the database. Without the right permissions on the folder, these lock files cannot be created and the database access will fail. To change these settings, perform the following 5 steps:
- Locate the folder where your database resides in. It's often a good idea to store the database in a special folder outside the Web scope like C:\Databases. This way, you can make sure that at run-time the database can be accessed, while the users of your Web site cannot download the database by typing in an address like http://www.YourSite.Com/Databases/YourDatabase.mdb. This way your database is safe from prying eyes. The rest of the article assumes you have stored your database in C:\Databases. If you decide to store the database within the scope of your Web site, you'll have to take extra precautions to prevent the database from being downloaded.
- Right click the folder Databases, choose Properties and switch to the Security tab. You'll see a screen similar to this:
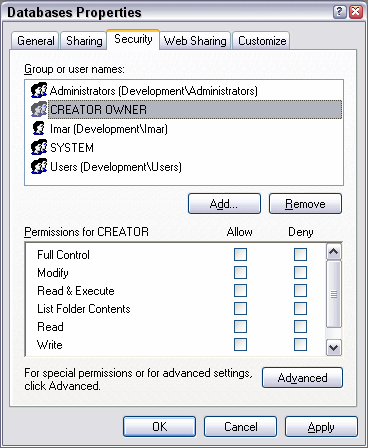
Figure 4 - The Security tab of the Properties dialog of the Databases folder
On this screen, you'll see various accounts and groups listed that have access to this folder. For example, you'll see that, among other accounts, both the group Administrators and the account Imar are listed. It's good practice to limit access to your Databases folder as much as possible by removing permissions you don't really need. Evaluate each name in the group or user names list, and determine whether they need access or not. Usually, I remove all user names, except for my own name, the Administrators group, the Creator Owner account and the System account. Before you start removing all permissions, it's a good idea to read a bit in the Windows Help system about the implications of changing the security settings. - Once you're done removing the user accounts you don't need, click the Add... button, and then type IUSR_MachineName in the text box at the bottom of the Select Users or Groups dialog. Don't forget to replace MachineName with the name of your computer:
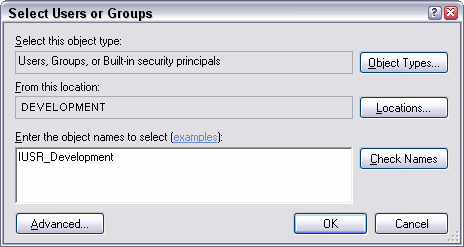
Figure 5 - The Select Users or Groups dialog allows you to add individual user accounts or groups - Once you click the OK button, the IUSR account will be listed in the Group or user names box as Internet Guest Account (MachineName\IUSR_MachineName). Click the account, and then make sure that the account has at least Read and Write permissions:
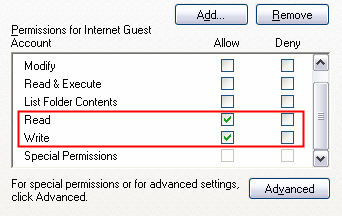
Figure 6 - The IUSR account needs at least Read and Write permissions
Depending on the requirements for your application, you may need to give other permissions as well. - Once you're done setting the individual security permissions for the Internet Guest Account, click the OK button to apply the changes to the folder and close the dialog.
Testing It Out
To test out whether the Web server can now successfully access and write to the database, it's best to create a page that performs a very simple INSERT or UPDATE statement. This way, you can focus on the security workings, so you're not bothered by the complexity of your application that may result in other errors.
- Create a new page and save it in the root of your Web site as TestDatabase.asp. Make sure the page has the skeleton required for a valid HTML page (the <html>, the <head> and <body> elements).
- Between the <body> tags, add the following ASP code:
<%
Dim MyConnection Dim MyConnectionString Dim MySQLStatement
MyConnectionString = "Provider=Microsoft.Jet.OLEDB.4.0;" & _ "Data Source=C:\Databases\WebSite.mdb;User Id=admin;Password="
MySQLStatement = "INSERT INTO Test (Description) Values('Test')"
Set MyConnection = Server.CreateObject("ADODB.Connection")
MyConnection.Open MyConnectionString MyConnection.Execute(MySQLStatement) MyConnection.Close()
Response.Write("Record inserted successfully")
Set MyConnection = Nothing %> - After you have saved the page, make sure you have a database called WebSite.mdb located in the folder C:\Databases. This database should have a table called Test which contains at least a column called Description. The database in the code download for this article matches those criteria, so you can just copy that file from the zip archive to C:\Databases. Alternatively, you can use your own database. In that case, make sure you adjust both the path to and the name of the database, and the SQL statement in MySQLStatement.
- Finally, request the page in your browser. You should get a message indicating that the record was inserted successfully.
If you get an ASP error instead, make sure you applied the security settings for the right account and for the right folder. Also, make sure you adjusted the connection string and the SQL statement in the code example.
Download Files
Where to Next?
Wonder where to go next? You can post a comment on this article.
Links in this Document
| Doc ID | 263 |
| Full URL | https://imar.spaanjaars.com/263/how-do-i-fix-asp-80004005-errors |
| Short cut | https://imar.spaanjaars.com/263/ |
| Written by | Imar Spaanjaars |
| Date Posted | 03/28/2004 21:56 |
| Date Last Updated | 12/07/2006 18:13 |
| Date Last Reviewed | 12/07/2006 18:13 |
| Listened to when writing | Tindersticks - Sweet Release from the album Can Our Love... |
Comments
Talk Back! Comment on Imar.Spaanjaars.Com
I am interested in what you have to say about this article. Feel free to post any comments, remarks or questions you may have about this article. The Talk Back feature is not meant for technical questions that are not directly related to this article. So, a post like "Hey, can you tell me how I can upload files to a MySQL database in PHP?" is likely to be removed. Also spam and unrealistic job offers will be deleted immediately.
When you post a comment, you have to provide your name and the comment. Your e-mail address is optional and you only need to provide it if you want me to contact you. It will not be displayed along with your comment. I got sick and tired of the comment spam I was receiving, so I have protected this page with a simple calculation exercise. This means that if you want to leave a comment, you'll need to complete the calculation before you hit the Post Comment button.
If you want to object to a comment made by another visitor, be sure to contact me and I'll look into it ASAP. Don't forget to mention the page link, or the Doc ID of the document.