Allowing Your Users to Sign Up for Your Site
However, with the current implementation of the login mechanism, you would have to add new users to the database directly. To do this, you'd need to download the database, add the user and then upload the database again. Fortunately, Dreamweaver has a few handy Server Behaviors that make adding a new user to the database very easy.
The first Server Behavior you need is the Insert Record behavior. This behavior will generate all the necessary HTML and ASP code to insert a new record in your database using an HTML form. In the book, a similar behavior, the Record Insertion Form Wizard was used to insert a new record in the Events table using an HTML page. Its counterpart, the Record Update Form Wizard behavior, took care of updating existing events in the database.
When you want to add a new user to your database, you're going to have one additional hurdle to take: you have to make sure that the new user you want to insert, is going to be unique. The column Name in the Users table is used to uniquely identify a user, so you can't allow duplicates. Once again, the developers of Dreamweaver has thought about this too, and created the second behavior you need for this task: the Check New Username behavior. This behavior checks in the database if the username you want to insert already exists. If it does, it won't allow the new user to be inserted.
To successfully allow your users to sign up for your site, you'll have to perform the following steps:
- Create a new HTML form that submits to itself
- Add fields for the username and password and a submit button to the form
- Add a Insert Record behavior that takes care of the database insert
- Add a Check New Username behavior to make sure you don't accidentally insert the same username twice.
The rest of this article assumes you have followed along with the Soccer Site project. If you don't own the book, don't worry. It'll be easy to follow along. You won't get the same screens because you don't have the templates used in this site, but everything will work as expected. If you want, you can even download the necessary file for this article. You do have to set up a connection to your database, though, because this article assumes you have a valid connection to a Microsoft Access database on the Databases panel in Dreamweaver.
Making Preparations for the Sign Up Page
The current database for TheSoccerSite has a little problem that hasn't come up in the 7 Chapters of the book Beginning Dreamweaver MX. The column Password in the Users table has in fact an illegal name. Microsoft Access allows a column to be called Password when you create it. This is not a problem for SELECT statements, as you have seen in the login page, but it will cause problems when you use INSERT or UPDATE statements through ADO. You'll see that when you pass the following SQL statement to the database, you'll get an error:
The column name Password is actually a reserved word, although it's not officially listed on the Reserved Words for Microsoft Access list. To fix this, you'll need to change the column Password to UserPassword in the database. If you have Microsoft Access installed, perform the following steps to change the database TheSoccerSite.mdb. If you have completed the Soccer Site project, you can use the database from the last chapter, as it contains all the tables you need. If you don't already have the database, you can download it together with the code for this tutorial at the bottom of this article. In that case, there is no need to change anything and you can skip the next three steps. The database in the code download is already up-to-date.
- Open the database TheSoccerSite.mdb by double-clicking it.
- If necessary, switch to the Tables tab, right-click the Users table and choose Design View. You'll see the following screen appear:

Figure 1 - Design View for an Access Table
-
Change the column name Password to UserPassword and then click the Save button on the toolbar.
- If you have completed the login.asp page for TheSoccerSite, you'll notice that the page now no longer runs, because the column name has changed. Fortunately, this can easily be fixed. Open login.asp and locate the code at the top of the page that takes care of the user validation, and change the two instances of Password in the SELECT statement and in the WHERE clause to UserPassword, as shown in the following code (note the changes in bold):
MM_rsUser.Source = "SELECT Name, UserPassword"
If MM_fldUserAuthorization <> "" Then MM_rsUser.Source = _
MM_rsUser.Source & "," & MM_fldUserAuthorization
MM_rsUser.Source = MM_rsUser.Source & _
" FROM Users WHERE Name='" & Replace(MM_valUsername,"'","''") & _
"' AND UserPassword='" & Replace(Request.Form("txtPassword"),"'","''") & "'"
MM_rsUser.CursorType = 0
By making these two changes, everything is back as it was. The login page will pass UserPassword as the password column to the database, which will now happily accept this as a valid column, so your users will be validated correctly.
Creating the Insert Form
With the database done, it's time to create a new page and then add the Insert Record form and behavior, to allow your users to sign up on your page.
-
Create a new page based on the main template for the site. Alternatively, just create a new Dynamic ASP VBScript page. Give the page a title of Sign Up for GlobalSoccerEvents.com in the Title region of the template and clear the other two placeholders. Save the page as createNewUser.asp in the root of your site.
- Make sure you're in Design view, place your cursor in the Content region of the template and then press Ctrl+~ to switch to Code view. Using Design view to position your cursor makes it easier to find the exact location of the Content region of the template in Code view.
- Choose Insert | Form | Form to open the Tag Editor dialog for a form. Fill in the dialog as in the next Figure and click OK when you're done:
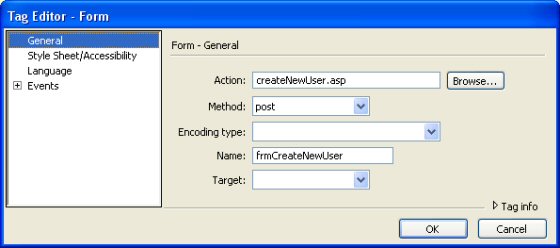
Figure 2 - The Tag Editor Dialog for the Form Tag
-
Add two text boxes to the form and name them txtUserName and txtPassword respectively. Set the type of the second text box to password.
-
Add a button to the form and set its type to submit, so it can be used to send the form to the server. Label the button Sign Up and name it btnSignUp.
-
Add labels in front of the text boxes, so your user will know what to type where.
- If you want, you can spend some time to enhance the looks of the form. For example, you can apply the class TextInput to the text boxes, so they get a thin border around them. You can also add graphics, change the layout of the page or apply other CSS styles to the form controls. For this example, I decided to keep the form pretty simple so it's easy to see what's going on. In the end, you should end up with something like this:
<table>
<tr>
<td><strong>Username</strong></td>
<td><input name="txtUserName" type="text"class="clsTextInput"
style="width:150px">
</td>
</tr>
<tr>
<td><strong>Password</strong></td>
<td><input name="txtPassword" type="password" class="clsTextInput"
style="width:150px">
</td>
</tr>
<tr>
<td> </td>
<td><input name="btnSignUp" type="submit" value="Sign Up"></td>
</tr>
</table>
<br>
<br>
</form>
Adding the Insert Record Behavior
Now that you have a complete HTML form, you're ready to add the Insert Record behavior. This behavior will generate the necessary ASP code to insert a new record in the Users table in the database.
-
Choose Insert | Application Objects | Insert Record | Insert Record.
-
Fill in the dialog as shown in the following Figure:
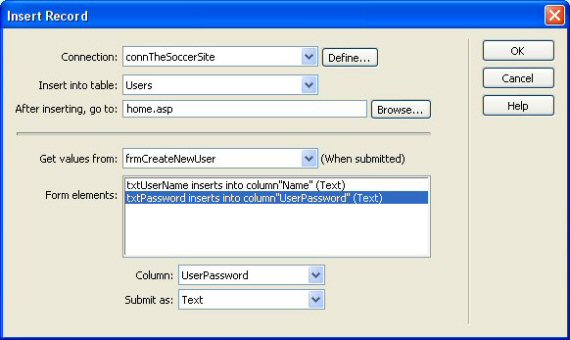
Figure 3 - The Insert Record Dialog
What's important in this dialog is that you select the right Column for the correct Form element. To do this, first select txtUserName in the Form elements list, and then choose Name from the Column drop-down. Repeat this step for the txtPassword field, but choose UserPassword instead. You can leave the Submit as: drop-down to Text for both text boxes. Instead of redirecting users to your home page (home.asp) you can also redirect them to a Thank You page where you can confirm the new account they just created.
Click OK to apply the behavior to the page.
- Save the page and open it in your browser. Type a username and password and then hit the Sign Up button. You'll be taken to the home page of your site.
- Open the page in your browser again, and add the same user with the same password again. If all went well, you'll end up with two identical users in your database. You'll see how to fix that in the next section of this article.
A Little Explanation
If you look at the code that Dreamweaver has generated for you, you may recognize it. In many respects, it's similar to the code that is used for the Record Insertion Form Wizard that was used to insert a new event in the database. The ASP code sets up a few variables that hold the column names in the database and the text boxes on your form. A SQL statement is created that retrieves the value for each column from the form fields. Once the entire SQL statement is complete, it is send to the database by using the Execute method of the ADODB Command object.
The current Sign Up form has a few problems. First of all, it is still possible to insert two users with the same username, something you shouldn't allow in your Web site. Second, when the user is inserted, it has no Access Level yet. Not only is this inconvenient, it's also problematic when it comes to security. An empty access level will pass the access check for levels like Administrators or Members. Take a look at the following code that performs an Access Level check and see how this is possible:
' User is allowed to enter
Else
' User is denied access
End If
The previous If statement will return True when UserRole contains "Administrators". However, it will also return True when UserRole is an empty string, which will be the case when no access level has been assigned to the user. Whoooops....
To fix this security hole, you have three options:
-
Add a hidden form field with a default value of "Members" to your form. This allows you to map this field to the column AccessLevel in your database. You shouldn't use this method, however. In terms of security, it's about as bad as not assigning an access level at all. Malicious users can easily create their own HTML form, replace Members with Administrators and voila, instant access to the Admin section of your site. Not a comforting thought.
-
The second method is pretty effective, and also quite easy: just change the Default Value of the column AccessLevel to Members in your database. This way, any new record you insert will automatically have Members as the access level. To do this, open the Design View of the Users table in your Access database and type Members in the Default Value field for the AccessLevel column.
- Change the SQL statement right before it is sent to the database. You'll need to append the column name (AccessLevel) to the MM_tableValues variable, and the hard-coded text Member to the variable MM_dbValues.
Although the second method is really easy to implement and pretty secure, I'll discuss the third method in a bit more detail. It's not always possible to let the database decide the default value for new columns; you'll often need to append data like a date or some other value based on the current day, a login account, an order or any other business logic decision you may have to make. In the next steps, I'll show you how you can add the AccessLevel column to the SQL statement, so your users will be assigned a level of Members by default.
Adding the AccessLevel Column
- Locate the code that concatenates the table name, the column names and the column values, right before the SQL statement is sent to the database:
MM_dbValues = MM_dbValues & MM_formVal
Next
MM_editQuery = "insert into " & MM_editTable & " (" & _
MM_tableValues & ") values (" & MM_dbValues & ")"
If (Not MM_abortEdit) Then
' execute the insert
- Right before the line that starts with MM_editQuery, add the following two shaded lines of code:
MM_dbValues = MM_dbValues & MM_formVal
Next
MM_dbValues = MM_dbValues & ", 'Members'"
MM_tableValues & ") values (" & MM_dbValues & ")"
If (Not MM_abortEdit) Then
' execute the insert
- That's all that's necessary to have the SQL statement insert a default value for the AccessLevel column. To see if it works, save the page and open it in your browser. Type a new username and a password, and hit the Sign Up button. Open the database in Microsoft Access and then double-click the table Users. You'll see that the record you just inserted now has Members as the AccessLevel:
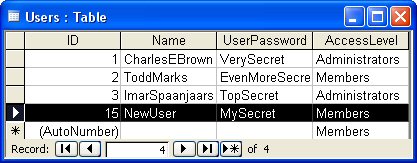
Figure 4 - The Users Table in the Database
A Little Explanation
Without the two lines of code you added, the variables MM_tableValues and MM_dbValues could contain something like this when you submit the form:
MM_tableValues = Name, UserPassword
MM_dbValues = 'NewUser', 'MySecret'
By appending these values to the rest of the SQL statement, you end up with a complete and valid SQL string. However, before you sent the string to the database, you added ", AccessLevel" to MM_tableValues and ", 'Members'" (including the ' characters) to MM_dbValues. This way, the entire SQL statement ended up like this:
VALUES('NewUser', 'MySecret', 'Members')
which eventually added Members as the AccessLevel for the new users in the database.
With the Access Level done, there is still one improvement to make to this page; you'll need to prevent two users from registering with the same name. The Check New Username behavior that Dreamweaver supplies makes this very easy. The next steps will show you how to apply this behavior.
Preventing Duplicate Usernames from Appearing in Your Database
- Make sure you have the page createNewUser.asp open and then choose Insert | Application Objects | User Authentication | Check New Username. Fill in the dialog as shown in this Figure and click OK:
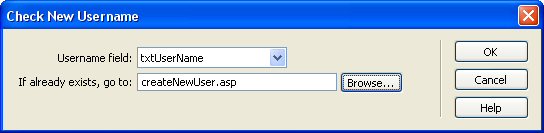
Figure 5 - The Check New Username Behavior
- When the username is already taken, Dreamweaver will redirect to the page you specify in the If already exists, go to field. In this example, this is the Sign Up page itself. This makes it easy to present your user with an error message stating that the username is already taken, while they stay on the Sign Up page. All they need to do is type a new username, retype their password and click the Sign Up button again. To show the error message, add the following shaded lines of code right before the <form> tag:
If Len(Request.QueryString("requsername")) > 0 Then
Response.Write("<br><br><span class=""clsErrorMessage"">" & _
"The username " & Request.QueryString("requsername") & _
" has already been taken. Please choose a different username.</span>")
End If
%>
<table>
- Save the page and open it in your browser. Try to add the same user you added earlier. Instead of getting the homepage, you'll now get an error message stating that the requested username has already been taken:
Figure 6 - The Sign Up Page in the Browser Showing the Duplicate Username Errormessage
A Little Explanation
To see what makes this magic happen, let's take a look at the code that Dreamweaver has inserted for you:
' *** Redirect if username exists
MM_flag="MM_insert"
If (CStr(Request(MM_flag)) <> "") Then
MM_dupKeyRedirect="createNewUser.asp"
MM_rsKeyConnection=MM_connTheSoccerSite_STRING
MM_dupKeyUsernameValue = CStr(Request.Form("txtUserName"))
MM_dupKeySQL="SELECT Name FROM Users WHERE Name='" & _
MM_dupKeyUsernameValue & "'"
This block of code first checks if the form has been submitted to the server. If it has, MM_flag will have a value (it's retrieved from a hidden form field, MM_insert). Then the page that the user is redirected to if they try to claim a name that has already been taken is set up, followed by the connectionstring used for the database lookup. In the last line of this block, a SQL statement is created that will simply perform a SELECT on the Users table to find out if the name is already in use by passing the username from the form to the WHERE clause.
The next block of code creates and initializes an ADODB Recordset object:
set MM_rsKey=Server.CreateObject(MM_adodbRecordset)
MM_rsKey.ActiveConnection=MM_rsKeyConnection
MM_rsKey.Source=MM_dupKeySQL
MM_rsKey.CursorType=0
MM_rsKey.CursorLocation=2
MM_rsKey.LockType=3
MM_rsKey.Open
The ActiveConnection is set to MM_rsKeyConnection, that points to the database used for this example. Once the Recordset is set up, it is opened using the Open method.
' the username was found - can not add the requested username
MM_qsChar = "?"
If (InStr(1,MM_dupKeyRedirect,"?") >= 1) Then MM_qsChar = "&"
MM_dupKeyRedirect = MM_dupKeyRedirect & MM_qsChar & "requsername=" & _
MM_dupKeyUsernameValue
Response.Redirect(MM_dupKeyRedirect)
With the Recordset open, the code checks if the the recordset contains the requested username. If it does, the EOF property of the Recordset will be False, so the code in the If block will run. Inside that block, the redirect string is created. The name of the page you want to redirect to is extended with a QueryString name/value pair. requsername is passed as the name and the requested username is passed as the value. This allows you to see what name was initially requested when you display the error message.
MM_rsKey.Close
End If
%>
If the username was not found, the page will continue after the End If statement, so the code for the Insert Record will fire normally, adding the user to the database.
The last part that needs some explanation is the error message:
If Len(Request.QueryString("requsername")) > 0 Then
Response.Write("<br><br><span class=""clsErrorMessage"">" & _
"The username " & Request.QueryString("requsername") & _
" has already been taken. Please choose a different username.</span>")
End If
%>
If the username was already taken, requsername will have a value, so the code in the If block will run. An error message is displayed onscreen, indicating that the requested username has already been taken.
Summary
With the Check New Username in place, you have a fully functional Sign Up page. Users can simply add their username and password and get immediate access to the restricted sections of your site. The Check New Username behavior will make sure that you don't end up with two members sharing the same username, so you're always able to uniquely identify your members. The additional code you added to the Insert Record behavior ensures that your new members are assigned the AccessLevel of Members by default. If you want to assign them a different level, you'll need to modify the code, or change the level in the database directly.
Possible Extensions to the Sign Up Page
This article has just shown you the basic steps you need to perform to have a user sign up at your Web site. However, there are quite a lot of extensions possible you can add to this page:
- Add a link to createNewUser.asp on the login page. This way, new users can easily access the Sign Up page.
- If you require more information from your user, add additional fields (like e-mail address, full name etc to your database and your HTML form. You'll need to update the Insert Record behavior so the new fields are passed to the database correctly.
- As a service to the user, you can add the username back to the text box if their username has already been taken. This makes it easier for them to choose a new name, by appending a sequential number for example. All you need to do is add <%=Request.QueryString("requsername")%> to the value attribute of the txtUserName text box.
- Right now, the user can insert anything they like for a name or password, or even leave all fields empty. You could add some JavaScript with regular expressions that checks the username and password for a specific pattern so you can force your user to submit valid data. Don't forget to perform the same validation on the server, because it's easy for a determined visitor to circumvent the JavaScript validation.
Works With
- Macromedia Dreamweaver MX
- Macromedia Dreamweaver MX 2004
References
Download Files
Where to Next?
Wonder where to go next? You can post a comment on this article.
Links in this Document
| Doc ID | 209 |
| Full URL | https://imar.spaanjaars.com/209/allowing-your-users-to-sign-up-for-your-site |
| Short cut | https://imar.spaanjaars.com/209/ |
| Written by | Imar Spaanjaars |
| Date Posted | 11/01/2003 11:58 |
| Date Last Reviewed | 12/07/2006 19:06 |
Comments
Talk Back! Comment on Imar.Spaanjaars.Com
I am interested in what you have to say about this article. Feel free to post any comments, remarks or questions you may have about this article. The Talk Back feature is not meant for technical questions that are not directly related to this article. So, a post like "Hey, can you tell me how I can upload files to a MySQL database in PHP?" is likely to be removed. Also spam and unrealistic job offers will be deleted immediately.
When you post a comment, you have to provide your name and the comment. Your e-mail address is optional and you only need to provide it if you want me to contact you. It will not be displayed along with your comment. I got sick and tired of the comment spam I was receiving, so I have protected this page with a simple calculation exercise. This means that if you want to leave a comment, you'll need to complete the calculation before you hit the Post Comment button.
If you want to object to a comment made by another visitor, be sure to contact me and I'll look into it ASAP. Don't forget to mention the page link, or the Doc ID of the document.