Building Layered Web Applications with Microsoft ASP.NET 2.0 - Part 3
NOTE: the concepts presented in this article are now considered obsolete possibly because better alternatives are available.
Update!! - I have written a new series on N-Layer design targeting ASP.NET 4.5 and Entity Framework 5. You can check out the new series here.
Update!! 12-24-2008 - I have written a new series on N-Layer design as a major follow up to this one. It builds on the foundation created in this first series, but digs much deeper into concepts like Validation, Sorting, Paging, Concurrency and Security. You can check out the new series here.
Update!! 04-25-2007 - There is now also a VB.NET version of the code available for download. You find the download at the end of this article. For more information about the translation, check out this blog post.
This is part three of the article series "Building Layered Web Applications" that shows you how to build N-Layer applications with Microsoft ASP.NET 2.0. These articles teach you how to design, build and use custom business objects in your web application. The target audience for this series are developers that are ready to make the switch from using SqlDataSource controls to ObjectDataSource controls with custom business objects. Experience with ASP.NET 2 and C# is necessary while some knowledge about object oriented design certainly helps.
Part one dealt with the design of the application: what business objects do you need to fulfill the requirements of the application. What should these objects be capable of and how do they look. How do these business objects interact with other parts of the system? Part two showed you how to code the classes that were designed in part one. You saw how to implement the data access methods and database code and how the various classes were able to work together. You also saw how to use the API to programmatically create contact persons and their contact data and save those in a database. However, writing explicit code to work with your business objects isn't always fun, and can be a cumbersome task.
Therefore, this article (part three) deals with using the business objects in a web application. You'll see how to use the ASP.NET controls like the GridView in conjunction with the business objects. You'll see how you can build pages that allow you to list, create, edit and delete your contact persons and their contact data, like e-mail addresses and phone numbers.
If you haven't read part one or two yet, you should really read them first, as this article uses many concepts that have been explained in part one and two. The entire series (including this current article) can be found here:
- Building Layered Web Applications with Microsoft ASP.NET 2.0 - Part 1
- Building Layered Web Applications with Microsoft ASP.NET 2.0 - Part 2
- Building Layered Web Applications with Microsoft ASP.NET 2.0 - Part 3
The article uses a SQL Server 2005 Express database which is easy to use in development scenarios. However, the downloads for this series also come with the T-SQL scripts to recreate the database in SQL Server 2000 or SQL Server 2005. You'll find the download link at the end of this article. Besides the forementioned SQL scripts and database, the download also contains the full source for the demo application in C#.
Introduction
Before we dig into the code for the web site, let's briefly recap the application's design I showed you in the two previous articles. The following figure shows the four main components of the application:
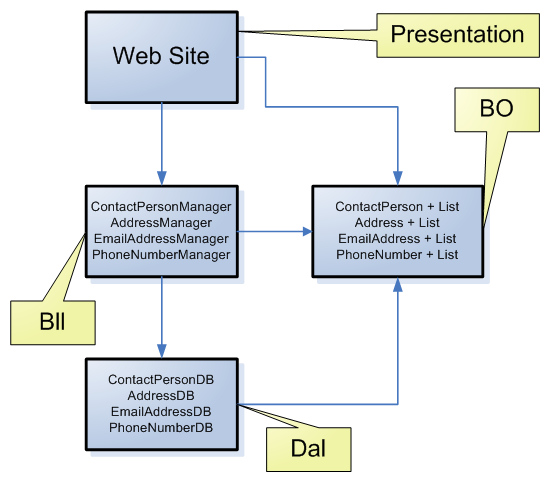
Figure 1 - The Four Main Components of the Contact Person Manager Application
Business Objects (BO)
First, there are a number of business objects that live in the Spaanjaars.ContactManager.BO namespace, indicated by the rectangle on the right. The classes used for these objects are the ContactPerson, the Address, the EmailAddress and the PhoneNumber. They don't have any behavior, and can therefore be considered as "dumb" objects. All they can do, is hold and expose data through their public properties. Additionally, each BO object has a List counterpart, like ContactPersonList, EmailAddressList and so on. These lists inherit from a generics list, like List<ContactPerson> and are used to hold collections of the business objects.
Each of the other three components of the application has a reference to the objects in the Business Objects layer. This means that the web site can consume objects like ContactPerson that are returned from the business layer that in turn got them from the data access layer.
Business Logic Layer (Bll)
In the middle of the diagram, you see the Business Logic Layer; the bridge between the web site and the data access layer. The Bll gets instructions from the presentation layer (the web site in this example), to carry out tasks, like retrieving items from the data layer, or sending changed objects back into this layer. Additionally, it can perform tasks like enforcing security and carrying out validation, as you saw in part two of this article series.
Data Access Layer (Dal)
The data access layer contains the code that directly interacts with the data source, a SQL Server database in the case of the Contact Person Manager application but this could be any other kind of data source, like text or XML files, Access, Oracle, DB2 databases and any other data source you can come up with.
Presentation Layer
At the top of the diagram, you see the Web Site, the presentation layer of this application. It's the web site and the pages and code it contains that is the main subject of this article, as you have already seen the other three parts in the previous two articles.
Building the Web Site
In part two of the article series I showed you how the site was set up: the important layers each have a separate folder under the special App_Code folder. Besides that, the site contains two .aspx pages: Default.aspx and AddEditContactPerson.aspx.
The first one lists all the contact persons in the system and allows you to manage their contact records through GridView and FormView controls on the page. The AddEditContactPerson.aspx page allows you to create a new or change an existing contact person in the system.
I'll start by a quick introduction of the setup of the site (web.config, themes, styles and so on) followed by an explanation of the markup and code in Default.aspx and AddEditContactPerson.aspx.
Setup of the Site
In part two you saw the Solution Explorer of the application mainly showing the files in the App_Code folder. Obviously, the entire site contains more files, depicted in Figure 2:
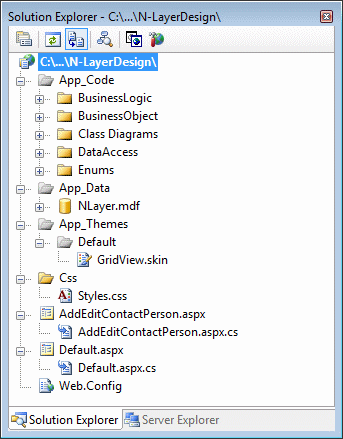
Figure 2 - The Solution Explorer for the Contact Person Manager Application
Besides the now familiar folders under App_Code, the site has a few other folders and files worth looking at.
App_Data and NLayer.mdf
This is the SQL Server 2005 Express database used for the application. In the Download for this application you also find the SQL Scripts to recreate the database on SQL Server 2000 or SQL Server 2005.
App_Themes and Css\Styles.css
The App_Themes folder contains a single theme called Default which in turn holds a single skin file that is used to change the appearance of the GridViews used in the application. Instead of styling each individual GridView used in the Default.aspx page (four in total), I created a .skin file that changes the styling of elements site-wide. Take a look at the contents of GridView.skin to see how this works:
<asp:GridView runat="server" CellPadding="4" GridLines="None">
  <FooterStyle CssClass="FooterStyle" />
  <RowStyle CssClass="RowStyle" />
  <SelectedRowStyle CssClass="SelectedRowStyle" />
  <PagerStyle CssClass="PagerStyle" />
  <HeaderStyle CssClass="HeaderStyle" />
  <AlternatingRowStyle CssClass="AlternatingRowStyle" />
</asp:GridView>
Each important *Style element has its CssClass set to a CSS class defined in the file Styles.css. When the page renders, these CssClass attributes are translated to HTML class attributes for the relevant HTML elements. For example, each GridView header gets a HeaderStyle class set like this:
<tr class="HeaderStyle">
The HeaderStyle class in the CSS file then changes the appearance of the header to bold white letters on a blue background:
.HeaderStyle
{
  background-color: #507CD1;
  color: #fff;
  font-weight: bold;
}
This way, all the GridViews in the site have the exact same appearance. More importantly, when you want to change the appearance, you now need to do this in only one location: the Styles.css file. The web.config (discussed next) contains a setting that applies the Default theme to all pages in the site.
Web.config
The web.config file is mostly a standard config file, with only two important settings. The <connectionStrings> element and the <pages /> element. Under the <connectionStrings> node you find two connection strings, with one being commented out, The first contains a connection string that points to a local SQL Server Express database with the database in App_Data, while the other points to a database on a commercial version of SQL Server 2000 or 2005. Refer to this article about configuring SQL Server 2000 or 2005 if you need more information about using this second connection string.
The <pages /> element contains a single attribute that tells ASP.NET to apply the Default theme to all pages in the site:
<pages theme="Default" />
If you remove the theme attribute, you'll see that the GridView controls in the site will return to their default layout.
With the additional files in the site looked at, let's take a look at how you can display contact persons on a page.
Displaying all Contact Persons in the System
Because much of the work has already been done by writing the code in the BO, Bll and Dal layers, displaying a list of contact persons is now super easy. To display a list of users in a GridView, follow these 7 steps:
- Create a new page and switch to Design View. Add a GridView to the page by dragging it from the Toolbox on the design surface.
- Open the GridView's Smart Task panel and under Choose Data Source select <New data source>.
- In the Data Source Configuration Wizard, Select Object and click OK.
- In the Choose a Business Object, make sure Show only data components is checked and then choose the appropriate business object from the list. In my case, I chose: Spaanjaars.ContactManager.Bll.ContactPersonManager:
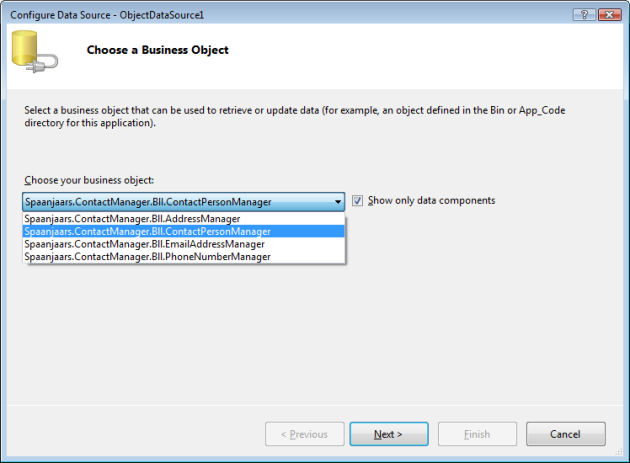 Figure 3 - The Configure Data Source Wizard
If you want to know how I was able to limit the items in the drop down to my business objects in the App_Code folder only, and what the meaning of the [DataObjectAttribute()] on the classes in the business layer is, then be sure to check out this article about using attributes in your code. In short, [DataObjectAttribute()] signals to the designer that your class can be used in the Object Data Source wizard. In addition, you can mark methods in these classes with the [DataObjectMethod()] attribute. This attribute is used to mark any method as the default Select, Insert, Update or Delete method, like this:
[DataObjectMethod(DataObjectMethodType.Select, true)]
public static AddressList GetList(int contactPersonId)
{
  return AddressDB.GetList(contactPersonId);
}
This marks the GetItem method as the default Select method of the AddressList class (due to the true argument in the attribute's constructor). Since the Save method is used for both Insert and Update statements, ideally I'd like to apply the attribute with the default value twice: for both DataObjectMethodType.Insert and DataObjectMethodType.Update. This, unfortunately, doesn't work. If you know a work around, please let me know. So, instead, I decided to mark the Save method as the default for Update. This means that whenever you need to select an Insert method, you'll need to select one manually. If you don't like this, then you can create two public methods, called Insert and Update for example, and then have both of them call Save.
- Next, on the Define Data Methods window, make sure that on the Select tab the GetList() method is selected (it was already preselected due to the DataObjectMethodType attribute). Next, clear the selection on the Update tab as you don't need an Update method at this stage. You can leave the Insert and Delete tabs to their defaults which means there's no Insert method selected while Delete points to Delete(ContactPerson myContactPerson) .
- Finally, click Finish to close the wizard.
You should end up with the following markup for the control:
<asp:ObjectDataSource ID="ObjectDataSource1" runat="server"
  DataObjectTypeName="Spaanjaars.ContactManager.BO.ContactPerson"
  DeleteMethod="Delete"
  SelectMethod="GetList"
  TypeName="Spaanjaars.ContactManager.Bll.ContactPersonManager">
</asp:ObjectDataSource>
(I removed the OldValuesParameterFormatString attribute, as it's not needed, but added by default).
As soon as you finish the Object Data Source wizard, the GridView refreshes to show the relevant columns from the business object that the ObjectDataSource returns:
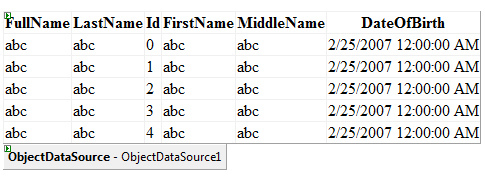
Figure 4 - The GridView and its Associated ObjectDataSource Control
Notice how the GridView displays the data for a ContactPerson object from the BO namespace. The ObjectDataSource wizard was smart enough to figure out that although I am using the ContactPersonManager as my methods class, this Manager object returns instances of ContactPerson that I am working with.
That's all for now. Just hit Ctrl+F5 in Visual Studio 2005 and you'll see a list with contact persons appear:
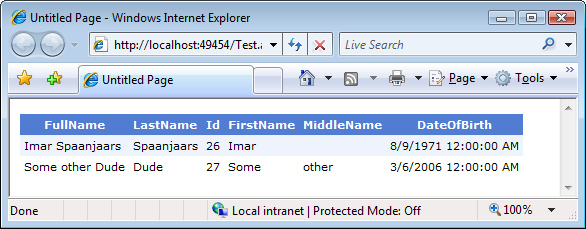
Figure 5 - A List With Contact Persons
Not bad, don't you think? 11 lines of code (the GridView and the ObjectDataSource together) are all that's required to display a list in the presentation layer. Notice how the GridView is skinned automatically by the .skin file you saw earlier. For this to work, you also need to include the CSS file in the page, and enable the Theme in the web.config file. If you don't have the theme set up correctly, your GridView will be quite plain, with black text on a white background.
Although the ASPX page only needs 11 lines of code, a lot of other code is executed under the hood. To get the data in the page, the following sequence of events takes place:
- The GridView sees it needs to display its data and requests the data from the ObjectDataSource (ODS) control.
- The ODS in turn sees it needs to call GetList on the ContactPersonManager class. Since this method is static, it is able to call it directly. If the method hadn't been static, a new instance of the class would have been created first.
- GetList in ContactPersonManager forwards the call to GetList in the ContactPersonDB class in the DAL.
- This DAL method eventually fires a stored procedure in the database called sprocContactPersonSelectList that returns the records to the calling code.
- GetList in the DAL creates a new ContactPersonList (that derives from List<ContactPerson>) based on the records from the database and returns it to GetList in the business layer.
- That GetList forwards the list to the ODS.
- The ODS then hands over the list to the GridView which eventually displays all the contact persons on the page.
Obviously, just displaying the contact persons isn't good enough. We also need to be able to Edit and Delete them as well as insert new ones.
Managing Contact Persons in the System
ASP.NET 2.0 offers many features that make it easy to work with data in a web page. You have the various DataSource controls to manage data, the GridView to display lists of records and the DetailsView and FormView controls to display a single record at the time, with insert and update capabilities.
However, I often find the FormView and DetailsView a bit problematic to work with, especially when you need to manage Business Objects with many properties. To fully support all data scenarios (Insert, Update and Display), these controls require you to create three separate templates, each with a number of controls bound to the data source. This can quickly lead to a lot of code that is hard to manage. It also leads to duplicate code which is even worse. In many circumstances, editing an object is identical to inserting a new one, so theoretically you should be able to reuse the templates for insert and update. So, for the Contact Person Manager application I'll use a different approach to manage the contact persons. To show how things work, and because the contact data objects are easier to manage, I do use FormView controls to manage those objects.
However, before we look at that, let's first look at how we can decide what contact person to edit or delete.
To give the user a way to edit or delete a contact person, I added two columns to the GridView: a standard ButtonField with a CommandName of Edit and a TemplateField with an embedded LinkButton. After I configured the fields in the Fields editor for the GridView, I ended up with the following code:
<asp:ButtonField CommandName="Edit" Text="Edit" />
<asp:TemplateField ShowHeader="False">
  <ItemTemplate>
    <asp:LinkButton ID="LinkButton1" runat="server"
        CausesValidation="False" CommandName="Delete" Text="Delete"
        OnClientClick="return confirm('Are you sure you want to
               delete this contact person?');">
    </asp:LinkButton>
  </ItemTemplate>
</asp:TemplateField>
These two fields end up as an Edit and a Delete link in the GridView. As you can see, both of the fields have their CommandName set. This way, when they are clicked, the GridView triggers its RowCommand event. I set up a RowCommand handler for the GridView that points to a method in the Code Behind:
<asp:GridView ID="gvContactPersons" runat="server" AutoGenerateColumns="False"
  DataSourceID="odsContactPersons" DataKeyNames="Id"
  OnRowCommand="gvContactPersons_RowCommand"
  AllowPaging="True" CellPadding="4" GridLines="None">
<Columns>
  ....
</Columns>
</asp:GridView>
The RowCommand event handler looks at the CommandName that is passed to it and then determines what to do:
protected void gvContactPersons_RowCommand(
               object sender, GridViewCommandEventArgs e)
{
  switch (e.CommandName.ToLower())
  {
    case "addresses":
       ..... Shown later

    case "edit":
      int rowIndex = Convert.ToInt32(e.CommandArgument);
      int contactPersonId = Convert.ToInt32(
              gvContactPersons.DataKeys[rowIndex].Value);
      Response.Redirect(String.Format("AddEditContactPerson.aspx?Id={0}",
              contactPersonId.ToString()));
      break;
  }
}
When the Edit link is clicked, the case block for edit fires. The index of the clicked row is available from e.CommandArgument so it's easy to use that to retrieve the DataKey for the contact person. The DataKey is the unique ID of the contact person in the database and is used as the DataKeyNames for the GridView. This way, you can always retrieve the original ID of an item in a GridView. Once the ID is known, the code simply redirects to the AddEditContactPerson.aspx page that I'll discuss in a minute.
Notice that you don't see a Delete block in the RowCommand handler. That's because deleting is done fully automatically by the LinkButton in the TemplateField that you saw earlier. The GridView knows it's bound to a DataSource that supports deleting (because it has a DeleteMethod set) so whenever the Delete command is raised, the GridView automatically signals the ODS that it should delete the requested record. The ODS in turn then fires the shared Delete method on the ContactPersonManager class. The only tweak I made was convert a standard ButtonField to a TemplateField that contains a LinkButton with its CommandName set to Delete. By converting the ButtonField to a TemplateField, it's much easier to add a confirmation message to the LinkButton, asking the user for confirmation before actually deleting the contact person:
<asp:TemplateField ShowHeader="False">
  <ItemTemplate>
    <asp:LinkButton ID="LinkButton1" runat="server" CausesValidation="False"
        CommandName="Delete" Text="Delete"
        OnClientClick="return confirm('Are you sure you want to
                delete this contact person?');">
    </asp:LinkButton>
</ItemTemplate>
</asp:TemplateField>
Finally, allowing a user to insert a new contact person is even simpler. At the top of the page, you find a button called btnNew that simply sends the user to AddEditContactPerson.aspx without passing any query string information. I'll discuss this page next.
The AddEditContactPerson.aspx Page
The markup of this page is really simple. It contains a standard HTML <table> containing standard rows and cells that in turn contain a number of ASP.NET controls, like TextBox, Calendar, Button and a few validator controls. In Design View, the page looks like this:
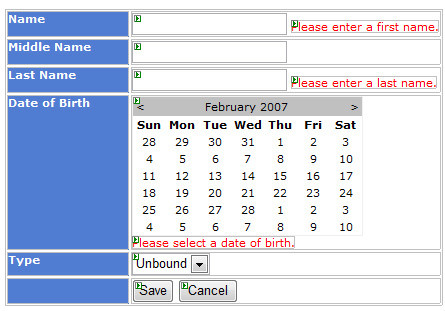
Figure 6 - The Add and Edit Contact Person Page In Design View
It's the code in the code behind that's a lot more interesting to look at.
protected void Page_Load(object sender, EventArgs e)
{
  if (Request.QueryString.Get("Id") != null)
  {
    contactPersonId = Convert.ToInt32(Request.QueryString.Get("Id"));
  }
  if (!Page.IsPostBack)
  {
    BindTypeDropDown();
    if (contactPersonId > 0) // Edit an existing item
    {
      // Get person
      ContactPerson myContactPerson = ContactPersonManager.GetItem(contactPersonId);
      if (myContactPerson != null)
      {
        txtFirstName.Text = myContactPerson.FirstName;
        txtMiddleName.Text = myContactPerson.MiddleName;
        txtLastName.Text = myContactPerson.LastName;
        calDateOfBirth.SelectedDate = myContactPerson.DateOfBirth;
        if (lstType.Items.FindByText(myContactPerson.Type.ToString()) != null)
        {
          lstType.Items.FindByText(myContactPerson.Type.ToString()).Selected = true;
        }
        this.Title = "Edit " + myContactPerson.FullName;
      }
    }
    else
    {
      this.Title = "Create new Contact Person";
    }
  }
}
When the page loads, the code checks the query string and sees if the ID of a contact person was passed in. If that's the case, the contact person is fetched using ContactPersonManager.GetItem(contactPersonId). When the item is returned, the code accesses its public properties to fill the controls in the page, like txtFirstName and so on.
If there's no query string, the page assumes a new contact person must be created so it leaves all fields empty.
In both cases, the Title property of the page is updated to reflect the action that is being carried out.
Take a look at the code that adds the items to the Type drop down. It uses some nifty code borrowed from the article Universal enumeration editor control on CodeProject.com:
private void BindTypeDropDown()
{
  FieldInfo[] myEnumFields = typeof(PersonType).GetFields();
  foreach (FieldInfo myField in myEnumFields)
  {
    if (!myField.IsSpecialName && myField.Name.ToLower() != "notset")
    {
      int myValue = (int)myField.GetValue(0);
      lstType.Items.Add(new ListItem(myField.Name, myValue.ToString()));
    }
  }
}
This code loops over the items in the PersonType enum, skipping system items and the NotSet item and then inserts the remaining items in the DropDownList called lstType. This way, the drop down gets filled with the values from the enum type automatically. The good thing about this is you never have to worry about this list anymore. Whenever you remove or add items from the enum, this list is updated automatically.
The final piece of interesting code in this page is inside the Save button's click handler. This code is fired when all the client side validators have done their work. The code for the handler looks like this:
protected void btnSave_Click(object sender, EventArgs e)
{
  Page.Validate();
  if (calDateOfBirth.SelectedDate == DateTime.MinValue)
  {
    valRequiredDateOfBirth.IsValid = false;
  }
  if (Page.IsValid)
  {
    ContactPerson myContactPerson;
    if (contactPersonId > 0)
    {
      // Update existing item
      myContactPerson = ContactPersonManager.GetItem(contactPersonId);
    }
    else
    {
      // Create a new ContactPerson
      myContactPerson = new ContactPerson();
    }
    myContactPerson.FirstName = txtFirstName.Text;
    myContactPerson.MiddleName = txtMiddleName.Text;
    myContactPerson.LastName = txtLastName.Text;
    myContactPerson.DateOfBirth = calDateOfBirth.SelectedDate;
    myContactPerson.Type = (PersonType)Convert.ToInt32(lstType.SelectedValue);
    ContactPersonManager.Save(myContactPerson);
    EndEditing();
  }
}
The page calls Page.Validate() first to ensure all controls check whether they are valid or not. It then checks the SelectedDate of the calendar and sets the IsValid property of the custom validator to false when no date has been selected. Note that the current implementation for the calendar isn't very user-friendly for a birth date. Imagine your contact person is 35. This means you'll need to click around 420 times (35 * 12) to get at the right month back in 1971. Instead, you could add an additional drop down with the years that could allow a user to quickly select the relevant year. As other alternatives, you could drop the entire Calendar and use three drop down instead for the year, month and day or use the new Calendar control from the Ajax Toolkit that features some cool ways to browse through the calendar. However, for the purpose of demonstrating n-layer design, the Calendar control is fine.
Once the date has been checked, the code determines whether we're editing an existing item, or creating a new one. When contactPersonId is larger than zero, it means we're editing an existing item. The code then retrieves this existing ContactPerson using ContactPersonManager.GetItem(contactPersonId) just as with the code in Page_Load. This is done to ensure you always get all the data for the ContactPerson. So, let's say you have a property like CreateDate that you don't want to update when you're changing an existing item. If you'd create a brand new item using a default constructor and then set all the properties, this property might either default to DateTime.MinValue or get today's date. But by retrieving the existing item from the database, and only overriding what has changed, you can leave the existing data in tact.
If we're creating a new contact person, the code instantiates one using the object's default constructor :
myContactPerson = new ContactPerson();
Regardless of whether we're inserting or updating, in both cases all the public fields of the object are filled with the values from the web controls. At the end, the Save method on the ContactPersonManager is called which receives the ContactPerson instance. The ContactPersonManager forwards this object to the Save method in ContactPersonDB which eventually saves the object in the database and returns its new ID. You saw how this worked in the previous article in this series.
At the end, when the object was saved successfully, the code calls the custom method EndEditing() which simply sends the user back to the Default.aspx page.
You can see that with the Business Objects, Business Logic and Data Access Layers built, it's quite easy to create web pages that allow users to manage objects in your system. You only need around 25 lines of code to save a contact person where most of the code contains straight forward web control to property copying.
However, in some cases, you don't even need all of this code, as you can rely on ASP.NET 2.0's data binding capabilities. In the next section, I'll show you how you can use controls like the GridView and the FormView to allow a user to edit, add and delete contact data, like e-mail addresses, addresses and phone numbers. Just as in part two, I'll only show you the code for the EmailAddress class, as Address and PhoneNumber are pretty similar.
Managing EmailAddress Objects for a ContactPerson
Earlier in this article, I showed you the code for the GridView that displays the contact persons. You saw how I used a number of BoundFields to display ContactPerson properties and how I used a ButtonField and a TemplateField to enable a user to edit or delete a contact person. Besides these two columns I added three more ButtonField columns, to allow a user to select the addresses, e-mail addresses and phone numbers respectively.
<asp:ButtonField CommandName="Addresses" Text="Addresses" />
<asp:ButtonField CommandName="EmailAddresses" Text="Email" />
<asp:ButtonField CommandName="PhoneNumbers" Text="Phonenumbers" />
When the user clicks one of the columns, the GridView fires its RowCommand that you saw before:
protected void gvContactPersons_RowCommand(
            object sender, GridViewCommandEventArgs e)
{
  switch (e.CommandName.ToLower())
  {
    case "addresses":
      gvContactPersons.SelectedIndex = Convert.ToInt32(e.CommandArgument);
      MultiView1.ActiveViewIndex = 0;
      break;
    case "emailaddresses":
      gvContactPersons.SelectedIndex = Convert.ToInt32(e.CommandArgument);
      MultiView1.ActiveViewIndex = 1;
      break;
    case "phonenumbers":
      gvContactPersons.SelectedIndex = Convert.ToInt32(e.CommandArgument);
      MultiView1.ActiveViewIndex = 2;
      break;
    .....
  }
}
In each of the three case blocks, the code sets the SelectedIndex of the record that was just clicked. It then displays one of the Views in the MultiView control. To make it a bit easier to hide or show anything related to an e-mail address, an address or a phone number, I wrapped all the functionality in a number of different views. Showing, say, the phone number list, or the FormView to insert a new one is now as easy as showing a specific View.
Inside each view, you find five important controls:
| Control | Description |
| GridView | The GridView is used to display the contact data, like addresses or phone numbers. |
| FormView | The FormView control is used to insert new items to the data store. |
| ObjectDataSource | The ObjectDataSource is used to display, insert, update and delete the contact records. Inserting is done with the FormView, while displaying, updating and deleting is done by the GridView control |
| Two Button controls | For each contact data type, there are two buttons: an "Add New" and a "Show List" button. To make it easier for a user to focus on a task, these buttons either show or hide the GridView and the FormView, so only one is visible at any given time. |
When the View for the e-mail addresses becomes visible, the GridView knows it must display its data and tells the ObjectDataSource to get a list of EmailAddress objects from the EmailAddressManager class by calling GetList. Recall from part two that this method requires the ID of the contact person. The ObjectDataSource gets this ID by looking at the SelectedValue property of the GridView, that was set in the RowCommand you just saw.
<asp:ObjectDataSource ID="odsEmailAddresses" runat="server"
    DataObjectTypeName="Spaanjaars.ContactManager.BO.EmailAddress"
    DeleteMethod="Delete" InsertMethod="Save" SelectMethod="GetList"
    TypeName="Spaanjaars.ContactManager.Bll.EmailAddressManager"
    UpdateMethod="Save">
  <SelectParameters>
    <asp:ControlParameter ControlID="gvContactPersons"
        Name="contactPersonId" PropertyName="SelectedValue" Type="Int32" />
  </SelectParameters>
</asp:ObjectDataSource>
Finally, if the selected contact person had any e-mail addresses, they are displayed in the GridView using standard BoundFields.
Much of the editing of the EmailAddress objects is done automatically by the standard controls. For example, the Delete column will automatically trigger the Delete method of the ObjectDataSource. Similarly, when you update an item in the GridView, the Save method of EmailAddressManager is called automatically. This method then gets a reference to the EmailAddress that is being edited, so first the BLL and then finally the DAL knows what record to update.
However, there are a few events that are triggered in the code behind that contain some interesting code. If you look in the code behind, you see the following regions and the fv_ItemInserting method:
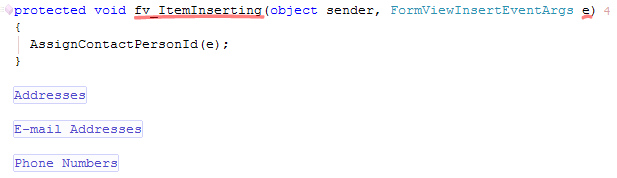
Figure 7 - The Collapsed Code for the Default.aspx Page
fv_ItemInserting is the event handler for all three FormView controls in the page and handles their ItemInserting event. I'll get to that a little later.
Each of the regions contains similar code that responds to button clicks and other events to show or hide the GridView or the FormView. It also features an ItemCommand handler that shows the GridView again whenever the user clicks the Cancel link on the FormView to cancel an insert operation:
protected void fvEmailAddress_ItemCommand(
                object sender, FormViewCommandEventArgs e)
{
  switch (e.CommandName.ToLower())
  {
    case "cancel":
      ShowEmailAddressList();
      break;
  }
}
Other than that, the code in the different regions isn't very exciting.
A lot more interesting to look at is the ItemInserting even handler. This handler is set up for all three FormView controls like this:
<asp:FormView ID="fvEmailAddress" runat="server" DataKeyNames="Id"
    DataSourceID="odsEmailAddresses" DefaultMode="Insert" Visible="false"
    OnItemInserting="fv_ItemInserting"
    OnItemCommand="fvEmailAddress_ItemCommand"
    OnItemInserted="fvEmailAddress_ItemInserted" EnableViewState="False">
  <InsertItemTemplate>
          ...
  </InsertItemTemplate>
</asp:FormView>
Since all three FormView controls fire the same event and all of them need to perform the same action, all three are bound to the same event handler. The FormView control fires this event when it is about to send its data to the ObjectDataSource. It's a perfect location to look at the data that the user entered, modify it, or add any data to it. In our case, we need to set the ContactPersonId as this ID is not entered by the user, but is retrieved from the contact person GridView instead:
protected void fv_ItemInserting(object sender, FormViewInsertEventArgs e)
{
  e.Values["ContactPersonId"] =
              Convert.ToInt32(gvContactPersons.SelectedDataKey.Value);
}
When the code in this event runs, you get all the available properties of the business object in a dictionary exposed by e.Values. Adding new or changing existing properties is as easy as indexing the Values collection. So, for example, if you wanted to enforce that the Type of the EmailAddress was ContactType.Business regardless of what the user has entered, you could use the following code:
e.Values["Type"] = ContactType.Business;
In the sample application though, I am just setting the ContactPersonId that I get from the contact persons GridView by accessing its SelectedDataKey and casting it to an int.
To clarify the process that takes place when a user enters a new e-mail address, here's a detailed description of all the steps:
- The user loads the list with contact persons and then clicks the Email link to display existing e-mail addresses (if any).
- The page reloads and the existing e-mail addresses are shown.
- The user clicks the Create new Email Address button, the GridView disappears and the FormView is shown so the user can enter a new e-mail address:
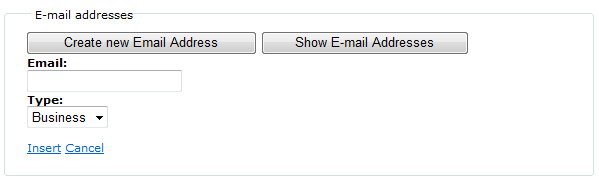
Figure 8 - Part of the Page that Allows a User to Enter a New E-mail Address - The user enters a new address, chooses a type and then clicks the Insert link.
- The ItemInserting event of the FormView control is triggered. The code in the event handler retrieves the ID of the selected contact person and assigns it to the ContactPersonId key of the Values dictionary.
- A new instance of the EmailAddress class is created and each of the objects's properties are filled with the corresponding values in the Dictionary object properties (Email, Type and ContactPersonId).
- Next, the Save method of the EmailAddressManager class is called. This method receives the EmailAddress instance created in the previous step.
- As you saw before, this Save method forwards the EmailAddress object to the DAL.
- The DAL saves the EmailAddress in the database and returns the new ID of the e-mail address to the calling code.
- The Save method in the business layer assigns the new ID returned from the data access layer to the Id property of the EmailAddress object and then returns that ID.
- Finally, the FormView control fires its ItemInserted event. This method simply calls ShowEmailAddressList() that hides the FormView and displays the GridView again that now shows the newly inserted e-mail address.
That seems like a lot of steps for something as simple as inserting an e-mail address in the database. Remember, though, that most of these steps take place in the framework that was developed earlier. In fact, from an ASPX page perspective, all you need are the controls and the code in the ItemInserting event. All the other event handlers are just there to improve the user's experience, by showing or hiding the relevant controls.
Similar processes are executed when you either edit or delete an item in the GridView. When you edit an item, eventually the Save methods in the BLL and DAL are called, while obviously Delete is called when you delete an item from the list.
That's about all there is to it. With the entire business and data access layer built, managing your objects in a web form is often as simple as dragging and dropping a few controls and writing a little bit of code for some relevant event handlers.
Wrapping it Up
Obviously, the code and the pages you have seen in this article series represent a simplified version of a real world application. But, simplified as it may be, it still represents real-world concepts. The layer architecture, object design, object and method implementation, page design (controls and code behind) are all concepts that can be mapped directly to your own applications.
To limit the size of this article series, I left out a few detail implementations of techniques you would otherwise include in your code:
Validation
In part two I showed you how to implement validation in your business objects, This way, the business layer becomes responsible for checking the data that is sent to the database, and guarding the data integrity. This is crucial in real-world applications.
In addition to checking data at the business layer and optionally throwing exceptions when the data doesn't meet the standards, your presentation layer should also check the data to help the user input correct data in the first place. The various validator controls (RequiredFieldValidator, RangeValidator, CustomValidator and so on) are indispensable tools in validating user input both at the client and the server. You saw how the AddEditContactPerson.aspx page used a number of these controls to validate the input. You can use the same controls in the EditItemTemplate of the GridView columns to validate user input in the GridView as well.
Error Handling
Other than the TransactionScope object to roll back any open transaction whenever an error occurs when saving a contact person, the code has no error handling. In a real-world app, you could wrap the code in a try / catch block and log the error in a database or text file or send it by e-mail. Alternatively, you'd allow all exceptions to bubble up to code in Global.asax and handle it here, or deploy ELMAH to handle and log all errors in your system in a consistent way.
Summary
This article showed you how to use the business objects that were designed and created in parts one and two of this article series.
The article started off with a quick description of the structure of the site. You saw how the pages were organized, how the site uses a Theme and a Skin to ensure a consistent look of some of the controls in the site, and you saw how the connection string for the application is stored and accessed at run-time.
You then saw how to configure an ObjectDataSource control to allow a user to display and delete contact persons and you saw how to modify the GridView to include an Edit link.
The article then discussed a way to create new and update existing ContactPerson objects using a separate page.
Next, I showed you how to use the FormView control to insert new contact data records. Although the FormView and GridView controls become hard to use for more complex business objects, they can be great for relatively simple objects like EmailAddress or PhoneNumber.
The article ended with a brief discussion of the topics that were *not* discussed in this article, including extended validation and error handling.
If there are any topics that you feel should be included in this article series, send me a message and I'll take a look at your request.
Download Files
- Source Code of the Demo Application in C#. Comes with scripts to create the database
- Source Code of the Demo Application in Visual Basic .NET. Comes with scripts to create the database
- The MyGeneration templates for the Bll, BO and Dal classes in C#
- The MyGeneration templates for the Bll, BO and Dal classes in VB.NET
Where to Next?
Wonder where to go next? You can post a comment on this article.
Links in this Document
| Doc ID | 420 |
| Full URL | https://imar.spaanjaars.com/420/building-layered-web-applications-with-microsoft-aspnet-20-part-3 |
| Short cut | https://imar.spaanjaars.com/420/ |
| Written by | Imar Spaanjaars |
| Date Posted | 02/25/2007 16:17 |
| Date Last Updated | 04/25/2007 00:03 |
| Listened to when writing | Pink Maggit by Deftones (Track 7 from the album: Back To School (Mini Maggit)) |
Comments
Talk Back! Comment on Imar.Spaanjaars.Com
I am interested in what you have to say about this article. Feel free to post any comments, remarks or questions you may have about this article. The Talk Back feature is not meant for technical questions that are not directly related to this article. So, a post like "Hey, can you tell me how I can upload files to a MySQL database in PHP?" is likely to be removed. Also spam and unrealistic job offers will be deleted immediately.
When you post a comment, you have to provide your name and the comment. Your e-mail address is optional and you only need to provide it if you want me to contact you. It will not be displayed along with your comment. I got sick and tired of the comment spam I was receiving, so I have protected this page with a simple calculation exercise. This means that if you want to leave a comment, you'll need to complete the calculation before you hit the Post Comment button.
If you want to object to a comment made by another visitor, be sure to contact me and I'll look into it ASAP. Don't forget to mention the page link, or the Doc ID of the document.