Building Layered Web Applications with Microsoft ASP.NET 2.0 - Part 2
NOTE: the concepts presented in this article are now considered obsolete possibly because better alternatives are available.
Update!! - I have written a new series on N-Layer design targeting ASP.NET 4.5 and Entity Framework 5. You can check out the new series here.
Update!! 12-24-2008 - I have written a new series on N-Layer design as a major follow up to this one. It builds on the foundation created in this first series, but digs much deeper into concepts like Validation, Sorting, Paging, Concurrency and Security. You can check out the new series here.
Update!! 04-25-2007 - There is now also a VB.NET version of the code available for download. You find the download at the end of this article. For more information about the translation, check out this blog post.
Update!! 04-24-2007 - Fixed a bug in the stored procedure that deletes a Contactperson, based on feedback from reader csharpdev. This also affects the downloadable code for this article, which now also has the update applied.
This is part two of the article series "Building Layered Web Applications" that shows you how to build N-Layer applications with Microsoft ASP.NET 2.0. These articles teach you how to design, build and use custom business objects in your web application. The target audience for this series are developers that are ready to make the switch from using SqlDataSource controls to ObjectDataSource controls with custom business objects. Experience with ASP.NET 2 and C# is necessary while some knowledge about object oriented design certainly helps. The design I am going to show you in these articles is a simplified version of a design you would use in a real world application. It doesn't feature all the necessary functionality your application needs, but instead focuses on the underlying concepts.
Part one dealt with the design of the application: what business objects do you need to fulfill the requirements of the application. What should these objects be capable of and how do they look. This article (part two) continues where the previous article stopped: it shows you how to code the classes that were designed in part one. You'll see how to implement the data access methods and database code and you'll learn how you can connect these classes. Part three then deals with using the business objects in a web application. You'll see how to make use of the out-of-the-box ASP.NET 2.0 controls together with the business objects coded in this part.
If you haven't read part one yet, you should really read it first, as this article uses many concepts that have been explained earlier. Afterwards, check out part three where you'll see the concepts from this article in an actual web site. The entire series (including this current article) can be found here:
- Building Layered Web Applications with Microsoft ASP.NET 2.0 - Part 1
- Building Layered Web Applications with Microsoft ASP.NET 2.0 - Part 2
- Building Layered Web Applications with Microsoft ASP.NET 2.0 - Part 3
The article uses a SQL Server 2005 Express database which is easy to use in development scenario's. However, the downloads for this series also come with the T-SQL scripts to recreate the database in SQL Server 2000 or SQL Server 2005. You'll find the download link at the end of this article. Besides the aforementioned SQL scripts and database, the download also contains the full source for the demo application in C#
Introduction
In part 1 you saw the design of the classes that make up the Contact Manager application. You saw the classes in the Business Objects layer, the Business Logic Layer and you saw a number of classes in the DAL (Data Access Layer).
In this installment, I'll show you the code for these classes. You'll see how to implement the public properties for each of the classes in the Business Objects layer, how to write the code for methods like GetItem and GetList, and you'll see how to connect to the database in a safe, transactional manner for inserts and updates. But, before we dig into the code, let's take a brief look at the class design again. With the class design in mind, it's easier to make decisions for the layout of your project. Although you could simply drop all your classes in the App_Code folder or in a separate class library project all under the same namespace, it's often easier to put them in separate folders and namespaces so the code is easier to find. The following figure shows the organization of the classes in the application:
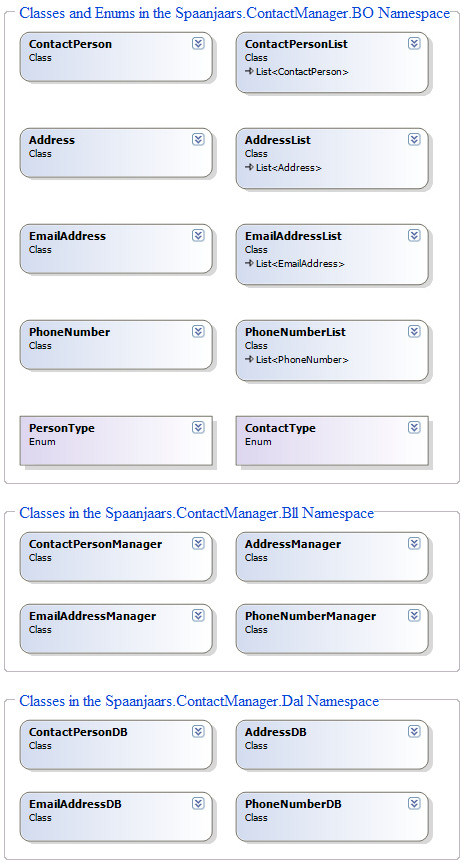
Figure 1 - The Full Class Diagram for the Contact Person Manager Application
At the top of the image you see the business objects in the BO namespace. These classes are placed in the Spaanjaars.ContactManager.BO namespace, following a best practice in namespace names where each namespace is named in the format CompanyName.ProjectName.Layer. I also put the enumerations in that layer, as they are used directly as types for certain properties of the classes in the same layer.
All the *Manager classes are put in the Spaanjaars.ContactManager.Bll namespace and similarly, I put the *DB classes in the Spaanjaars.ContactManager.Dal namespace.
To continue this separation, I also used different folders inside the App_Code folder of the application. In a larger application you may want to use three separate class libraries instead. The Business Layer class library would then have a reference to the Business Objects and Data Access class libraries, the DAL would also have a reference to the Business objects layer, while the final web site would reference the BO and BLL layers. In the sample application for this article, I decided to keep things simple and store everything in separate folders under App_Code, but the exact same principles would apply if you'd be using class library projects.
So, after I created a brand new web site in Visual Studio 2005 (I am using the Professional Edition, but you can follow along if you have the Express Edition), I added four folders under the special ASP.NET App_Code folder, and put a number of empty class files in them, each one named after the class or enum from the diagram in Figure 1. I ended up with the following Solution Explorer:
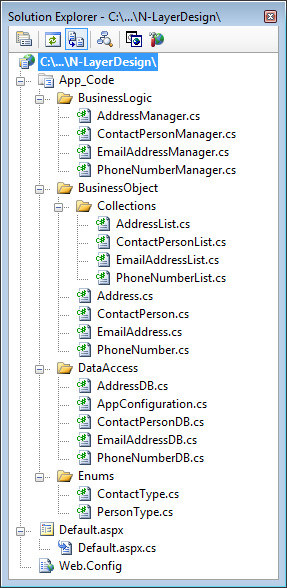
Figure 2 - The Solution Explorer for the Contact Person Manager Application
Each class in the BusinessLogic folder is put in the Bll namespace, files in the BusinessObject folder fall under the BO namespace while the classes in the DataAccess folder are put in the Dal namespace. For example, the Address class in the BusinessObject folder looks like this:
namespace Spaanjaars.ContactManager.BO
{
  public class Address
  {
    // Implementation here

  }
}
Although the enumerations actually fall under the BO namespace, I added them in a separate folder so they are easier to find.
Now that you've seen the basic structure of the site, let's take a look at the actual code for the classes.
Code Organization in the Contact Person Manager Application
Before I show you the specific implementation of the classes, let's first take a look at the basic structure of the class files. To make it easier to locate and maintain code, I often wrap them in #region / #endregion constructs. I typically use at least four different regions although I don't use all of them in every file. Figure 3 shows the collapsed code for a typical business object:
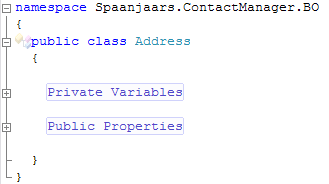
Figure 3 - The Collapsed Code for the Address Class Showing Two Code Regions
The Private Variables region contains all the backing variables for the public properties and optionally other private, class scoped variables for the business objects. They're often assigned a default value here as well. For example:
private string street = String.Empty;
The Public Properties region contains all the properties that the class exposes, like Id, Street and HouseNumber in the case of the Address class. Most of these properties use the private fields from the Private Variables region.
Figure 4 shows the collapsed code for a typical class in the data access layer:
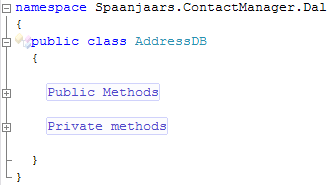
Figure 4 - The Collapsed Code for the AddressDB Class Showing Two Other Code Regions
Many classes in the sample application contain a region called Public Methods. This region contains the class's public methods that are used to interact with the object and the underlying database. You'll find methods like GetItem and GetList to retrieve the objects, and Save and Delete to propagate object changes back to the database. In addition, the class also contains a Private Methods region that contains methods that are only accessible from within the class that defines them.
Coding the Classes for the Contact Person Manager Application
With the code organization behind our back, it's time to look at the actual implementation of the classes. Since the Address, EmailAddress and PhoneNumber classes are very similar, I'll only look at one of them: the EmailAddress class. Of course, I'll also show you the EmailAddressManager and EmailAddressDB classes as we progress through the code.
After you have seen the EmailAddress class, I'll take a detailed look at the ContactPerson class. Since this class is a bit more complex than the other three, it helps to understand the other three classes before you look at ContactPerson.
The EmailAddress Class - Implementation
The first region in the class, called Private Variables contains the following code:
private int id = -1;
private string email = String.Empty;
private ContactType type = ContactType.NotSet;
private int contactPersonId = -1;
The private field id is initially set to -1. This value is used later on to determine whether an object is entirely new (id is still -1), or that it already has an associated record in the database (id is greater than 0). Normally, this is considered a magic number, where a fixed number has a special meaning that cannot be derived easily by its value. Magic numbers are usually considered a bad programming practice. You can avoid magic numbers by using Nullable Types (new in .NET 2) where an int could be null as well to indicate it doesn't have a value. In this case, I can live with the magic number. Legal values for the id and contactPersonId fields come from identity columns in the database. These values are always greater than zero, so it's clear from the code that -1 means something special. If you don't like this, then check out Nullable Types on the MSDN site.
The email field (which contains the actual e-mail address) defaults to String.Empty while the type defaults to ContactType.NotSet, a custom value of the ContactType enumeration to indicate it hasn't been set to another value before. Think of this as a null value for the ContactType type. Finally, the contactPersonId is set to -1 as well.
In the Public Properties region of the code, you find one property for each of these fields. All of them look similar to this:
public string Email
{
  get
  {
    return email;
  }
  set
  {
    email = value;
  }
}
You can see that each of the private fields is used as a backing variable for the public property.
Earlier I said that the classes in the BO namespace, like EmailAddress, are "dumb" classes. They are not capable of performing any action; all they do is contain data. To work with instances of EmailAddress, you need to use the methods in the EmailAddressManager class.
Working with Instances of EmailAddress
The EmailAddressManager contains a number of methods that allow you to perform CRUD operations on an EmailAddress: Create, Read, Update and Delete. Let's take a look at Read first.
First of all, the EmailAddressManager class has a method called GetItem. This method accepts the ID of the EmailAddress in the database. The implementation of this method is really simple: all it does is forward the call to the GetItem method in the data access layer:
public static EmailAddress GetItem(int id)
{
  return EmailAddressDB.GetItem(id);
}
Although this seems like a lot of work for nothing (why not have the calling code access the DAL method directly?), it serves a distinct purpose. Although not implemented in GetItem for the EmailAddressManager class, the code in the business layer is an ideal place for things like security. Instead of directly calling EmailAddressDB.GetItem, you could perform a security check first to determine whether the current user has sufficient access right to perform the call. You could, for example, modify GetItem so it looks like this:
public static EmailAddress GetItem(int id, IPrincipal currentUser)
{
  if (!currentUser.IsInRole("EmailAddressManagers"))
  {
    throw new NotSupportedException(@"You're not allowed to call
             EmailAddressManager.GetItem when you're not in the
             EmailAddressManagers role");
  }
  return EmailAddressDB.GetItem(id);
}
You would then call this method from an ASPX page like this:
EmailAddress myEmailAddress = EmailAddressManager.GetItem(10, Context.User);
And, instead or in addition of this, you could use this method to cache the object returned by GetItem for some time, so you don't have to hit the database every time you need to work with the object. Another valid activity for methods in the business layer is validation. You'll see how this works when the Save method is discussed.
Since these kind of requirements - security, validation, caching and so on - are often application specific, it's important to implement them in the business layer. If you implement them in the data access layer, you can't reuse that layer in an application that has different requirements or demands.
The GetItem method is static which means you can call it without an object instance. With this method, calling code can get an instance of EmailAddress with a single line of code:
EmailAddress myEmailAddress = EmailAddressManager.GetItem(id);
where id is the ID of a valid EmailAddress in the database.
As you saw, GetItem in the business layer simply forwards the call to GetItem in the EmailAddressDB class. That method looks like this:
public static EmailAddress GetItem(int id)
{
  EmailAddress myEmailAddress = null;
  using (SqlConnection myConnection =
             new SqlConnection(AppConfiguration.ConnectionString))
  {
    SqlCommand myCommand = new SqlCommand(
              "sprocEmailAddressSelectSingleItem", myConnection);
    myCommand.CommandType = CommandType.StoredProcedure;
    myCommand.Parameters.AddWithValue("@id", id);

    myConnection.Open();
    using (SqlDataReader myReader = myCommand.ExecuteReader())
    {
      if (myReader.Read())
      {
        myEmailAddress = FillDataRecord(myReader);
      }
      myReader.Close();
    }
    myConnection.Close();
  }
  return myEmailAddress;
}
First, this method creates a new SqlConnection by passing in the connection string (retrieved from the web.config file through the static property ConnectionString on the AppConfiguration class). It then creates and sets up a new SqlCommand. The command is configured to call a stored procedure called sprocEmailAddressSelectSingleItem which returns a single EmailAddress by its ID. This ID is passed to the stored procedure by adding a parameter object to the command using AddWithValue. The stored procedure itself is as straight forward as it can be:
CREATE PROCEDURE sprocEmailAddressSelectSingleItem

@id int

AS

SELECT
  Id,
  Email,
  EmailType,
  ContactPersonId
FROM
  EmailAddress
WHERE
  Id = @id
This procedure simple retrieves all the fields from the EmailAddress table for the specified ID.
The GetItem method in the EmailAddressDB class finally opens a connection to the database and then calls ExecuteReader to get an open SqlDataReader. Each row in the SqlDataReader implements the generic IDataRecord interface that gives you strongly typed access to the values within each row. The private helper method FillDataRecord is then used to create and fill an instance of the EmailAddress class based on the data in the IDataRecord instance:
private static EmailAddress FillDataRecord(IDataRecord myDataRecord)
{
  EmailAddress myEmailAddress = new EmailAddress();
  myEmailAddress.Id =
          myDataRecord.GetInt32(myDataRecord.GetOrdinal("Id"));
  myEmailAddress.Email =
          myDataRecord.GetString(myDataRecord.GetOrdinal("Email"));
  myEmailAddress.Type = (ContactType)
          myDataRecord.GetInt32(myDataRecord.GetOrdinal("EmailType"));
  myEmailAddress.ContactPersonId =
          myDataRecord.GetInt32(myDataRecord.GetOrdinal("ContactPersonId"));
  return myEmailAddress;
}
This method first creates a new instance of the EmailAddress class and then copies each of its fields from the IDataRecord in the EmailAddress. At the end of the method, the EmailAddress object is returned. This helper method is used to create a single instance of each class in GetItem, but is also used to get lists of objects in the GetList methods. To make it easier to use this code as the basis for an implementation of a different database, the method accepts an IDataRecord, an interface that all DataReaders, like the SqlDataReader and the OleDbDataReader implement.
The code in this method simply copies the data from the reader into the private fields of the classes by calling the appropriate Get* methods. These Get* methods expect a zero based index of the column in the IDataRecord. However, using "magic numbers" in your code makes it hard to maintain and read, so I used GetOrdinal to "translate" the name of a column in its index. Why the Get* methods don't have an overload that accepts a string with the column name as well is beyond me though. This may be a nice addition for the .NET 3.5 framework.
Since all the properties of the EmailAddress are required columns in the database, there's no need to check for null values in the helper method. In cases where you do expect null values, you need to take extra precautions, as is the case with the Address class. This is code from that class's FillDataRecord method:
if (!myDataRecord.IsDBNull(myDataRecord.GetOrdinal("ZipCode")))
{
  myAddress.ZipCode =
         myDataRecord.GetString(myDataRecord.GetOrdinal("ZipCode"));
}
Since ZipCode is not a required column in the Address table, I have to check for null values using IsDBNull. Only when the column isn't null, I assign the ZipCode property the value from the reader. Otherwise, I leave it to its default value of String.Empty.
At the end of GetItem in the data access layer, the EmailAddress object is returned to GetItem in the business logic layer which in turn returns it to the client.
As you can see, the code in the EmailAddressDB class is tied to a specific database provider: SQL Server. However, with minimal changes, you can make it work with Access or Oracle. Alternatively, you can write almost completely provider agnostic code using the new database provider factory model in .NET 2. Check out my book ASP.NET 2.0 Instant Results for an example of this in the chapter The Wrox Blog.
But, however you change the code in the DAL, you don't need to change the business objects or business logic layers; as long as the DAL returns an object from the BO namespace, which is shared between the Bll and the Dal namespaces, everything will work, regardless of the database you're using.
The GetList method in the EmailAddress class in the Business Layer follows a similar approach. However, since we're potentially working with more than one e-mail address, we need some way to work with a collection of EmailAddress records. In .NET 2, Microsoft introduced a concept called Generics that allow you to write classes that can work with different types of other classes. In the case of the ContactPerson, I make use of the generic List<T> class. The List<T> works very similar to an ArrayList in that it allows you to easily add and remove objects to a list. However, one of the shortcomings of the ArrayList is the fact you can store *any* object in it. So, it's possible to accidentally store both an EmailAddress and an Address in a list. This obviously can lead to problems when you want to use the list to bind it to a GridView for example. The GridView is set up to work with a single object type and will be confused (and raise an exception) when you pass it different object types. Also, because the GridView isn't able to determine the actual type of the object, it also can't generate strongly typed columns for you, impacting the design time experience and your productivity.
The List<T> on the other hand is designed to work with objects of type T. You determine what T represents when you declare a variable of type List<T> as in the following example that creates a list that can only hold EmailAddress instances:
List<EmailAddress> tempList = new List<EmailAddress>();
With this declaration, you'll get a compile time error whenever you try to add an object to the list that is not of type EmailAddress.
In my initial design for this application, I used List<T> directly. So, my ContactPerson class had properties of type List<Address>, List<EmailAddress> and so on. Additionally, the GetList methods would work with and return types of List<T> as well. However, after a discussion with someone I work with, I decided to create four separate *List classes, each inheriting from its generics counterpart. For example, the EmailAddressList class looks like this:
public class EmailAddressList : List<EmailAddress>
{
  public EmailAddressList()
  { }
}
Although at this stage I am not really adding anything to List<T> in my custom list, this additional layer serves two purposes. First of all, the API has now become a lot simpler for users unfamiliar with generics as the generics have been taken out of the API completely. So, instead of declaring a list that can hold e-mail address records with the following generics syntax:
private List<EmailAddress> emailAddresses = new List<EmailAddress>();
you can now declare an address list with this simplified code:
private EmailAddressList emailAddresses = new EmailAddressList();
This code is a lot easier to read and understand by other developers.
Another benefit of the separate class is that it is easier to add additional methods or even change the underlying type of EmailAddressList completely, to something like CollectionBase for example without breaking existing code.
Once you understand a little how List<T> and the classes that inherit from it work, the rest of the code in GetList is straight forward:
public static EmailAddressList GetList(int contactPersonId)
{
  EmailAddressList tempList = null;
  using (SqlConnection myConnection =
            new SqlConnection(AppConfiguration.ConnectionString))
  {
    // Open connection here. Not shown.
    using (SqlDataReader myReader = myCommand.ExecuteReader())
    {
      if (myReader.HasRows)
      {
        tempList = new EmailAddressList();
        while (myReader.Read())
        {
          tempList.Add(FillDataRecord(myReader));
        }
      }
      myReader.Close();
    }
  }
  return tempList;
}
Once the ExecuteReader method returns an open SqlDataReader, the code starts looping, creating a new instance of EmailAddress with FillDataRecord and adding it to the list on each iteration. Creating the EmailAddress object is identical to the code in GetItem. The initial time it took to the create the private helper method has now been compensated for as we can easily reuse it in different situations where we need to create an EmailAddress from any object that implements the IDataRecord interface.
Inserting, Updating and Deleting Data
While it's nice that you can read a single item or a list of items from the database, the EmailAddressManager class really needs some methods to send data to the database. In particular: it needs an Insert, an Update and a Delete method to complete the CRUD acronym I talked about earlier.
In the case of the Contact Person Manager application, both Insert and Update are handled by the same upsert method: Save(). This means that the code in the business logic and in the data access layer makes no distinction between these two operations.
The Save method in the business layer is straight forward; just as you saw with GetItem and GetList, it simply forwards the call to the DAL. It stores the return value of the Save method (which is the ID of the EmailAddress in the database) in the Id property:
public static int Save(EmailAddress myEmailAddress)
{
  myEmailAddress.Id = EmailAddressDB.Save(myEmailAddress);
  return myEmailAddress.Id;
}
Remember, this would be the place to do security checks. For example, you could check if the current user was a ContentManager before you'd allow the call to Save(). After I show you how Save() is implemented in the DAL, I'll show you another variation of Save in the business layer that validates the EmailAddress before it sends it to the DAL.
The current version in the demo application calls the Save method on the associated database class. Let's take a look at the code to see how this all works. This is the Save() method in the EmailAddressDB class in the data access layer:
public static int Save(EmailAddress myEmailAddress)
{
  int result = 0;
  using (SqlConnection myConnection =
             new SqlConnection(AppConfiguration.ConnectionString))
  {
    SqlCommand myCommand = new SqlCommand(
                "sprocEmailAddressInsertUpdateSingleItem", myConnection);
    myCommand.CommandType = CommandType.StoredProcedure;

    if (myEmailAddress.Id == -1)
    {
      myCommand.Parameters.AddWithValue("@id", DBNull.Value);
    }
    else
    {
      myCommand.Parameters.AddWithValue("@id", myEmailAddress.Id);
    }

    myCommand.Parameters.AddWithValue("@email", myEmailAddress.Email);
    myCommand.Parameters.AddWithValue("@emailType", myEmailAddress.Type);
    myCommand.Parameters.AddWithValue(
                "@contactPersonId", myEmailAddress.ContactPersonId);

    DbParameter returnValue;
    returnValue = myCommand.CreateParameter();
    returnValue.Direction = ParameterDirection.ReturnValue;
    myCommand.Parameters.Add(returnValue);

    myConnection.Open();
    myCommand.ExecuteNonQuery();
    result = Convert.ToInt32(returnValue.Value);
    myConnection.Close();
  }
  return result;
}
Similar to what you saw before, this code sets up a connection and a command to call the stored procedure sprocEmailAddressInsertUpdateSingleItem.
Then, based on whether the ID of the EmailAddress is -1 (a new item) or greater than -1 (an existing item), it creates a parameter called @id and passes it the relevant value: DBNull.Value (which translates to null in database land) for the new item, or the actual ID for an existing item. This is the "magic number" I talked about earlier in the article. I'll show you in a bit how the stored procedure deals with these values.
The code then continues to setup a few other parameters for the other fields of the EmailAddress class: email, emailAddressType and contactPersonId.
It also sets up a ReturnValue parameter to catch the return value from the stored procedure. This procedure returns the new ID of an item when it's inserted, or the existing ID in case of an update.
At the end, ExecuteNonQuery is called to send the data to the database, the return value is retrieved from the parameter which is then returned to the calling code. It's useful to have the Save method return the ID of the item so you can use it in your presentation layer somehow, for example, to redirect the user to a details page shopwing the new e-mail address.
The final thing you need to look at is the stored procedure that performs either the INSERT or the UPDATE:
CREATE PROCEDURE sprocEmailAddressInsertUpdateSingleItem

  @id int,
  @email nvarchar (100),
  @emailType int,
  @contactPersonId int

AS

  DECLARE @ReturnValue int

  IF (@id IS NULL) -- New Item
  BEGIN

    INSERT INTO EmailAddress
    (
      Email,
      EmailType,
      ContactPersonId
    )

    VALUES
    (
      @email,
      @emailType,
      @contactPersonId
    )

    SELECT @ReturnValue = SCOPE_IDENTITY()

  END
  ELSE
  BEGIN

    UPDATE EmailAddress SET
      Email = @email,
      EmailType = @emailType,
      ContactPersonId = @contactPersonId
    WHERE Id = @id

    SELECT @ReturnValue = @id

  END
  IF (@@ERROR != 0)
  BEGIN
    RETURN -1
  END
  ELSE
  BEGIN
    RETURN @ReturnValue
  END

GO
When the @id parameter contains null, the code performs an INSERT in the EmailAddress table. It then uses SCOPE_IDENTITY() to get the new ID of the record that was just inserted.
If @id does contain a value, the procedure performs an UPDATE for the requested record and then assigns the ID of the record to the @returnValue variable which is returned at the end to the calling code.
In both case, the ID of the record is returned to the calling code. There it is caught by the return value parameter, converted to an int and returned to the Save method in the business logic layer.
Earlier I said that the Save method in the business logic layer is also a good place to validate the objects you're saving. To do this, you can implement a method like this:
private static void Validate(EmailAddress myEmailAddress)
{
  if (String.IsNullOrEmpty(myEmailAddress.Email))
  {
    throw new Exception(@"Cannot save an EmailAddress
           without a valid Email property.");
  }
  if (myEmailAddress.Type == ContactType.NotSet)
  {
    throw new Exception(@"Cannot save an EmailAddress
           without a valid Type property.");
  }
  if (myEmailAddress.ContactPersonId == -1)
  {
    throw new Exception(@"Cannot save an EmailAddress
           without a valid ContactPersonId property.");
  }
}
This method accepts an instance of EmailAddress, validates its properties and then throws an exception when the EmailAddress doesn't appear to be valid. In this example, the EmailAddress is considered invalid when the Email property has not been set, when the Type property is still ContactType.NotSet or when the ContactPersonId contains a value of -1.
You call the Validate method right before you send the object to the data access layer:
public static int Save(EmailAddress myEmailAddress)
{
Validate(myEmailAddress);
  myEmailAddress.Id = EmailAddressDB.Save(myEmailAddress);
  return myEmailAddress.Id;
}
Since the Save method can now throw exception when the object is not in a valid state, it's a good idea to implement a public method Validate as well that performs the same validation but doesn't throw the exception. You could add an overload for the Validate method and have it accept a bool that indicates whether or not you want to throw an exception when the object is in an invalid state. With the public Validate method, users of your class can check if the object is valid before they attempt to call Save.
The Delete mechanism in the EmailAddressManager class follows a very similar approach, so I won't show you the code for this. Instead, you're advised to download the entire application at the end of this article and see for yourself.
This concludes the fields, properties, constructors and methods of the three contact record classes. While I only showed you the implementation for the EmailAddress class, it should be easy to understand Address and PhoneNumber as well, as both of these classes follow the exact same pattern.
In the next section, I'll show you the ContactPerson class.
The ContactPerson Class - Implementation
The ContactPerson class is discussed separately, because it has a few twists that are worth looking at.
In the Private Variables and Public Properties regions you see code that sets up three lists: one for the EmailAddresses, one for the Addresses and for the PhoneNumbers. Here's the code for the three private backing variables:
private AddressList addresses = new AddressList();
private PhoneNumberList phoneNumbers = new PhoneNumberList();
private EmailAddressList emailAddresses = new EmailAddressList();
These lists allow you to access the respective contact data collections for a contact person. Earlier you saw how each of these lists inherits from its generics List<T> counterpart.
There's one more public property that's worth looking at: the FullName:
public string FullName
{
  get
  {
    string tempValue = firstName;
    if (!String.IsNullOrEmpty(middleName))
    {
      tempValue += " " + middleName;
    }
    tempValue += " " + lastName;

    return tempValue;
  }
}
You'll see there's no backing variable for the FullName property because the getter makes use of existing variables: firstName, middleName and lastName to build up the complete name of a ContactPerson. With this property, showing a contact person's full name is now as easy as accessing this property. Client code no longer needs to bother with the individual fields, and whether the middleName actually contains a value or not.
The GetList method of ContactPersonManager is almost identical to the ones you saw before, so I won't go over it anymore. The GetItem method, however, is quite different. In addition to getting its own data, the GetItem method is also responsible for getting the associated contact records, like Addresses and Phonenumbers. However, since there are circumstances where you may not need to associated contact records, the GetItem method has a second overload that allows you to control this. Either call GetItem with only the ID of the contact person, or call GetItem and pass false for the second parameter: getContactRecords. If you call GetItem with the ID and true as the value for the getContactRecord parameter, you get a fully populated ContactPerson object, with all of its contact data collections set up as well.
public static ContactPerson GetItem(int id)
{
  return GetItem(id, false);
}

public static ContactPerson GetItem(int id, bool getContactRecords)
{
  ContactPerson myContactPerson = ContactPersonDB.GetItem(id);
  if (myContactPerson != null && getContactRecords)
  {
    myContactPerson.Addresses = AddressDB.GetList(id);
    myContactPerson.EmailAddresses = EmailAddressDB.GetList(id);
    myContactPerson.PhoneNumbers = PhoneNumberDB.GetList(id);
  }
  return myContactPerson;
}
The first overloads calls the second, and passes a default value of false for getContactRecords.
Just as with the EmailAddressManager class, the ContactPersonManager class calls ContactPersonDB.GetItem(id) to get a ContactPerson instance from the database. It then checks if the ContactPerson returned from the DAL is not null and that getContactRecords is true. If both are true, the code proceeds by assigning values to the three lists for the Addresses, EmailAddresses and the PhoneNumbers. Each of these lists gets a value by calling its associated GetList method in the DAL, passing it the ID of the contact person. That way, the Address class knows for which contact person it must retrieve address records for example.
At the end of the code, if the ContactPerson was found in the database, it is returned to the calling code. Otherwise, myContactPerson would contain null indicating to calling code that there is no ContactPerson for the requested ID.
The Save method of the ContactPersonManager class is also capable of saving the associated contact records. It does this by calling Save on each contact record in the list when requested:
public static int Save(ContactPerson myContactPerson)
{
  using (TransactionScope myTransactionScope = new TransactionScope())
  {
    int contactPersonId = ContactPersonDB.Save(myContactPerson);
    foreach (Address myAddress in myContactPerson.Addresses)
    {
      myAddress.ContactPersonId = contactPersonId;
      AddressDB.Save(myAddress);
    }

    foreach (EmailAddress myEmailAddress in myContactPerson.EmailAddresses)
    {
      myEmailAddress.ContactPersonId = contactPersonId;
      EmailAddressDB.Save(myEmailAddress);
    }

    foreach (PhoneNumber myPhoneNumber in myContactPerson.PhoneNumbers)
    {
      myPhoneNumber.ContactPersonId = contactPersonId;
      PhoneNumberDB.Save(myPhoneNumber);
    }

    //  Assign the ContactPerson its new (or existing) ID.
    myContactPerson.Id = contactPersonId;

    myTransactionScope.Complete();

    return contactPersonId;
  }
}
First, the ContactPersonManager saves the ContactPerson by calling a method with the same name in the ContactPersonDB class. This is identical to how objects like EmailAddress are saved in the database. Then the code continues to save each individual contact record by looping through the respective collections and passing each contact record to the Save method in the respective *DB class.
foreach (EmailAddress myEmailAddress in myContactPerson.EmailAddresses)
{
  myEmailAddress.ContactPersonId = contactPersonId;
  EmailAddressDB.Save(myEmailAddress);
}
Before Save is called, each contact record gets its ContactPersonId property assigned, which is the result of the Save method of the ContactPerson.
Notice how the entire code block for the method is wrapped inside a using block that creates a new TransactionScope object. The TransactionScope automatically sets up a transaction for all other code that falls within its scope. This is useful to ensure the database remains in a valid state. Whenever an error occurs, for example because the code tries to save an Address with an invalid ContactPersonId, all previous database actions are rolled back. So, for example, when you save a contact person, then four of its addresses and two email addresses but the code fails on the first Save action of a phone number, the transaction for the ContactPerson, Addresses and EmailAddresses is undone.
For this code to work correctly, you need to have the Microsoft Distributed Transaction Coordinator up and running. As of Service Pack 2, it's off by default. Check the following article for more details about configuring MSDTC.
- Distributed Transaction Coordinator
- How to Enable MSDTC on the Business Management Server
- Transactional Remote Receive
If you have the web site and the database on different machines, make sure you configure MSDTC on both of them.
The Delete method in the ContactPersonManager class always deletes the associated contact records; there is no point in having an Address record in the database without an associated ContactPerson. In fact, the database will throw an exception when you try to delete a ContactPerson that still has contact records attached to it.
public static bool Delete(ContactPerson myContactPerson)
{
  return ContactPersonDB.Delete(myContactPerson.Id);
}
The Delete method doesn't use a TransactionScope object to manage transactions. All contact data records are deleted in the procedure that deletes a contact person:
CREATE PROCEDURE sprocContactPersonDeleteSingleItem

  @id int

AS

  BEGIN TRAN

  DELETE FROM
    Address
  WHERE
    ContactPersonId = @id

  IF @@ERROR <> 0
  BEGIN
    ROLLBACK TRAN
    RETURN -1
  END

  DELETE FROM
    EmailAddress
  WHERE
    ContactPersonId = @id

  IF @@ERROR <> 0
  BEGIN
    ROLLBACK TRAN
    RETURN -1
  END

  DELETE FROM
    PhoneNumber
  WHERE
    ContactPersonId = @id

  IF @@ERROR <> 0
  BEGIN
    ROLLBACK TRAN
    RETURN -1
  END

  DELETE FROM
    ContactPerson
  WHERE
    Id = @id

  IF @@ERROR <> 0
  BEGIN
    ROLLBACK TRAN
    RETURN -1
  END

  COMMIT TRAN
This code first deletes all contact data based on the incoming ID of the contact person. Once the contact records have been deleted, it also deletes the contact person itself. Notice how after each DELETE statement the code checks for an error, and if necessary rolls the transaction back. This is necessary to avoid records from being deleted when an error occurs later in the stored procedure. Thanks to csharpdev who commented on this at the end of this article, pointing out a big mistake I had in an earlier version of this article.
Wrapping it Up
With the code you have seen so far, we have a nice API to manage ContactPerson objects and their associated contact records. With the available classes, you can now create, edit and delete ContactPersons, EmailAddresses, Addresses and PhoneNumbers programmatically. The following code snippet shows you how to create a ContactPerson and save it in the database:
ContactPerson myContactPerson = new ContactPerson();

myContactPerson.FirstName = "Imar";
myContactPerson.LastName = "Spaanjaars";
myContactPerson.DateOfBirth = new DateTime(1971, 8, 9);
myContactPerson.Type = PersonType.Family;

Address myAdress = new Address();
myAdress.Street = "Some Street";
myAdress.HouseNumber = "Some Number";
myAdress.ZipCode = "Some Zip";
myAdress.City = "Some City";
myAdress.Country = "Some Country";
myContactPerson.Addresses.Add(myAdress);

EmailAddress myEmailAdress = new EmailAddress();
myEmailAdress.Email = "Imar@DoNotSpam.com";
myEmailAdress.Type = ContactType.Personal;
myContactPerson.EmailAddresses.Add(myEmailAdress);

PhoneNumber myPhoneNumber = new PhoneNumber();
myPhoneNumber.Number = "555 - 2368";
myPhoneNumber.Type = ContactType.Personal;
myContactPerson.PhoneNumbers.Add(myPhoneNumber);

ContactPersonManager.Save(myContactPerson);
This code creates a new ContactPerson, sets a few public properties, and then adds an Address, an EmailAddress and a PhoneNumber instance to the respective collections of the ContactPerson object. As soon as Save is called, the ContactPerson is saved in the database, as well as all of its contact records.
Getting a fully populated ContactPerson is now very easy as well. Let's assume the ContactPerson in the previous code block got an ID of 29. Getting it from the database, together with all its associated data can be done with a single line of code:
myContactPerson = ContactPersonManager.GetItem(29, true);
To see what the ContactPerson looks like, you can set a breakpoint in your code and then look at the ContactPerson object in the watch window. To do this, follow these steps:
- Clear all existing break points by pressing Ctrl+Shift+F9
- Put your cursor on the line that calls ContactPersonManager.GetItem(29, true) and press F9. This sets a breakpoint in the code window. When the code executes, it'll stop here.
- Hit F5 to start debugging your application. As soon as the code hits the line above, execution will halt. Notice that the actual line with the breakpoint hasn't executed yet, so you'll need to press F10 to execute it.
- Next, right-click the myContactPerson variable and choose Add Watch. The variable is added to the Watch window where it looks like this:
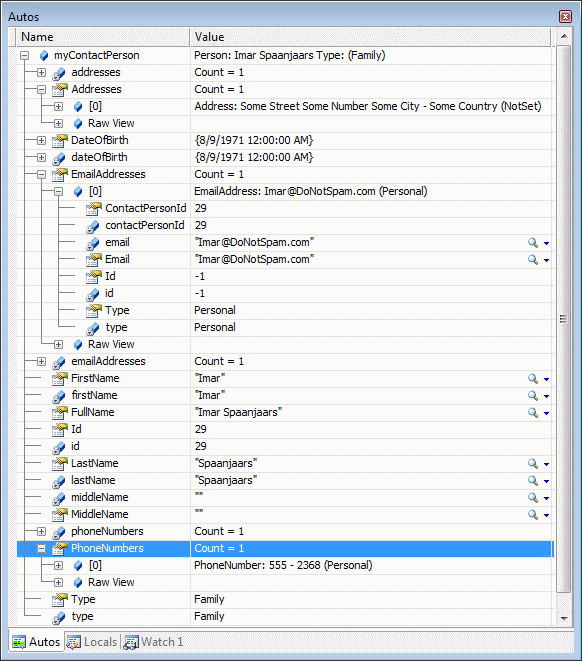
Figure 4 - The Watch Window for the ContactPerson
Notice how I expanded the Addresses and PhoneNumbers collection one level deep, while I also expanded the first EmailAddress in the collection, showing its full details. You may wonder how it's possible that you see these details in the Watch window, instead of the default Namespace.ClassName naming scheme that Visual Studio usually uses for custom types. The full details are made available by a DebuggerDisplay attribute on the respective classes. For example, the attribute for the Address class looks like this:
[
  DebuggerDisplay("Address: {Street, nq} {HouseNumber, nq}
         {City, nq} - {Country, nq} ({Type})")
]
public class Address
{
Within the DebuggerDisplay's constructor you specify a string with placeholders, each one wrapped in a pair of curly brackets. At debug time, these placeholders are replaced with their run-time values. In this example, the Address object displays its Street, Housenumber, City and Country properties and displays its type in parentheses. The nq inside the placeholders stands for no quote and is used to remove the quotes from string variables. Take a look at this article for a detailed examination of the DebuggerDisplay attribute.
While it's certainly useful to manage your contact persons and their contact data programmatically, this isn't always the easiest way to deal with it. It would be much easier if you'd be able to drag and drop a number of controls on a web page, set some properties using wizards, property grids and tasks panes and then be able to manage your contacts in a web browser.
This is exactly what part three of this article series will show you. You'll see how to create pages that display a list of contact persons. This lists is retrieved by calling GetList() on the ContactPersonManager class through an ObjectDataSource control. Each contact person in the list will be updatable and obviously, you'll be able to add new contact persons as well. You'll also be able to add, edit and delete the contact records for each contact person.
Summary
This article showed you how to implement your own business objects in .NET. You saw how to build the classes in the Business Objects and Logic Layers and how to write code for data access in the Data Access Layer. The four classes in the business layer, ContactPersonManager, AddressManager, EmailAddressManager and PhoneNumberManager can be used to manage your contact persons and their contact data in any type of application as they are not specific to ASP.NET.
First I showed you how most of the class files in the application are laid out, with a #region for each important section of the class. Then you saw how to write the private and public properties of the classes in the business objects layer. Most of the article was spent on discussing the inner workings of the methods in the classes that are responsible for getting data from the database and for inserting, updating and deleting existing records.
At the end of the article you saw a quick example of how you can use these classes programmatically.
Since a programmatic way to manage your contact persons isn't often the easiest solution, part three of this article series will show you how to use the classes in a web application that mostly uses declarative databinding.
Download Files
- Source Code of the Demo Application in C#. Comes with scripts to create the database
- Source Code of the Demo Application in Visual Basic .NET. Comes with scripts to create the database
- The MyGeneration templates for the Bll, BO and Dal classes in C#
- The MyGeneration templates for the Bll, BO and Dal classes in VB.NET
Where to Next?
Wonder where to go next? You can post a comment on this article.
Links in this Document
| Doc ID | 419 |
| Full URL | https://imar.spaanjaars.com/419/building-layered-web-applications-with-microsoft-aspnet-20-part-2 |
| Short cut | https://imar.spaanjaars.com/419/ |
| Written by | Imar Spaanjaars |
| Date Posted | 02/17/2007 17:29 |
| Date Last Updated | 04/25/2007 00:03 |
| Listened to when writing | Hits of Sunshine (For Allen Ginsberg) by Sonic Youth (Track 7 from the album: A Thousand Leaves) |
Comments
Talk Back! Comment on Imar.Spaanjaars.Com
I am interested in what you have to say about this article. Feel free to post any comments, remarks or questions you may have about this article. The Talk Back feature is not meant for technical questions that are not directly related to this article. So, a post like "Hey, can you tell me how I can upload files to a MySQL database in PHP?" is likely to be removed. Also spam and unrealistic job offers will be deleted immediately.
When you post a comment, you have to provide your name and the comment. Your e-mail address is optional and you only need to provide it if you want me to contact you. It will not be displayed along with your comment. I got sick and tired of the comment spam I was receiving, so I have protected this page with a simple calculation exercise. This means that if you want to leave a comment, you'll need to complete the calculation before you hit the Post Comment button.
If you want to object to a comment made by another visitor, be sure to contact me and I'll look into it ASAP. Don't forget to mention the page link, or the Doc ID of the document.