Configuring an ASP.NET 2.0 Application to Work with Microsoft SQL Server 2000 or SQL Server 2005
Introduction
Configuring an ASP.NET 2 application to work with SQL Server is not an easy undertaking. You need to be aware of a number of security related concepts in the area of SQL Server, IIS and ASP.NET 2.0. The number of different options you have make the problem even more complex. In this article, I describe some of the common scenarios that you are likely to run into when working with SQL Server and ASP.NET pages. I'll be using SQL Server 2005 in all my examples, but most of the concepts also apply to SQL Server 2000. Note that most of the principles described in this article can also be used in ASP.NET 1.x applications.
Many books about ASP.NET 2.0 (including my own), use Microsoft SQL Server 2005 Express Edition. The reason behind this choice is that the Express Edition is very easy to use and configure. In many cases, using a SQL Server Express database is as easy as adding a database to your project (or one of the new Login controls), and then hitting F5 to run the application. This makes the Express Edition great for local development and quick and dirty applications. However, in a production environment, the Express Edition won't cut it. Instead, you'll need one of its bigger brothers like SQL Server 2005 Standard Edition. But as soon as you try to make the move to one of these SQL Server versions, you may run into a number of security related configuration issues. This article takes a look at a number of common issues that you need to be aware of when you try to use SQL Server 2005 in your applications.
The article starts off with familiarizing you with the terminology that you'll run into when configuring the system. The second part then looks at a number of different scenarios for configuring an ASP.NET 2.0 application with SQL Server 2005. You'll see how to use a custom SQL Server database in your own application and how to configure both SQL Server and your application.
This article doesn't touch on configuring your database for the new ASP.NET 2.0 provider features, like Membership and the Role Manager. However, there's a great article by Scott Guthrie called "Configuring ASP.NET 2.0 Application Services to use SQL Server 2000 or SQL Server 2005" that shows you how to use tools like aspnet_regsql.exe to configure an existing SQL Server 2000 or 2005 to work nicely with the new provider features. That article, together with this one, should provide you with enough details to set up your system so it can work with a SQL Server 2000 or 2005 database.
Terminology and Concepts
When you want to connect to a SQL Server database, you have to authenticate yourself, so the database knows what user is trying to gain access. Microsoft SQL Server supports two different authentication mechanisms: SQL Server Authentication and Windows Authentication (often called Integrated Security).
SQL Server Authentication
With SQL Server Authentication, SQL Server takes care of user management. This means that users and their passwords are managed by SQL Server. You can access the user management functionality in SQL Server through the SQL Server Management Studio (for SQL Server 2005) or the Enterprise Manager (for SQL Server 2000). You'll see more on this later.
To connect to a SQL Server instance that uses SQL Server authentication, you need to pass a user name and password in the connection string of your application. A typical connection string looks like this:
Data Source=YourServer;Initial Catalog=YourDatabase;
           User Id=UserName;Password=Password;
Windows Authentication
With Windows Authentication, the Windows OS takes care of user management. All interaction with the database is done in the context of the calling user (more on that later) so the database knows who's accessing the system, without an explicit user name and password being passed in the connection string. You still need to map a Windows account to a SQL Server account so SQL Server can determine whether the account has sufficient permissions. I'll show you how to do this later.
A typical connection string using Windows Authentication can look like this:
Data Source=YourServer;Initial Catalog=YourDatabase;
             Integrated Security=SSPI;
Instead of Integrated Security=SSPI you can also use Trusted_Connection=True which has the same effect.
Windows or SQL Server Authentication?
In general, it's recommended to use Windows authentication. The fact that you don't need to use a password in the connection string, means your application will be a bit safer. You don't need to send the password over the wire, and there's no need to store it in a configuration file for your application where it can be viewed by anyone with access to that file.
However, SQL Server Authentication is a bit easier to use. Since you specify your own user name and password, you don't need to know the final user account that your application runs under.
Notice that it is possible in SQL Server to disable SQL Server Authentication (but not Windows Authentication). You can configure this setting through the server's Properties dialog in the Management Studio or Enterprise Manager. The following screen shot shows the settings dialog for SQL Server 2005:
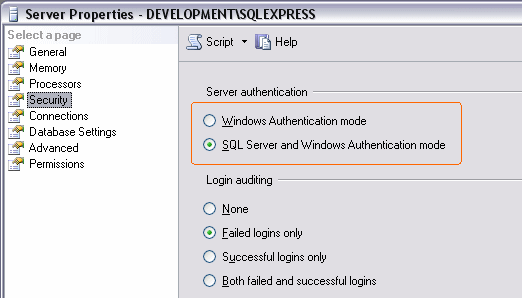
Figure 1: The SQL Server 2005 Server Properties Dialog
You can see from this screen shot that this instance of SQL Server is configured to allow both authentication mechanisms.
User Accounts
Another area you need to know a bit more about is user accounts. When you use SQL Server Authentication, things are simple. The account used is the account you specify in the connection string. But when you have a connection to SQL Server with Windows Authentication, that connection runs under the credentials of a specific user account. What that account is, depends on the application and its configuration. The following FAQ explains how you can find out the user account when you are using Internet Information Services (IIS) as the web server: "How Do I Determine the Security Account that IIS Uses to Run My Web Site?". For most scenarios this FAQ will be enough; however, when you are running a web site from within Visual Studio 2005 using the built-in development web server Cassini, the actual account used by the web server process is your own account that you use to log on to your Windows machine. So, keep that in mind when you have a site in Visual Web Developer and run it against the development web server.
Now that you are familiar with the important terminology, it's time to look at a number of different scenarios. In the section that follows, I'll show you how to configure your application and SQL Server in 3 different scenarios. For these scenarios, I'll use a machine called Development that holds the web site and an installation of SQL Server called Development\Sql2005. In my examples, I am using a database called BugBase, taken from my latest book ASP.NET 2.0 Instant Results.
Attaching Databases to SQL Server
Before I show you the three different scenarios, let's take a look at attaching databases to your SQL Server installation. Unlike file based databases like Microsoft Access, a SQL Server database need to be attached to a running instance of SQL Server. Once you've attached the database, it remains attached until you either delete or detach it. This works a little bit different for databases that run under SQL Server Express. For more details about this, check out Working with User Instances on the MSDN site.
-
To attach a database, open up SQL Server Management Studio from the Microsoft SQL Server 2005 start menu item. After you logged in, you'll see the following screen:
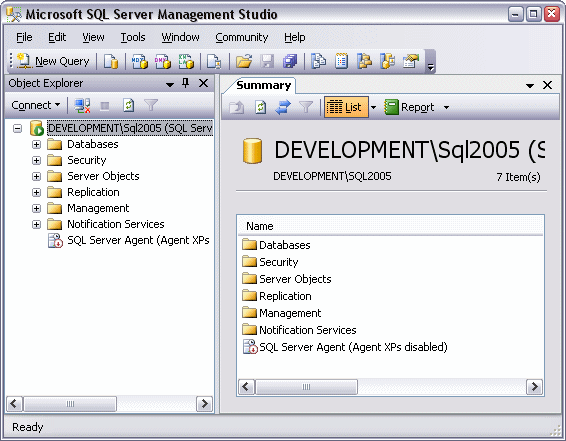
Figure 2 - Microsoft SQL Server Management Studio
-
Right-click the Databases node and choose Attach. In the dialog that follows, click the Add button, browse for your .mdf file and click OK twice to attach the database.
- Once you have added the database, you may need to rename it. By default the database is named after the full path to the .mdf file. To rename the database, click it once, press F2 and type a new name. In my case, I renamed the database to BugBase.
At this stage, by default only the administrative accounts (Windows administrators or the SQL Server SA account) have access to the database. With your database attached to your instance of SQL Server, it's time to look at configuring the database and the application.
Scenario 1 - Using SQL Server Authentication
From a configuration point of view, this is probably the easiest scenario to configure: all you need to do is create a user in SQL Server, assign a password and then use that account in the connection string. The first action in this process is to add a user account. To do this, follow these steps:
-
Open the Security node that you can see in Figure 2, then right-click on Logins and choose New Login.
-
Select the SQL Server authentication option, and then type a user name and password. In my examples, I am using MyWebsiteUser as the username, and Pa$$w0rD as the password.
- Finally, click the OK button.
The final step is to give this new account the proper permissions to your database:
-
Go back to the database you attached previously, expand the database, then expand Security, and finally expand Users. You should see something similar to this:
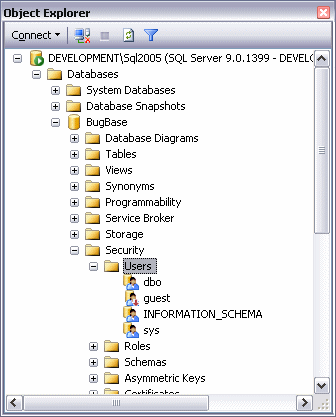
Figure 3 - The Expanded View of the BugBase Database
-
Right-click the Users node and choose New User.
-
In the Username text box, type MyWebsiteUser.
-
In the Login name text box, type MyWebsiteUser. Alternatively, you can click the little button with the three ellipses and browse for the user name.
-
At the bottom half of the screen, you see a box labeled Database role membership. In this box, you can choose a number of roles that you want to grant to your new user. The rule here is: give users as little permissions as possible. A good choice is db_datareader and db_datawriter that allows the account to both read from and write to tables in the database.
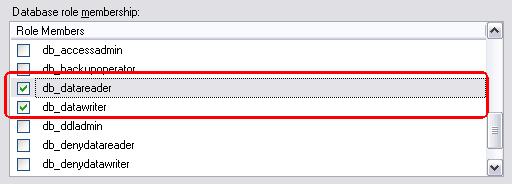
Figure 4: The Database Role Membership List.
Check out SQL Server's Books Online for more information about the various roles.
-
There's a fair chance that only reading and writing to tables is not enough. For instance, you could have a number of stored procedures that the user account must be able to execute as well. To grant the account execute permissions on your procedures, click Securables in the left hand pane and click the Add button. In the dialog that follows, choose All objects of the types and then click OK. Then check Stored Procedures and click OK. The list with Securables will be filled with a number of stored procedures, including your own. Locate your stored procedure, and then make sure at least Execute is selected in the Grant column of the Explicit permissions box.
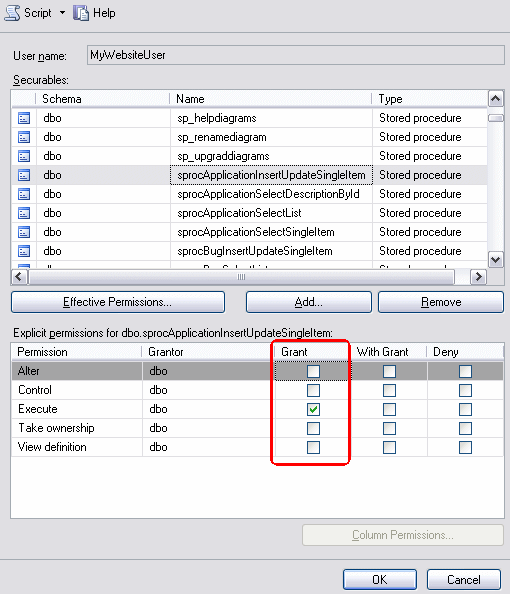
Figure 5 - The Permissions Dialog for a Stored Procedure
Repeat this step for every custom stored procedure in your database.
- Finally, when all permissions have been set, click the OK button to apply all the changes to the new user account.
Pfew, a lot of work, right? Fortunately, most of the work is now done. The next step is testing it out. In the following section, I'll walk you through creating a simple web site that displays data from the BugBase database with the user accounted created and configured in the previous steps.
-
Start up Visual Web Developer or Visual Studio 2005 and create a new web site. It doesn't matter whether you choose C# or Visual Basic as the language for the site.
-
Open the Web.Config file and add a connection string that looks like this:
Don't forget to replace the items that are highlighted in this connection string.<connectionStrings> <add name="BugBase" connectionString="Data Source=.\SQL2005; Initial Catalog=BugBase; User ID=MyWebsiteUser;password=Pa$w0rD" providerName="System.Data.SqlClient" /> </connectionStrings>
-
From here, you can use the connection string in ASPX pages. How you do this depends on your requirements, but you could for example use this connection string in a SqlDataSource control that is used as the data source for a GridView. The following code snippet shows a SqlDataSource and a GridView that displays two columns from the Bug table in the BugBase database:
<asp:SqlDataSource ID="SqlDataSource1" runat="server" ConnectionString="<%$ ConnectionStrings:BugBase %>" SelectCommand="SELECT [Id], [Title] FROM [Bug]"> </asp:SqlDataSource> <asp:GridView ID="GridView1" runat="server" AutoGenerateColumns="True" DataKeyNames="Id" DataSourceID="SqlDataSource1"> </asp:GridView> - Once you create a page that can display data, you can view it in your browser. If it all worked out as expected, you should see the data from the database being displayed. If you get an error, make sure that you used the right account and password in the connection string and that SQL Server is configured for SQL Server Authentication.
Scenario 2 - Using Windows Authentication with IIS and the Database on the Same Machine
This is a common scenario, especially when you're developing your site on your local machine. Both the web server (either IIS or the built-in development web server) and SQL Server run on the same physical machine. This scenario makes it easy to use Integrated Security because both the web server and SQL Server can use the same Windows account. To configure your server for this scenario, follow these steps:
-
Start by determining the account used by your web server. Check out this FAQ for more details: "How Do I Determine the Security Account that IIS Uses to Run My Web Site?". For the remainder of this section, I'll use the ASPNET account on my machine called Development.
-
Next, you need to map this Windows account to a SQL Server account. To do this, open up Microsoft SQL Server Management Studio and log in to your SQL Server instance. Expand the Security node (that you can see in Figure 2) and then right-click Logins and choose New Login. Type MachineName\ASPNET in the Login name box, where MachineName is the name of your Windows machine, Development in my case. Make sure that Windows authentication is selected:
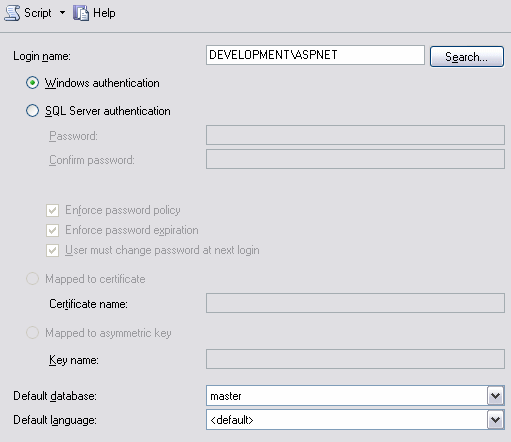
Figure 6 - Part of the New Login Dialog
-
With the Windows account mapped to a SQL Server login the next step is to assign this login the appropriate permissions in your database. To do this, expand the Databases node (visible in Figure 2) and then expand Security. Right-click the Users node and choose New User. In the Username box, type ASPNET and in the Login name type MachineName\ASPNET. Alternatively, click the button with the ellipses, then Browse to select the account from the Matching objects list. You should end up with something like this:
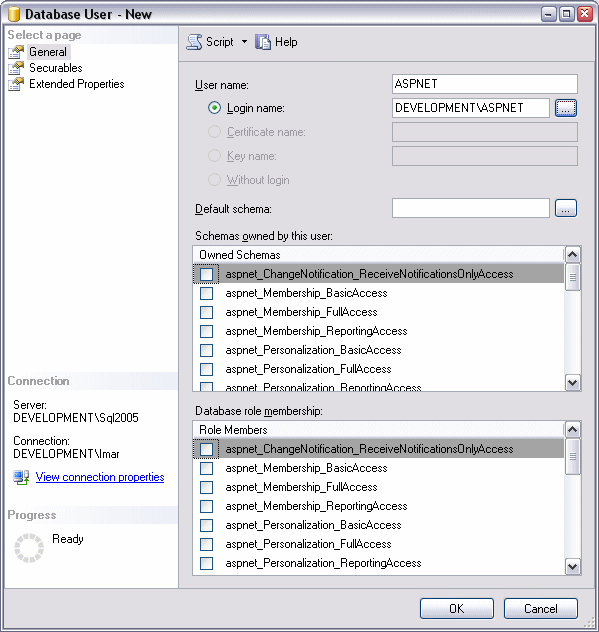
Figure 7 - The New User Dialog
-
At the bottom half of the screen, you see a box labeled Database role membership. In this box, you can choose a number of roles that you want to grant to your new user. For this example, choose db_datareader and db_datawriter. For more details about configuring roles and permissions for other other objects like stored procedures, see steps 5 and 6 of scenario 1 earlier in this article.
- Finally, when all permissions have been set, click the OK button to apply all the changes to the new user account.
The next step is testing out these settings. In the following section, I'll walk you through creating a simple web site that displays data from the BugBase database with the user accounted created and configured in the previous steps. Notice that these steps are similar to those from scenario 1 earlier in this article. However, you'll need to use a different connection stirng, and configure IIS for your web site.
-
Start up Visual Web Developer or Visual Studio 2005 and create a new web site. It doesn't matter whether you choose C# or Visual Basic as the language for the site. Save the site in a folder like C:\TestWebsite.
-
Open the Web.Config file and add a connection string that looks like this:
Don't forget to replace the items that are highlighted in this connection string to values that apply to your situation.<connectionStrings> <add name="BugBase" connectionString="Data Source=.\SQL2005;Initial Catalog=BugBase; Integrated Security=SSPI;" providerName="System.Data.SqlClient" /> </connectionStrings>
-
From here, you can use the connection string in ASPX pages. How you do this depends on your requirements, but you could for example use this connection string in a SqlDataSource control that is used as the data source for a GridView. The following code snippet shows a SqlDataSource and a GridView that displays two columns from the Bug table in the BugBase database:
<asp:SqlDataSource ID="SqlDataSource1" runat="server" ConnectionString="<%$ ConnectionStrings:BugBase %>" SelectCommand="SELECT [Id], [Title] FROM [Bug]"> </asp:SqlDataSource> <asp:GridView ID="GridView1" runat="server" AutoGenerateColumns="True" DataKeyNames="Id" DataSourceID="SqlDataSource1"> </asp:GridView> - Once you have created the page that can display data, you should configure IIS so it points to your web site's root folder. To do this, open the Internet Information Services Manager and locate your web site (most likely, this site is called Default Web Site). Right-click it and choose Properties. On the Home Directory tab, enter C:\TestWebsite (or the location where you created the web site in step 1) in the Local path box. Next, switch to the ASP.NET tab and make sure that the site runs against version 2.0 of the framework.
- Finally, browse to http://localhost in your web browser. If all worked out as expected, you should see the data from the database being displayed. If you get an error, make sure that you used the right account and password in the connection string and that SQL Server is configured for SQL Server Authentication.
Scenario 3 - Using Windows Authentication with IIS and the Database on different Machines
This is another common scenario and one that you're likely to encounter in a production environment. The web site (or sites) run on a dedicated web server, while the data comes from a dedicated SQL Server machine. Quite often, the authentication mechanism in this scenario is SQL Server authentication. The reason behind this is that it's easy to set up. You don't need to be aware of what account is used by the web server, as you explicitly send a user name and a password in the connection string to the database. However, you don't have to use this security mechanism; it's quite possible to use Windows Authentication as well as long as the two machines are on the same network.
When using this scenario, there are two options that you need to be aware of: both machines fall under the same Windows domain, or both machines can be seen as independent, stand alone machines. In both configurations, the actions you need to perform are very similar to those of scenario 2. However, it's the exact user account that is different. The next two sections describe this in more detail.
Sharing the Same Windows Domain
When both machines are part of the same Windows Domain, you can configure IIS to run the web site under a specific domain account, like YourDomain\AnonIIS. For more details about configuring IIS, check out this FAQ: "How Do I Setup IIS to Allow it to Use Network Resources?" There's one caveat that you need to be aware of in ASP.NET pages: even if you specify a domain account in IIS, the ASP.NET web site will still run under MachineName\ASPNET or MachineName\Network Service.
However, you can change this behavior by modifying the Web.Config file for the application. To make the change, you can add an <identity impersonate="true" /> element to the <system.web> section. If you add the element, IIS will impersonate the current user and use that account instead of the ASPNET account. In this case, the "current user" means the account you set in the Anonymous access box when you're using anonymous access. Otherwise, the current user means an authenticated visitor.
When you have configured IIS to run under a domain account, and configured the application to use impersonation, the final step is to add the domain account as a user to SQL Server and your database. This works almost the same as described in scenario 2. The only difference is that the account you need to add follows the pattern of Domain\AccountName and not MachineName\AccountName.
Two Stand Alone Machines
Once again, this scenario is similar to scenario 2 in terms of configuring SQL Server. However, since both machines have different names, and thus different user accounts, it may seem impossible to add the account that is used by IIS on one machine to SQL Server on the other. The trick in this scenario is to use "mirrored accounts". You create accounts with identical names and passwords on both machines, for example MyWebsiteAccount. On the machine that runs IIS, you use this account in the Anonymous Access dialog for IIS and add an <identity impersonate="true" /> element to your application's configuration file. For more details, see the previous section "Sharing the Same Windows Domain". Then on the database server, you add the account MachineName\MyWebsiteAccount to SQL Server and your database. This works at run time, because the internal representation of the Windows account will be the same, regardless of the machine where the account was created.
For more information about mirroring the accounts, check out the section "Synchronize the IUSR Account" of this FAQ. Although the FAQ speaks about synchronizing the IUSR account in a classic ASP scenario, the same principles apply to ASP.NET.
Other Issues
When working with SQL Server 2005, you may also receive the following error: "An error has occurred while establishing a connection to the server. When connecting to SQL Server 2005, this failure may be caused by the fact that under the default settings SQL Server does not allow remote connections."
In a default installation, SQL Server only allows local applications to connect. To resolve this, and grant remote systems access to the database as well, follow these steps:
- Open the SQL Server Configuration Manager from the Microsoft SQL Server 2005 start menu item. Depending on the version of SQL Server you're using, this item may be located under the Configuration Tools sub menu.
- In the window that appears, locate your instance of SQL Server under the SQL Server 2005 Network Configuration item and click it.
- In the list with protocols on the right, right-click Named Pipes and choose Enable if its status is currently set to Disabled.
- Repeat the previous step but this time configure TCIP/IP.
You'll need to restart SQL Server for the changes to take effect. You can do this under the SQL Server 2005 Services node in the same dialog, or through the Services panel of the Administrative Tools of Windows.
Summary
As you have seen, securing SQL Server and ASP.NET applications is a daunting task. In many situations, you're better off leaving this to your system or database administrator. However, if you don't have a security specialist, or you are the system or database administrator, this article hopefully has given you some valuable insight in securing SQL Server and your application.
Please note that since this security topic is so broad, I haven't been able to describe each and every scenario, step or concept in great detail. If you feel something important is missing, feel free to contact me, describe what you're missing and I'll update the article.
Download Files
Source Code for this Article
This download contains a default ASP.NET page with a simple GridView and a SqlDataSource so you can test things out. It also contains a sample Web.Config file with two connection strings: one that uses SQL Server Authentication and one that uses Windows Authentication. Don't forget to update both the connection strings and the SELECT statement in the ASPX page when you use this sample. Also, since the Web.Config file contains two connection strings with the same name, you need to make sure that you comment out the one you don't need.
References
Where to Next?
Wonder where to go next? You can post a comment on this article.
Links in this Document
| Doc ID | 395 |
| Full URL | https://imar.spaanjaars.com/395/configuring-an-aspnet-20-application-to-work-with-microsoft-sql-server-2000-or-sql-server-2005 |
| Short cut | https://imar.spaanjaars.com/395/ |
| Written by | Imar Spaanjaars |
| Date Posted | 06/04/2006 00:12 |
| Date Last Updated | 11/06/2020 12:16 |
| Listened to when writing | Take One (Re-built) by Front 242 (Track 16 from the album: Geography 2) |
Comments
Talk Back! Comment on Imar.Spaanjaars.Com
I am interested in what you have to say about this article. Feel free to post any comments, remarks or questions you may have about this article. The Talk Back feature is not meant for technical questions that are not directly related to this article. So, a post like "Hey, can you tell me how I can upload files to a MySQL database in PHP?" is likely to be removed. Also spam and unrealistic job offers will be deleted immediately.
When you post a comment, you have to provide your name and the comment. Your e-mail address is optional and you only need to provide it if you want me to contact you. It will not be displayed along with your comment. I got sick and tired of the comment spam I was receiving, so I have protected this page with a simple calculation exercise. This means that if you want to leave a comment, you'll need to complete the calculation before you hit the Post Comment button.
If you want to object to a comment made by another visitor, be sure to contact me and I'll look into it ASAP. Don't forget to mention the page link, or the Doc ID of the document.