N-Layered Web Applications with ASP.NET 3.5 Part 1: General Introduction
NOTE: the concepts presented in this article are now considered obsolete possibly because better alternatives are available.
Update 09/06/2013: I have written a completely new series targeting (ASP).NET 4.5 and Entity Framework Code First version 5. Check out the new series here: http://imar.spaanjaars.com/573/aspnet-n-layered-applications-introduction-part-1.
Update 02/03/2009: There is now a VB.NET version of the application available thanks to Sven Huijbrechts from ClearMedia bvba. Check it out at the Downloads section at the end of this article
Note: this is part one in a series of six. If you rather read this entire series off-line, you can buy the series as a convenient PDF document that comes with the full source. Besides the convenience, buying the PDF will also make you feel good as it shows your appreciation for the articles and helps me pay the bills for my server and hosting so I can keep running imar.spaanjaars.com and continue to provide you with great content. For more details, check out this post that shows you how you can buy the entire series right now.
In January 2007 I released the first part of a highly popular three-part article series on N-Layer design using ASP.NET. This article was followed by two more parts in February, and I updated all three articles in April to fix some minor issues in the code and in the articles. In June 2007 I added another – small – article to the series that showed you how to do custom sorting in N-Layer applications.
Now, almost two years later, it’s time for a major update on the articles and the Contact Manager Application that is discussed in the article.
Over the next six articles, I’ll show you how I improved the design of the original application, making it more powerful, secure and easier to maintain.
This is part 1 in the series. It builds on top of the earlier three part series on N-Layer design. If you haven’t already done so, be sure to check out these articles first, as a lot of code and concepts used in this new series is explained in detail in the older series.
Quick Links to All Articles
Previous Series
Building Layered Web Applications with Microsoft ASP.NET 2.0 - Part 1
Building Layered Web Applications with Microsoft ASP.NET 2.0 - Part 2
Building Layered Web Applications with Microsoft ASP.NET 2.0 - Part 3
Custom Sorting with N-Layer Design Classes and the GridView
Current Series
N-Layered Web Applications with ASP.NET 3.5 Part 1: General Introduction
N-Layered Web Applications with ASP.NET 3.5 Part 2: Introducing the Validation Framework
N-Layered Web Applications with ASP.NET 3.5 Part 3: Advanced Validation Topics
N-Layered Web Applications with ASP.NET 3.5 Part 4: Sorting, Paging and Filtering
N-Layered Web Applications with ASP.NET 3.5 Part 5: Dealing with Concurrency
N-Layered Web Applications with ASP.NET 3.5 Part 6: Security
Introduction
The original article presented a simple on-line Contact Manager Application that allows you to manage information of your contacts, including their e-mail addresses, addresses and phone numbers. While simple in its feature set, the application showed the design of a full blown multi-layered web application.
I won’t be repeating a whole lot from the first article series here, so you’re advised to read them first (if you haven’t already done so) before you proceed with this new series. In particular, I’ll skip most of the following topics:
- Gathering requirements for your design (I’ll assume the requirements for the application haven’t changed much so the initial workshop and raw sketches still cut it).
- Database design (as the database hasn’t changed much).
- The Web Layer (most of the web layer has remained exactly the same since the initial release).
- Code Organization using #regions (I am still using the same organization rules, although I made some minor changes in the variable naming scheme due to evolving programming guidelines).
- Data Access Layer code. A lot of code in the DAL is pretty similar to that of the previous edition. The biggest changes are perhaps the extra using statement for the SqlCommand objects and the extra columns and other code added to support concurrency (explained in part 5)
To get up to speed with these topics, check out part 1, part 2, part 3 and part 4 of the original article series out now.
I’ll refer to the previous series or articles when I am using concepts that are not explained here, but that are explained in the previous series.
A Look Ahead
Before I dig into the new application in detail, I’ll give you a brief over of what to expect of the next couple of articles:
N-Layered Web Applications with ASP.NET 3.5 Part 1: General Introduction
N-Layered Web Applications with ASP.NET 3.5 Part 2: Introducing the Validation Framework
N-Layered Web Applications with ASP.NET 3.5 Part 3: Advanced Validation Topics
N-Layered Web Applications with ASP.NET 3.5 Part 4: Sorting, Paging and Filtering
N-Layered Web Applications with ASP.NET 3.5 Part 5: Dealing with Concurrency
N-Layered Web Applications with ASP.NET 3.5 Part 6: Security
Part 1 (which you are reading right now)
In this part you’ll find a quick look back the initial design and a general overview of the new version. You’ll see how I built up the new layered structure, how I organized the project structure better now that Visual Web Developer Express Edition allows you to use Class Library projects and I’ll show the new features of the new design (some of which are discussed in full detail in later parts).
Part 2 – Introduction to Validation
Many of you have asked me to show you how to implement validation in your application. How can you make sure a user enters a valid e-mail address? How can you be sure that a date of birth falls in a valid range? How do you force a user to enter a valid name without writing a lot of code? And how do you provide feedback to your users in case they made a mistake?
These are all typical day to day programming problems that need to be solved every time you work with data and custom business entities, so it makes sense to write a common solution to this problem in the Business Layer in order to avoid writing the same logic over and over again. In part 2 I’ll show you a Validation Framework that makes all of this very easy to do.
Part 3 – Advanced Validation Topics
The Validation Framework I discussed in part 2 is only the beginning of what’s possible. This part digs deeper in the possibilities, showing how to create your own validation rules and how to localize (make available in multiple languages) the application and Validation Framework.
Part 4 – Sorting, Paging and Filtering of Data
I think the main reason why my initial articles were so popular is because they were so simple and straight forward. The code and the design were pretty easy to understand as they were only focusing on a few main areas. However, that also meant I had to leave some import topics out, like sorting, paging and filtering. I’ll make up for these omissions in part 4 of this series and show you how to implement these concepts.
Part 5 – Dealing with Concurrency
Concurrency issues can be problematic when two users try to update the same piece of data at the same time. Normally, when you don’t deal with concurrency, the last user to write to the database wins. In small web sites with only a few visitors, you may not care about concurrency issues. However, as soon as your site attracts more visitors, or you have a site where it’s likely that multiple users can access the same data at the same time, concurrency becomes a real problem. In this part I’ll show you how to handle concurrency, what your options are and how I have implemented it in the new Contact Manager application.
Part 6 – Security
Security is another topic I left out of the original article series. However, almost all web applications require some sort of security applied, be it a simple access rule to block unauthenticated visitors from accessing your management pages, to a more fine-grained control system to adapt the user interface to the currently logged on user. In this part, I’ll show you how to use declarative and imperative role based security, how to use URL authorization and how to use the ASP.NET Membership and RoleManager API’s. Note that this part does not contain a general introduction to these concepts, as many other books and articles have already been written about. I’ll refer to books and on-line articles where appropriate.
Now that you have seen what’s coming in the near future, it’s time to take a step back, and see how we got here in the first place.
A Quick Look at the Initial and at the New Design
The initial design consisted of three layers, all shown in Figure 1.

Figure 1 – Overview of the Three Layers in the Contact Manager Application
At the top of the figure you see the Presentation or UI layer, implemented as an ASP.NET web application. In the middle you see the Business Layer which contains two separate namespaces: the BO namespace (with classes that act as relatively dumb data containers, renamed to BusinessEntities in the new design) and the Business Logic Layer (BLL) — responsible for interacting with the UI and Data Access Layers). At the bottom you see the Data Access Layer (DAL) which is responsible for accessing the database.
While this design works well from a high-level point of view, it had a few shortcomings that were pointed out by some of my readers. To be able to improve the design, it’s important to zoom in a bit on these shortcomings first.
Shortcomings of the Initial V1 Release
One of the biggest issues that people had with the design of version V1 was the lack of a validation mechanism. There was no central place to validate the state of an object and no easy way to express your validation rules. I advised some of you to implement and call a Validate method from the Save method and perform custom validation there optionally, throwing an exception when a business rule was broken. This often meant you needed to write a lot of custom code.
Another often requested feature was a common base class, or at least a common interface for the business objects. By letting classes inherit a common base class, it’s easier to define behavior that should apply to all classes in your application, make it easier to share behavior.
The V1 edition of the design was in English only. The UI wasn’t localizable and neither were any error messages or messages for broken validation rules you may have thrown from the Business Layer. Of course being able to easily translate a web site in multiple languages is almost a necessity these days in the global internet market to that’s another concern that needs to be addressed in the new version of the application.
Finally, some of you were a bit worried about the physical organization of the application. Some thought the separation of the various layers inside different folders *inside* the web application’s App_Code folder was breaking a pure multi-layered design. While I didn’t always agree with the reasoning behind these worries (and especially not with a few narrow-minded “booh booh” type of comments from people who clearly showed they didn’t understand what it’s all about and what these articles were meant to demonstrate), I do agree that good organization leads to better maintainable code and thus to better applications.
You’ll see how I address these shortcomings and more over the course of these six articles.
What’s New in v2
To give you an idea of what’s new in Design v2, I’ll list the major changes here. With the first installment of this article series, you won't be able to download the full source code yet. However, staring with part 2 which is released in December 2008, I'll supply the full code for the entire application, showing all the features and techniques I am discussing in this series. Want a copy of the full source right now and get a copy of all six articles? Check out this article to learn how you can buy the full set right now!
- I reorganized the application’s structure by using separate Class Library projects for each layer or namespace. Previously you couldn’t do this with the free VWD Express Edition, but now with Service Pack 1 for VWD, you can easily create multi-project solutions containing web sites and class libraries.
- I introduced a new namespace naming scheme: the BO layer has been renamed to BusinessEntities.
- I introduced a new common base class for all objects in the BusinessEntities layer called BusinessBase. This class defines behavior common to all other objects, like ContactPerson and Address. This BusinessBase in turn inherits from ValidationBase which provides the services needed by the Validation Framework.
- I implemented a Validation Framework to make it easy to validate your business objects before you save them in the database. Additionally, the business objects expose a collection of BrokenRules that provide information about the different rules that are broken, along with an error message that explains why these rules are broken. Although not required to implement, the framework makes it super easy to localize the error messages in different languages using standard .NET localization features. You’ll see how this works in part 3.
- Both the business and the Web layer are now localizable. The download comes with all string resources translated in English and Dutch, but it’s easy to add your own language, or to modify the exiting text. The BusinessBase class defines shared behavior for localization.
- The initial design featured collection classes that inherited from List<T>. FX Cop flagged this design choice, detailing it’s better to inherit from Collection<T>. You’ll see how this works and how to overcome the lack of a Sort method on this base class that is present on the List<T> class.
- The entire solution is now upgraded to ASP.NET 3.5 to be able to use LINQ to Objects. This is only used in the Validation Framework and in the sorting and paging routines in the Business Layer so it’s relatively easy to downgrade the entire solution back to ASP.NET 2.0 in case you have the need.
- The web project now uses a Master Page for common design elements. Additionally, all CSS and presentation related code has been moved into the main Default theme.
- I implemented sorting and paging in the business and data layers making it easy for a user to see smaller chunks of data. This results in better performance and in a better user experience.
- I implemented Concurrency checks in the Data Access Layer and stored procedures to deal with concurrency problems. I modified the UI pages to deal with this and inform the user of any conflicts.
- I dropped support for Microsoft SQL Server 2000. The database and code that comes with these articles can be used as-is on SQL Server 2005 and 2008 though, including the free Express editions. If you really want to use this on SQL Server 2000, you’ll need to rewrite a few stored procedures, and change some of the columns in the database from nvarchar(max) to ntext. You should be able to open the database with SQL Server 2005 and 2008, but if you get an error related to a missing Microsoft.SqlServer.Management.Sdk.Sfc file, be sure to check out the file Troubleshooting.txt that comes with the download.
- I wrapped the entire Default.aspx page in an AJAX UpdatePanel to smooth out page transitions.
- I implemented security, both on the page level using URL Authorization and at the code level using declarative and imperative security checks.
- Additionally, I made the following minor changes to the code or the model:
- The NotSet items of the enumerations have been renamed to None and given a value of 0 to better align with programming guidelines. Because this default value now has the underlying value of 0 (zero) which was previously assigned to real items, the application is no longer backwards compatible with the data in the database from the previous version. However, given the limited practical use of the data in this application, I doubt that will be a problem.
- Changed most properties to be auto-implemented properties. Not a big deal, but makes code files slightly more manageable.
- The integer ID properties of the business entities no longer default to -1 but to 0. Again, not a big deal. It was mostly a side effect of the auto-implemented properties. Additionally, 0 looks less like a magic number than -1 does.
- Updated variable names to match with the latest programming guidelines. Most notably: private fields have now all been prefixed with an underscore.
- Updated the API documentation (the XML comments) so they are in line with the new model and name changes.
- Moved some code from code behind to a separate Helpers class to make it easier to reuse it across pages.
Now that you’ve seen what’s new and coming, it’s time to look at these changes in detail. Some of them are discussed in this part while the remainder of the topics are discussed in the next six articles.
Application Setup
In the previous version of this application, the code for all layers was stored in the App_Code folder of the web application. This was necessary as Visual Web Developer Express Edition didn’t allow you to create separate class library projects and consume them in a web application. Since I wanted as many people as possible to be able to follow along, even if they were using the free Express Edition, I had to take this route which resulted in the following overview of the Web Site project in Visual Web Developer 2005:

Figure 2 – The Solution Explorer of the Contact Manager Application Version 1.0
The application consisted of a single Web Site Project with all the code placed in the App_Code folder, separated by layer.
Fortunately, Service Pack 1 for Visual Web Developer 2008 now adds support for Class Library projects, making it easier to spread out the various layers over multiple, physically separated, class library projects. This results in the design for the Contact Manager Application shown in Figure 3:

Figure 3 - The Solution Explorer of the Contact Manager Application Version 2.0
The Visual Studio Solution Spaanjaars.ContactManager.sln now contains 5 separate projects, each of which is discussed in the next sections. If you purchased the commerical version of this article, you have another project in the solution that contains the tests for this project.
To setup a brand new solution like this in Visual Web Developer 2008 (VWD 2008) or Visual Studio 2008 (VS 2008), (with Service Pack 1 applied), carry out the following steps:
- Start VWD 2008 or VS 2008, choose File | New Web Site (or File | New | Web Site depending on the version of VWD 2008 you are using and the type of configuration you have chosen at start up). Choose ASP.NET Web Site and save it in a folder like C:\Projects\CompanyName\ApplicationName\CompanyName.ApplicationName.Web. In my example, I stored the site at C:\Projects\Spaanjaars\ContactManager\Spaanjaars.ContactManager.Web. This is how I usually set things up. By grouping everything under Projects, it's easy to find all your project files. Within Projects, I create a folder per customer / company, and within that folder, I create a folder per project I am doing for that customer. My source control tree is set up with an identical structure, so it's easy to find stuff when you need it. The final folder (Spaanjaars.ContactManager.Web) contains one of the Visual Studio projects that make up the entire application. In the next steps, more projects are added.
- Next, choose File | Add | New project, select the Class Library template, and enter CompanyName.ApplicationName.Bll as the name of the project. In my case, I used Spaanjaars.ContactManager.Bll. Save the project in the same folder as the web project (at C:\Projects\CompanyName\ApplicationName\) so the two projects end up in the same parent folder (this is not a requirement but makes managing your projects much easier).
- Repeat the previous step three more times, adding the following class libraries:
- CompanyName.ApplicationName.BusinessEntities
- CompanyName.ApplicationName.Dal
- CompanyName.Validation
(Note there’s no ApplicationName in the Validation project as the Validation framework can be shared by multiple applications.
- When you’re done, your Solution Explorer should look similar to the one shown earlier in Figure 3.
- Finally, save the solution in the root folder (at C:\Projects\CompanyName\ApplicatioName) and call it CompanyName.ApplicationName. Your application folder in a Windows Explorer should now look like Figure 4:

Figure 4 – Windows Explorer Showing the Organized Folder Structure
- The last step in the setup process is linking the various applications. To do this, right click the Web Site Project. Choose Add Reference and on the Projects tab choose the Bll and BusinessEntities projects.
- Repeat the previous step, creating references between the following projects:
|
From |
To |
|
Spaanjaars.ContactManager.Bll |
Spaanjaars.ContactManager.BusinessEntities |
|
|
Spaanjaars.ContactManager.Dal |
|
|
Spaanjaars.Validation |
|
Spaanjaars.ContactManager.BusinessEntities |
Spaanjaars.Validation |
|
Spaanjaars.ContactManager.Dal |
Spaanjaars.ContactManager.BusinessEntities |
|
Spaanjaars.Validation |
Remember you don’t have to carry out all of these steps manually if you just want to follow along with this article: the code download that I'll publish starting from part 2 of this series contains the full application, including the different projects and solution files. (If you want to get the full source now, take a look here.) However, if you want to create a similar application like this from scratch, it’s good to know how to set it up yourself.
Now that you’ve seen the general setup of the Visual Studio Solution and the various projects it contains, it’s time to look at the individual projects in more detail.
Application Design
To help you understand how all these layers work together, Figure 6 presents a graphical representation of a typical flow of data when requesting an item like a contact person or an e-mail address in the application:

Figure 5 – A Typical Flow of Data Through All Layers
Here’s a quick run-down of the process that’s carried out when a user requests the details of a contact person on the web site:
- The Presentation layer, for example an ASPX page called ShowContactPerson.aspx gets the ID of the requested contact person from the Query String and asks the BLL for a specific ContactPerson. It does this by calling ContactPersonManager.GetItem() and passing it the ID of the contact person.
- The BLL can optionally perform some security checks (more on that in part 6) and then forwards the request to the DAL by calling ContactManagerDB.GetItem().
- The DAL connects to the database and asks it for a specific record. It does this by executing a stored procedure, like sprocContactPersonSelectSingleItem and passing it the ID of the contact person.
- When the record is found, it is returned from the database to the DAL in a SqlDataReader object.
- The DAL wraps the database data in a custom ContactPerson business entity from the BusinessEntities namespace and returns it to the BLL.
- Finally, the BLL returns the ContactPerson object to the Presentation layer, where it can be displayed.
A similar flow is used for other data operations, for example when a Business Entity is saved or deleted, or when an entire list of entities is retrieved.
To see how each layer operates and what it is responsible for, the next couple of sections dig deeper into the various layers. Notice how I won’t discuss each and every class, feature or page in detail. A lot of it has already been explained in the first version of these articles (which you should have read by now). Additionally, future articles in this series dig deeper into some parts of the application, most notable validation in parts 2 and 3 and security (part 6), and data behaviors (paging, sorting and so on) in part 4.
The Web layer is what you primarily see when using a typical web application, so it makes sense to look at that layer first.
Spaanjaars.ContactManager.Web
This layer is implemented with a simple Visual Web Developer (VDW) 2008 Web Site Project, rather than a Web Application Project. Because it’s a Web Site Project where namespaces are not added automatically to the code behind and class files, I decided to leave them out altogether. However, if you were using a Web Application Project instead, you get namespaces for all your web pages and other code files automatically. Either way, the same principles demonstrated in these articles apply. For an excellent explanation of the differences between a Web Site Project (WSP) and a Web Application Project (WA), check out Peter Lanoie’s article on the subject: Web Site vs. Web Application Project. The Web Site Project that comes with this article is shown in Figure 6:
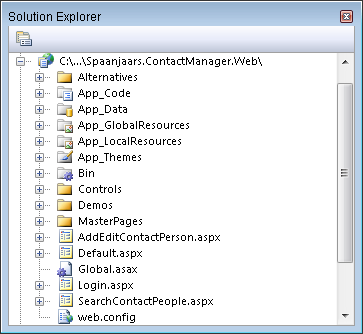
Figure 6 – The Web Site Project of the Contact Manager Application
The Default.aspx and AddEditContactPerson.aspx pages are used to manage your contacts and their contact data like addresses and phone numbers. Part 3 of the original article series described how these pages work in detail, so you’re advised to take a look there in case you want to know how they work. The new functionality in these pages, like dealing with concurrency and validation is discussed in later parts, just as the other files, like Login.aspx and SearchContactPeople.aspx are.
The MasterPages and App_Themes folders are used for the presentational aspects of the site and are responsible for a consistent look and feel throughout the application.
The Demos folder contains a few sample pages that demo a few concepts I’ll show throughout the article series.
The Controls folder contains a simple User Control used to present validation errors. You’ll see how this works in part 2.
The App_Data folder contains the SQL Server 2005 database for this project. This database contains the various tables and stored procedures, most of which have been described in the first version of this article. For some functionality — paging for example — I added new stored procedures and modified existing ones which I’ll discuss together with the functionality that uses these procedures.
The two resources folders contain localized resources for the application. You'll see more on localization in part 3.
The Web layer has references to two other layers: the Bll and the BusinessEntities. It needs a reference to the BusinessEntities layer in order to work with specific entities like ContactPerson or Address. Additionally, it communicates with the Bll layer to get or save these entities.
Spaanjaars.ContactManager.BusinessEntities
This layer contains the main data entities for the application. Figure 7 shows the Solution Explorer for this layer:

Figure 7 – The Business Entities Layer Project
Besides the main entities in the root of the project, you see a folder for the collections, enumerations and for localization files. For a large part, the classes in the BusinessEntities layer are just simple data containers, or “dumb classes” as I called them in earlier articles. The use of automatically implemented properties (available in C# only, although they are coming in the next version of VB.NET) make these classes even more compact to write than ever before. Here’s a quick example of the EmailAddress class before the Validation Framework is put in place:
public class EmailAddress
{
  public EmailAddress()
  {
    this.Type = ContactType.None;
  }

  /// <summary>
  /// Gets or sets the unique ID of the e-mail address.
  /// </summary>
  [DataObjectFieldAttribute(true, true, false)]
  public int Id { get; set; }

  /// <summary>
  /// Gets or sets the actual e-mail address text of the e-mail address.
  /// </summary>
  public string Email { get; set; }

  /// <summary>
  /// Gets or sets the type of the e-mail address, like business or personal.
  /// </summary>
  public ContactType Type { get; set; }

  /// <summary>
  /// Gets or sets the ID of the owner (a <see  cref="ContactPerson"/>)
  /// of the e-mail address.
  /// </summary>
  public int ContactPersonId { get; set; }
}
Pretty straightforward, don’t you think? All this class does is define a data container: a bunch of public properties that make up the business entity. Other classes in other namespaces (the Bll and Dal in particular) are responsible for filling and managing these data containers.
If you look at the Class Diagram for the BusinessEntities, shown in Figure 8 you see that in reality things are slightly more complex than this. Each data entity inherits from BusinessBase which in turn inherits from ValidationBase. Both these classes and the Validation Framework are discussed in part 2 and 3, so you can ignore them for now. You'll see the full code for these and other classes in the code download that comes with part 2 and later articles in this series.

Figure 8 - Class Diagram of the Business Entities Layer
Spaanjaars.ContactManager.Bll
The Bll namespace contains — just as in the original application — a number of classes that define the behavior for the entities in the application. Figure 9 shows the classes that exist in this namespace:

Figure 9 –The Business Logic Layer Project
Each of these classes is responsible for working with their counterparts from the BusinessEntities namespace. For example, there’s a ContactPersonManager class that allows you to create, retrieve, update and delete your contacts. Likewise, there’s an AddressManager class responsible for managing the Address instances of the application. To a large extent, these classes are almost identical to the ones from the v1 version, so again you’re advised to take a look at the original articles in case you have questions about these classes.
Figure 10 shows the full class diagram for this layer:

Figure 10 - Class Diagram of the Business Logic Layer
Each of these *Manager classes exposes the following four methods:
|
Method Name |
Input Parameters |
Description |
|
Delete |
Accepts an instance of the business entity that must be deleted from the database. |
Deletes the business entity from the database. When a ContactPerson entity is deleted, it also deletes its associated contact data records, like EmailAddress and PhoneNumber. |
|
GetItem |
id (int) |
Gets an item from the underlying data source based on the (unique) ID of the item passed in. |
|
GetList |
Depending on the underlying type this method has a few overloads to get all records, a paged and sorted set or to get specific records for a contact person. |
No matter what overload you use, this method returns a collection for the type you requested. So, ContactPerson.GetList returns ContactPersonCollection defined in the BusinessEntities namespace. |
|
Save |
Accepts an instance of the business entity that must be saved in the database. |
Saves an instance of the business entity in the database. When a ContactPerson is saved, it also saves its contact data like EmailAddress and PhoneNumber. |
These methods delegate the responsibility of getting and updating data to the classes in the Dal namespace. In the previous version of this article, they did literally just that, as is shown by the following piece of code that is responsible for instructing the Data Access Layer to save an EmailAddress in the database:
[DataObjectMethod(DataObjectMethodType.Update, true)]
public static int Save(EmailAddress myEmailAddress)
{
  myEmailAddress.Id = EmailAddressDB.Save(myEmailAddress);
  return myEmailAddress.Id;
}
This was also the place where you could implement your own validation or security code, although I left the implementation of that up to the reader.
Now, in the new version of this application design, validation is implemented at the root of the business entities. Before they call into the DAL, classes in the BLL can check the validity of the business entities using the Validation Framework. Additionally, they can make security checks to determine if the current user has sufficient permissions to carry out the operation. In short: they allow you to apply your business rules before any data gets out of or in the system. You’ll see how this works later.
Spaanjaars.ContactManager.Dal
Just as in the previous version of this application, the DAL holds a number of classes responsible for getting data in and out of the database. Figure 11 shows the complete list of available classes:

Figure 11 –The Data Access Layer Project
The classes in the Data Access Layer are responsible for getting data in and out of the database. The implementation of the Contact Manager Application uses Microsoft SQL Server 2005 or 2008 so the code also targets classes in the System.Data.SqlClient namespace. However, it’s pretty easy to replace the DAL classes with another one that targets a different database like Microsoft Access or Oracle. Finally, you could rewrite these classes to use the generic counterparts of many of the main database related objects like the DbConnection, DbCommand and DbDataReader. While this greatly improves the interoperability of the application with regards to the different database it can target, it also means that you need to write a lot of “database agnostic” code. That is, you can no longer use stored procedures (as their implementation is for a large part vendor specific) but instead you’ll need to resort to inline SQL. Since the amount of code you need to rewrite to target a different database is relatively limited, I’ll opt for a database specific solution (SQL Server in my case) and leave it up to you to write in-line SQL or rewrite the code to target a different database.
Since the classes in the BLL forward their calls to the DAL, it should come as no surprise that this layer has similar classes and methods, all shown in Figure 12:

Figure 12 - Class Diagram of the Data Access Layer
The FillDataRecord method is discussed in full detail in part 2 of the original article series.
A brand new namespace in the v2 design is the Spaanjaars.Validation namespace which is discussed next.
Spaanjaars.Validation
The last class library in the solution of the Contact Manager Application is the Spaanjaars.Validation project. The code in the Spaanjaars.Validation namespace is inspired by the work by AzamSharp in his article “Creating a Domain Object Validation Framework”. I reused many of the concepts, including the attribute usage and validation code. However, I also made a lot of changes and enhancements, including the introduction of a separate ValidationBase and BusinessBase classes, localization behavior in the BusinessBase class and extended behavior on the BrokenRules collection class to quickly find specific broken rules. All of these classes are visible in Figure 13:

Figure 13 – The Validation Project
I also moved the validation behavior from a separate ValidationEngine class into the ValidationBase class where my business entities ultimately inherit from. In Figure 14 you see the class hierarchy for the Validation Framework.

Figure 14 - Class Diagram of the Validation Namespace
The full details of this framework and its implementation are discussed in part 2 of this series.
Summary
I started off this article with a quick introduction and a look ahead of what you can expect from the entire series. I then looked back at the initial design of the Contact Manager Application that I released in January 2007. While the design, the application and the articles received a lot of praise from my reader base, they left a lot of room for improvement. Most notably was the lack of any easy validation mechanism, followed by the lack of a central base class or interface. Additionally, the classes in the project were not easy to localize. Finally, because all code was stored in the App_Code folder of a web application, it wasn’t as easy to maintain and reuse it across other applications.
All of these concerns — and more — have been addressed in the Contact Manager Application v2. In this first part of the article series I showed you the setup of the new application which uses separate class libraries for each of the layers. This makes the code better organized and thus easier to maintain. Additionally, it’s now easier to reuse some parts, as could be the case with the code in the Spaanjaars.Validation namespace.
I also showed you how the different layers are connected, how they work together and how the data flows from one layer to another and back. I also deliberately skipped some steps as they have been discussed in the previous edition of the article.
I closed this article with a quick overview of each of the layers and the classes they contain. This overview should help you better understand the application and its design which in turn will be helpful when I zoom in on various parts of the application in the coming articles.
In the next part and the one after that you’ll find a detailed explanation of the Validation Framework. You’ll see how to create custom attributes that you can apply to properties of your business objects to make validation super easy, requiring only a few lines of code. You also see how to write a common validation base class that your custom business entities can inherit from to incorporate the validation behavior.
Part 4 touches on advanced data topics like paging, sorting and filtering of data.
Part 5 shows you how to deal with concurrency in your applications by implementing concurrency behavior in the business entities. With this behavior, you can prevent two users from inadvertently overwriting each other’s data.
In part 6, the final part in this entire series, you’ll learn more about implementing security checks to ensure only authenticated and authorized people can access specific parts of your application and code.
I'll be publishing the later articles over the coming months and update the links to them in this and later articles.
Stay tuned!
Downloads
Where to Next?
Wonder where to go next? You can post a comment on this article.
Links in this Document
| Doc ID | 476 |
| Full URL | https://imar.spaanjaars.com/476/n-layered-web-applications-with-aspnet-35-part-1-general-introduction |
| Short cut | https://imar.spaanjaars.com/476/ |
| Written by | Imar Spaanjaars |
| Date Posted | 11/25/2008 23:46 |
| Listened to when writing | Extreme Ways by Moby (Track 9 from the album: 18) |
Comments
Talk Back! Comment on Imar.Spaanjaars.Com
I am interested in what you have to say about this article. Feel free to post any comments, remarks or questions you may have about this article. The Talk Back feature is not meant for technical questions that are not directly related to this article. So, a post like "Hey, can you tell me how I can upload files to a MySQL database in PHP?" is likely to be removed. Also spam and unrealistic job offers will be deleted immediately.
When you post a comment, you have to provide your name and the comment. Your e-mail address is optional and you only need to provide it if you want me to contact you. It will not be displayed along with your comment. I got sick and tired of the comment spam I was receiving, so I have protected this page with a simple calculation exercise. This means that if you want to leave a comment, you'll need to complete the calculation before you hit the Post Comment button.
If you want to object to a comment made by another visitor, be sure to contact me and I'll look into it ASAP. Don't forget to mention the page link, or the Doc ID of the document.