N-Layered Web Applications with ASP.NET 3.5 Part 3: Advanced Validation Topics
NOTE: the concepts presented in this article are now considered obsolete possibly because better alternatives are available.
Update!! - I have written a new series on N-Layer design targeting ASP.NET 4.5 and Entity Framework 5. You can check out the new series here.
Update 02/03/2009: There is now a VB.NET version of the application available thanks to Sven Huijbrechts from ClearMedia bvba. Check it out at the Downloads section at the end of this article
Note: this is part three in a series of six. If you rather read this entire series off-line, you can buy the series as a convenient PDF document that comes with the full source. Besides the convenience, buying the PDF will also make you feel good as it shows your appreciation for the articles and helps me pay the bills for my server and hosting so I can keep running imar.spaanjaars.com and continue to provide you with great content. For more details, check out this post that shows you how you can buy the entire series right now.
This is part 3 of a six-part series of articles on N-Layer design. This article series builds on top of my three part series on N-Layer design that I released in early 2007. If you haven’t already done so, be sure to check out these articles first, as a lot of code and concepts used in this new series is explained in detail in the older series.
In this installment I'll dig deeper into the Validation Framework I introduced in part 2 and show you how to write your own validation behavior in your business entities and how to set up your application for localization so you can target users in multiple languages.
After you’ve read the previous series, be sure to check out the previous two parts as well as they describe the new application’s architecture and introduce you to the Validation Framework.
Quick Links to All Articles
Previous Series
Building Layered Web Applications with Microsoft ASP.NET 2.0 - Part 1
Building Layered Web Applications with Microsoft ASP.NET 2.0 - Part 2
Building Layered Web Applications with Microsoft ASP.NET 2.0 - Part 3
Custom Sorting with N-Layer Design Classes and the GridView
Current Series
N-Layered Web Applications with ASP.NET 3.5 Part 1: General Introduction
N-Layered Web Applications with ASP.NET 3.5 Part 2: Introducing the Validation Framework
N-Layered Web Applications with ASP.NET 3.5 Part 3: Advanced Validation Topics
N-Layered Web Applications with ASP.NET 3.5 Part 4: Sorting, Paging and Filtering
N-Layered Web Applications with ASP.NET 3.5 Part 5: Dealing with Concurrency
N-Layered Web Applications with ASP.NET 3.5 Part 6: Security
In the previous article I introduced you to the Validation Framework. You saw how to use the ValidationBase class, how to apply validation attributes to the properties of your business entities and how to write your own validation attributes.
In this article I’ll show you two more important concepts: writing your own business rules at the entity level (as opposed to the property level) and localization of the Validation Framework and validation rules so they can be used in multi-lingual web sites.
Implementing Custom Business Rules
Besides simple value validation, you are likely to have more validation needs. For example, it’s not uncommon that you have the need to validate two or more properties in relation to each other. Consider for example a Project class that has nullable StartDate and EndDate properties. You could use the NotNullOrEmpty attribute to enforce that both these dates contain at least a value. However, for a valid Project instance you need more, like making sure that the StartDate is not greater than or equal to the EndDate (naturally, a project should be started before it can be finished). So how would you go about validating this in the current Validation Framework? The answer is: override Validate().
Overriding Validate() to Implement Your Own Business Rules
Earlier you saw that the Validate() methods of the ValidationBase class are marked as virtual, like this:
public virtual bool Validate() {…}
public virtual bool Validate(bool clearBrokenRules) {…}
Virtual methods are methods that can be overridden in a child class (using the override keyword) and are an excellent way to implement behavior in a child class that differs from the base class. So in order to implement your own validation rules for related properties, all you need to do is override the Validate method in your business entity. If you do so, be sure to call base.Validate() as well as that executes the standard validation rules as you’ve seen so far. You’ll see how this works in a bit.
In the following examples I am using the aforementioned Project class that looks like this:
public class Project : ValidationBase
{
  // ... Other proprties here; omited for brevity.
  [NotNullOrEmpty(Message = "Enter a start date.")]
  public DateTime? StartDate { get; set; }

  [NotNullOrEmpty(Message = "Enter an end date.")]
  public DateTime? EndDate { get; set; }
}
Both the DateTime properties are nullable, so it’s sufficient to put a NotNullOrEmpty attribute on them to make sure they contain a non-null value. To compare the StartDate and EndDate properties in relation to each other, you could override Validate() like this:
public class Project : ValidationBase
{
  public override bool Validate()
  {
    bool baseValid = base.Validate();
    bool localValid = true;
    if (StartDate >= EndDate)
    {
      BrokenRules.Add("The StartDate of this project has to
            be smaller than the EndDate.");
      localValid = false;
    }
    return baseValid && localValid;
  }
}
Notice how this code calls base.Validate() first and stores the results in the baseValid variable. When you call base.Validate, the code that checks the individual properties is executed. The code then proceeds with some custom logic: in this case, it compares the StartDate and the EndDate. If the StartDate is greater than or equal to the EndDate, a new BrokenRule is added the project’s BrokenRules collection using a handy Add overload on the BrokenRules collection class.
At the end of the method, the combined result of the base class and child class validation is returned. This way, if either one of them fails (or both ), the method returns false and the BrokenRules collection now contains your own rules as well.
Taming the BrokenRules Collection
You may have noted that the Validate method in ValidationBase has an overload with a bool parameter that determines whether the internal BrokenRules collection is cleared or not. This is useful in scenarios where you have already added your own rules to the collection before you call base.Validate(). In the previous example you don’t need it, as the custom rules are added after the ones from the base class validation. However, if you need to reverse things, you can call the overloaded version to stop your custom rules from being cleared. Don’t forget to manually clear the BrokenRules collection first in order to remove any leftover rules from a previous call:
public override bool Validate()
{
  BrokenRules.Clear();
  bool localValid = true;
  if (StartDate >= EndDate)
  {
    BrokenRules.Add(@"The StartDate of this project has to
             be smaller than the EndDate.");
    localValid = false;
  }
  bool baseValid = base.Validate(false);
  return baseValid && localValid;
}
Typically, you don’t need this, and you should use the parameterless version from the first example. However, knowing how to use this overloaded version can be useful, especially when you’re fixing up some behavior or data in the Validate method yourself before you want the base class to do its work.
Validate(): A Method or a Property?
Initially, the Validate() method was called IsValid in AzamSharp’s version. During a few pair programming sessions with my colleagues at Design IT to let them provide feedback on my implementation of the Validation Framework I noticed they initially tried to use IsValid without parentheses. It turned out that — based on the method’s name — they thought it was a property, rather than a method. I very much agreed with that reasoning and thought about a fix: renaming it to Validate() or making it a property instead? We really had some discussions about it before we came to our final conclusion.
From an API point of view, a property called IsValid would have been the easiest to read. This is the way that the Page class and various Validation Controls in ASP.NET implement it. However, in order for that IsValid property to get a value, you need to call Validate first.
Since the Validate method does so much work, and, more importantly, changes the inner state of the business entity, just a property called IsValid wouldn’t have cut it either. So, that brought me down to two choices: a void Validate method and an IsValid property that is set by Validate, or just a Validate method.
To minimize the code you need to write, I decided to implement just the single Validate method. However, if you feel it’s more natural to have an IsValid property as well, you can easily fix that in the ValidationBase class yourself.
So far the validation examples you have seen contained hard coded validation message detailing the reason why validation failed. For English only applications, this is not a real issue. However, many of today's web sites need to be multi-lingual, so you'll need a way to easily present this data in different languages, without writing many versions of the applications. You'll see how the Validation Framework implements this localization behavior in the next section.
Localization of Validation Messages
The ability to localize error and validation messages is a key concept of the Validation Framework. You certainly don’t want to hard code validation messages in English (or your own “default” language) into your properties directly. This makes it near impossible to use your business entities in multi-lingual web sites. ASP.NET already comes with great tools to localize the UI of web sites and string resources so it makes sense to hook into that existing framework.
To implement localization in the Validation Framework, you need to do the following:
- Set the Key property of the ValidationAttribute rather than the Message property.
- Override GetValidationMessage of ValidationBase in a child class to get a localized messaged based on the Key property of the ValidationAttribute.
- Define Localization files for the supported languages and create the required keys and translations.
I’ll discuss each of these in the following sections:
1. Set the Key property of the ValidationAttribute
Rather than setting the Message property of each validation attribute as you’ve seen so far, you now need to set the Key attribute (notice that Message and Key are mutually exclusive; you’ll get a run-time exception when you try to set both).
[NotNullOrEmpty(Key = "EmailNotEmpty")]
[ValidEmail(Key = "EmailNotValid")]
public string Email { get; set; }
The keys used in this example refer to localization keys in resource files defined in the project, as you’ll see later.
2. Override GetValidationMessage of ValidationBase in a child class.
The default behavior of this method is to return the key as is:
protected virtual string GetValidationMessage(string key)
{
  return key;
}
This means that by design, you’ll end up with the key as a validation message if you don’t implement your own translation services.
So, in order for the GetValidationMessage to return something useful (the localized version of the validation message associated with the key), you should override this method in a class that inherits from ValidationBase and then return the localized version - by accessing a ResourceManager for example. Because you don’t want to write this behavior in each of your business entities over and over again, it’s best to introduce an intermediate class that sits between the ValidationBase and your custom business entity. In the Contact Manager Application that comes with this article, this class is called BusinessBase. In Figure 21 you see the relation between the base classes and the ContactPerson class:
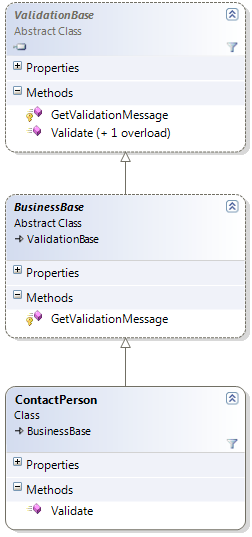
Figure 21 – The Inheritance Hierarchy of the ContactPerson Class
The GetValidationMessage method in the BusinessBase class overrides its parent version from ValidationBase. This in turn means that if you call Validate in ContactPerson, GetValidationMessage is called in BusinessBase to convert a key associated with a validation attribute in a localized version of the validation message. By using the standard localization features of .NET to get a localized description for a key, all you need is the following code:
public abstract class BusinessBase : ValidationBase
{
  protected override string GetValidationMessage(string key)
  {
    return General.ResourceManager.GetString(key);
  }
}
In this code snippet, the General class is a standard Resource file and is used to get the language and culture neutral translations (English in my case) and the localized versions of the validation messages. The ASP.NET Framework will figure out from what resource file it should get the messages, based on the current language. You’ll see how the language is set later in this article.
3. Define Localization Files
The final part of the localization equation deals with the resource files. For the Contact Manager Application I added two files to the Localization folder of the Business Entities project, called General.resx and General.nl-NL.resx, visible in Figure 22
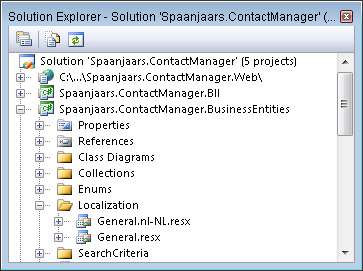
Figure 22 – Resx Files that Contain Localized Text Stored in the Localization Folder
These files contain the fall back validation messages (General.resx) and language and culture specific versions of them (General.nl-NL.resx with all validation messages translated in Dutch).
The resource files contain simple key-value pairs that relate validation keys to validation messages. Figure 23 shows the English version:
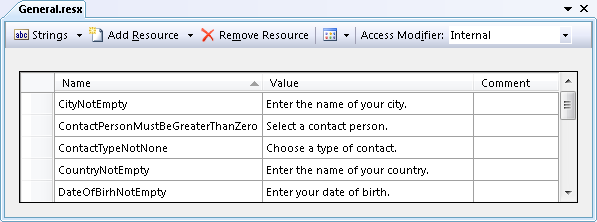
Figure 23 – The Language and Culture Neutral Resources
You can see the same keys but with Dutch validation messages in Figure 24:
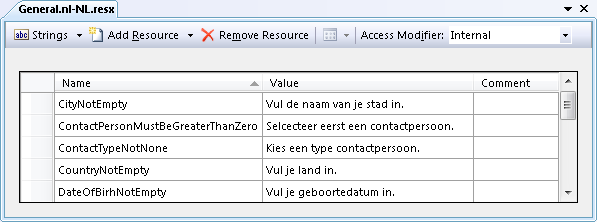
Figure 24 – The Dutch Translations of the Resources
As soon as you add these Resource files to your project (using Project | Add New Item | Resources File), you get a strongly typed class named after the resource file that provides access to the keys. You can then access this class in the GetValidationMessage method and retrieve the necessary validation messages.
With the localized versions of the validation messages in the Business Entities project, you’re pretty much done. When a message needs to be displayed in a supported language, it’s retrieved from its associated resx file automatically. To let the web application automatically pick up the browser’s language preference to get the validation messages in the correct language, set the following element under <system.web> in web.config:
<globalization uiCulture="auto" />
However, if the user requests a language that’s not supported, the system will fall back to the culture and language neutral texts defined in the General.resx file.
References
For more information on localization, take a look at the following articles:
- How to: Set the Culture and UI Culture for ASP.NET Web Page Globalization
- Creating a Data Driven ASP.NET Localization Resource Provider and Editor
- Introduction to Localization in ASP.NET 2.0
- dasBlonde – Globalization
- Localization practices for .NET 2.0: It's still about the architecture
You may not like it from an OO, design and maintenance point of view that the BusinessEntities project is responsible for maintaining the translated messages. In my sample application, I don’t really mind. The business entities are quite simple and closely related to the UI and other layers. Therefore, it isn’t that bad that translation keys are kept in the same project as the business entities. However, in more extensive applications, this may not always be the case. Fortunately, it’s easy to group all translation messages in resource files in the UI and then pass a ResourceManager into the BusinessBase class so it knows where to get the messages from. The following list gives you an overview on how to implement this in an ASP.NET web site:
-
Create global resources in your web application. In a Web Site Project you do this by adding Resource files (with a .resx extension) to the App_GlobalResources folder. With a Web Application Project you can put the .resx anywhere you like, although you’re advised to standardize on logical folder names and thus store them in a folder like /Resoures.
-
Give the BusinessBase class in the BusinessEntities namespace a static property of type ResourceManager from the System.Resources namespace. This is the underlying type of resource managers in .NET applications. The property could look like this:
public abstract class BusinessBase : ValidationBase
{
  …
  public static ResourceManager ResourceManager { get; set; }
  …
}
-
In your web application, assign the web scoped resource manager to the static property in the BusinessEntities namespace. A good location to do this is in Global.asax, for example in the Application_AuthenticateRequest. You could use code like this:
protected void Application_AuthenticateRequest(object sender, EventArgs e) { Spaanjaars.ContactManager.BusinessEntities. BusinessBase.ResourceManager = Resources.WebResources.ResourceManager; } -
Finally, in the GetValidationMessage method in the BusinessBase class, you can access the newly created resource manager. If you want, you can fall back on existing keys in the BusinessEntities project in case they’re not defined in the web application’s resource manager. The following code shows how to try and retrieve a key from the passed resource manager, and fall back to the existing resources in case the first attempt fails:
protected override string GetValidationMessage(string key)
{
  string tempValue = string.Empty;
  if (ResourceManager != null)
  {
    tempValue = ResourceManager.GetString(key);
  }

  if (string.IsNullOrEmpty(tempValue))
  {
    tempValue = General.ResourceManager.GetString(key);
  }
  return tempValue;
}
With this setup, you can centralize your resource files in the UI. For fallback scenarios, the Business Layer still provides default messages for all localizable keys.
Validation in the Contact Manager Application
I implemented pretty much all the concepts I explained in this article. To quickly find the implementation in the Contact Manager Application, here’s a quick list of what is implemented where:
-
All business entities in the Spaanjaars.ContactManager.BusinessEntities namespace inherit from BusinessBase which in turn inherits from the ValidationBase class.
-
All business entities in the Spaanjaars.ContactManager.BusinessEntities namespace have validation attributes applied to relevant properties.
-
The validation attributes all use the Key property to refer to a validation text defined in a Resource file. For example, the Email property of the EmailAddress class looks like this:
[NotNullOrEmpty(Key = "EmailNotEmpty")] [ValidEmail(Key = "EmailNotValid")] public string Email { get; set; } -
The ContactPerson class overrides the Validate method of the ValidationBase class so it only returns true when the instance is valid and all of its collections are valid as well.
-
The collections, like AddressCollection all inherit from BusinessCollectionBase<T>. This gives these collections validation behavior as well. The validity of a collection is currently determined by looking at each individual instance in the collection. If one is not valid, the entire collection is considered invalid. Note that you’re not limited to checking individual instances. The Validate method from the ValidationCollectionBase class is virtual, so you can override it in a class like AddressCollection to ensure, say, the AddressCollection contains at least one address, or at the most one Home address if that’s what your application requires.
-
The *Manager classes in the Spaanjaars.ContactManager.Bll throw an InvalidSaveOperationException (a custom class defined in the Spaanjaars.Validation namespace) when you try to save an invalid BusinessBase instance.
-
The pages in the Web Application call Validate on a business entity before an attempt is made to save them in the database. In case validation fails, the list of errors (translated by the GetValidationMessage method) is displayed using the ErrorList.ascx User Control (located in the Controls folder). This user control has a BrokenRules property that you can set to the collection of broken rules for a BusinessBase instance. The following code snippet shows a simplified version of SaveContactPerson (the final version also takes concurrency, discussed in part 5, into account):
if (myContactPerson.Validate()) { ContactPersonManager.Save(myContactPerson); EndEditing(); } else { ErrorList1.BrokenRules = myContactPerson.BrokenRules; } - Code in the code behind of Default.aspx executes when an address is about to be inserted. Inside the Inserting event handler, an instance of the Address is retrieved and validated. When the instance is invalid, a bulleted list (using the same ErrorList control) with validation messages is shown. I have only implemented this for the Address class, but it’s easy to write the same behavior for the other contact entities as well.
Summary
As you have seen, validation is quite a broad topic, with many different factors to keep in mind.
Over the past two articles, you learned about the following important topics:
- How to inherit from the ValidationBase class and use its Validate method.
- How to use Validation attributes and how to write your own for validation purposes currently not covered by the Validation Framework.
- How to localize your validation messages in order to display them in a multi-lingual web site.
- How to centralize the display of the broken rules using a separate User Control.
Note that you’re not limited to the implementation you’ve seen here. It’s likely you’ll need to write additional validation attributes (attributes like MinimumValue, MaximumValue, RegularExpression, ZipCode and so on come to mind) to support all your business logic. Did you write your own validation attribute based on this article? Drop me a line and if the attribute looks useful and reusable, I’ll add it to the Validation Framework and these articles.
In the next part in this article series, I’ll take a look at advanced data concepts: Sorting, Paging and Filtering. Stay tuned.
Downloads
Where to Next?
Wonder where to go next? You can post a comment on this article.
Links in this Document
| Doc ID | 478 |
| Full URL | https://imar.spaanjaars.com/478/n-layered-web-applications-with-aspnet-35-part-3-advanced-validation-topics |
| Short cut | https://imar.spaanjaars.com/478/ |
| Written by | Imar Spaanjaars |
| Date Posted | 01/03/2009 11:28 |
Comments
Talk Back! Comment on Imar.Spaanjaars.Com
I am interested in what you have to say about this article. Feel free to post any comments, remarks or questions you may have about this article. The Talk Back feature is not meant for technical questions that are not directly related to this article. So, a post like "Hey, can you tell me how I can upload files to a MySQL database in PHP?" is likely to be removed. Also spam and unrealistic job offers will be deleted immediately.
When you post a comment, you have to provide your name and the comment. Your e-mail address is optional and you only need to provide it if you want me to contact you. It will not be displayed along with your comment. I got sick and tired of the comment spam I was receiving, so I have protected this page with a simple calculation exercise. This means that if you want to leave a comment, you'll need to complete the calculation before you hit the Post Comment button.
If you want to object to a comment made by another visitor, be sure to contact me and I'll look into it ASAP. Don't forget to mention the page link, or the Doc ID of the document.