Building Layered Web Applications with Microsoft ASP.NET 2.0 - Part 1
NOTE: the concepts presented in this article are now considered obsolete possibly because better alternatives are available.
Update!! - I have written a new series on N-Layer design targeting ASP.NET 4.5 and Entity Framework 5. You can check out the new series here.
Update!! 12-24-2008 - I have written a new series on N-Layer design as a major follow up to this one. It builds on the foundation created in this first series, but digs much deeper into concepts like Validation, Sorting, Paging, Concurrency and Security. You can check out the new series here.
Update!! 04-25-2007 - There is now also a VB.NET version of the code available for download. You find the download at the end of this article. For more information about the translation, check out this blog post.
This is part 1 of the article series "Building Layered Web Applications" that shows you how to build N-Layer applications with Microsoft ASP.NET 2.0. These articles teach you how to design, build and use custom business objects in your web application. The target audience for this series are developers that are ready to make the switch from using SqlDataSource controls to ObjectDataSource controls with custom business objects. Experience with ASP.NET 2 and C# is necessary while some knowledge about object oriented design certainly helps. The design I am going to show you in these articles is a simplified version of a design you would use in a real world application. It doesn't feature all the necessary functionality your application needs, but instead focuses on the underlying concepts.
What's important to realize is that this is *my* take at layered design for web applications. I won't say this is *the* design for the problem, or the only right one. In fact, I am sure some will judge this as "not the right one". However, it's a design that has worked for me in the past and still works today. It works best in many day-to-day small to medium sized web sites. You know, the kind of sites many of you (including myself) are building right now.
Part one deals with the design of the application: what business objects do you need to fulfill the requirements of the application? What should these objects be capable of and how do they look? How do these business objects interact with other parts of the system? Part two then shows you how to implement the code for these objects, while part three deals with using the business objects in a real-world web application.
The entire series (including this current article) can be found here:
- Building Layered Web Applications with Microsoft ASP.NET 2.0 - Part 1
- Building Layered Web Applications with Microsoft ASP.NET 2.0 - Part 2
- Building Layered Web Applications with Microsoft ASP.NET 2.0 - Part 3
The article uses a SQL Server 2005 Express database which is easy to use in development scenario's. However, the downloads for this series also come with the T-SQL scripts to recreate the database in SQL Server 2000 or SQL Server 2005. You'll find the download link at the end of this article. Besides the forementioned SQL scripts and database, the download also contains the full source for the demo application in C#.
Introduction
Layered development or multi-layer development refers to a development model where presentation, business logic and data are separated. This brings many advantages, including cleaner code, increased maintainability and the ability to spread your application's load over multiple servers. In the discussion of layered design, you often see both the terms layer and tier. Generally, layer refers to a conceptual separation of the application, while tier defines physical boundaries. This article talks mainly about layers and presents a design where quite often most layers run on the same physical system, with some of them even in the same process space.
To get a general understanding of what a multi layered application looks like, consider the following diagram that shows a number of possible layers in a system.
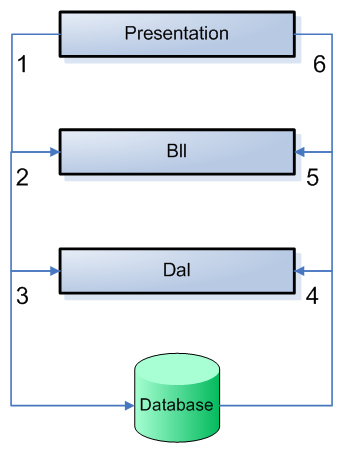
Figure 1 - Overview of the Different Layers in a System
This diagram describes a general process of an application that presents data that comes from a database. The application, like a web site or a Windows Forms application is usually called the Presentation layer. Then in the middle, you find the Business Logic Layer, or the BLL that is the bridge between the Presentation layer and the next layer: the Data Access Layer or the DAL. This DAL then talks to the database to perform selects, inserts, updates and deletes.
One of the ideas of this design is that you can replace one or more of the layers without affecting the others. So, you could for example drop the web site as the presentation layer and replace it with a Windows Forms application. This change wouldn't require a change in any of the other layers. Similarly, you should be able to remove a SQL Server specific DAL and replace it with an Oracle or Microsoft Access version without the Presentation layer even noticing the difference.
In the diagram in figure 1 you see a process go around in a counter clockwise direction. The process goes through the following 6 steps:
- The Presentation layer asks the BLL for some object, for example a contact person.
- The BLL can optionally perform some validation (for example, is the current user allowed to make this call?) and then forwards the request to the DAL.
- The DAL connects to the database and asks it for a specific record.
- When the record is found, it is returned from the database to the DAL.
- The DAL wraps the database data in a custom object and returns it to the BLL.
- Finally, the BLL returns the object to the Presentation layer, where it could be displayed on a web page for example.
I'll revisit this diagram at the end of the article and add more detail to it.
Starting with ASP.NET 1.0, layered development was brought to web applications on the Microsoft platform. While previous versions of ASP (now referred to as "classic ASP") allowed for some separation in the form of COM components or ASP classes, this usually wasn't done as it was quite cumbersome and hard to maintain. However, with ASP.NET it's much easier to create reusable, object oriented classes that can be consumed by web applications and other types of applications. It's easy to create classes in a separate class library (or in the App_Code folder - new to ASP.NET 2) and then reference these classes in your web application.
In this article series I'll show you how to design, build and implement reusable object oriented classes that are easy to use and maintain. The objects created from these classes are often referred to as business objects so that's the term I'll use in these articles. Throughout the articles, I'll use a simple and straight forward sample application that allows you to manage your contact persons and their contact data, like e-mail addresses and phone numbers.
Different Options for Building Database Driven Web Sites
Before we dig deeper in the world of custom business objects, let's briefly go over a couple of very common examples that are used nowadays to create database driven web applications in ASP.NET 2.0. I'll take the Edit page for a Person (shown in Figure 3) as an example when looking at all the options.
The Spaghetti Model
This model has a lot of similarities with the way classic ASP sites were built. All the data access code and business logic is placed in the presentation layer; with either in-line code, or in the code behind of the ASPX page. For example, on a page to edit contact persons, in Page_Load you open a connection object, and then based on the value of the query string for example, you get a SqlDataReader and then use that to fill a number of TextBox controls on your page. When the user clicks the Save button, you get the data from the TextBox controls, construct your own SQL statement to update the database and send that over an open connection.
protected void Page_Load(object sender, EventArgs e)
{
  if (!Page.IsPostBack)
  {
    string sql = @"SELECT FirstName, LastName,
        MiddleName FROM ContactPerson WHERE Id = 1";

    using (SqlConnection myConnection =
        new SqlConnection(ConfigurationManager.ConnectionStrings["NLayer"]
        .ConnectionString))
    {
      using (SqlCommand myCommand = new SqlCommand(sql, myConnection))
      {
        myConnection.Open();
        using (SqlDataReader myReader = myCommand.ExecuteReader())
        {
          if (myReader.Read())
          {
            txtFirstName.Text = myReader.GetString(0);
            txtLastName.Text = myReader.GetString(1);
            if (!myReader.IsDBNull(2))
            {
              txtMiddleName.Text = myReader.GetString(2);
            }
          }
          myReader.Close();
        }
        myConnection.Close();
      }
    }
  }
}

protected void btnSave_Click(object sender, EventArgs e)
{
  string sqlBase = @"UPDATE ContactPerson SET FirstName='{0}',
  LastName='{1}', MiddleName ='{2}' WHERE Id = 1";
  using (SqlConnection myConnection =
        new SqlConnection(ConfigurationManager.ConnectionStrings["NLayer"]
            .ConnectionString))
  {
    string sql = String.Format(sqlBase,
           txtFirstName.Text, txtLastName.Text, txtMiddleName.Text);
    SqlCommand myCommand = new SqlCommand(sql, myConnection);
    myConnection.Open();
    myCommand.ExecuteNonQuery();
    myConnection.Close();
  }
}
While this code certainly works, it has a number of serious issues.
- This code is open for SQL injection. It's easy for a malicious user to enter data in one of the TextBox controls to completely change the meaning of the SQL statement. That way, a user could delete a record (or the entire database), instead of updating one specific record.
- This code is difficult to write and remember. You hardly get IntelliSense with this code, especially not with column names. Every time you want to display someone's LastName, you need to remember you queried it as the 2nd column in the SQL statement.
- You cannot reuse this code. On every page where you want to let a user edit a contact person record, you need to copy and paste this code. If you want to change something - say you want to add an additional field to the ContactPerson table, you'll have to change multiple pages. The same applies to fixing bugs; if you know this code has a bug, you need to change it in multiple locations.
SqlDataSource Controls
Another common option is the use of SqlDataSource controls. These controls connect to the database for all CRUD (Create, Read, Update and Delete actions) and offer the data to other controls like the GridView, FormView and so on.
While they are easy to configure using the Configure Data Source wizard, SqlDataSource controls often require large amounts of code in your page. As an example, here's a SqlDataSource control that is capable of selecting, inserting, delete and updating a ContactPerson in the database.
<asp:SqlDataSource
  ID="SqlDataSource1" runat="server"
  ConnectionString="<%$ ConnectionStrings:NLayer %>"
  DeleteCommand="DELETE FROM [ContactPerson] WHERE [Id] = @original_Id"
  InsertCommand="INSERT INTO [ContactPerson] ([FirstName], [MiddleName],
    [LastName], [DateOfBirth], [ContactPersonType]) VALUES (@FirstName,
    @MiddleName, @LastName, @DateOfBirth, @ContactPersonType)"
  SelectCommand="SELECT * FROM [ContactPerson]"
  UpdateCommand="UPDATE [ContactPerson] SET [FirstName] = @FirstName,
    [MiddleName] = @MiddleName, [LastName] = @LastName,
    [DateOfBirth] = @DateOfBirth, [ContactPersonType] =
    @ContactPersonType WHERE [Id] = @original_Id"
  OldValuesParameterFormatString="original_{0}"
>
  <DeleteParameters>
    <asp:Parameter Name="original_Id" Type="Int32" />
  </DeleteParameters>
  <UpdateParameters>
    <asp:Parameter Name="FirstName" Type="String" />
    <asp:Parameter Name="MiddleName" Type="String" />
    <asp:Parameter Name="LastName" Type="String" />
    <asp:Parameter Name="DateOfBirth" Type="DateTime" />
    <asp:Parameter Name="ContactPersonType" Type="Int32" />
    <asp:Parameter Name="original_Id" Type="Int32" />
  </UpdateParameters>
  <InsertParameters>
    <asp:Parameter Name="FirstName" Type="String" />
    <asp:Parameter Name="MiddleName" Type="String" />
    <asp:Parameter Name="LastName" Type="String" />
    <asp:Parameter Name="DateOfBirth" Type="DateTime" />
    <asp:Parameter Name="ContactPersonType" Type="Int32" />
  </InsertParameters>
</asp:SqlDataSource>
Not only do you get a lot of code, the worst part is that this code is embedded directly in your page. If you want to list a contact person on two different pages, you need to recreate this code on both. If you need to make a change because, say, you want to add an additional field, you need to update all pages that reference this table. You can decrease the problem a little by using stored procedures, but you still need to set up all the code for the parameters.
TableAdapters
Another alternative worth looking at are TableAdapters. In short, a TableAdapter is a class that inherits from System.ComponentModel.Component and that handles all the interaction with the database. The good thing about TableAdapters is that they can be created automatically by Visual Studio. Based on a simple select statement, it generates code that handles inserts, updates, selects and deletes for you. As the business object, you get classes that inherit from System.Data.DataTable and System.Data.DataRow which have convenient methods like AcceptChanges to send any changes to your business object to the database.
For a great tutorial on TableAdapters, refer to Scott Mitchell's 3-Tier Architecture tutorial series on the official ASP.NET web site.
Personally, I am not too fond of TableAdapters. First of all, a lot of code gets generated that you can't really look into or change. Also, a lot of data is stored in XML files in a custom format, so it can be hard to use them in conjunction with (custom) code generators. But in my opinion the biggest drawback is how validation is handled. Since you have no direct access to properties of the object, like ContactPerson.FirstName, you have to handle the ColumnChanging event of the DataTable object, validate your columns and optionally throw and exception when the data is in an invalid format. This can make the code look a little awkward and may make it difficult to maintain.
Finally, because so much code is generated for you, it's difficult to create specialized classes to get a clean object model.
So, although they're often quick to use in many situations, I don't use them very often. Your mileage may vary and you may have a different opinion about how they work, so be sure to check out the tutorial series by Scott Mitchell to see if TableAdapters are useful to you.
Linq and Linq for SQL
Another very promising option is Linq. In short, Linq is "a collection of features that help compilers understand and implement query logic over in-memory collections of objects". One of the components of Linq, called Linq for SQL, "provides a run-time infrastructure for managing relational data as objects without giving up the ability to query. It does this by translating language-integrated queries into SQL for execution by the database and then translating the tabular results back into objects you define." This way, Linq for SQL can handle most of the database interaction for you. However, since Linq is still in beta, and will be for some time, it isn't always applicable in applications you build today. For more information about Linq and Linq for SQL, check out the Linq Project homepage.
Custom Business Objects
With the alternatives behind our back, let's take a look at custom business objects. In many cases, a business object is a simple class that inherits from Object and optionally implements one or more interfaces to make it easy to pass the object around. In its simplest form, a custom object can look like this:
public class ContactPerson
{
  private string firstName;
  public string FirstName
  {
    get { return firstName; }
    set { firstName = value; }
  }
}
In practice, this object on its own isn't very useful, as it can only hold data but not perform any operations. However, before we look at that in more detail, we first need to look at the design of our objects. How do we want our objects to look? What data should they contain? What operations must they support? All these questions are generally answered in the requirements gathering phase.
Throughout the series, I'll use a small sample application that allows you to manage contact persons and their addresses, phone numbers and e-mail addresses. I'll generally refer to the latter three as contact records, or contact data. The object model for the application will have the ContactPerson as a root object, containing collections with the contact data.
Introduction to the Sample Application
The Contact Person Manager application is a simple web based application that allows you to manage contact persons and their associated contact data, like e-mail addresses and phone numbers. The application allows you to create new, and update and delete existing contact persons. In addition, it allows you to manage the associated contact data for each contact person as well.
The following screen shot shows a list with all the contact persons in the system.
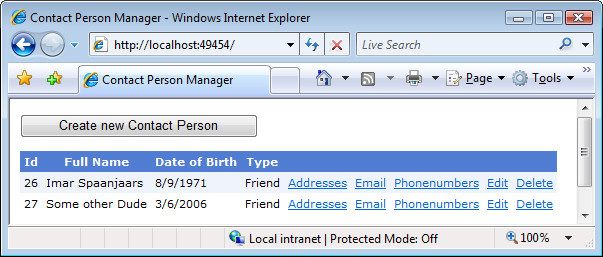
Figure 2 - A List of Contact Persons
Clicking the Edit link for a person takes you to a page where you can edit the details for the contact person:
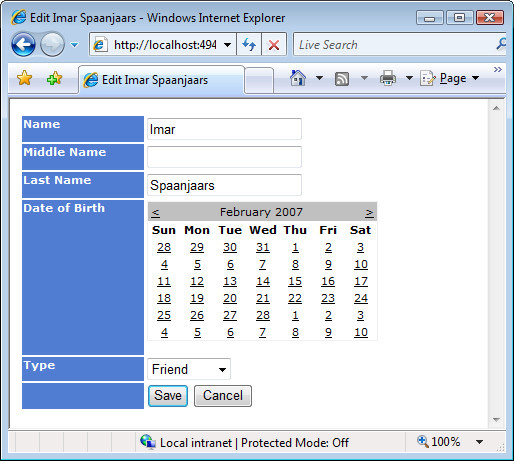
Figure 3 - Editing a Contact Person
The Delete link in Figure 2 allows you to remove the contact person, together with all of its contact records.
When you click one of the contact records links you see in Figure 2, like Addresses, you see a list of address records for the requested person that are editable as well:
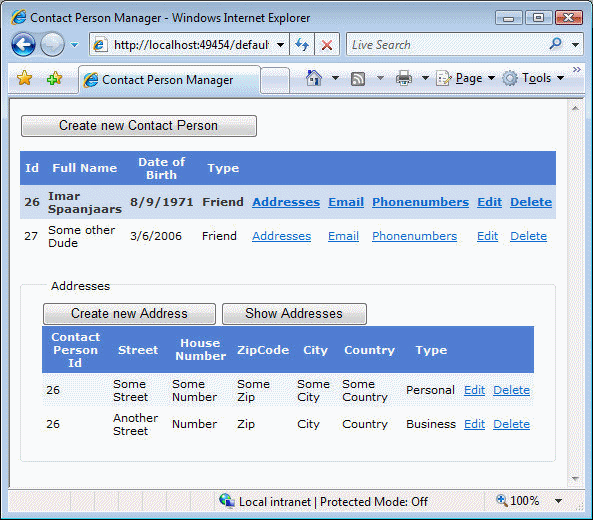
Figure 4 - A List of Addresses for the Contact Person
During the remainder of these articles, you'll see how the entire application is built, starting with the design all the way through building the UI.
Design - Gathering Requirements
Before you start building an object, you need to gather the requirements for that object. Note that this isn't a one-time operation. It's not uncommon to revisit your design multiple times during the development of an application, because requirements have changed.
There are a few ways to gather requirements for an application, including data analysis and data flow, UI design and story boarding and Business concept and process analysis [*]. The actual details of these methods is a little outside the scope of this article, but let's assume we've held a meeting with one of the core stakeholders of the application that has been able to describe what it is she wants the ContactPerson manger application to do:
[*] Taken from Expert C# 2005 Business Objects by Rockford Lhotka, page 322.
- The user of the application must be able to view a list of all contact persons in the system. Additionally, she should be able to create new, and change and delete existing contact persons.
- The user of the application must be able to select a specific contact person, and then get a list of its associated addresses. In addition, she should be able to create new and change and delete existing addresses for the contact person.
- The user of the application must be able to select a specific contact person, and then get a list of its associated e-mail addresses. In addition, she should be able to create new and change and delete existing e-mail addresses for the contact person.
- The user of the application must be able to select a specific contact person, and then get a list of its associated phone numbers. In addition, she should be able to create new and change and delete existing phone numbers for the contact person.
From this simple list, you could list the following classes that you need in your application:
- ContactPerson
- Address
- EmailAddress
- PhoneNumber
Besides these actions, you should also think about the data that you want these objects to store. A good way to gather this information is sketching it out on a whiteboard, writing down whatever you think is appropriate for the application. After a white-board session, you may come up with the following diagram:
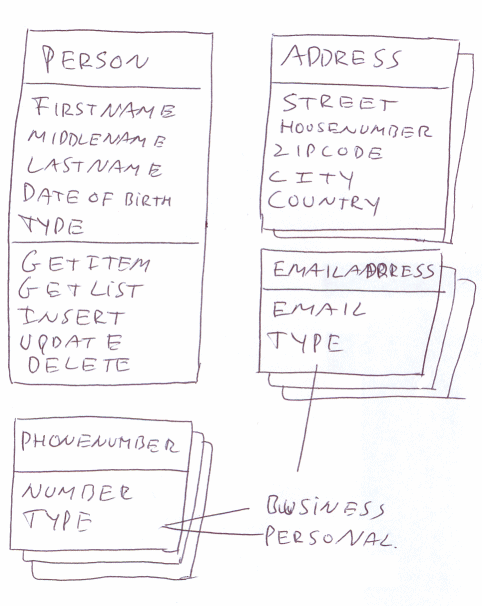
Figure 5 - A First Attempt to the Class Design for the ContactPerson Application
In this diagram, you see a simple ContactPerson class with a number of obvious properties, like FirstName, LastName and so on. You also see the contact data, like Address and PhoneNumber. You can see that behind these classes, you see more of them, implying that a ContactPerson can have more than Address, EmailAddress and PhoneNumber. This is an indication that your application might need to present those classes in the form of collections. You'll see how these collections are designed later in this and the next article.
The next step to think about are the actions that your business objects should be able to carry out. First, you need to determine where you want to store your behavior. You can decide to put all the method logic in the class itself, making them smart classes. Alternatively, you could decide to store only data in the actual class (a dumb data class) and then create a separate class to handle all interactions with your data class. In the first example, all you need is a ContactPerson class, with both properties and methods.
In the second example, you could have a simple ContactPerson class with only properties, and a separate ContactPersonManager class that is responsible for working with instances of ContactPerson. The biggest benefit of this design is the way your other layers can work with these objects. When you define a separate data object, both your Business Layer and the Data Access Layer can reference it and thus use it. This makes it much easier to pass instances of your business objects around.
For the sample application, I'll use "dumb" classes that only store data. Examples are the ContactPerson and Address classes. I'll then use a second set of classes whose names end in Manager. So, I have an AddressManager to manage Address instances, a ContactPersonManager to manage ContactPerson objects and so on. These Manager classes in turn talk to the data access layer, passing around instances of ContactPerson, Address and so on.
Let's take ContactPerson and its associated ContactPersonManager class as an example. To be able to display a list of contact persons, select one to edit or delete it and to create an entirely new contact person, you could come up with the following methods:
- GetItem
- GetList
- Insert
- Update
- Delete
If you're familiar with databases, you may recognize the CRUD acronym here: Create, Read, Update and Delete where the GetItem and GetList methods read the data for a single object or a list of objects respectively. In addition to these five methods (which are shared across many business objects) you could also come up with other methods like:
- Search
- Deactivate
- Clone
- Filter
These methods are often more specific to the business object. In the sample application, I'll stick to the methods from the first list, but you can use the exact same principles to implement other methods in your custom objects.
Design - Designing your Object Model
Now that we have a list with requirements, it's time to design the actual classes. There are many design tools available to help you in this process. You can use the Class Designer of Visual Studio 2005 (available in all versions except the Express Editions), Microsoft Visio or a number of other commercially available modeling tools. For this article, I'll stick to Visual Studio's Class Designer. The biggest benefit of this tool is that the design of your classes is always in sync with your code and vice versa. So, whenever you add, say, a property to one of your classes, it shows up automatically in the diagram. The reverse is also true; when you add a method in the diagram, the method's signature is added to the code for you. For some tutorials about using the class designer, check out the following links:
- Visual Studio 2005 Class Designer
- Designing an API with the Visual Studio 2005 Class Designer
- First Look at the Class Designer - Two Minute Tips (Video)
- The Visual Studio 2005 Class Designer (Part One, Two and Three) (Video)
So, let's take a look at the first draft of the class design for the demo application based on the white board sketch you saw before:
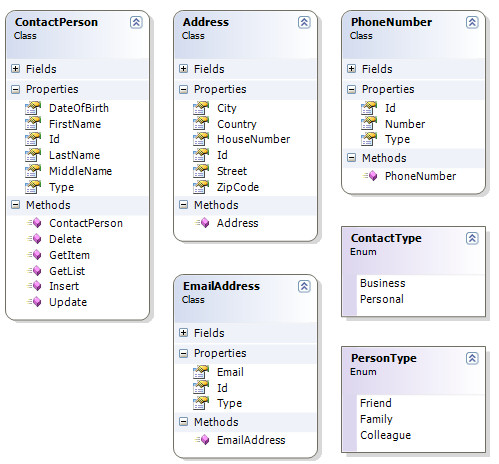
Figure 6 - The First Draft of the Class Diagram
This diagram displays a number of classes and enumeration types that make up the object model for the Contact Person Manager application. There are a few things worth noting.
First of all, you can see the diagram shows "smart " classes, where the data and the operations to work with that data are located in the same class. However, I decided to use "dumb objects" with separate Manager classes instead, so we'll need to change this in the next round.
Next, you can see I added two enumerations called ContactType and PersonType. The enumerations are used to determine the type of the contact person or contact record. So, a contact person can either be a friend, a family member or a colleague. You can change or add PersonType elements in the PersonType.cs file in the Enums folder. Similarly, ContactType is used to determine whether a contact record holds personal or business data.
Another thing to notice is that the Address class is missing a Type property; something we overlooked in the requirements gathering phase. This property needs to be added during the second round of class design.
The Address, PhoneNumber and EmailAddress classes are all lacking methods to get data in and out of the database. These methods will need be added in separate classes in the next round as well.
Another shortcoming of the design is the fact that ContactPerson has no properties that refer to the EmailAddress, Address or PhoneNumber classes. Obviously, it would be convenient to have those types available in the form of a collection. To do this, we can implement the collections as a generics List<T> type where T refers to the generic type like Address (List<Address>), PhoneNumber (List<PhoneNumber>) and so on. To make it easier for developers that are unfamiliar with generics to work with these kind of collections, I'll create four collections, like EmailAddressList, ContactPersonList and so on, that inherit from their generic counterpart (e.g. List<ContactPerson>. In the next part of this article series, you'll see how these lists are implemented.
To make it easier to display the full name of a contact person, a FullName property on this class would be nice. That way, client code doesn't have to mess with concatenating the first and last, and optionally the middle name every time it needs to display the contact person's name, but can instead use the FullName property directly. This property will be implemented as read-only and will return the concatenated values of the three name properties.
The final thing to notice is the Update and Insert methods of the ContactPerson class. Both methods perform a very similar function in that they save the data for the ContactPerson in the underlying data store. From an API perspective, it would be easier to call this method Save and then let the business object determine whether to insert a new contact person in the database, or to update an existing one. This concept is often referred to as Upsert, a combination of the words Insert and Update.
With all those changes applied, the class diagram for the data objects now looks like this:
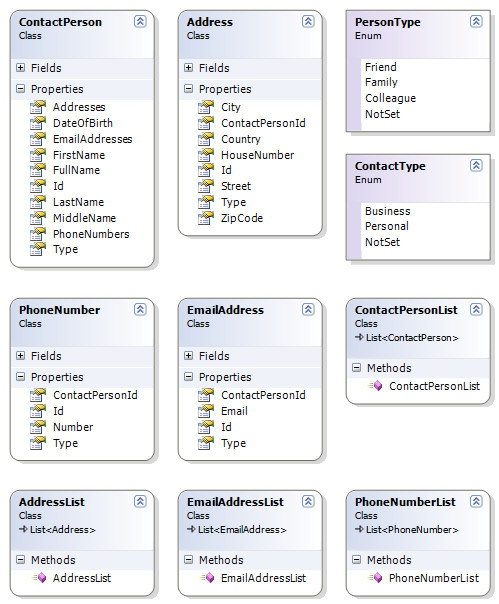
Figure 7 - The Second Draft of the Class Diagram Showing the Data Objects
In the upper left corner, you see the four main Business Objects. Notice how ContactPerson now has properties to hold collections of the other types: Addresses, EmailAddresses and PhoneNumbers respectively. Each of these types is of the type of its respective collection you see in the lower half of the image: AddressList, EmailAddressList and PhoneNumberList. To work with lists of contact persons, the application also has a ContactPersonList.
Finally, I added a NotSet value to both enumeration so they can hold undetermined values.
To work with these classes in the system, each class gets an associated *Manager class, shown in the following figure:
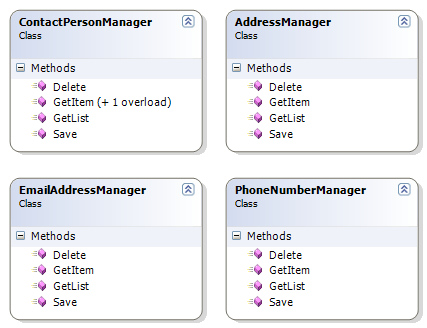
Figure 8 - The *Manager Classes
Although not visible in this diagram, each of the classes has a reference to the business objects namespace you saw in Figure 7, so each class knows how to deal with instances of those business objects. You'll see how this work in part two of the article series.
The implementation of these classes is pretty straight forward: GetItem returns an instance of the class, GetList returns a list of instances of the class, while Save accepts an instance of the class that is to be saved in the database. Finally, the Delete method accepts an instance of the class as well, containing the item that should be deleted.
GetItem for the ContactPersonManager has an overload that allows you to determine whether you want to load only the basic data for a ContactPerson, or all it associated contact data as well.
Another interesting thing to look at is the implementation of the GetList methods in the EmailAddress, Address and PhoneNumber classes. Since each of those objects belongs to a specific ContactPerson, the GetList methods expects the ID of a contact person. That way, GetList knows for what person it must retrieve the records. Again, you'll see how this works later on.
Design - Designing the Data Access Layer
The next step in the design process is the design of a Data Access Layer, often referred to as the DAL. You have a couple of options to design your DAL.
TableAdapters
Earlier in this article I talked about TableAdapters as the representation of your business objects. Personally, I don't like them as business objects as I find them too close to the data, and too far away from the business domain. However, as a Data Access Layer, they may make a lot of sense. Calling code (the presentation layer) calls a method on the business object, like Save() with in turn calls one of the methods on the TableAdapter to send the data to the database. Refer to the tutorial I mentioned earlier for more information about TableAdapters.
Embedded Data Access Code
Another often used solution to the data access code problem is embedded data access code. This means that the business objects fulfill the role of all three layers, and interact with the database directly. While this breaks the layered design principle because the Business Layer and the Data Access Layer are no longer separate, it's still an interesting option as it makes your classes easier to develop and maintain. The biggest problem with this solution is that it often ties your code to a single database, which is one of the main problems that layered design is supposed to solve. To minimize the impact of this design solution, you can use the ADO.NET 2.0 Provider Pattern. With the Provider Pattern you can write data access code in a generic fashion. It allows you to write code that can target different kind of databases, like SQL Server, Oracle, Microsoft Access and so on. The idea behind the pattern is that your code is database agnostic and just uses generic interfaces that are available for all .NET data access providers. A simple configuration setting can then determine the actual database that is used.
For a great open source database helper that uses the Provider Pattern to minimize the code you have to write to target different databases, check out the BinaryIntellect's Database Helper for .NET 2.0. For an introduction to the Provider Pattern, check out the article Writing Generic Data Access Code in ASP.NET 2.0 and ADO.NET 2.0 on the MSDN site.
Separate DAL Classes
The final methodology for data access code that I'd like to discuss involves separate DAL classes for each of your business objects. So, the ContactPersonManager class gets a ContactPersonDB counterpart, EmailAddressManager gets an EmailAddressDB class and so on. The DB extension (which stands for Data Base), is arbitrarily chosen, but helps in determining the role of the classes. From their name, you can see these classes interact with the database, just as the *Manager classes in the business layer are used to manage instances of other classes in the system. These new *DB classes get the same methods, like GetItem, Save, Delete and so on. As parameters, the accept types of the business objects, like ContactPerson and EmailAddress or they accept simple .NET bases types like int.
With the classes for the DAL designed, this is how the class diagram for the data access layer looks:

Figure 9 - The Class Diagram for the Data Access Layer
In all four classes, the Delete methods return a bool, to indicate success or failure of the operation. The Save method returns an int that holds the ID of the record that was inserted or updated by the method. The data centric methods, GetItem and GetList both return business objects. GetItem returns a single instance (or null), while GetList returns a custom type that inherits from a generics list. You'll see how this works in the second part of this article series.
To clearly separate the business objects, the business logic and data access layers, I have put all of them in separate namespaces: Spaanjaars.ContactManager.BO for the business objects, Spaanjaars.ContactManager.Bll for the business logic layer and Spaanjaars.ContactManager.Dal for the data access code. Both the business logic layer and the data access layer get a reference to the objects in the BO namespace. Additionally, the business layer gets a reference to the data access layer for all data interaction.
Because I put the business objects in a separate namespace, it's easy to give both the BLL and the DAL access to them. Had I instead put them in the business layer directly, I would have ended up with a problematic circular reference: the BLL needs a reference to the DAL to get items in and out of the database, while the DAL needs a reference to the BLL to understand what kind of objects it needs to return. By moving the business objects to a separate layer, I can avoid this problem.
You can see how this works in the following figure:
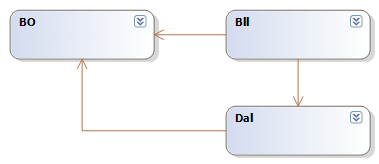
Figure 10 - The Three Namespaces and Their Relations
You can see in the diagram that the Business Layer (Bll) has a reference to both the business objects layer (BO) and the data access layer (Dal) while the Dal only has a reference to the business objects. These relations map one on one to using statements in the code. You'll see this in the second installment of this article series, when the code is discussed.
Now, take another look at the diagram that was introduced at the beginning of this article. Now that you know more about the classes in the different layers and the methods they contain, it's easier to add more detail to the six steps in the process.
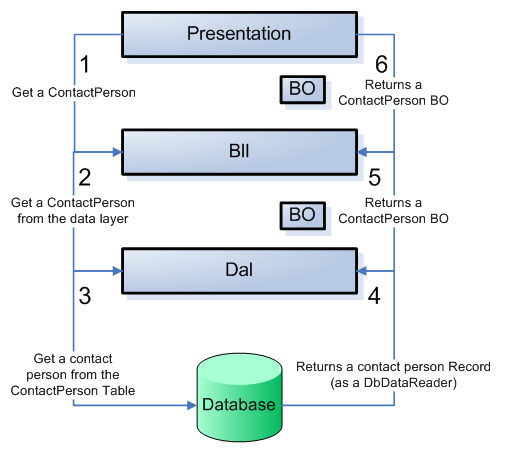
Figure 11 - The Layers in the Contact Person Manager Application
- The Presentation layer, for example an ASPX page called ShowContactPerson.aspx, asks the BLL for some object, for example a contact person. It does this by calling ContactPersonManager.GetItem() and passing it the ID of the contact person.
- The BLL can optionally perform some validation and then forwards the request to the DAL by calling ContactManagerDB.GetItem().
- The DAL connects to the database and asks it for a specific record. It does this by executing a stored procedure, like sprocContactPersonSelectSingleItem and passing it the ID of the contact person.
- When the record is found, it is returned from the database to the DAL in a SqlDataReader object.
- The DAL wraps the database data in a custom ContactPerson object from the BO namespace and returns it to the BLL.
- Finally, the BLL returns the ContactPerson object to the Presentation layer, where it could be displayed on a web page for example.
You'll see the implementation of these steps in the next part of this article series.
Database Design
It should come as no surprise that the actual database diagram has a lot of similarities with the class design. It has a table for each of the four relevant classes, and each table has columns that map to the properties of those classes. The following image shows the full diagram for the application's database:
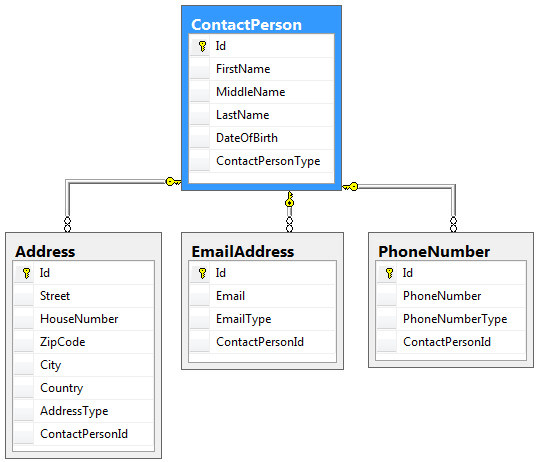
Figure 12 - The Database Diagram for the Contact Person Manager Application
In part two of this article series I'll take a deeper look at some of the stored procedures in the database that are used to get data in and out of the database.
This concludes the design of the business and data access layers of the Contact Person Manager Application.
Wrapping it Up
This article covered a lot of ground and made a great foundation for the actual implementation of the code that you'll see in part two of this article series.
The article started off with a short introduction of the sample Contact Person Manager application that is used throughout this article series. This introduction was followed by a discussion of a few design patterns that are available: spaghetti code, SqlDataSource controls, TableAdapters and Linq. The fifth alternative, custom business objects is the main topic of this and the remainder of the articles.
You saw how to turn information gathered in the requirements phase into a number of classes in the object model. These classes and their properties and methods form the API that is used to build the actual Contact Person Manager application.
A large part of the article was dedicated to the actual classes in the system, spread out over three layers: the Business Objects, the Business Logic and the Data Access layer. You saw what classes live in what namespace and what their activities and responsibilities are.
Finally, I have given you a quick look at the application's database model.
Part two of this series shows you how to build the actual classes. You'll see how the database with its tables and stored procedures is created, how to implement the various methods in the business and data access layers, and how to make the contact data (EmailAddress, Address and PhoneNumber) play together with the ContactPerson class so the contact data is available through the ContactPerson objects instead of calling methods in those classes directly.
Download Files
- Source Code of the Demo Application in C#. Comes with scripts to create the database
- Source Code of the Demo Application in Visual Basic .NET. Comes with scripts to create the database
- The MyGeneration templates for the Bll, BO and Dal classes in C#
- The MyGeneration templates for the Bll, BO and Dal classes in VB.NET
Where to Next?
Wonder where to go next? You can post a comment on this article.
Links in this Document
| Doc ID | 416 |
| Full URL | https://imar.spaanjaars.com/416/building-layered-web-applications-with-microsoft-aspnet-20-part-1 |
| Short cut | https://imar.spaanjaars.com/416/ |
| Written by | Imar Spaanjaars |
| Date Posted | 01/14/2007 18:19 |
| Date Last Updated | 04/25/2007 00:03 |
| Date Last Reviewed | 02/04/2007 21:16 |
| Listened to when writing | Hard Work (Live 2-1-1981) by Sonic Youth (Track 6 from the album: Sonic Youth) |
Comments
Talk Back! Comment on Imar.Spaanjaars.Com
I am interested in what you have to say about this article. Feel free to post any comments, remarks or questions you may have about this article. The Talk Back feature is not meant for technical questions that are not directly related to this article. So, a post like "Hey, can you tell me how I can upload files to a MySQL database in PHP?" is likely to be removed. Also spam and unrealistic job offers will be deleted immediately.
When you post a comment, you have to provide your name and the comment. Your e-mail address is optional and you only need to provide it if you want me to contact you. It will not be displayed along with your comment. I got sick and tired of the comment spam I was receiving, so I have protected this page with a simple calculation exercise. This means that if you want to leave a comment, you'll need to complete the calculation before you hit the Post Comment button.
If you want to object to a comment made by another visitor, be sure to contact me and I'll look into it ASAP. Don't forget to mention the page link, or the Doc ID of the document.