Storing Uploaded Files in a Database or in the File System with ASP.NET 2.0
Update 2010/08/10: I just posted an article featuring a new version of this application based on the Provider Model design pattern. You can find the article here.
A common requirement in web sites is handling client files that are uploaded through the browser. Whether these files come from a protected Admin section where content managers can upload files, or from a public section doesn't matter; you need a way to retrieve and store these files in your system somewhere so they are available for viewers.
Allowing a user to upload a file is easy; just drop a FileUpload control on your page and .NET will handle the rest for you. However, it's after the file gets uploaded to the server where things get interesting. One of the things you have to take into account is where you're going to store the uploaded file. Two common places are the hard drive of your server and a database. There has been a lot of debate on the Internet about the best way to store your files. Some say the file system is the only acceptable option, while others really like the database solution.
In this article I'll show you how to store files both ways. I'll discuss the pros and cons of each solution, and show you the code you need to save your uploaded files. As a sample application, I'll build a small web site that allows you to upload files and store them at a location that you determine. You can decide where the files are stored through a simple setting in the web.config file. Depending on this setting, files are either stored directly at the hard drive of your server or in a database. You can even change this setting at run-time without affecting existing files.
Introduction
UPDATE 2006/01/17: I added the VB version of the code to the Downloads section
Right now, the article and the code download are in C# only, but I am working on a Visual Basic version of the application as well. Send me a nice e-mail if you want me to hurry up...
I converted the code to Visual Basic .NET using DotNetTaxi's Code converter and then manually fixed a few remaining issues. I tested the application and everything seems to work fine. If you do find an issue, please let me know. The full VB code is available in the Downloads section at the end of this article.
Besides showing how to store files in the database and retrieve them again, this article also presents a little demo application that demonstrates the concepts from this article. Instead of performing all the code directly in the code behind of the ASPX pages, this application uses a number of separate classes that each perform a limited set of tasks. If you're not interested in the design of the application or the pros and cons of storing files in the database, you skip directly to the code that shows you how to save files in the database and retrieve them again.
Before we start looking at the application and it's code, it's a good idea to briefly look at the pros and cons of both solution. Since so many people have a strong favor for one of the two solutions, there must be interesting differences between the two. Let's look at storing the files in the file system first.
File System - Advantages
One of the main benefits of storing the file on disk is that it's very easy to do. Just call SaveAs on a FileUpload control and you're pretty much done.
Another advantage is that files on disk are easy to backup; you just copy the files to another location. This also makes it easier to do incremental backups; files that have already been backed up don't need to be copied again.
FileSystem - Disadvantages
Storing your files in the file system has a few disadvantages as well. Probably the most problematic issue is the loosely coupled nature of the files on disk. They have no strong relation with a record in the database. So, when you delete, say, a product from the database, you may end up with an orphaned product image. There is no direct way to do an INNER JOIN between the product table and your images folder to determine what orphaned files you have left. This means that a page developer is responsible for writing code that deletes the file from disk whenever the associated database records gets deleted.
Also, to store uploaded files on disk, your web server needs permissions to write to the file system. This is easy to come by when you run your own server, but may prove to be more problematic in an ISP scenario.
Database - Advantages
Of course some of the advantages of a database are the exact opposite of the disadvantages of saving them as physical files: since they are stored in the database, they're easy to relate to other records. They can be retrieved in JOIN style queries, and even be deleted automatically with cascading delete turned on. You also don't need additional permissions on the server; if you can write to the database, you can store files in it.
But another advantage of storing your files in a database is the fact that all data is contained in a single location. Make a backup of your database, and you have everything you need. That makes it a lot easier to move your data to another server; other than the database, you don't need to copy files, set up permissions and so on.
Database - Disadvantages
At the top of the list of disadvantages of storing your files in a database is probably performance. While I don't have any hard figures to support this, the "word is" that it's slow. How slow may depend on your situation, the type of files you have, the server, and so on.
Another downside is the lack of easy access to the files. When you store them on disk, it's easy to download them to your desktop machine and batch process them; for example, use an imaging program to scale or rotate all your images. When you use a database, you need to "materialize" them to disk first and upload them again afterwards.
A final problem with the database is backups. Whenever you make a full backup of your database, all the files are included, whether they have been changed or not. If you copy your backups to a different machine or network for safety reasons, this could be problematic as you need to move the entire backup file. With a file based solution, you can use diff programs that can determine which files have been changed since the last backup, and only download those.
Realizing that both methods have their pros and their cons, the question is: what to choose? Personally, I favor storing them on disk. The accessibility of the files on disk, combined with the simple coding model makes the disk solution a better one in many situations. However, I have also used the database solution at places where that made more sense. Bottom line is that you need to carefully examine your scenario and determine what works for you.
The solution I am presenting in this article shows you how to do both; with a simple option in the web site's config file, you can switch between a file based and a database solution.
Storing the Files
When you store the files on disk, things are pretty easy. The SaveAs method on the PostedFile does all the work for you, provided you set the right security settings. Storing them in a database isn't too hard either, but you need to be aware of a few things. First of all, you need to know what data type to use to store your files. With SQL Server 2000, you can use the image data type. Although its name suggests you can only use it to store image files, this is not true. You can store text files, Word documents, spread sheets or any other file type you have. With SQL Server 2005, you can use the new varbinary(max) data type. The sample application that comes with this article uses a SQL Server 2005 Express database and thus the varbinary(max) data type. If you want to use SQL Server 2000 instead, simply replace each occurrence of varbinary(max)with the image data type, including the FileData column in the Files table.
Additionally, you need to know the code to access the database to store and retrieve the files. You'll see a lot more of that right after I discussed the demo application and its feature set.
The Demo Application - A Simple File Manager
The demo application used in the article is a simple web site that allows you to upload, download and view files. With an optional switch in the web.config file, you can determine whether the files are stored in the database or on disk. The code for the entire application is available in the Download Files section at the end of the article.
The application contains four .cs files in the App_Code folder, a SQL Server 2005 Express database, four .ASPX files with code behind and a web.config file, all of them visible in Figure 1.
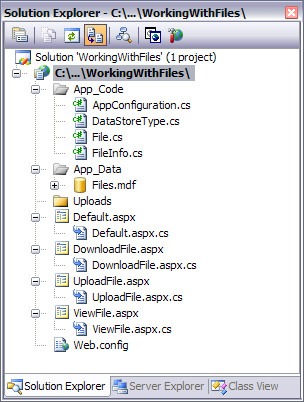
Figure 1 - The Solution Explorer for the Project
In this article, I'll show what each file is used for and what code it contains. I won't discuss each and every line of code in the application, but instead focus on the important concepts. You're encouraged to download the application so you can see the full source, and play around with it.
To keep the discussion focused, the design of the application is extremely simple. It features a page with a standard GridView that displays the files that have been upload:
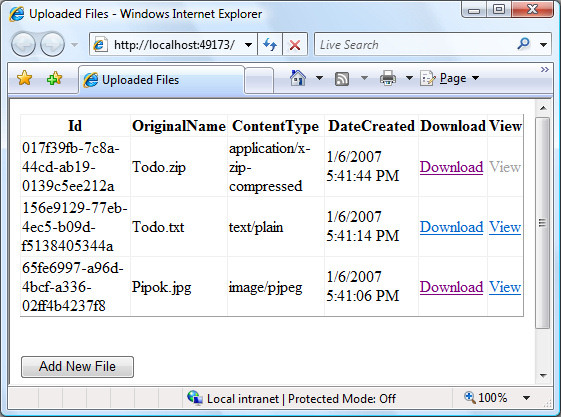
Figure 2 - A GridView Showing the Uploaded Files
Each uploaded file always has a Download link to allow a user to download the file from the server. For files that can be viewed in the browser, there's also a View link. This works only for files like images, Word documents and text files in the demo application, but it's easy to extend this to other files, like Excel spreadsheets.
If you click the Add New File button, you can upload a new file which is then shown in the GridView in Figure 2.
The Demo Application - Class Design
Instead of doing all the code logic in the page's code behind, the application uses a class based design, where each class has a strong focus on a single task. Let's take a look at the class design for the application:
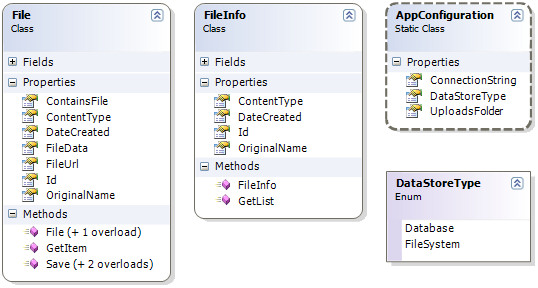
Figure 3 - The Class Diagram for the Sample Application
The class diagram in Figure 3 contains three classes and one enumeration. I'll discuss all four of them in the following section.
The File class
The File class represents an uploaded file and is used to store and retrieve uploaded files on disk and in a database. The database is used in both scenario's. Even when you decide to save the files on disk, some meta data of the file is still stored in the database. The File class has properties to store the ContentType of a file (like image/jpeg, application/msword etc), the date it was created (DateCreated), its unique ID in the database and the original name of the file when it was uploaded (OriginalName). It also contains a FileUrl which is used when files are stored on disk, and a FileData property which contains the actual file when it's retrieved from the database. The last property of the File class is ContainsFile, which indicates whether the file holds the bytes for the uploaded file in FileData, or that it contains a virtual path to the file on disk in FileUrl.
It also contains two constructors and two methods: one to get a file (from the database or from disk) and one to save the file. This Save method has two public overloads and one private version that performs the actual save operation.
The FileInfo class
The FileInfo class serves as a lightweight summary object for the file. A FileInfo object basically contains the meta data of the file, but without the actual file or virtual path to it. This is useful in scenarios where you want to display a list of files, as in Figure 2. In such a case, it doesn't make much sense to have each item in the GridView contain the actual file, as you aren't doing anything with it. By using a lightweight FileInfo object, you can save some overhead and speed up your application.
The AppConfiguration Class
If you're familiar with my latest book ASP.NET 2.0 Instant Results, you should be familiar with this class. It's a static class that's essentially a wrapper around some settings in the web.config. While you can certainly access the web.config file from code directly, I prefer to wrap them in a static class with static properties, so I have easy access to them and get Intelli Sense on them.
The ConnectionString property defines the connection string to the SQL Server database (a SQL Server 2005 Express database in the demo application), while UploadsFolder contains a virtual path to the folder where uploaded files are stored (for example: ~/Uploads)
The final property of this class is DataStoreType which determines the location where to store the files. The DataStoreType enumeration is discussed next.
The DataStoreType Enum
The DataStoreType enumeration contains two members: Database and FileSystem. When the application is configured to use Database, all files are stored in the SQL Server 2005 database, When FileSystem is specified, then the meta data is still stored in the database, while the actual files are saved to disk.
Uploading Files
OK, enough for the theory, let's look at some code.
When you click the Add New File button you see in Figure 2, you're taken to UploadFile.aspx. The markup of this page is extremely simple and only contains an <asp:FileUpload /> control and a Button. When you select a file and then click the Upload File button, the following code is executed:
protected void btnUpload_Click(object sender, EventArgs e)
{
  if (FileUpload1.HasFile)
  {
    string contentType = FileUpload1.PostedFile.ContentType;

    // Get the bytes from the uploaded file
    byte[] fileData = new byte[FileUpload1.PostedFile.InputStream.Length];
    FileUpload1.PostedFile.InputStream.Read(fileData, 0, fileData.Length);

    // Get the name without folder information from the uploaded file.
    string originalName = Path.GetFileName(FileUpload1.PostedFile.FileName);

    // Create a new instance of the File class based on the uploaded file.
    File myFile = new File(contentType, originalName, fileData);

    // Save the file, and tell the Save method what data store to use.
    switch (AppConfiguration.DataStoreType)
    {
      case DataStoreType.Database:
        myFile.Save();
        break;
      case DataStoreType.FileSystem:
        myFile.Save(Server.MapPath(Path.Combine(
        AppConfiguration.UploadsFolder, myFile.FileUrl)));
        break;
    }
    Response.Redirect("~/");
  }
}

(From: UploadFile.aspx.cs)
The code first checks if a file has been uploaded by looking at the HasFile property. If that's the case, its content type is derived from the ContentType property of the PostedFile.
Next, a byte array is created from the uploaded file. First, the array is dimensioned to the length of the uploaded file and then it's filled by calling Read on the InputStream of the PostedFile. At this stage, fileData contains the actual bytes of the file the user has uploaded.
Then the original name is retrieved. By default, PostedFile.FileName contains the full path and name of the file at the client's computer. Since we're only interested in the file's name (and extension) and not in the original path, Path.GetFileName is used to strip off the path.
Then a new File object is constructed with a constructor that accepts the content type, the file name and the bytes for the file. Inside this constructor, the parameters are stored in the class's backing variables, like this:
public File(string contentType, string originalName, byte[] fileData)
{
  this.id = Guid.NewGuid();
  this.contentType = contentType;
  this.fileData = fileData;
  this.originalName = originalName;

  string extension = Path.GetExtension(originalName);
  string fileName = this.Id.ToString() + extension;

  this.fileUrl = fileName;
}

(From: File.cs)
Notice how the constructor builds up the unique fileUrl for the file, by adding a Guid and the file's extension together. This way, each file ends up with a unique name so you don't have to worry about files being accidentally overwritten. Since the original name of the file is always stored in the database, it's easy to use that name again when the file is downloaded. You'll see how this works later.
Once the new File instance is ready, it's saved by calling Save(). There are two public overloads of the Save method; a parameterless version that saves the file in the database and an overloaded version that accepts the physical location of where the file must be saved. Notice that the correct overload is chosen based on the DataStoreType:
// Save the file, and tell the Save method what data store to use.
switch (AppConfiguration.DataStoreType)
{
  case DataStoreType.Database:
    myFile.Save();
    break;

  case DataStoreType.FileSystem:
    myFile.Save(Server.MapPath(Path.Combine(
          AppConfiguration.UploadsFolder, myFile.FileUrl)));
    break;
}

(From: UploadFile.aspx.cs)
Both of the two public versions of the Save method call another, private overload that accepts a DataStoreType and the physical location of the file. This version of the Save method is discussed next.
Saving the File
The Save method contains a lot of code, but most of it is pretty standard ADO.NET code:
private bool Save(DataStoreType dataStoreType, string filePath)
{
  using (SqlConnection mySqlConnection = new
          SqlConnection(AppConfiguration.ConnectionString))
  {
    // Set up the Command object
    SqlCommand myCommand = new SqlCommand(
          "sprocFilesInsertSingleItem", mySqlConnection);
    myCommand.CommandType = CommandType.StoredProcedure;

    // Set up the ID parameter
    SqlParameter prmId = new SqlParameter("@id",
        SqlDbType.UniqueIdentifier);

    prmId.Value = id;
    myCommand.Parameters.Add(prmId);

    // Set up the FileData parameter
    SqlParameter prmFileData = new SqlParameter("@fileData ",
          SqlDbType.VarBinary);
    // If we need to store the file in the database,
    // pass in the actual file bytes.
    if (dataStoreType == DataStoreType.Database)
    {
      prmFileData.Value = fileData;
      prmFileData.Size = fileData.Length;
    }
    else
    {
      prmFileData.Value = DBNull.Value;
    }
    myCommand.Parameters.Add(prmFileData);

    // Set up the FileUrl parameter
    SqlParameter prmFileUrl = new SqlParameter("@fileUrl",
        SqlDbType.NVarChar, 255);
    // If we need to store the file on disk, save the fileUrl.
    if (dataStoreType == DataStoreType.FileSystem)
    {
      prmFileUrl.Value = fileUrl;
    }
    else
    {
      prmFileUrl.Value = DBNull.Value;
    }
    myCommand.Parameters.Add(prmFileUrl);

    // Set up the OriginalName parameter
    SqlParameter prmOriginalName = new SqlParameter("@originalName",
          SqlDbType.NVarChar, 50);
    prmOriginalName.Value = originalName;
    myCommand.Parameters.Add(prmOriginalName);

    // Set up the ContentType parameter
    SqlParameter prmContentType = new SqlParameter("@contentType",
          SqlDbType.NVarChar, 50);
    prmContentType.Value = contentType;
    myCommand.Parameters.Add(prmContentType);

    // Execute the command, and clean up.
    mySqlConnection.Open();
    bool result = myCommand.ExecuteNonQuery() > 0;
    mySqlConnection.Close();

    // Save the file to disk if necessary; shown later

    return result;
  }
}

(From: File.cs)
This code creates a SqlConnection and a SqlCommand object and then creates a number of parameters. Most of them are pretty straight forward, but the fileUrl and fileData parameters need a bit more explanation (highlighted in the code above). When the DataStoreType passed in equals Database, it means the actual file is stored in the database. In that case, the fileData property is assigned to the value of the prmFileData parameter. The type of that parameter is SqlDbType.VarBinary, which corresponds to the data type of the column in the database. (When you're using SQL Server 2000, you should use SqlDbType.Image instead.) Since the file has already been converted to a byte array in the calling code, all you need to do here is assign the fileData variable to the parameter's Value property.
In the else clause (when the FileSystem option is used), DBNull.Value is passed instead, so null is stored in the database.
The FileUrl parameter takes the opposite approach and only passes its value when DataStoreType is FileSystem.
Finally, the Command object is executed against an open database connection and the result of the ExecuteNonQuery call is stored in a temporary variable.
Notice that when the FileSystem is used, the Save method also saves the file to disk:
// Database update is done; now store the file on disk if we need to.
if (dataStoreType == DataStoreType.FileSystem)
{
  const int myBufferSize = 1024;
  Stream myInputStream = new MemoryStream(fileData);
  Stream myOutputStream = System.IO.File.OpenWrite(filePath);
           	byte[] buffer = new Byte[myBufferSize];
  int numbytes;
  while ((numbytes = myInputStream.Read(buffer, 0, myBufferSize)) > 0)
  {
    myOutputStream.Write(buffer, 0, numbytes);
  }
  myInputStream.Close();
  myOutputStream.Close();
}

(From: File.cs)
To save the file, the byte array is converted back to a Stream again, which is then written to disk using another Stream object. For the file name, this code uses the filePath parameter passed to the Save method.
As an alternative to this solution, you can decide to call the SaveAs method on the FileUpload control in the code behind of UploadFile.aspx. This is easier, as the SaveAs method takes care of it all; all you need to do is pass a file name. However, it also means you're spreading logic across your application. By encapsulating all the code into a single File class, your application becomes easier to maintain and extend.
As another alternative, you could pass the entire FileUpload control to the Save method, and have that method call its SaveAs method. Personally, I don't like that solution too much, as it ties the File class to a WebControl, which makes it harder to reuse it in other type of applications.
The stored procedure that is used in the Save method is really simple; it performs a simple INSERT operation in the File table:
CREATE PROCEDURE sprocFilesInsertSingleItem

  @id uniqueidentifier,
  @fileUrl nvarchar(255),
  @fileData varbinary (max),
  @originalName nvarchar(50),
  @contentType nvarchar(50)

AS

INSERT INTO Files
(
  Id,
  FileUrl,
  FileData,
  OriginalName,
  ContentType
)
VALUES
(
  @id,
  @FileUrl,
  @FileData,
  @originalName,
  @contentType
)

(From: sprocFilesInsertSingleItem)
Again, the varbinary(max) data type is used for the fileData parameter, to line up with the SqlParameter and the column for the file in the database as you saw earlier.
With the Save operation done, the next thing to look at is displaying files.
Displaying the Files
To display files in a web browser, there are two scenario's to consider: displaying lists of files, and displaying or downloading a single file. I'll look at the list first, followed by the single file.
Viewing a List of Files
The page Default.aspx, that displays a list of files that can be downloaded or viewed, contains a simple GridView with a few columns that display the file's unique Id, original name, content type and the date and time it was uploaded. It also contains two columns that allow you to download a file and - in certain circumstances - view the file in-line in the browser. In Figure 2 you can see that only some files have the View link enabled. Some code in the code behind looks at the content type of the file in each row, and enables the View link when the file can be viewed in-line in the browser. That's the case for images (jpg, gif for example) and other files that the browser can usually handle (Word files, Excel spreadsheets). Other files that can't be viewed directly, but need a separate application (Zip and Rar files for example) can only be downloaded. You'll see the code for this a little later.
The GridView gets its data from an ObjectDataSource control that is tied to the FileInfo class with its GetList method. You could opt to implement the GetList method in the File class and remove the entire FileInfo class. However, I have chosen to implement it like this for performance reasons. In most scenarios, when you display a list of files, you don't need the actual files; all you need is some meta data like the name and unique ID. By implementing a simple, and read-only class FileInfo, you get all the data you need without the overhead of retrieving all the files from the database.
Because all the work is done by the GetList method of the FileInfo class, the ObjectDataSource is very simple:
<asp:ObjectDataSource ID="odsFiles" runat="server"
    SelectMethod="GetList" TypeName="FileInfo" />

(From: Default.aspx)
When this control gets its data, it calls the static GetList method that returns a generics List of FileInfo objects:
public static ListGetList() { List<FileInfo> myList = null; using (SqlConnection mySqlConnection = new SqlConnection( AppConfiguration.ConnectionString)) { SqlCommand myCommand = new SqlCommand("sprocFileInfoSelectList", mySqlConnection); myCommand.CommandType = CommandType.StoredProcedure; mySqlConnection.Open(); using (SqlDataReader myReader = myCommand.ExecuteReader()) { if (myReader.HasRows) { myList = new List<FileInfo>(); while (myReader.Read()) { myList.Add(new FileInfo(myReader)); } } } mySqlConnection.Close(); } return myList; } (From: FileInfo.cs)
Again, most of this code is pretty straight forward. A SqlCommand executes the stored procedure sprocFileInfoSelectList to get the data from the database. Each record retrieved from the database is transformed into a FileInfo object that is added to a generics List<FileInfo>. To make the code a bit more readable, the FileInfo class has a constructor that accepts a SqlDataReader. This way, you only need a single line of code in the while loop to create a FileInfo instance and add it to the list. The constructor that accepts the SqlDataReader looks like this:
public FileInfo(SqlDataReader myReader)
{
  id = myReader.GetGuid(myReader.GetOrdinal("Id"));
  dateCreated = myReader.GetDateTime(myReader.GetOrdinal("DateCreated"));
  originalName = myReader.GetString(myReader.GetOrdinal("OriginalName"));
  contentType = myReader.GetString(myReader.GetOrdinal("ContentType"));
}

(From: FileInfo.cs)
Each of the four fields of the FileInfo class are filled with a value from the SqlDataReader. Since all fields are required in the database, there's no need to check for null values.
At the end of the GetList method, the list with FileInfo objects is returned to the calling code where it's bound to the GridView. For each FileInfo object that is added to the GridView, it fires its RowDataBound event that is used to determine whether the View link should be enabled or not:
protected void GridView1_RowDataBound(object sender,
            GridViewRowEventArgs e)
{
  switch (e.Row.RowType)
  {
    case DataControlRowType.DataRow:
      FileInfo myFileInfo = (FileInfo) e.Row.DataItem;
      switch (myFileInfo.ContentType.ToLower())
      {
        case "image/pjpeg":
        case "image/gif":
        case "application/msword":
        case "text/plain":
          // Do nothing. When the row contains a viewable type,
          // we want the View link to be enabled.
          break;
      default:
        // Find the View link and disable it.
        HyperLink myLink = (HyperLink)e.Row.FindControl("lnkView");
        myLink.Enabled = false;
        break;
      }
    break;
  }
}

(From: Default.aspx.cs)
Whenever a DataRow is added, a FileInfo object is retrieved from the DataItem property of e.Row. The FileInfo's ContentType is then used to determine whether the file is viewable in the browser or not. In the example above, this is only done for .jpg, .gif, .doc and .txt files but you can easily add additional case statements to the switch block.
For all other files, the link is retrieved with the FindControl method of the row and then its Enabled property is set to false.
Downloading or Viewing a Single File
When you click the Download or View link, you're take to DownloadFile.aspx or ViewFile.aspx respectively. The code behind of these files are pretty similar, but there are a few interesting differences worth looking at.
Both pages start by getting a File object from the database by calling File.GetItem. This method is pretty straight forward, and uses the same principle as the FileInfo class by implementing a constructor that accepts a SqlDataReader object to fill the private fields:
public File(SqlDataReader myReader)
{
  id = myReader.GetGuid(myReader.GetOrdinal("Id"));
  dateCreated = myReader.GetDateTime(myReader.GetOrdinal("DateCreated"));
  originalName = myReader.GetString(myReader.GetOrdinal("OriginalName"));
  contentType = myReader.GetString(myReader.GetOrdinal("ContentType"));

  if (!myReader.IsDBNull(myReader.GetOrdinal("FileData")))
  {
    fileData = (byte[])myReader[myReader.GetOrdinal("FileData")];
    containsFile = true;
  }
  else
  {
    fileUrl = myReader.GetString(myReader.GetOrdinal("FileUrl"));
    containsFile = false;
  }
}

(From: File.cs)
The first four fields are retrieved directly from the reader. The code then checks if the column FileData has a value that isn't null. If that's the case, the value is casted to a byte array and assigned to the fileData field. Notice that containsFile is also set to true to indicate that the File instance contains the actual file bytes. The public ContainsFile property is used in the download and view pages to determine whether the File instance contains the actual file bytes, or that they should search for the files on the server's hard drive.
In the else clause, the fileUrl (with the virtual path to the file on disk, starting from the virtual Uploads folder) is set, and containsFile gets a value of false.
Once the File object is returned, DownloadFile.aspx sets Response.ContentType to application/x-unknown and appends an additional header that contains the original name of the file. Then it uses either the BinaryWrite or the WriteFile method of the Response object, based on the fact whether the File object contains the actual file data:
Response.ContentType = "application/x-unknown";
Response.AppendHeader("Content-Disposition",
      "attachment; filename=\"" + myFile.OriginalName + "\"");
if (myFile.ContainsFile)
{
  Response.BinaryWrite(myFile.FileData);
}
else
{
  Response.WriteFile(Path.Combine(AppConfiguration.UploadsFolder, myFile.FileUrl));
}

(From: DownloadFile.aspx.cs)
In both cases, this forces the browser to display a File Download dialog that allows the user to save the file to disk :
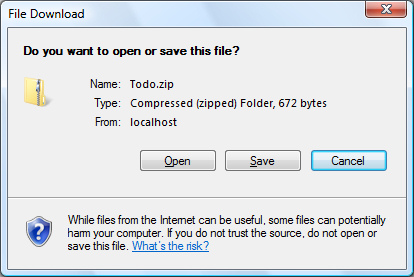
Figure 4 - The File Download Dialog
The ViewFile.aspx page takes a similar approach, but first sets the ContentType that it retrieves from the File instance. It then switches between BinaryWrite and Redirect to send the file to the browser where it's displayed in line:
Response.ContentType = myFile.ContentType;
if (myFile.ContainsFile)
{
  Response.BinaryWrite(myFile.FileData);
}
else
{
  Response.Redirect(Path.Combine(AppConfiguration.UploadsFolder, myFile.FileUrl));
}

(From: ViewFile.aspx.cs)
With the code to download or view an uploaded file, we've come full circle. You can now upload files to the server and store them on disk or in a database depending on your own preferences or requirements. You can list the files in a GridView and offer your users a way to download or display them.
Summary
Storing your uploaded files in a SQL Server database can be very convenient. It allows you to easily relate the uploaded files to other records in the database. However, there are also some disadvantages that you need to be aware of. One is performance, while another is increased backup-time. Whether you should save your files on disk or in a database depends on your own preferences and requirements.
This article showed you how to upload your files and store them in a database or on disk depending on a simple configuration switch. When you store them in a database, you can use the Image or the varbinary(max)data type. When you store them on disk, you need to ensure that the account used by the web server has sufficient permissions to write to the Uploads folder.
At the end of the article I showed you the code to either download a file or view it directly in the browser. Viewing it in the browser is not possible for every type of file. For example, .zip files cannot be viewed directly so they can only be downloaded. The code in the code behind of Default.aspx determines whether the View link must be enabled based on the file's ContentType property.
References
- How Do I Allow My Web Application to Write to Files, Folders and Databases?
- How Do I Determine the Security Account that IIS Uses to Run My Web Site?
Download Files
Where to Next?
Wonder where to go next? You can post a comment on this article.
Links in this Document
| Doc ID | 414 |
| Full URL | https://imar.spaanjaars.com/414/storing-uploaded-files-in-a-database-or-in-the-file-system-with-aspnet-20 |
| Short cut | https://imar.spaanjaars.com/414/ |
| Written by | Imar Spaanjaars |
| Date Posted | 01/06/2007 17:12 |
| Date Last Updated | 01/17/2007 23:42 |
| Listened to when writing | Sporen by Opgezwolle (Track 1 from the album: Vloeistof) |
Comments
Talk Back! Comment on Imar.Spaanjaars.Com
I am interested in what you have to say about this article. Feel free to post any comments, remarks or questions you may have about this article. The Talk Back feature is not meant for technical questions that are not directly related to this article. So, a post like "Hey, can you tell me how I can upload files to a MySQL database in PHP?" is likely to be removed. Also spam and unrealistic job offers will be deleted immediately.
When you post a comment, you have to provide your name and the comment. Your e-mail address is optional and you only need to provide it if you want me to contact you. It will not be displayed along with your comment. I got sick and tired of the comment spam I was receiving, so I have protected this page with a simple calculation exercise. This means that if you want to leave a comment, you'll need to complete the calculation before you hit the Post Comment button.
If you want to object to a comment made by another visitor, be sure to contact me and I'll look into it ASAP. Don't forget to mention the page link, or the Doc ID of the document.