Using Attributes to Improve the Quality and Usability of Your Code Part 1 - Decorating Business Objects for Data Binding
Read Part 2 - Improving Debugging
What is an Attribute Anyway?
An attribute is a bit of metadata that you can attach to elements like classes, methods, fields and assemblies. They allow you to provide information about your element that can be used at design time or at run-time. Here's what the MSDN has to say about attributes:
The Attribute class associates predefined system information or user-defined custom information with a target element. A target element can be an assembly, class, constructor, delegate, enum, event, field, interface, method, portable executable file module, parameter, property, return value, struct, or another attribute.
Information provided by an attribute is also known as metadata. Metadata can be examined at run time by your application to control how your program processes data, or before run time by external tools to control how your application itself is processed or maintained. For example, the .NET Framework predefines and uses attribute types to control run-time behavior, and some programming languages use attribute types to represent language features not directly supported by the .NET Framework common type system.
In it's simplest form, an attribute looks like this:
VB.NET
<WebMethod()> _
Public Function HelloWorld() As String
  Return "Hello World"
End Function

C#
[WebMethod]
public string HelloWorld()
{
  return "Hello World";
}
The attribute WebMethod, indicated by <> in Visual Basic and [] in C# is used to mark this method as a web method, accessible through a web service.
However, there are many more attributes available and you can even create your own. In the remainder of this article, I'll show you how to apply attributes to a custom Business Object that can be used in data binding scenario's in ASP.NET. By applying the right attributes to objects, methods and properties, you can greatly enhance a developer's productivity, because the Visual Web Developer IDE can make intelligent decisions based on the class's attributes.
As an example, I'll use a modified version of the Bug class from chapter 12 - The Wrox BugBase from my book ASP.NET 2.0 Instant Results.
An Introduction to the Bug Class
To understand what the Bug class is, and how and where you can apply attributes, take a look at its class diagram. If you have read the book ASP.NET 2.0 Instant Results, you'll notice this is a slightly different version. For the purpose of this article, I limited the list of Members so the class is a bit easier to understand. I also renamed and moved a number of methods from the BugManager class into the Bug class itself that is shown in the following figure:

Figure 1 - The Bug Class
Besides a number of (public) properties, you also see a number of methods. These methods have a 1 to 1 mapping to the basic CRUD operations: Create, Read, Update and Delete. GetItem and GetList are both used to read; the first returns a single Bug instance, while GetList returns a generic List <Bug> or List (Of Bug), depending whether you prefer to think in C# or in VB.NET.
Applying Attributes to Classes
Now, this class is ready to be consumed by a web application. All you need to do is drop a GridView on the page, hook it up to an ObjectDataSource control by choosing Choose Data Source on the GridView's Smart Task panel, set a number of properties and you're ready to select, update and delete items. (Note: since the GridView doesn't support inserting, you need to use a DetailsView or FormView control for inserts). When you enter the Configure Data Source wizard, you'll see something like this:
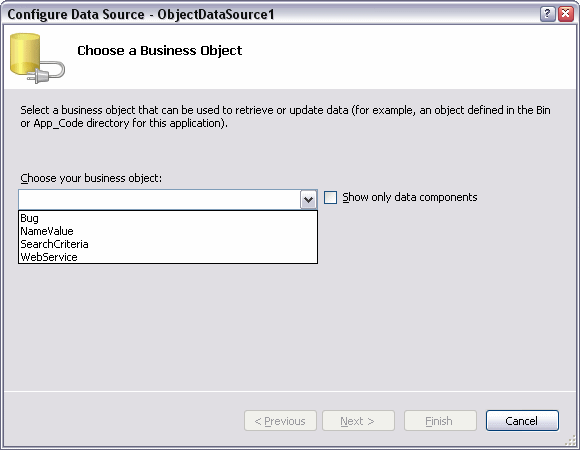
Figure 2 - The Configure Data Source Wizard
The list with classes in the business object drop-down can grow pretty large, depending on the number of classes in your project. Wouldn't it be great if you could limited the list to just those that provide data binding capabilities to the ObjectDataSource control? Sure, it would, but as soon as you check Show only data components, the list goes blank. Here's where Attributes come into play. To make your class show up in this list, so you can easily select it, you need to apply the DataObjectAttribute that you find in the System.ComponentModel namespace. To do that, you need to add a using / Imports statement for this namespace to your class, and then add the following attribute to the Bug class:
VB.NET
<DataObjectAttribute()> _
Public Class Bug
  ' Implementation here
End Class

C#
[DataObjectAttribute()]
public class Bug
{
 // Implementation here
}
With this attribute applied, the class will now be seen as a business object, and show up correctly in the list with business objects in the Configure Data Source wizard (Note: you may need to recompile the application before VWD sees the new attributes):
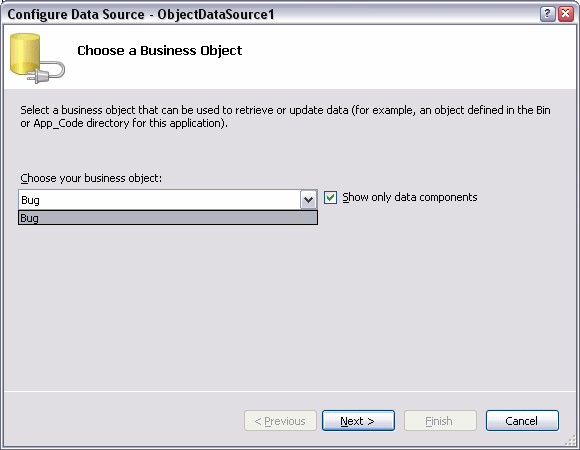
Figure 3 - The Configure Data Source Wizard with the Bug Class
Applying Attributes to Methods
This is a nice start, but I always want more. If you click Next on the Wizard, you get a dialog that allows you to choose the Select, Update, Insert and Delete methods. While the IDE is smart enough to recognize the methods, it doesn't preselect them in the list. You have to manually select each method, on all four tabs (assuming you want to enable all four kinds of operations).
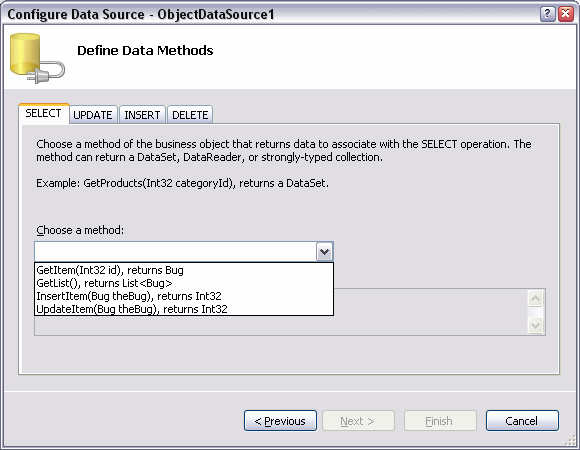
Figure 4 - The Configure Data Source Wizard - Choosing the Select method manually
Fortunately, you can teach the IDE what methods it should select on all four tabs. You can do this by applying the DataObjectMethod attribute to the appropriate methods. One of the overloaded constructors for this attributes accepts two arguments: the first being a DataObjectMethodType that allows you to indicate whether the method is used to Delete, Insert, Select, Fill or Update an item. The second attribute, a boolean, is used to indicate whether a certain method is the default for its type of operation. So, an attribute that marks a method as the default Select method, could look like this:
VB.NET
<DataObjectMethod(DataObjectMethodType.Select, True)>
Public Shared Function GetList() As List(Of Bug)
  Throw New NotImplementedException()
End Function

C#
[DataObjectMethod(DataObjectMethodType.Select, true)]
public static List<Bug> GetList()
{
  throw new NotImplementedException();
}
This defines the GetList method that returns List<Bug> as the default Select method. Below you see the relevant attributes applied to each method in the Bug class:
VB.NET <DataObjectMethod(DataObjectMethodType.Select, True)> _ Public Shared Function GetList() As List(Of Bug) Throw New NotImplementedException() End Function <DataObjectMethod(DataObjectMethodType.Select, False)> _ Public Shared Function GetItem(ByVal id As Integer) As Bug Throw New NotImplementedException() End Function <DataObjectMethod(DataObjectMethodType.Insert, True)> _ Public Shared Function InsertItem(ByVal theBug As Bug) As Boolean Throw New NotImplementedException() End Function <DataObjectMethod(DataObjectMethodType.Update, True)> _ Public Shared Function UpdateItem(ByVal theBug As Bug) As Boolean Throw New NotImplementedException() End Function <DataObjectMethod(DataObjectMethodType.Delete, True)> _ Public Shared Function DeleteItem(ByVal theBug As Bug) As Boolean Throw New NotImplementedException() End Function C# [DataObjectMethod(DataObjectMethodType.Select, true)] public static ListGetList() { throw new NotImplementedException(); } [DataObjectMethod(DataObjectMethodType.Select, false)] public static Bug GetItem(int id) { throw new NotImplementedException(); } [DataObjectMethod(DataObjectMethodType.Insert, true)] public static bool InsertItem(Bug theBug) { throw new NotImplementedException(); } [DataObjectMethod(DataObjectMethodType.Update, true)] public static bool UpdateItem(Bug theBug) { throw new NotImplementedException(); } [DataObjectMethod(DataObjectMethodType.Delete, true)] public static bool DeleteItem(Bug theBug) { throw new NotImplementedException(); }
Notice how for the GetItem method the DataObjectMethod attribute has been applied as well, with its type set to Select. However, the parameter for isDefault has been set to false. This way, the other Select method is considered the default and will be preselected in the ObjectDataSource wizard:
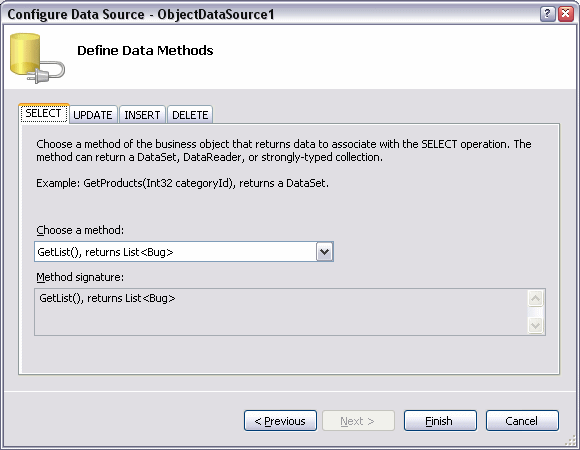
Figure 5 - The Configure Data Source Wizard - The Select method has been preselected
Just as with the select method, the Update, Insert and Delete methods have been preselected as well. This saves you from a lot of clicks if you need to configure many ObjectDataSource controls. You also make it easier for other developers using your business objects to determine what method to choose. Instead of figuring out what method to use, the most likely candidates have already been preselected.
Applying Attributes to Properties
Once I understood how to apply and use these attributes, I wanted even more. With the current setup, creating a page with a GridView showing records that can be sorted, paged, deleted and edited has now become a matter of a few clicks; you add a GridView, point it to an ObjectDataSource, and that's about it. However, for the GridView (and the FormView and DetailsView) to function correctly, it also needs the data key name(s) set to the object's property that represents the primary key in the data source. Normally, you would set this property manually on the GridView's property grid:
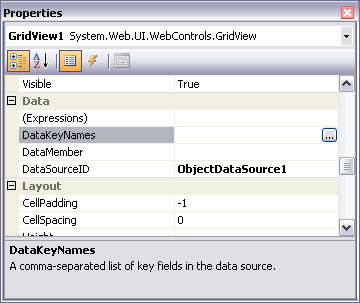
Figure 6 - The GridView's property grid
What I really wanted was that the GridView was able to figure out what property of my business object represents the object's primary key. Fortunately, there's another attribute that you can use: the DataObjectFieldAttribute. This attribute has a number of overloads that allows you to specify whether the property is a primary key and an identity. It also allows you to indicate it's length in bytes and whether or not it's nullable. Applying the attribute to the Bug's Id property results in this code:
VB.NET
<DataObjectField(True, True, False)> _
Public Property Id() As Integer
  Get
    Return _id
  End Get
  Set(ByVal value As Integer)
    _id = value
  End Set
End Property

C#
[DataObjectField(true, true, false)]
public int Id
{
  get { return id; }
  set { id = value; }
}
This attribute indicates that the Id property is a primary key and an identity in the database (the first two parameters of the attribute's constructor) and that it's not nullable (the third parameter).
The next time you run the Configure Data Source Wizard, the GridView is able to figure out what the primary key for the business object is, and fill in the DataKeyNames property for you automatically:
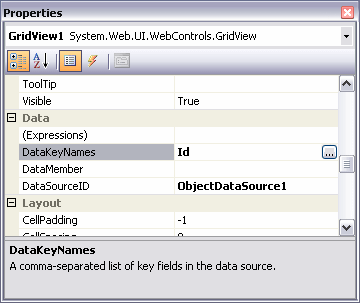
Figure 7 - The GridView's property grid with the DataKeyNames property filled in correctly
At first, this may not seem like a big time saver. However, if you configure many ObjectDataSource controls a day, you'll quickly start appreciating this behavior. But, better than saving time, this attribute improves the quality of your code: since the attribute is set automatically, you can no longer forget to set it manually, so your updates and deletes will function as expected, right out of the box.
Summary
Attributes are a great way to improve the quality of your code. By applying these attributes, you decorate your classes with useful metadata, allowing both an IDE like Visual Web Developer or Visual Studio and run-time code to inspect your elements to gain a better understanding of their capabilities. The idea is that you specify an attribute once when you write your code, but you benefit from it many times.
There are many more attributes in namespaces like System.ComponentModel and System.Diagnostics, making your life as a developer a whole lot easier.
Are you using special attributes to decorate the elements you code that increase your productivity? Leave a comment at the end of this article, so others can benefit from your knowledge as well.
In a future installment of this series, I'll take a look at a number of attributes that make debugging your code a lot easier.
Where to Next?
Wonder where to go next? You can post a comment on this article.
Links in this Document
| Doc ID | 390 |
| Full URL | https://imar.spaanjaars.com/390/using-attributes-to-improve-the-quality-and-usability-of-your-code-part-1-decorating-business-objects-for-data-binding |
| Short cut | https://imar.spaanjaars.com/390/ |
| Written by | Imar Spaanjaars |
| Date Posted | 05/04/2006 22:46 |
| Listened to when writing | X by System Of A Down (Track 5 from the album: Toxicity ) |
Comments
Talk Back! Comment on Imar.Spaanjaars.Com
I am interested in what you have to say about this article. Feel free to post any comments, remarks or questions you may have about this article. The Talk Back feature is not meant for technical questions that are not directly related to this article. So, a post like "Hey, can you tell me how I can upload files to a MySQL database in PHP?" is likely to be removed. Also spam and unrealistic job offers will be deleted immediately.
When you post a comment, you have to provide your name and the comment. Your e-mail address is optional and you only need to provide it if you want me to contact you. It will not be displayed along with your comment. I got sick and tired of the comment spam I was receiving, so I have protected this page with a simple calculation exercise. This means that if you want to leave a comment, you'll need to complete the calculation before you hit the Post Comment button.
If you want to object to a comment made by another visitor, be sure to contact me and I'll look into it ASAP. Don't forget to mention the page link, or the Doc ID of the document.