ASP.NET N-Layered Applications - Introduction (Part 1)
Note: this is part one in a series of ten. If you rather read this entire series off-line, you can buy the full series as a convenient PDF document that comes with the full source. Besides the convenience, buying the PDF will also make you feel good as it shows your appreciation for the articles and helps me pay the bills for my server and hosting so I can keep running imar.spaanjaars.com and continue to provide you with great content. For more details, check out this post that shows you how you can buy the entire series right now.
Now that the RTM versions of Visual Studio 2012 and .NET 4.5 have been out for a while, it seems like a good time to finally write the follow up to my popular series on N-Layered design using ASP.NET 3.5 that I wrote in 2008 and early 2009. I have been wanting to do this for a long time, but there were always other things on my Todo list with a higher priority. The wait has been worth it though; since the last series targeting .NET 3.5 that I published in late 2008 and early 2009, new and compelling technologies have been released that make writing an N-Layered application such as the Contact Manager a lot easier to write.
The following list has links to all articles in this series:
- Part 1 - Introduction
- Part 2 - Setting up the Solution in Visual Studio
- Part 3 - Making your Projects Unit Testable
- Part 4 - Implementing a Model
- Part 5 - Implementing a Repository using Entity Framework Code First
- Part 6 - Implementing an ASP.NET MVC 4 Frontend
- Part 7 - Implementing a Web Forms 4.5 Frontend
- Part 8 - Implementing a WCF 4.5 Frontend
- Part 9 – Importing Data Using the API
- Part 10 - Extensions, Tools and Wrapping Up
Introduction
In this new article series you'll see how to design and build an N-Layered ASP.NET application using ASP.NET MVC 4, ASP.NET 4.5 Web Forms and a number of other up-to-date technologies such as Entity Framework 5 and WCF. In this series, I'll build a sample application to manage contact people called the ContactManager v4.5 application, similar to the demo application demonstrated in the previous article series. Over the next 10 articles I'll dissect the sample application (that you can download at the end of each article, starting with Part 2) and show you how I designed and built it.
A big thanks to the people who reviewed tbis article and helped me find and fix issues in the text and code:
- Ben Fox
- Paul Hudson
- Bart van Uden
- Spiro Uyar
Your contributions have helped greatly in improving this article series. Many thanks!
Although you find full details in the remainder of this series, here’s a quick list of all the technologies and concepts I’ll be using for the ContactManager application.
- Entity Framework (EF) 5 with Code First for all data access.
- MVC 4, Web Forms 4.5, WCF and a command line tool for four different frontend implementations.
- Unit and integration tests to make the model and application testable.
- NuGet to quickly bring in additional libraries and assemblies.
- FluentAssertions to make unit tests more straightforward to write and easier to read, especially for non-technical people.
- A Dependency Injection (DI) framework called StructureMap to make it easier to program against interfaces and determine the concrete types at run time as well as improve the testability of your code.
- A framework called AutoMapper to automatically map between your own domain objects and View Models in MVC and other applications.
- DynamicQuery, a helper library from Microsoft to write string based LINQ expressions for sorting and filtering data.
- FileHelpers, a third-party library to read CSV files which I’ll use in Part 9 to import data from a text file through the application’s API into the database.
- NLog, a logging framework for .NET.
Why an N-Layered Architecture?
Using an N-Layered architecture for your ASP.NET applications brings a number of benefits, such as:
- Separation of concerns - by putting code in separate layers, you separate the various parts of your application, such as data access, business logic and the UI. This makes it easier to design and build the application and makes it possible for developers in multiple disciplines (database, server side programming, frontend development, design) to work on the application in parallel.
- Abstraction - With a layered architecture it's easier to look at a complete application and understand the roles and responsibilities of individual layers and the relationship between them. Each layer has its own responsibilities which allows you to analyze them in isolation.
- Testability - with a layered architecture, it's much easier to test each layer separately with unit tests as there are fewer dependencies between the various layers. This means, for example, that you can test your business logic or your UI without requiring a real database to test against.
- Replaceability - It'll be easier to swap out layers. For example, you can replace your data access technology without affecting the other layers higher up in the stack.
- Reuse - You can reuse one or more layers in different applications. You'll see the benefits of this in part 6 through 9 where the same data access and business layers are reused in four different frontend applications without requiring any changes to the lower layers.
Note that there is a big difference between N-Layers and N-Tiers. N-Layers deal with separate software layers and helps you group code logically within the application. N-Tiers on the other hand deals with the physical location of your software components: e.g. the machines where your code runs. This article series deals with N-Layer exclusively, although you could reuse much of it in an N-Tier application as well.
Introducing the Contact Manager Application
In this article series I’ll use the same sample application that I used in the previous article series: a simple contact manager application that enables you to manage your contacts and their contact data such as phone numbers and e-mail addresses. But rather than a single Web Forms demo application, the new sample solution has four different frontend applications: an ASP.NET MVC 4 web site, a Web Forms site, a WCF service project and a Command Line application.
When you start up one of the two web applications (the MVC or the Web Forms version) you see the home screen with a short welcome text. The People menu shows a list with all the contact people in the system with links to edit and delete them, and to manage their contact data:

Figure 1-1 The MVC site showing all contact people (click to enlarge)
When you click Edit you see the following page:
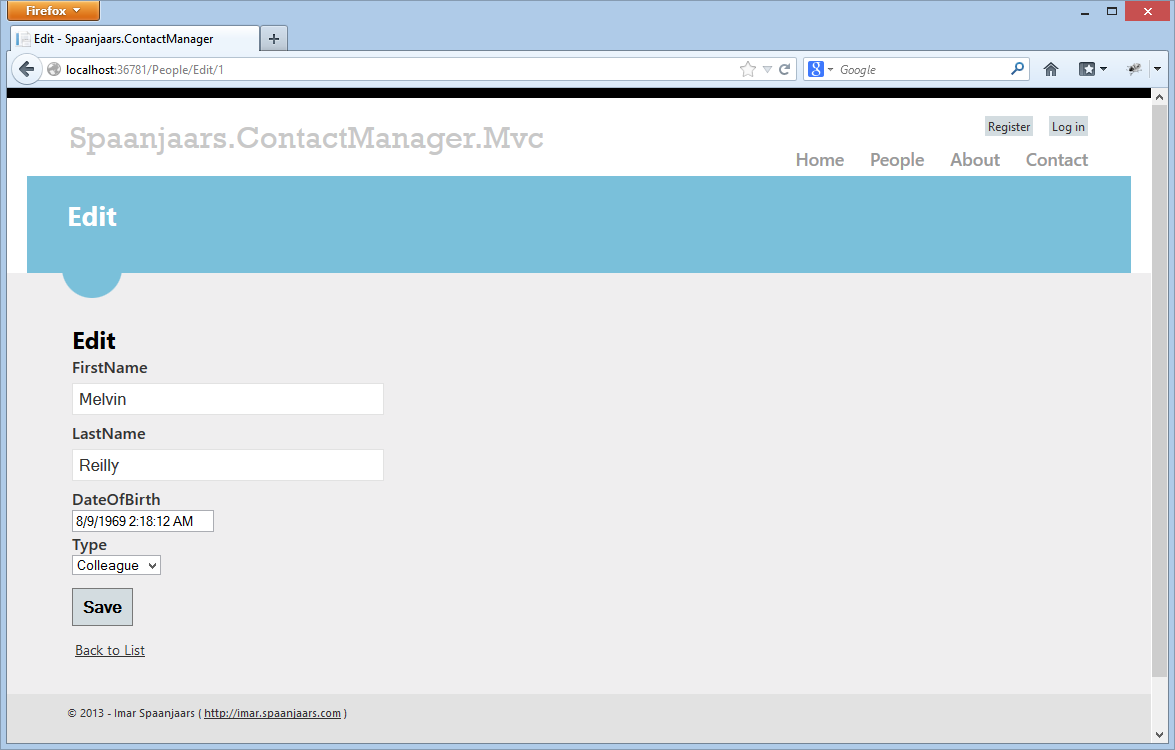
Figure 1-2 Editing a contact person in the MVC site (click to enlarge)
By clicking one of the address links for a contact person in the list with people (visible in Figure 1-1), you see a screen that lets you manage address details. Figure 1-3 shows the Web Forms version of the Edit address screen. The user has already pressed Save and the validation (from the Address class in the Model project) has kicked in:

Figure 1-3 Editing an Address in the Web Forms application (click to enlarge)
When you click the Email addresses or Phone numbers link in the list of contact people, you see a list of associated contact details for that person:
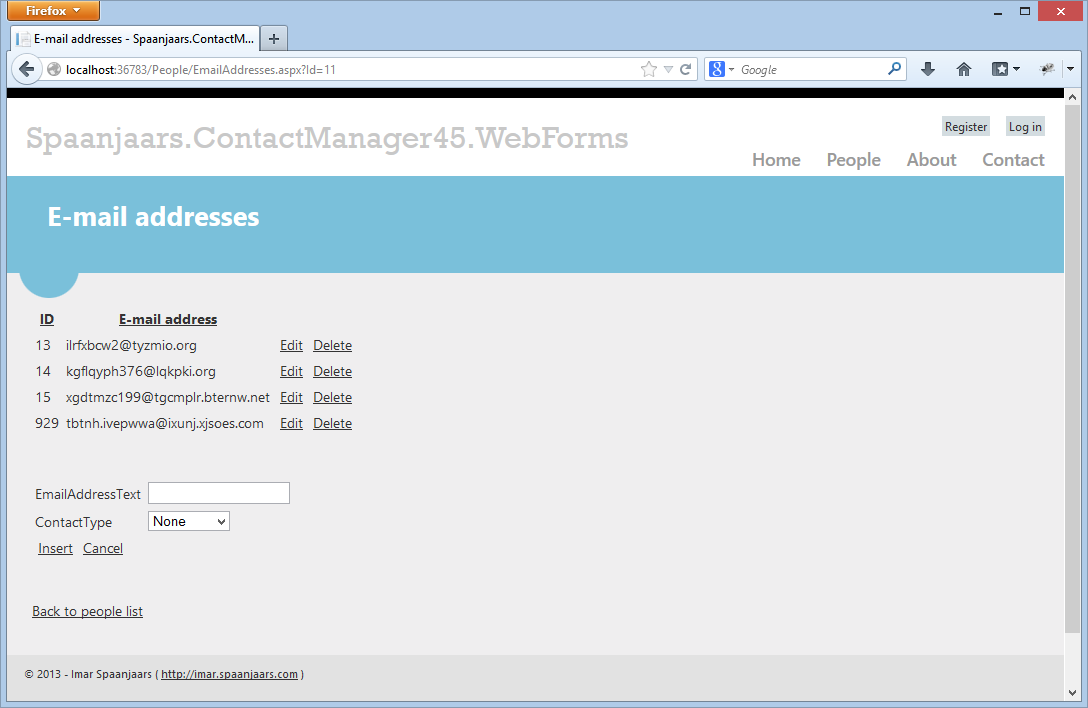
Figure 1-4 Managing contact data in the Web Forms application (click to enlarge)
From here, you can manage the existing data (edit and delete) as well as create new e-mail addresses for this contact.
The WCF project lets you execute CRUD (Create, Read, Update and Delete) methods against the contact people in the database over the network which is useful for machine-to-machine interactions.
Finally, the Command Line tool shows how to import data from a source like a CSV file to get existing data into the database through the application’s API.
As you can see, the functionality is rather simple which makes it easier to focus on the core concepts. However, when designing and building the sample application I haven’t taken any shortcuts or oversimplified things. Anything you see in the sample solution can be used to build real-world, large scale web applications.
History of the Contact Manager Application
This is the third version of the Contact Manager Application used to demonstrate N-Layer design concepts in ASP.NET. The first version was released in January 2007 and came as a single Web Site Project with all the UI, data access and business logic in a single project. The second version was released in November 2008. It introduced a Web Site Project for the UI as well as a number of class library projects for the business logic layer, the entities, the data access layer and the validation.
The previous design brought a lot of advantages in terms of separation of concerns and code that was relatively easy to understand and maintain. However, it did have a number of drawbacks that made it more difficult to use as I’ve learned in the past few years while building real-world web sites and applications based on this design. I’ll discuss these drawbacks in the next section. The solution to these drawbacks are discussed in the remainder of this article series.
Room for Improvement
Here’s a list of some of the issues that I ran into when building applications based on the previous design:
- The solution required quite a lot of code in each of the layers. You needed code in the “dumb” data object, you needed a Manager class in the Business layer for validation of business rules, you needed a Manager class in the Data layer for database access and you needed quite a lot of code in stored procedures. Probably the biggest downside of this code is that most of it is repetitive, forcing you to write the same code over and over again for each of your implemented main entities.
- Because of the tight coupling with the database layer, it was a challenge to test both the DAL and the code that uses the database layer, especially when used in other applications such as an ASP.NET MVC web site.
- The solution required a lot of stored procedures, making maintenance and testing hard. For simple CRUD operations you needed at least four stored procedures (GetItem, GetList, InsertUpdateItem and DeleteItem) while you needed even more code to implement advanced scenarios such as filtering and sorting.
- Adding members to the data entities was pretty difficult. Besides adding the member to a class in the BusinessEntities project, you also needed to add support for it in the various Manager classes and stored procedures. This meant lots of updates in lots of different places for something as simple as adding a new property.
- The solution contained a lot of code to interact with the database. With the many ORM (Object Relational Mapping) systems available today, you really shouldn't have to write your own data access code anymore. For more information, check out: http://lostechies.com/jimmybogard/2012/07/24/dont-write-your-own-orm/.
- The framework used its own validation mechanism. While this has served me (and others) well over the years, better alternatives are now available that make it easier to implement validation in your business entities. In addition, frameworks like ASP.NET MVC and Entity Framework (EF) have built-in support for this newer validation mechanism.
- The application used an anemic design model, where business logic is implemented in separate classes that modify the state of your model objects. This is now considered an anti-pattern.
A Look Ahead
You’ll see how I am addressing these concerns in the new version of the application over the next 10 articles. To give you an idea of what to expect in this series, here’s a short summary of each of the 10 articles:
Part 1 - Introduction
In this article (which is what you’re reading right now), you’ll get a high-level overview of the architecture and see how I set up my projects, namespaces, classes etc. I’ll describe the purpose and responsibility of each of the main projects and how they work together.
Part 2 - Setting up the Solution in Visual Studio
In this article I’ll show you how to setup the solution using Microsoft Visual Studio 2012. I’ll show you how to organize your projects and solution on disk, and how to prepare the solution for integration with TFS so it allows for easy team development and branching. I’ll show you how to use NuGet to add and maintain third party libraries in the projects.
Part 3 - Making your Project Unit Testable
This article shows you how to add unit test projects to your solution and how to set them up. I’ll be using a third party library called FluentAssertions to make your tests easier to write and understand.
Part 4 - Implementing a Model
In this article you’ll see how to set up the domain model for the application. It borrows heavily from the original application by reusing the main classes from the BusinessEntities project. This part focuses purely on the domain model, as interaction with the database is handled by a separate Visual Studio project that uses EF Code First, discussed in Part 5.
Part 5 - Implementing a Repository with Entity Framework 5 Code First
In this article you’ll see how to use Entity Framework 5 Code First to implement a data access layer that maps your model to an underlying (SQL Server) database. I’ll show you how to use the repository pattern to centralize data access code and make it available to other calling code. This article also talks about validation. Validation was a big feature of the 3.5 version of my framework, so it makes sense to implement it in the new version as well. You’ll see how to implement a validation strategy that is somewhat similar to the previous design in that it provides both property and object level validation. However, using built-in functionalities from the .NET Framework and the Entity Framework will make it much easier to implement the same validation in other applications such as an ASP.NET MVC site.
Part 6 - Putting it all together - Implementing an MVC 4 Frontend
In this article you’ll see how to implement an MVC 4 frontend using the model and repositories introduced in the earlier articles. The demo application enables you to manage contact people as well as their contact details such as addresses, e-mail addresses and phone numbers. You’ll see how to use Dependency Injection to inject the repository and other dependencies into the MVC controllers and how the controllers then use the repository to get data in and out of the database.
Part 7 - Putting it all together - Implementing a Web Forms 4.5 Frontend
In this article you’ll see how to implement an ASP.NET 4.5 Web Forms frontend using the model and repositories introduced in the earlier articles. The frontend of the application is almost the same as the MVC application, but now everything is implemented using ASP.NET 4.5 Web Forms and the new model binding capabilities introduced in ASP.NET 4.5.
Part 8 - Putting it all together - Implementing a WCF 4.5 Frontend
In this article you’ll see how to implement a WCF 4.5 service frontend using the model and repositories introduced in the earlier articles. The WCF service enables calling applications to retrieve contact people. In addition it also allows a calling application to create new and modify and/or delete existing contact people.
Part 9 - Putting it all together - Importing Data from the old Database using the API
This article shows you how to use the API of the application to import legacy data from an existing data source such as a CSV file. This serves as an example on accessing data using an application that has no UI and that just uses the application’s API.
Part 10 – Extensions, Tools and Wrapping Up
In the final part of the series I’ll show you some interesting tools that you can use when building applications like the ContactManager. I’ll also look at some extensions you could write and then summarize the full series.
Note: Part 2 and 3 of the series contain a lot of hands-on, step by step instructions as these articles show you how to setup a solution like the Spaanjaars.ContactManager application yourself. You can use these instructions pretty much as-is for your own applications. The remaining parts in the series then analyze the working code for the Spaanjaars.ContactManager application that you can download at the end of each article. I’ll show a lot of the code in detail, and explain how it works, but you won’t find detailed step by step instructions on how to add the code and files to the various projects.
Overview of the Architecture
In this section I’ll give you an overview of the complete application. You’ll see the main architecture, how I set up the various Visual Studio projects and how I linked them together. In addition you’ll see many of the important classes and other types inside each of the projects and learn about their responsibilities.
From a high level point of view, the architecture of the Spaanjaars.ContactManagerV45 solution looks as follows:
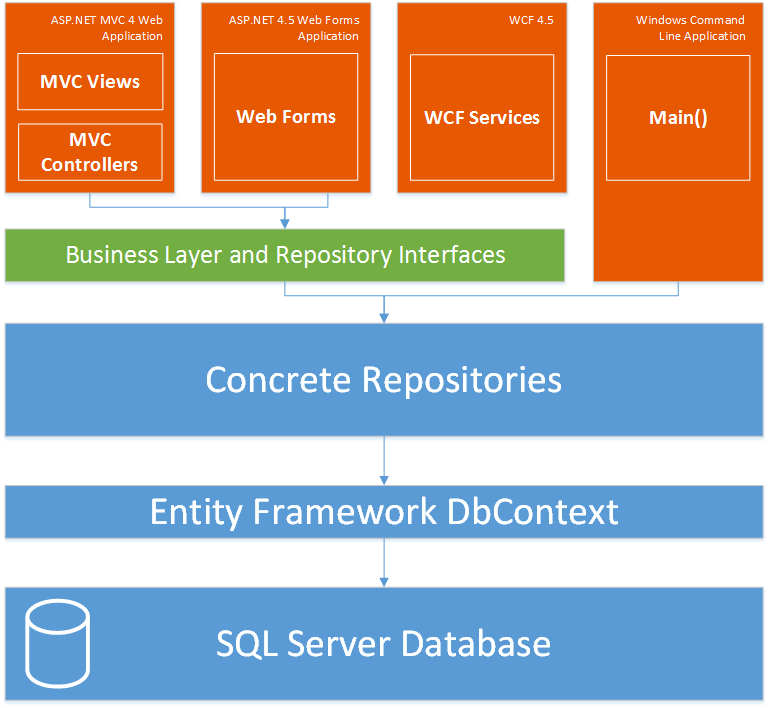
Figure 1-5 The Architecture of the Spaanjaars.ContactManagerV45 Application (click to enlarge)
The blue boxes at the bottom represent the data access layer, the green box in the middle represents the business layer and the orange boxes at the top represent the UI. The business layer also contains the model with all the main entities but that’s not shown in this diagram yet. You’ll see more of the model in Part 4.
At the bottom, you see a SQL Server database which is, just as in the previous series, the relational database used for the application. Above the database you can see the Entity Framework DbContext; the main class used for Entity Framework 5 Code First which is what I’ll use in this article series. Above this you can see a layer containing concrete repositories which use the Entity Framework DbContext internally. Note that this is just an implementation decision. The concrete repositories implement the interfaces defined in the green Repository Interfaces layer which means you can swap the concrete repositories and the Entity Framework for alternatives; for example you could build a concrete repository that uses NHibernate or Telerik’s OpenAccess ORM. The user interface applications that you see at the top of the diagram would never know you swapped the underlying data access technology as all they are aware of are the interfaces in the business layer. The exception to this is the command line application tool that you’ll see in Part 9 of this series. Since this application can be considered a one-off or “throw away” application, I haven’t bothered trying to decouple it from the concrete repositories that use EF.
You’ll see much more of this in the remainder of this series as I dig deeper into the various layers and explain how they are constructed.
From a Visual Studio perspective, the application looks as follows:
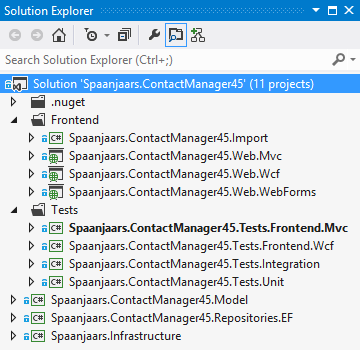
Figure 1-6 The Solution Explorer showing the Spaanjaars.ContactManagerV45 Application
Notice how I used Visual Studio Solution Folders to group related project types (such as Tests and Frontend (UI) projects). This makes it easier to understand how the solution is organized and it helps you to quickly show or hide a particular group of projects you’re working with.
At the bottom of the Solution Explorer you can see three projects. The Spaanjaars.Infrastructure project contains a number of “plumbing” classes and interfaces used throughout the solution. The Spaanjaars.ContactManager45.Model project contains the core domain classes such as Person and Address and is somewhat similar to the BusinessEntities project from the 3.5 version of my N-Layer design. The Repositories.EF project contains all the code to interact with a SQL Server database using Entity Framework (EF) 5 Code First. Note that for the project names I use the pattern: Company.Project.Layer where Company is your company’s or your client’s name, Project is the name of the application and Layer specifies the type of project in the stack. You see more of this at the beginning of Part 2.
The Frontend folder contains four UI or frontend projects: one using ASP.NET MVC 4, one using ASP.NET Web Forms 4.5, one using WCF and a Command Line tool used for import of data. You’ll see these projects in later articles in this series. Under the hood, these projects make use of the various Model and Repositories projects.
The Tests Solution Folder contains a number of test projects for unit, integration and UI / MVC / WCF tests. These projects are discussed in Part 3.
This may look a little overwhelming, leading you to wonder why you need so many projects for a relatively simple application. If that’s the case, it’s important to realize you typically don’t need that many projects. In my sample application I have four different frontends, demonstrating N-Layer design in various types of applications. Also, for these projects I have separate test projects, quickly increasing the total number of projects. For my new design, the minimum number of projects you need is four: the three projects in the root of the solution explorer and at least one frontend application that uses these three projects.
To see how these projects relate to each other, consider the following model diagram that shows the dependencies of the two Web frontend and the WCF projects:
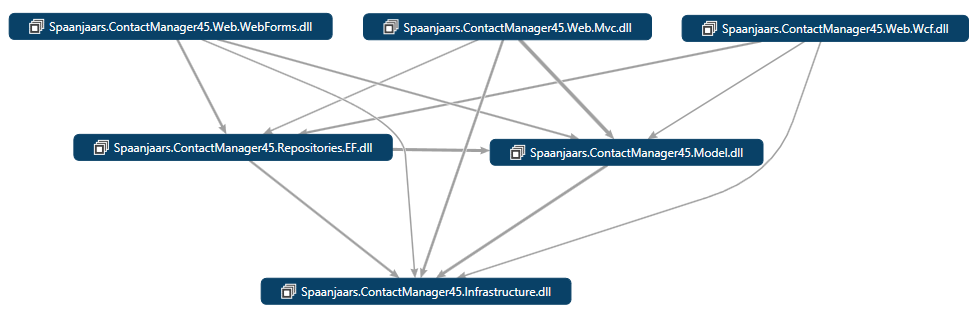
Figure 1-7 A model diagram showing various components of the Application (click to enlarge)
This figure shows how the Model project references the Infrastructure project, and nothing else (except for the .NET framework libraries of course which are not shown in this diagram.) The Repositories.EF project using Entity Framework (EF) references the Model project as well the Infrastructure project. The three Frontend projects (MVC, Web Forms and WCF) have a reference to the Model and Infrastructure projects as well as a reference to the Repositories.EF project. This latter reference isn’t strictly needed as all the code in the UI projects is based on interfaces defined in the Model project. Using a Dependency Injection framework such as Ninject or StructureMap you could inject the concrete types in the EF project at run-time, without any compile-time dependency on this project. However, I prefer to write the bootstrapper code (code that configures the Dependency Injection framework, discussed in detail in Part 6 and 8) in my project over configuration files, and so the UI projects each have a reference to the EF project. If I wanted to switch to a repository that uses another ORM such as NHibernate or other data access technology such as ADO.NET, all I would need to do is replace the project reference and rewrite the bootstrapper code. You’ll see more of this in part 5 when the EF Repository is implemented.
Although the details of the individual projects are discussed in great detail in the remainder of this article series, here’s an overview of how all the different projects work together:
- The Model project defines all the core entities and their validation rules. Here you find classes such as Person and EmailAddress. You also find an IPeopleRepository which is an interface that defines the contract for working with Person objects. The types in the Model project are used by the UI projects. For example, the MVC project uses Person to display information about people in the system, as well as accept modifications to those objects (Insert, Update and Delete). These types are not directly used by the UI (such as Views) but are converted to View Models as you’ll see later in the series.
- The UI projects don’t directly access the database to get their data. Instead, they use repositories that in turn access the database. A repository makes it easier to centralize data access code and make it available to other calling code. In my application, the Model project defines the contract for the repository which is then implemented in the Repositories.EF project. This project uses Entity Framework under the hood to get data in and out of the database.
- The MVC and other UI projects use a concrete PeopleRepository from the Repositories.EF project. However, they don’t have a hardcoded link to this class as that would make it both difficult to replace EF with another database technology and unit test your UI applications. Instead, the UI projects work with the IPeopleRepository interface, while a concrete EF implementation is supplied at run-time using a concept called Dependency Injection.
- The Spaanjaars.Infrastructure project provides low-level plumbing services used by all the other projects.
- The various test projects have references to other parts of the application they are testing. For example, the integration tests project has a reference to the Repositories.EF project as it accesses a real database during its tests.
The application makes use of the Repository pattern. For alternatives to this pattern, see:
- http://lostechies.com/jimmybogard/2012/09/20/limiting-your-abstractions/
- http://lostechies.com/jimmybogard/2012/10/08/favor-query-objects-over-repositories/
I’ll discuss each of the projects in the Solution Explorer next. You’ll find a high-level overview here with pointers to other articles in the series for more in-depth information.
Spaanjaars.Infrastructure
This is a fairly simple project with only a few classes, shown in Figure 1-8:
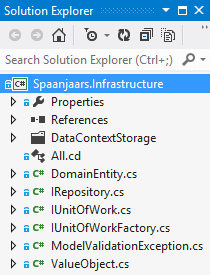
Figure 1-8 The Solution Explorer for the Spaanjaars.Infrastructure Project
As you can tell from its name, this project isn’t directly tied to the ContactManager application, Instead, I placed it in the more general Spaanjaars.Infrastructure namespace (which could be your company name or other root level namespace you might use) so it can easily be reused across multiple projects. This project provides three plumbing interfaces that the rest of the application uses. Figure 1-9 shows the class diagram for this project:
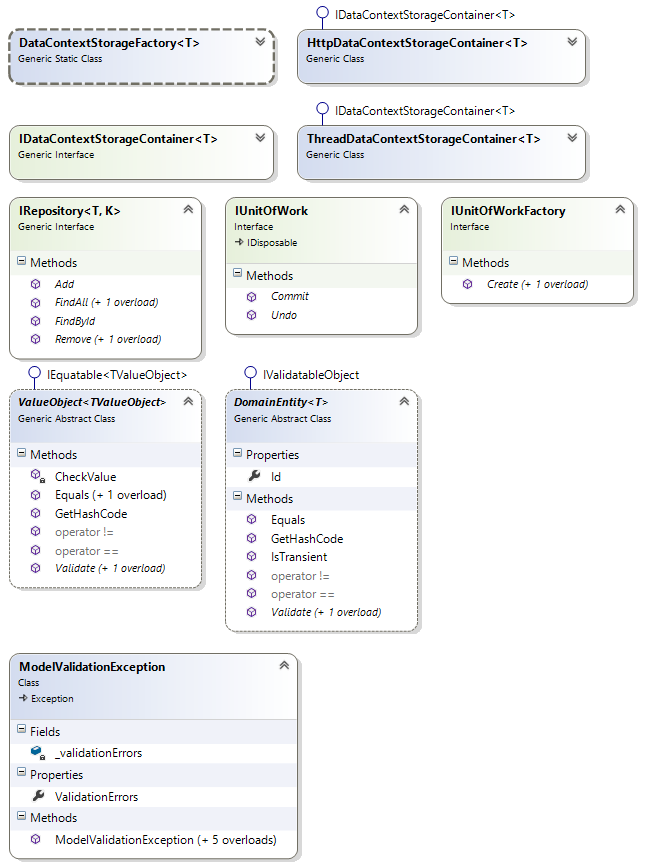
Figure 1-9 The Class Diagram of the Spaanjaars.Infrastructure Project (click to enlarge)
The IRepository interface defines the contract that concrete repositories need to implement. It defines the members you interact with to get data in and out of the underlying data source. You’ll see an implementation of this interface along with the unit of work related interfaces in Part 5 when you see how to build a concrete repository using Entity Framework. It’s easy to build your own repository that targets a different database or ORM. All it needs to do is implement this interface and then you can plug it into another application such as a public facing ASP.NET MVC website.
DomainObject<T> and ValueObject<T> are the base classes for the various domain classes in the Model project. DomainObject<T> is the base class for entities that have an identity and is used by classes such as Person. ValueObject<T> is used by pure value objects that don’t have their own identity. In the sample application, Address has been implemented as a ValueObject<T> to demonstrate the differences. You’ll see more of this in Part 3.
Finally, in Part 5 you’ll see what the types in the DataContextStorage folder are used for and learn about the lifetime of an Entity Framework object context.
Spaanjaars.ContactManager45.Model
The Model project is somewhat similar to the BusinessEntities project in the .NET 3.5 version of this application. It features the application’s core types such as Person, Address and PhoneNumber. It also features a number of collections as well as a few enumerations to define types of contact records and people, respectively. Here’s what the Solution Explorer for the project looks like:
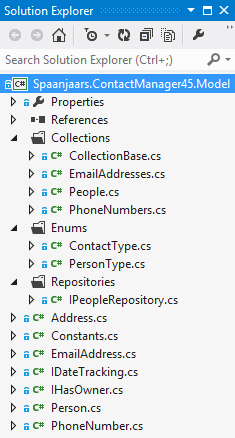
Figure 1-10 The Solution Explorer for the Spaanjaars.ContactManager45.Model Project
Notice the four core types: Address, EmailAddress, Person, and PhoneNumber. If you’ve read the previous article series, these should all look familiar (except that Person was previously called ContactPerson). For the sake of demonstration, I let Address inherit from ValueObject<T> which means it’s considered a value type while all other classes inherit from DomainObject<T>. These last three types also have a collection counterpart that inherits from the custom, generic CollectionBase<T> type.
The IPeopleRepository interface provides a contract that the other applications in the project work against. You’ll see a lot more of this in Part 4 and 5 of this article series.
Figure 1-11 shows the complete Class Diagram for the Model project. In later articles in this series I’ll dig deeper into the various types and their members.
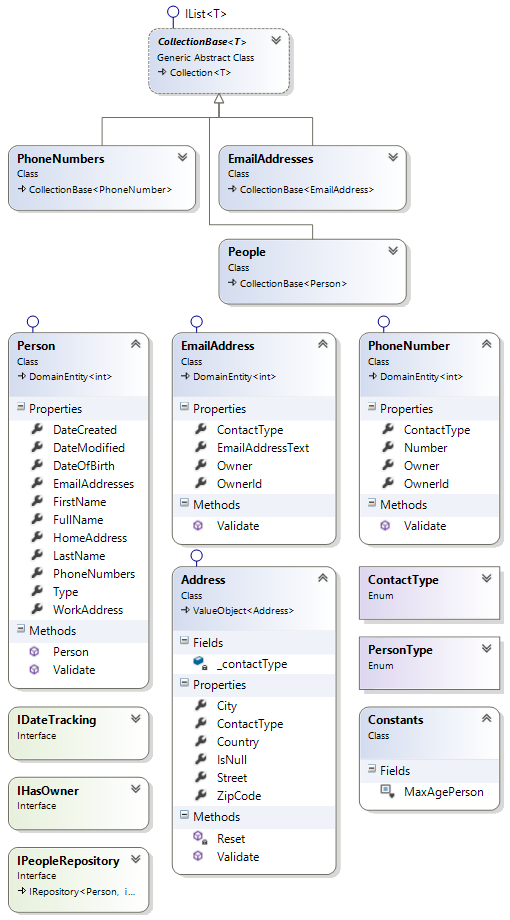
Figure 1-11 The Class Diagram of the Spaanjaars.ContactManager45.Model Project
You see more of the repositories in the next section, while a detailed explanation of the EF implementation can be found in Part 5 of this article series.
Spaanjaars.ContactManager45.Repositories.EF
This project contains all the implementation for working with contact people in a SQL Server database using Entity Framework 5 Code First. Figure 1-12 shows the Solution Explorer for this project.
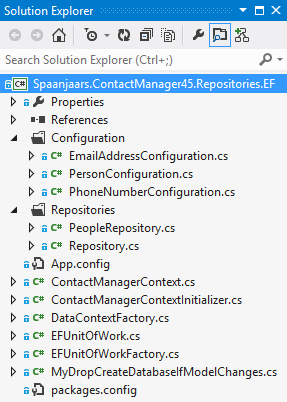
Figure 1-12 The Solution Explorer for the Spaanjaars.ContactManager45.Repositories.EF Project
This project contains concrete implementations of the repository and unit of work related interfaces you saw earlier. In addition, it contains a number of classes related to setting up the Entity Framework, and initializing and configuring the database using the fluent API and database creating strategy classes. You see how all of this works when setting up Entity Framework in Part 5. For now, here’s the complete class diagram:
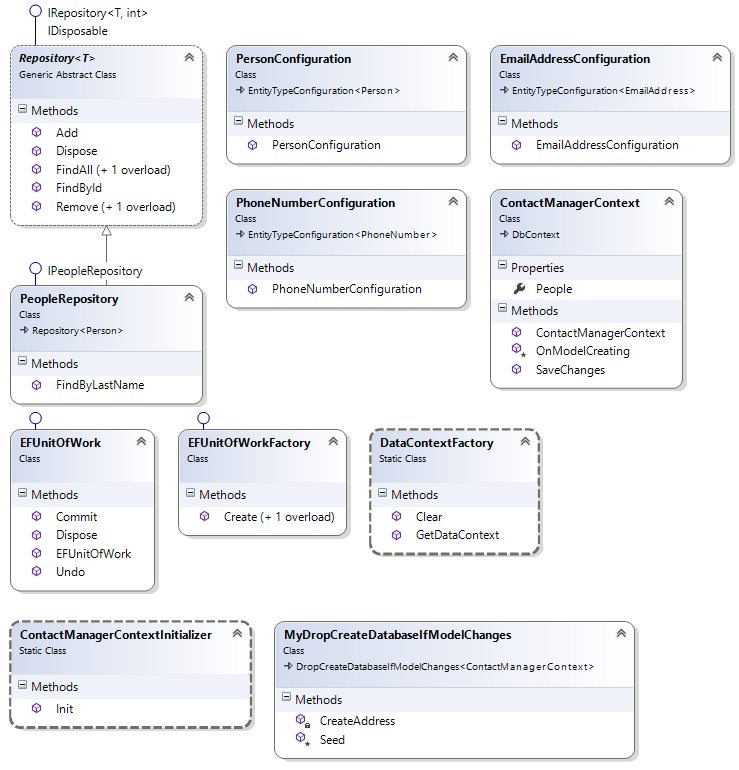
Figure 1-13 The Class Diagram for the Spaanjaars.ContactManager45.Repositories.EF project (click to enlarge)
Spaanjaars.ContactManager45.Web.Mvc
This project contains the ASP.NET MVC 4 implementation of the frontend to work with contact people and their associated contact data in a web application. It’s discussed in detail in Part 6 of this article series. Here you’ll see Dependency Injection at work when the concrete repositories for the Entity Framework (or any other type you build) are injected into the application at run-time.
Spaanjaars.ContactManager45.Web.WebForms
This project contains the Web Forms implementation of the frontend to work with contact people and their associated contact data in a web application. It’s discussed in detail in Part 7 of this article series.
Spaanjaars.ContactManager45.Web.Wcf
This project contains a WCF service to work with contact people in your system over remote services. The WCF service has methods to retrieve, add, update and delete people from the system. The WCF project is discussed in detail in Part 8 of this article series.
Spaanjaars.ContactManager45.Import
This project contains a command line tool that can import contact people and their contact data from a CSV file. The purpose of this project is to demonstrate how to use the application’s public API from other applications. Part 9 of this series shows how I built the import tool.
In addition to the core libraries and the four frontend projects, the solution contains four test projects, nicely grouped together under a Solution folder called Tests. You will see how to set up the test projects in Part 3. Tests are then added to these projects in the remainder of the articles.
Spaanjaars.ContactManager45.Tests.Unit
This project contains unit tests for the solution. You’ll find some basic tests for the entities and their members, tests for validation, and more. Part 3 of this series digs deeper into this project.
Spaanjaars.ContactManager45.Tests.Integration
Since this application relies heavily on a database, it makes sense to have a number of integration tests that make use of the database. This way, you can test the interaction of the various components, as well as some database specific logic such as unique constraints. Once again Part 3 of this series digs deeper into this project.
Spaanjaars.ContactManager45.Tests.Frontend.Mvc
In this project you’ll find a number of tests for the ASP.NET MVC frontend. While the purpose of this article is not to show you how to write unit tests for MVC or other application frameworks, the tests in this project serve to demonstrate that with the framework presented in this series, unit testing is easy because of the way you can inject concrete types using a Dependency Injection framework while your application programs against an interface. This makes it much easier to test your controllers that have dependencies on components such as repositories.
Spaanjaars.ContactManager45.Tests.Frontend.Wcf
In this project you find a number of tests for the WCF services project. Just as with the MVC project, I am using Dependency Injection to decouple the service methods from their dependencies such as repositories to enable unit testing.
This article series is meant as an introduction to architecting N-Layered web applications using ASP.NET 4.5 and Entity Framework 5 Code First. This means I’ll dig as deep into these technologies as appropriate to explain the topic. However, it also means I won’t provide a lot of details about side issues. For example; I may be using an open source framework to make unit testing easier in the sample application, but I won’t dig into the details on how to retrieve and install this framework, or how to configure it for the sample application and how to use it.
Stuff I Like to Do
At the end of each article, I’ll provide a section called Stuff I Like to Do where I mention a number of asides and provide links and guidance where appropriate. For this first article, there’s nothing to add yet, other than maybe a suggestion to read Part 1 of the original article series at http://imar.spaanjaars.com/476/n-layered-web-applications-with-aspnet-35-part-1-general-introduction so that you have a general idea of how the application was designed previously.
Summary
In this article, you saw a brief overview of the ContactManager v4.5 application. I described some of the application’s history, and highlighted some shortcomings of the .NET 2.0 and 3.5 versions of the application. You then saw an overview of the new framework including the various components (Visual Studio projects) that are involved. The article concluded with a description of each project in the solution so you can see what their responsibilities are and how they fit together. Each of these projects is discussed in more detail in later parts of this article series.
In the next part, you’ll see how to setup the solution in Visual Studio. You’ll see how to add the Class Library projects and four Frontend projects (an MVC 4 site, a Web Forms application, a WCF service and a command line tool) to the solution. I’ll be using all of these projects in the remaining articles in this series.
Downloads
Where to Next?
Wonder where to go next? You can post a comment on this article.
Links in this Document
| Doc ID | 573 |
| Full URL | https://imar.spaanjaars.com/573/aspnet-n-layered-applications-introduction-part-1 |
| Short cut | https://imar.spaanjaars.com/573/ |
| Written by | Imar Spaanjaars |
| Date Posted | 06/28/2013 16:42 |
Comments
Talk Back! Comment on Imar.Spaanjaars.Com
I am interested in what you have to say about this article. Feel free to post any comments, remarks or questions you may have about this article. The Talk Back feature is not meant for technical questions that are not directly related to this article. So, a post like "Hey, can you tell me how I can upload files to a MySQL database in PHP?" is likely to be removed. Also spam and unrealistic job offers will be deleted immediately.
When you post a comment, you have to provide your name and the comment. Your e-mail address is optional and you only need to provide it if you want me to contact you. It will not be displayed along with your comment. I got sick and tired of the comment spam I was receiving, so I have protected this page with a simple calculation exercise. This means that if you want to leave a comment, you'll need to complete the calculation before you hit the Post Comment button.
If you want to object to a comment made by another visitor, be sure to contact me and I'll look into it ASAP. Don't forget to mention the page link, or the Doc ID of the document.