Changing the Login Control to Display a List of Users
A while ago I saw this post on the P2P Wrox forum (near the middle of the thread) where the poster asked for a way to replace the standard TextBox in the asp:Login control with a list of user names from the system. He didn't mind the lowered security implications of this solution and instead wanted to make it a little easier for users to login. With his proposed solution, a user can pick a name from the list, enter a password and log in. I guess fewer things to remember means fewer calls to the helpdesk.
It turns out this is actually quite easy to do.
Changing the Login Control
To make this work, the first thing you need to do is convert a standard <asp:Login> control to a templated version. This is quite easy; right-click the Login control in Visual Studio and choose Convert to Template. You'll end up with lots of HTML mixed with ASP.NET server controls. The User Name text box now ends up like this:
<tr>
  <td align="right">
    <asp:Label ID="UserNameLabel" runat="server"
          AssociatedControlID="UserName">User Name:</asp:Label>
  </td>
  <td>
    <asp:TextBox ID="UserName" runat="server"></asp:TextBox>
    <asp:RequiredFieldValidator ID="UserNameRequired" runat="server"
            ControlToValidate="UserName" ErrorMessage="User Name is required."
            ToolTip="User Name is required." ValidationGroup="Login1">*
    </asp:RequiredFieldValidator>
  </td>
</tr>
You may be tempted to delete the entire TextBox called UserName and replace it with a DropDownList control. However, as soon as you do that and run the page in the browser, you get this exception:
Login1: LayoutTemplate does not contain an IEditableTextControl
        with ID UserName for the username.
Apparently, the Login control thinks it needs a TextBox called UserName to operate properly. Fortunately, it's easy to circumvent this problem by hiding the TextBox instead of removing it. Simply adding Visible="False" is enough to prevent the error from occurring.
The next step is to add an <asp:DropDownList> control to the table cell that holds the user name text box. While you're there, you might as well remove the RequiredFieldValidator as it's no longer used. You should end up with code like this:
</td>
  <td align="right">
    <asp:Label ID="UserNameLabel" runat="server"
          AssociatedControlID="UserName">User Name:</asp:Label>
  </td>
  <td>
    <asp:TextBox ID="UserName" runat="server" Visible="false"></asp:TextBox>
    <asp:DropDownList ID="DropDownList1" runat="server" />
  </td>
</tr>
With the drop down list in place, it's time to add an ObjectDataSource control that gets a list with users from the system. Depending on your requirements, you have two options to get this list. First, you could call Membership.GetAllUsers() to get a MembershipCollection object that holds all your MembershipUser objects. The advantage of this method is that you get strongly typed user objects so you can access all the user properties like CreateDate, Email etc. The downside is that there isn't an easy way to filter users. You always get all the users in the system. You could use the FindUsersByEmail and FindUsersByName methods to limit the list, but they can't be used to find, say, users in a specific role.
The alternative is to use the shared GetUsersInRole method of the Roles class. This method allows you to query the users in a specific role. This way, you can limit the users in the drop down to those in a specific role, allowing you to filter out special accounts like Administrator. The downside of this method is that all you get is the user name, and nothing else. For the purpose of filling the drop down, this is enough though.
I'll show you how to use Membership.GetAllUsers first, followed by Roles.GetUsersInRole.
Both alternatives use an ObjectDataSource (ODS), so you should add one to the page. Normally, you'd use the Configure Data Source wizard to fill in the SelectMethod and other properties of the ODS. However, this wizard doesn't allow you to type in values manually, and only shows objects that are present in your current solution. Instead, you should switch to Code View and type the code for the ODS manually.
Using Membership.GetAllUsers()
To use the Membership class, you need to set the following properties on the ODS:
| Property | Value |
| TypeName | System.Web.Security.Membership |
| SelectMethod | GetAllUsers |
| DataObjectTypeName | System.Web.Security.MembershipUser |
You should end up with this code:
<asp:ObjectDataSource ID="ObjectDataSource1"
        DataObjectTypeName="System.Web.Security.MembershipUser"
        runat="server" SelectMethod="GetAllUsers"
        TypeName="System.Web.Security.Membership">
</asp:ObjectDataSource>
When the ODS is about to get its data, it fires the GetAllUsers method to get the list of users from the database. You can use this list with users to fill the drop down as follows:
- Switch to Design View
- Click the little arrow on the DropDownList control you added earlier to open its Task Pane.
- Click Choose Data Source.
- Select ObjectDataSource1 from the first drop down.
- To have the properties of the user show up in the other two drop downs, click the Refresh Schema link at the bottom of the dialog.
- Choose UserName for the second drop down (to select a data display field).
- Repeat the previous step for the third drop down to select a data value field.
- Click OK to close dialog, save the page and open it in your browser. Instead of the default text box for the user name, you're now presented with a nice drop down:
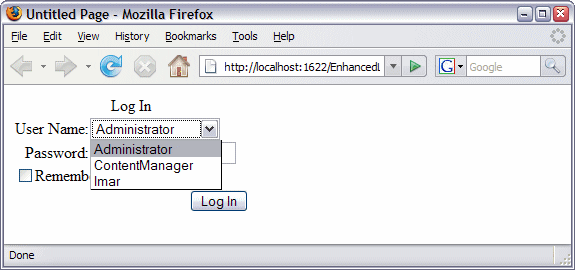
Figure 1 - The Login Control Showing a DropDownList with User Names
The final step you need to perform is to get the user name from the drop down and assign it to the Login control's UserName property so the user name from the drop down is used for authentication. You can do that in the LoggingIn event of the Login control like this:
VB.NET
Protected Sub Login1_LoggingIn(ByVal sender As Object, _
          ByVal e As System.Web.UI.WebControls.LoginCancelEventArgs) _
          Handles Login1.LoggingIn

  Login1.UserName = CType(Login1.FindControl("DropDownList1"), _
          DropDownList).SelectedValue
End Sub

C#
protected void Login1_LoggingIn(object sender, LoginCancelEventArgs e)
{
  Login1.UserName = ((DropDownList)
        Login1.FindControl("DropDownList1")).SelectedValue;
}
The LoggingIn event fires as soon as the user hits the Login button, but before authentication takes place. This is the perfect location to get the selected user name from the drop down and assign it to the UserName property of the Login control. Once the Login control starts with its authentication process, it contains a valid user name so authentication succeeds (provided you entered a valid password). The Login control doesn't even know you changed its behavior.
Using Roles.GetUsersInRole(roleName)
To use the Roles class, you need to set the following properties on the ODS:
| Property | Value |
| TypeName | System.Web.Security.Roles |
| SelectMethod | GetUsersInRole |
Additionally, you need to add a parameters to the <SelectParameters> element, call it roleName and set its DefaultValue to the role you want your users to be in.
You should end up with this code:
<asp:ObjectDataSource ID="ObjectDataSource1"
      runat="server" SelectMethod="GetUsersInRole"
      TypeName="System.Web.Security.Roles">
  <SelectParameters>
    <asp:Parameter DefaultValue="Members" Name="roleName" />
  </SelectParameters>
</asp:ObjectDataSource>
When the ODS is about to get its data, it fires the GetUsersInRole method and passes it the roleName, Members in this example. This gets a list of users from the database that are in the specified role. You can use this list with users again to fill the drop down. However, because GetUsersInRole returns an array of strings, you can no longer set the DataTextField and DataValueField to UserName. So, all you need to do is assign the drop down list a valid ObjectDataSource with its DataSourceID property:
<asp:DropDownList ID="DropDownList1"
     runat="server" DataSourceID="ObjectDataSource1" />
The code in the LoggingIn event remains is the same, whether you use the Membership or the Roles class to get the list of users.
Note that the role you're specifying in the <SelectParameters> element needs to exist in the database, or you'll get an exception.
Conclusion
The collection of Login features in ASP.NET 2.0 (the Login control, CreateUserWizard but also the Membership and Roles API) are very powerful, allowing you to implement authentication in your web site in no time. With the ability to change the behavior of some of the features as presented in this article, they become even more powerful.
You should use the idea presented in this article with caution; giving away the user names in your system makes it easier for hackers to perform a brute force attack against your system. By giving them the user name, you give up half the security of the site; all hackers need to do is "guess" the password.
Download Files
Full Source Code for this Article in VB.NET and C#Where to Next?
Wonder where to go next? You can post a comment on this article.
Links in this Document
| Doc ID | 409 |
| Full URL | https://imar.spaanjaars.com/409/changing-the-login-control-to-display-a-list-of-users |
| Short cut | https://imar.spaanjaars.com/409/ |
| Written by | Imar Spaanjaars |
| Date Posted | 12/06/2006 11:07 |
| Listened to when writing | Finger Und Zaehne by Einsturzende Neubauten (Track 8 from the album: Zeichnungen Des Patienten O.T.) |
Comments
Talk Back! Comment on Imar.Spaanjaars.Com
I am interested in what you have to say about this article. Feel free to post any comments, remarks or questions you may have about this article. The Talk Back feature is not meant for technical questions that are not directly related to this article. So, a post like "Hey, can you tell me how I can upload files to a MySQL database in PHP?" is likely to be removed. Also spam and unrealistic job offers will be deleted immediately.
When you post a comment, you have to provide your name and the comment. Your e-mail address is optional and you only need to provide it if you want me to contact you. It will not be displayed along with your comment. I got sick and tired of the comment spam I was receiving, so I have protected this page with a simple calculation exercise. This means that if you want to leave a comment, you'll need to complete the calculation before you hit the Post Comment button.
If you want to object to a comment made by another visitor, be sure to contact me and I'll look into it ASAP. Don't forget to mention the page link, or the Doc ID of the document.