How Do I Setup IIS to Allow it to Use Network Resources?
Let's say you have two machines, called WebServer and FileServer. The first machine is obviously the one that hosts IIS and serves your Web site. The second is the machine where you want to save your files. To configure your Web site on WebServer so it is allowed to write to a folder on FileServer, you have at least 4 options:
- Use Integrated Security;
- Synchronize the IUSR account account between the two machines;
- Configure IIS on WebServer so it uses a Domain Account instead of the default IUSR_WebServer account;
- Move your code to a COM+ DLL and host this DLL in a COM+ package. This package can be configured to run under a specific Domain Account.
In this article, I'll use WebServer and FileServer to refer to the two machines. This also means that the account IUSR_WebServer refers to the local account that IIS uses on WebServer. Make sure you replace WebServer and FileServer with the names of your machines.
Using Integrated Security
If you're using Integrated Security, IIS will run under the context of the currently logged on user. So, if you access your Web site, IIS will run with your privileges. By configuring IIS to use Integrated Security, you can overcome the permissions issue: simply grant the users of your Web site the necessary permissions to the folder on FileServer.
Note that Integrated Security is only suitable for an Intranet scenario as it won't work over the Internet across firewalls and because it's an Internet Explorer only solution.
How to Configure Your Server for Integrated Security?
- Open the Internet Information Services Management Console which you'll find in the Administrative Tools menu on the Start Menu or in the Control Panel.
- Expand your server in the tree on the left until you see the Web site or Virtual Directory you want to configure. Right click the site or directory and choose Properties.
- Switch to the Directory Security tab and click the Edit... button in the Anonymous access and authentication control area.
- Make sure you disable Anonymous access and make sure Integrated Windows authentication is checked. The dialog should end up like this:
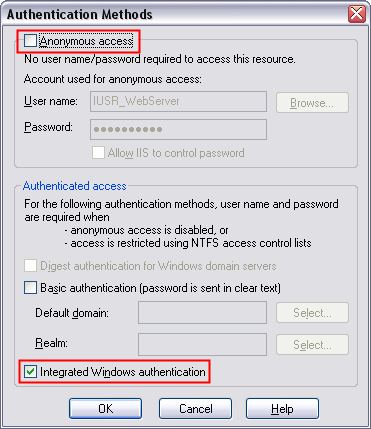
Figure 1 - The Authentication Method in IIS set to Integrated Windows Authentication - Browse to your Web site. Internet Explorer will log you on automatically and IIS runs with the privileges of your user account. If your account is allowed to write to the folder at FileServer, your file access code will work.
Synchronize the IUSR Account
The second solution is to create two identical accounts with identical passwords on both machines. This will work, as both accounts will use the same password hash. So, at run-time, when WebServer tries to write to FileServer, the machine FileServer will recognize the account that WebServer presents, and will allow it to write to the folder where the Web files reside.
How to Configure Your Servers for Synchronized Accounts?
- On WebServer, open up User Management (either under Computer Management, or within Active Directory) and change the password for the IUSR_WebServer account. Give it a strong password, and make sure that the password does not automatically expire.
- In IIS on WebServer, change the password that the IUSR_WebServer account uses. Also disable the feature Allow IIS to control password. To do this, open the Internet Information Services Management Console which you'll find in the Administrative Tools menu on the Start Menu or in the Control Panel. Expand your server in the tree on the left until you see the Web site or Virtual Directory you want to configure. Right click the site or directory and choose Properties.
Switch to the Directory Security tab and click the Edit... button in the Anonymous access and authentication control area. Make sure Anonymous access is enabled, and provide the strong password you set for the IUSR_WebServer account in step 1. The dialog box should look similar to this one: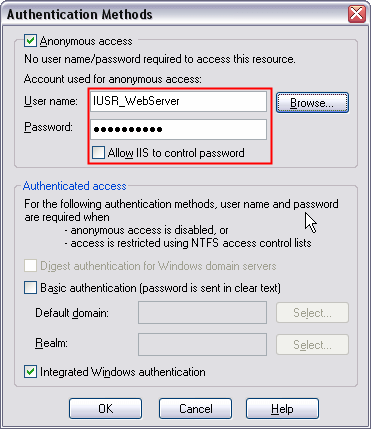
Figure 2 - Anonymous Authentication with a Synchronized IUSR Account - On FileServer, create a new account and name it IUSR_WebServer. Notice that the account ends with WebServer, not with FileServer. Give this account the same password as you gave to IUSR_WebServer in step 1.
- Give the IUSR_WebServer account on the FileServer machine the required privileges to write to the directory that holds your files
- Browse to your site. IIS will use the anonymous account IUSR_WebServer for any requests made to IIS. The mirrored account on FileServer makes sure that your IIS is allowed to write files to the folder on FileServer.
Using a Domain Account in IIS
Instead of using the mirrored IUSR account, you can create a brand new account that is specifically used for IIS anonymous access. Since this account lives in your (Active Directory) domain, it's easy to give it the required permissions on both WebServer and FileServer. You may be tempted to use the the Administrator account for that, but it's recommended not to that. Using the Administrator account for IIS is a great security risk as it allows IIS, and all pages being served by it, to operate with Administrator privileges.
How to Configure Your Servers for a Domain Account?
To create the domain account follow these steps:
- On WebServer, open up Active Directory Users and Computers (or other User Management software you may have) and create a new account. Call this account AnonIIS for example, although any name will do. Give it a strong password, and make sure that the password does not automatically expire.
- In IIS on WebServer, change the user account and password that is used for anonymous account uses. Also disable the feature Allow IIS to control password. To change both settings, open the Internet Information Services Management Console which you'll find in the Administrative Tools menu on the Start Menu or in the Control Panel. Expand your server in the tree on the left until you see the Web site or Virtual Directory you want to configure. Right click the site or directory and choose Properties.
Switch to the Directory Security tab and click the Edit... button in the Anonymous access and authentication control area. Make sure Anonymous access is enabled, and provide the account name and strong password you created in step 1. The dialog box should look similar to this one: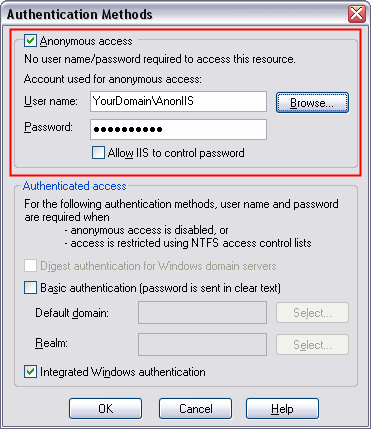
Figure 3 - Anonymous Authentication Using a Network Account - On FileServer, give the YourDomain\AnonIIS account the required privileges to write to the directory that holds your files.
- Browse to your site. IIS will use the anonymous account you set in step2 for any requests made to IIS. That domain account has also access rights to the folder on FileServer so IIS is allowed to write to files in that folder.
Using a COM+ Package
The last method I'll discuss in this article is the use of a COM+ package to host a COM+ DLL created in VB 6 or C++ for example. I won't discuss the steps you need to perform to create the actual DLL, but instead I'll assume you have a project called MyCompany that exposes a class called MyUsefulproject which in turn has a method called WriteFile. This DLL will be hosted inside a COM+ package that is configured to use a specific domain account that has the required privileges to write to the folder on FileServer.
How to Configure Your Servers for COM+?
- On WebServer, open up COM+ Services in Start | Programs | Administrative Tools (It's called MTS in NT 4).
- Expand Component Services | Computers | My computer.
- Expand COM+ applications.
- Right-click COM+ applications and choose New | Application.
- Click Next and choose Empty application.
- Enter a (arbitrary) name and click Next.
- Enter the details for a user account you want the component to run under. Leaving it to interactive can be dangerous. Suppose somebody without rights logs in, then your component will no longer work. Your package will also not run when nobody is logged on, a common scenario with (Web) servers. It's better to specify a user you created for this purpose with just enough rights. Refer to How to Configure Your Servers for a Domain Account, step 1 to find out how to create the account.
- Click Finish.
- Expand your newly created package and right-click Components and choose New | Component.
- Click Next, then choose Install new components.
- Click Add and browse for your DLL .
- Click Next again and then click Finish.
- Make sure the account you configured in step 7 has the required permissions for the documents folder on FileServer.
- Make changes to the code in your ASP pages. Instead of code dealing with files in your ASP pages directly, you should now make calls to the COM+ component, for example:
Dim ObjFileHandler Set ObjFileHandler = Server.CreateObject("MyCompany.MyUsefulproject") ObjFileHandler.WriteFile() - Browse to your page. The code from step 14 will run. Instead of using your user context or the context of the IUSR_WebServer account, the context of the user you configured in step 7 is now used to access the folder on FileServer. Since this account is allowed to access that folder, any file handling code in the WriteFile method will run successfully.
Summary
Setting security permissions in IIS is not always a piece of cake. There are quite a lot of possibilities and options you can change. Choosing the right security settings often depends on the requirements of your application. The four solutions presented in this article all serve different setups and applications. Choose the correct mechanism for the job, and you'll end up with a secure but easily maintainable Web server configuration.
Where to Next?
Wonder where to go next? You can post a comment on this article.
Links in this Document
| Doc ID | 276 |
| Full URL | https://imar.spaanjaars.com/276/how-do-i-setup-iis-to-allow-it-to-use-network-resources |
| Short cut | https://imar.spaanjaars.com/276/ |
| Written by | Imar Spaanjaars |
| Date Posted | 04/21/2004 14:25 |
| Date Last Reviewed | 12/06/2006 20:59 |
| Listened to when writing | Mini Bar Blues by Fun Lovin' Criminals (Track 13 from the album: 100% Colombian) |
Comments
Talk Back! Comment on Imar.Spaanjaars.Com
I am interested in what you have to say about this article. Feel free to post any comments, remarks or questions you may have about this article. The Talk Back feature is not meant for technical questions that are not directly related to this article. So, a post like "Hey, can you tell me how I can upload files to a MySQL database in PHP?" is likely to be removed. Also spam and unrealistic job offers will be deleted immediately.
When you post a comment, you have to provide your name and the comment. Your e-mail address is optional and you only need to provide it if you want me to contact you. It will not be displayed along with your comment. I got sick and tired of the comment spam I was receiving, so I have protected this page with a simple calculation exercise. This means that if you want to leave a comment, you'll need to complete the calculation before you hit the Post Comment button.
If you want to object to a comment made by another visitor, be sure to contact me and I'll look into it ASAP. Don't forget to mention the page link, or the Doc ID of the document.