Letting Users Manage Their Own Data using ASP.NET 4.5 Web Forms
A question that comes up often on forums such as p2p.wrox.com is how to let users manage their own data stored in a database. Probably the easiest way to accomplish this is to keep the user name in a separate column. Then when you query the data, you add a WHERE clause that retrieves only those rows that matches the user's name. Likewise, when inserting data, you store the user name along with that data.
But how do you capture the user's name? In the remainder of this article you see a two different ways to retrieve the user name of the currently logged in user.
Using Profile
If you're using the ASP.NET Profile feature (which is only supported in Web Site Projects) you can retrieve the user name by using Profile.UserName in code. You could use the UserName property when you're building up your SQL statements dynamically in Code Behind, or when you respond to events of the data-bound controls. You see an example of the latter in the second part of this article.
If, however, your site is already using Profile, you can also use the UserName property declaratively using a ProfileParameter as discussed next.
In this article, you see how to create a simple web application that lets users manage their favorite web links. A simple Insert box is used to add links which are then shown in a GridView. Users should only be able to see and manage their own links even though the links for all users are stored in the same database,.
The following steps that explain how you can implement this site assume the presence of a database in your web site that has a table called Favorites that has an Id, a Link and a UserName column. The ID will be generated automatically while the link is supplied by the user. When a user creates a new link, the UserName should be capture automatically. The demo application that you can download at the end of this article has this database in the App_Data folder and all the code shown in this article.
To set up a SqlDataSource that only shows rows that belong to a specific user, follow these steps:
- Create a new web form
- Add a new SqlDataSource control to the page
- On its Smart Tasks panel click Configure Data Source
- Choose your connection string and click Next
- Choose the Favorites table from the drop-down list and select all columns individually.
- Click the WHERE button to add a WHERE clause to your SQL statement. Complete the dialog as follows:
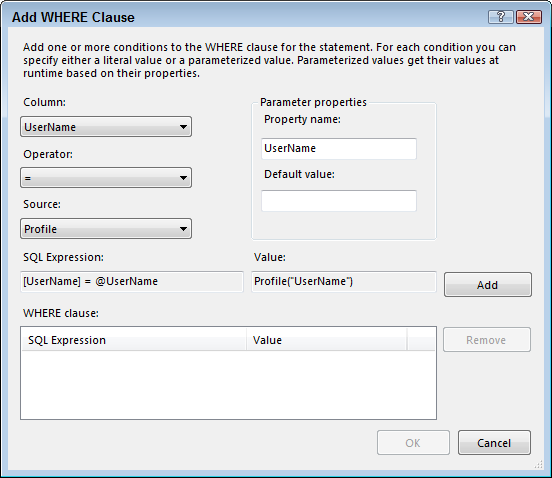
Notice how the Source is set to Profile, one of the available parameter providers. The Property Name is set to userName which is available on Profile automatically and returns the user's user name.
- Click the Add button to insert the parameter and then click OK to close the dialog.
- Click Advanced and check off the option to generate INSERT, UPDATE and DELETE statements.
- Complete the wizard until you return to the page. Visual Studio has created code that looks like this:
Notice how the SelectParameter contains a ProfileParameter pointing to the Profile property called UserName. When you set up Profile in the web.config file, ASP.NET autoatically ensures each profile has a UserName property, Now whenever the SELECT command is fired, .NET injects the user name into the query, so only rows for the current user are returned.<asp:SqlDataSource ID="SqlDataSource2" runat="server" ConnectionString="<%$ ConnectionStrings:ConnectionString %>" DeleteCommand="DELETE FROM [Favorites] WHERE [Id] = @Id" InsertCommand=" INSERT INTO [Favorites] ([Link], [UserName]) VALUES (@Link, @UserName)" SelectCommand=" SELECT [Id], [Link], [UserName] FROM [Favorites] WHERE ([UserName] = @UserName)" UpdateCommand=" UPDATE [Favorites] SET [Link] = @Link, [UserName] = @UserName WHERE [Id] = @Id" > <DeleteParameters> <asp:Parameter Name="Id" Type="Int32" /> </DeleteParameters> <InsertParameters> <asp:Parameter Name="Link" Type="String" /> <asp:Parameter Name="UserName" Type="String" /> </InsertParameters> <SelectParameters> <asp:ProfileParameter Name="UserName" PropertyName="UserName" Type="String" /> </SelectParameters> <UpdateParameters> <asp:Parameter Name="Link" Type="String" /> <asp:Parameter Name="UserName" Type="String" /> <asp:Parameter Name="Id" Type="Int32" /> </UpdateParameters> </asp:SqlDataSource>
To insert the user name in the database when a new row is created (the sample application uses a DetailsView to accomplish this), you should copy the ProfileParameter into the InsertParameter collection, overwriting the existing standard parameter for the UserName:
...
<InsertParameters>
  <asp:Parameter Name="Link" Type="String" />
  <asp:ProfileParameter Name="UserName" PropertyName="UserName" Type="String" />
</InsertParameters>
...
This way, when a new row is created, the user name is injected into the SELECT statement automatically, linking the newly created row to the currently logged in user. If you then hook up a DetailsView or other control to the same SqlDataSource control, it will pick up these settings automatically.
To prevent users from accidentally or deliberately deleting or updating other people's rows, you also need to add a WHERE to the DELETE and UPDATE statements, and supply a value for the UserName using a ProfileParameter. Your SQL statements then end up like this:
DELETE FROM [Favorites] WHERE [Id] = @Id AND [UserName] = @UserName
UPDATE [Favorites] SET [Link] = @Link, [UserName] = @UserName WHERE [Id] = @Id
     AND Username = @UserName"
If you would only make this change, your code wouldn't work and you would get an error like Must declare the scalar variable "@UserName" when you tried to delete a row from a GridView. To solve this issue, you also need to add the UserName to the DataKeyNames property of the GridView, so ASP.NET knows which values to use in the delete statement:
<asp:GridView ID="GridView1" runat="server" AllowPaging="True" AllowSorting="True"
     DataSourceID="SqlDataSource1" AutoGenerateColumns="False" DataKeyNames="Id, UserName">
With this set up, the user name is now also sent in UPDATE and DELETE statements, preventing users from deleting rows they don't own.
If you're not using Profile (for example, because you're using a Web Application Project instead), you can also assign the user name to the various SQL statements through code, as you'll see next.
Retrieving the Name Programmatically
All the Web Forms you create in an ASP.NET Web Forms web site have a User property that gives you access to the currently logged in user. To retrieve the user's name, you can use this code:
string user = User.Identity.Name;
You can use this user name to dynamically update the SQL statements that are about to be sent to the database. You can do this in one or more of the events raised by a data source control. For example the SqlDataSource control has Selecting, Inserting, Updating, and Deleting events that fire right before the SQL statement is sent to the database. This is an ideal location for your code to dynamically inject the user name. In this case, you would set up regular Parameter objects for the UserName (instead of the ProfileParameter you saw earlier), and supply a value through the code behind. Consider this web form code:
<asp:SqlDataSource ID="SqlDataSource1" runat="server"
    ConnectionString="<%$ ConnectionStrings:ConnectionString %>"
    DeleteCommand="DELETE FROM [Favorites] WHERE [Id] = @Id AND [UserName] = @UserName"
    InsertCommand="
      INSERT INTO [Favorites] ([Link], [UserName]) VALUES (@Link, @UserName)"
    SelectCommand="
      SELECT Id, Link, UserName FROM [Favorites] WHERE ([UserName] = @UserName)"
    UpdateCommand="
      UPDATE [Favorites] SET [Link] = @Link, [UserName] = @UserName WHERE [Id] = @Id
          AND Username = @UserName"
    OnDeleting="SqlDataSource1_Deleting" OnInserting="SqlDataSource1_Inserting"
    OnSelecting="SqlDataSource1_Selecting" OnUpdating="SqlDataSource1_Updating"
>
  <DeleteParameters>
    <asp:Parameter Name="Id" Type="Int32" />
    <asp:Parameter Name="UserName" Type="String" />
  </DeleteParameters>
  <InsertParameters>
    <asp:Parameter Name="Link" Type="String" />
    <asp:Parameter Name="UserName" Type="String" />
  </InsertParameters>
  <SelectParameters>
    <asp:Parameter Name="UserName" Type="String" />
  </SelectParameters>
  <UpdateParameters>
    <asp:Parameter Name="Link" Type="String" />
    <asp:Parameter Name="UserName" Type="String" />
    <asp:Parameter Name="Id" Type="Int32" />
  </UpdateParameters>
  </asp:SqlDataSource>

  <asp:GridView ID="GridView1" runat="server" AllowPaging="True" AllowSorting="True"
      DataSourceID="SqlDataSource1" AutoGenerateColumns="False" DataKeyNames="Id, UserName">
  <Columns>
  <asp:CommandField ShowDeleteButton="True" ShowEditButton="True" />
  <asp:BoundField DataField="Id" HeaderText="Id" InsertVisible="False" ReadOnly="True"
          SortExpression="Id" />
  <asp:BoundField DataField="Link" HeaderText="Link" SortExpression="Link" />
  <asp:BoundField DataField="UserName" HeaderText="UserName" SortExpression="UserName"
          ReadOnly="True" />
  </Columns>
  </asp:GridView>
You'll notice that the SQL statements still take the UserName parameter in to account. In addition, each of the four parameters collection has a parameter for the UserName. But where do they get their values? Take a look at the four On* handlers on the SqlDataSource. For each of the four SQL operations (SELECT, INSERT, UPDATE and DELETE), the SqlDataSource raises an associated event. In the Code Behind of the page, you can respond to these event and dynamically fill in the parameter using the user name you retrieve from the User property of the page. Here's the accompanying code behind:
protected void SqlDataSource1_Selecting(object sender,
               System.Web.UI.WebControls.SqlDataSourceSelectingEventArgs e)
{
  AssignUserName(e.Command.Parameters);
}

protected void SqlDataSource1_Inserting(object sender,
               System.Web.UI.WebControls.SqlDataSourceCommandEventArgs e)
{
  AssignUserName(e.Command.Parameters);
}

protected void SqlDataSource1_Updating(object sender,
               System.Web.UI.WebControls.SqlDataSourceCommandEventArgs e)
{
  AssignUserName(e.Command.Parameters);
}

protected void SqlDataSource1_Deleting(object sender,
               System.Web.UI.WebControls.SqlDataSourceCommandEventArgs e)
{
  AssignUserName(e.Command.Parameters);
}

private void AssignUserName(DbParameterCollection parameters)
{
  parameters["@UserName"].Value = User.Identity.Name;
}
Notice how each event handler forwards its Parameters collection to a helper method called AssignUserName. This method that dynamically assigns the user name to the @UserName parameter by retrieving it from User.Identity.name.
Just as with the ProfileParameter solution, the user's name is now successfully sent to the database, to ensure users can only see, and manage their own data.
Downloads
Download a full working example showing both concepts (requires ASP.NET 4.5; C# only)
Where to Next?
Wonder where to go next? You can post a comment on this article.
Links in this Document
| Doc ID | 571 |
| Full URL | https://imar.spaanjaars.com/571/letting-users-manage-their-own-data-using-aspnet-45-web-forms |
| Short cut | https://imar.spaanjaars.com/571/ |
| Written by | Imar Spaanjaars |
| Date Posted | 11/10/2012 16:30 |
Comments
Talk Back! Comment on Imar.Spaanjaars.Com
I am interested in what you have to say about this article. Feel free to post any comments, remarks or questions you may have about this article. The Talk Back feature is not meant for technical questions that are not directly related to this article. So, a post like "Hey, can you tell me how I can upload files to a MySQL database in PHP?" is likely to be removed. Also spam and unrealistic job offers will be deleted immediately.
When you post a comment, you have to provide your name and the comment. Your e-mail address is optional and you only need to provide it if you want me to contact you. It will not be displayed along with your comment. I got sick and tired of the comment spam I was receiving, so I have protected this page with a simple calculation exercise. This means that if you want to leave a comment, you'll need to complete the calculation before you hit the Post Comment button.
If you want to object to a comment made by another visitor, be sure to contact me and I'll look into it ASAP. Don't forget to mention the page link, or the Doc ID of the document.