Requiring Users to Confirm their E-mail Address after they Create an Account
Over the past couple of weeks I received a number of e-mails from readers with more or less the same question: how do you require users to confirm their e-mail addresses before they are allowed to log in with an account they just created. Rather than answer them individually by e-mail, I decided to write this article to explain the principles.
Introduction
In this article I’ll show you how you can let users sign up for an account that they need to confirm first before they can sign in with it. By using the standard ASP.NET features for account management (Membership, the CreateUserWizard control, built-in e-mail sending capabilities), it turns out this is pretty easy to do. Here’s a short rundown of all the required steps:
- Configure Membership, create a page using the standard CreateUserWizard control that sends out a standard e-mail with the user name and password.
- Disable the account when it is is created so users can't log in until they confirm their e-amail address.
- When the account is created, generate a unique ID for the user, save it the user’s profile, and then customize the e-mail message by including a link to a confirmation page that includes this unique ID.
- When the user clicks the confirmation link in the e-mail, retrieve the unique ID from the query string and use it to validate the account and approve the user.
I’ll dig a little deeper into each step in the following sections. You’ll find the full source code for the demo application at the end of the article. This article was written using Visual Studio 12 and SQL Server LocalDB. However, if you follow the instructions and create a new site from scratch, it would equally work in Visual Studio 2008 and 2010.
1. Setting the Stage
The first thing you need to do is modify your site so users can sign up for an account. This part is pretty simple and is identical to what you would normally do. I won’t describe this part in detail but instead describe the steps I followed to set up the demo site.
- Create a new web site or web application in Visual Studio (the source you can download is for a web site project).
- Set up Membership by executing the following NuGet command:
Install-Package Microsoft.AspNet.Providers
- Create a page that contains a CreateUserWizard control so users can sign up for an account. This page is called SignUp.aspx in the sample application.
- Create an e-mail message body in the App_Data folder that contains text to welcome the user. You can use the standard <% UserName%> and <% Password %> placeholders to inject the user name and password. For example:
Dear <% UserName %>

Your account has been created. Please find your account details below:

Username: <% UserName %>
Password: <% Password %>
This file is saved as ~/App_Data/YourNewAccount.txt in the sample application.
- Set up the MailSettings element on the CreateUserWizard control so it uses this mail template like this:
<asp:CreateUserWizard ID="CreateUserWizard1" runat="server" >
  <MailDefinition BodyFileName="~/App_Data/YourNewAccount.txt" From="imar@example.com"
          Subject="Your new account">
  </MailDefinition>
    <WizardSteps>
      <asp:CreateUserWizardStep runat="server" />
      <asp:CompleteWizardStep runat="server" />
  </WizardSteps>
</asp:CreateUserWizard>
- Configure the system.net element in Web.config so it can successfully send out e-mail. In the sample application I am using a local pickup folder. (see http://imar.spaanjaars.com/496/using-a-local-pickup-folder-for-email-delivery for more details).
- Create a page with a Login control so users can sign in to your site. In the sample application, this page is called Login.aspx.
- Test the application. For each account you create you should receive an e-mail. You should be able to log in using the user name and password you supplied.
2. Disabling Created Users
This step is really easy because the CreateUserWizard has built-in support for this. All you need to do is set DisableCreatedUser to True, like this:
<asp:CreateUserWizard ID="CreateUserWizard1" runat="server" DisableCreatedUser="True">
With this setting on, you should no longer be able to log om with new new accounts you create on the site.
3. Inserting a Confirmation Link in the E-mail Message
This action consists of a few steps:
- Generate a unique ID for the user and store it in the user’s profile. A good location to do this is in the CreateUserWizard’s CreatedUser event, like this:
For this code to work, I added the following profile property to Web.config:protected void CreateUserWizard1_CreatedUser(object sender, EventArgs e)
{
ProfileCommon userProfile = ProfileCommon.Create(CreateUserWizard1.UserName) as ProfileCommon;
accountConfirmationKey = Guid.NewGuid().ToString();
userProfile.AccountConfirmationKey = accountConfirmationKey;
userProfile.Save();
}
Notice how the code explicitly creates a profile using ProfileCommon.Create. Since the user account has just been created, Profile is not active for the current page yet so you need to get it explicitly. This also means you need to call Save. The random ID (created using Guid.NewGuid()) is stored in the user’s profile and in a field in the class so you can use it when sending the e-mail, discussed next.<profile defaultProvider="DefaultProfileProvider">
<properties>
<add name="AccountConfirmationKey"/>
</properties>
<providers>
<add name="DefaultProfileProvider" type="System.Web.Providers.DefaultProfileProvider, System.Web.Providers, Version=1.0.0.0, Culture=neutral, PublicKeyToken=31bf3856ad364e35" connectionStringName="DefaultConnection" applicationName="/" />
</providers>
</profile>
- Modify the outgoing message. The CreateUserWizard has a handy SendingMail event you can hook into to customize the e-mail. You access the MailMessage instance on the e.Message property. Here’s the code from the sample application that builds up a link to the current web site, embeds the unique user ID, and then adds the link to the MailMessage’s body:
Note: I could have combined the code in the CreatedUser and SendingMail events into a single block called from SendingMail. However, separating it like this feels a bit cleaner.protected void CreateUserWizard1_SendingMail(object sender, MailMessageEventArgs e) {
string confirmLink = string.Format("{0}://{1}/Confirm.aspx?ConfirmationKey={2}&UserName={3}", Request.Url.Scheme, Request.Url.Authority, accountConfirmationKey, CreateUserWizard1.UserName);
e.Message.Body = e.Message.Body.Replace("##ConfirmLink##", confirmLink);
}
- Modify the e-mail body to include a placeholder for the link. Here’s the full text for that message from the sample application:
Dear <% UserName %>,

Your account has been created. However, before you can use it you need to confirm
your e-mail address first by clicking the following link:

#ConfirmLink##

Please find your account details below:

Username: <% UserName %>
Password: <% Password %>
- Change the CompleteSuccessText property of the CreateUserWizard control to inform the user the account is not activated immediately, but needs manual confirmation first. Here’s the full code for the CreateUserWizard:
<asp:CreateUserWizard ID="CreateUserWizard1" runat="server" DisableCreatedUser="True"
   OnCreatedUser="CreateUserWizard1_CreatedUser" OnSendingMail="CreateUserWizard1_SendingMail"
   CompleteSuccessText="Your account has been successfully created. You'll
      receive an e-mail with a confirmation link that you need to click to confirm
      your e-mail address and activate your account."
>
  <MailDefinition BodyFileName="~/App_Data/YourNewAccount.txt"
           From="imar@example.com" Subject="Your new account">
  </MailDefinition>
  <WizardSteps>
    <asp:CreateUserWizardStep runat="server" />
    <asp:CompleteWizardStep runat="server" />
  </WizardSteps>
</asp:CreateUserWizard>
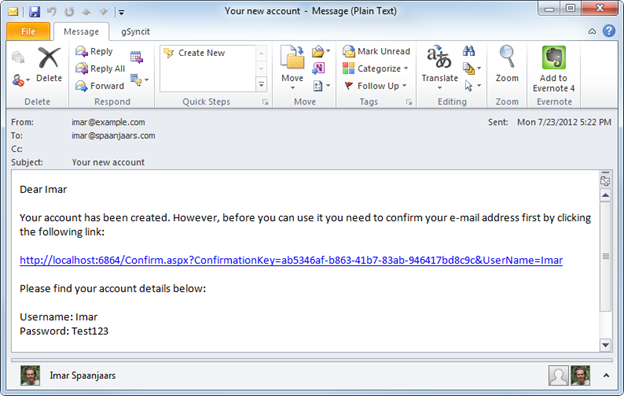
When users now sign up for a new account, they receive something like the following in their Inbox:
4. Activating the User Account
When the user clicks the confirmation link in the e-mail message, he's being sent to the Confirm.aspx page, along with the confirmation ID and UserName in the query string. A typical link could look like this:
http://localhost:6864/Confirm.aspx?ConfirmationKey=ef05127f-a050-41b9-9132-be8a8aeea925&UserName=Imar
The localhost:6864 part varies depending on where you run this code, and would include your full domain name when used on a production site.
In the code behind of Contfirm.aspx, you then get the user name from the query string and use it to create a Profile instance. This profile instance should have a value for the AccountConfirmationKey property that matches the confirmation key sent in the query string. If the two match, you can create a MembershipUser for the requested user name and activate the account by setting IsApproved to true. Here’s the code from the sample application that shows a way you can implement this:
protected void Page_Load(object sender, EventArgs e)
{
  string userName = Request.QueryString.Get("UserName");
  string accountKey = Request.QueryString.Get("ConfirmationKey");

  var profile = ProfileCommon.Create(userName) as ProfileCommon;
  if (accountKey == profile.AccountConfirmationKey)
  {
    var user = Membership.GetUser(userName);
    user.IsApproved = true;
    Membership.UpdateUser(user);
    Status.Text = "Account confirmed successfully.";
  }
  else
  {
    Status.Text = "Something went wrong while confirming your account.";
  }
}
As you can see, implementing this functionality is pretty straightforward, as most of what you need is supported out of the box. Hooking into some events to customize behavior is a great way to make modifications to existing functionality without building your own security system from scratch.
Extending the Sample
The sample application that comes with this article is pretty simple so it’s easy to focus on the concept without getting confused by too many details. For a real-world website, you may want to implement the following features:
- Key expiration. Along with the unique ID you could save the date and time the key was generated in the profile as well. Then when the key is validated in Confirm.aspx you could check this date and decide not to activate the user when the key has expired.
- If you don’t like sending the user name and password over e-mail and the query string, you could leave them out of the mail message. Then in Confirm.aspx you could add a TextBox and a Button so the user can manually enter their user name and click a confirm button. In the Code Behind you would replace the code that gets the user name from the query string with code that gets it from the text box.
Downloads
Where to Next?
Wonder where to go next? You can post a comment on this article.
Links in this Document
| Doc ID | 569 |
| Full URL | https://imar.spaanjaars.com/569/requiring-users-to-confirm-their-e-mail-address-after-they-create-an-account |
| Short cut | https://imar.spaanjaars.com/569/ |
| Written by | Imar Spaanjaars |
| Date Posted | 07/18/2012 14:04 |
Comments
Talk Back! Comment on Imar.Spaanjaars.Com
I am interested in what you have to say about this article. Feel free to post any comments, remarks or questions you may have about this article. The Talk Back feature is not meant for technical questions that are not directly related to this article. So, a post like "Hey, can you tell me how I can upload files to a MySQL database in PHP?" is likely to be removed. Also spam and unrealistic job offers will be deleted immediately.
When you post a comment, you have to provide your name and the comment. Your e-mail address is optional and you only need to provide it if you want me to contact you. It will not be displayed along with your comment. I got sick and tired of the comment spam I was receiving, so I have protected this page with a simple calculation exercise. This means that if you want to leave a comment, you'll need to complete the calculation before you hit the Post Comment button.
If you want to object to a comment made by another visitor, be sure to contact me and I'll look into it ASAP. Don't forget to mention the page link, or the Doc ID of the document.