Using .Less to Change the Way You Write Your CSS
Introduction
.Less - based on the ruby Less library - extends CSS with variables, mixins, operations and nested rules. Additionally, you can use it to minimize your CSS files, decreasing the time and bandwidth necessary to download the files by the client. Using .Less is pretty simple, yet powerful. I'll show you what you can do with it after I've shown you how to acquire it and how to configure your application to use it.
Configuring .Less
You can use .Less in a couple of ways: as an HTTP Handler that is integrated in an ASP.NET web site, with a command line compiler (so you can integrate it in automated builds or use it on servers that don't have or don't support .NET or .Less), programmatically and as a T4 template that you can add to a Visual Studio project (more on the T4 template later). The homepage of the .Less web site has a short introduction on getting started with .Less using the HTTP Handler that consists of 5 easy steps:
1. Download the latest source
You do that by hitting the large Download button on the .Less home page. The downloads page currently lists two files: dotless-v1.0.0.5 that contains the actual library and t4css-v1.0.0.5 that contains the T4 template.
Download the library and unzip it to a folder on your hard drive such as D:\Tools\DotLess.
2. Add a reference to the .Less Library
In your web project (Web Forms and ASP.NET MVC both work fine) add a reference to the dotless.Core assembly located in the folder you created in the previous step.
3. Add a new HttpHandler to your web.config
To hook up files with the .less extension to the .Less Library, you need to add an httpHandler element to either the system.web/httpHandlers node (for versions of IIS prior to 7.0) or to the system.webserver/handlers section.
<system.web>
  ...
  <httpHandlers>
      ...
    <add type="dotless.Core.LessCssHttpHandler, dotless.Core"
                   validate="false" path="*.less" verb="*" />
  </httpHandlers>
</system.web>
or
<system.webServer>
  ...
  <handlers>
    ...
    <add name="LessHttpHandler" type="dotless.Core.LessCssHttpHandler, dotless.Core"
             preCondition="integratedMode" path="*.less" verb="*" />
  </handlers>
</system.webServer>
Instead of just the .less extension you can also use a double extension of .less.css. I actually prefer that over the .less extension as the file is now more or less treated as a CSS file, giving you IntelliSense and color coding. The file is also treated as content and is included in a published version of your site without any additional steps. I'll stick to the .less extension in the remainder of this article though.
4. Add configuration information to web.config
To control the way .Less behaves you can add a new config section to the web.config followed by a configuration element for .Less:
<configuration>
  <configSections>
    ...
    <section name="dotless"
       type="dotless.Core.configuration.DotlessConfigurationSectionHandler,dotless.Core" />
  </configSections>
  ...
 <dotless minifyCss="true" cache="true" />
The configuration setting lets you change three settings for .Less (only two are shown in the example):
| minifyCss | Whether or not to remove all irrelevant white space from the CSS file when generated. |
| cache | Determines whether generated files can be cached, or are regenerated on every request. |
| source | This attribute expects a qualified type name of the type that implements the ILessSource interface. Shipping types are FileSource (the default), AspServerPathSource (the default when used in a web application), StringSource (although it doesn't seem to be used at the moment) and VirtualPathSource (which is used in advanced scenarios where there's no direct mapping between files on disk and virtual requests. For more information about the VirtualPathSource option, check out the article ".Less now supports files from the VirtualPathProvider!)" |
With the configuration done, the fifth and final step is actually using .Less, discussed next.
Using .Less
.Less supports a limited but powerful set of features. Using it is so simple that the documentation is only a single page: http://www.dotlesscss.org/docs.aspx. You're advised to check out the documentation and try the examples for yourself to get a better feel of the capabilities of .Less. To give you an idea of how it works, I am showing you a few of the concepts here.
The first thing you want to do is create a new .less file (a text file with with a .less extension) and reference the file in, say, a Master Page as you would any other CSS file. You can also simply rename an existing CSS file and update the reference to it. Here's an example from my View Master Site.Master referencing a file that was previously called Core.css:
<link href="/Content/Core.less" rel="stylesheet" type="text/css" />
Notice how this is a normal CSS reference with the extension changed to .less. When this file is requested by the browser, the .Less HTTP Handler kicks in, processes the .less file and returns plain CSS that the browser understands. Even if I made no other changes to my CSS file at this point, I would still benefit from .Less, as the CSS is now minimized when requested the first time and then cached. This reduces my file from somewhere over 7KB to around 6KB. Not a huge difference, but that's because my file doesn't contain a lot of overhead such as comments. I've seen other files where the actual compression is much more substantial.
Next it's time to implement some of the .Less features. The easiest to use and understand are variables.
Variables
In my CSS files I use the color #cc3300 a number of times. If I want to change the color, I currently need to do that in multiple places using search and replace. With .Less variables, I can define the color once and then refer to it multiple times. When the files is processed, the variables are replaced with their underlying value and the result is the same. So, previously I had something like this:
h1
{
  color: #cc3300
}

#footer
{
  border: 1px solid #cc3300;
}
With .Less, I can introduce a variable (prefixed with an @) that I can then refer to from my CSS code:
@dark-orange: #cc3300;
h1
{
  color: @dark-orange
}

#footer
{
  border: 1px solid @dark-orange;
}
When the .less file is requested, the variables are parsed and replaced and the final CSS that is sent to the browser is identical to the original example.
Mixins
A mixin is like an include for CSS. It lets you define multiple properties at once that can optionally be changed with a parameterized value. Consider this mixin that defines a default black border of 1 pixel on all four sides:
.border-all-around (@defaultBorder: 1px, @defaultColor: black)
{
  border: @defaultBorder solid @defaultColor;
}
Whenever you use this mixin by just specifying its name, you get the default border settings. E.g. this:
.MyStandardBox
{
  .border-all-around;
}
ends up like this in the final CSS file:
.MyStandardBox
{
  border: 1px solid black;
}
However, by specifying a parameter (called defaultBorder in my case) I can also use the mixin with other values. E.g. this .Less code:
.MyNonStandardBox
{
  .border-all-around (4px);
}
becomes:
.MyNonStandardBox
{
  border: 4px solid black;
}
Notice how the width of the border is overridden, but the color is still taken from the defaultColor parameter of the mixin.
Normal selectors can serve as a mixin as well. So if you have a class selector like this:
.ThickRedBorder
{
  border: 4px solid red;
}
you can assign a red border to other elements simply by referencing it as a mixin: by its name:
.SomeClass
{
  .ThickRedBorder;
}
Nested Rules
Nested rules give you the option to rewrite CSS rules targeting specific, nested elements in a more intuitive way. Consider this .Less rule:
#Footer
{
  border: 3px solid green;
  ul
  {
    padding: 0;
    li
    {
      margin: 0;
      padding: 0;
    }
  }
}
This defines an ID selector called Footer with a green border of three pixels. Inside this Footer I define an unordered list with a padding of zero. This unordered list in turn contains a definition for the list items with no padding and no margin. Pretty intuitive if you think about how these elements are organized hierarchically in the DOM in the browser. When processed, this .Less rule results in the following CSS:
#Footer { border: 3px solid green; }
#Footer ul { padding: 0; }
#Footer ul li
{
  margin: 0;
  padding: 0;
}
Exactly how you'd have written it yourself using normal CSS rules. What I really like about this is how everything that belongs together stays together. When you now rename #Footer to #footer, everything keeps working and there's no need to use search and replace to fix each occurrence of #Footer.
Other Features
Besides Variables, Mixins and Nested Rules, .Less also supports Operators, Functions, Namespaces and Accessors. With operators and functions you can do some cool stuff, like carrying out calculations to determine the size or colors of an element. The final thing I want to show here (before I repeat the documentation in its entirety) is a cool way to calculate the width of some element based on the width of another. Consider a site with a fixed width layout. Let's say the total width is 900 pixels. Next, imagine you want to divide this space in two: a small column on the left and a bigger block on the right for the main content (if that sounds familiar: it's because this web site uses a division like that as well). Normally, I would write CSS like this:
#PageWrapper
{
  width: 900px;
  ...
}

#LeftNavigation
{
  width: 200px;
  ...
}

#MainContent
{
  width: 700px;
  ...
}
Notice how the width of LeftNavigation and MainContent combined are the width of the PageWrapper. This code isn't so bad if that was all that's needed. However, in practice, these rules start to float around your CSS document so they are not so close to each other anymore. Furthermore, other width rules may in turn depend on the size of MainContent of LeftNavigation. So what happens when you want to change the width of the LeftNavigation to, say, 250 pixels? You need to update LeftNavigation but you also need to change MainContent. Forgetting to do the latter may result in a broken page layout as LeftNavigation and MainContent no longer fit in the PageWrapper container. With .Less you can calculate the width of an element relative to some other width. That means that you can express rules such as: give MainContent the width of (PageWrapper - LeftNavigation).When you then change the width of LeftNavigation from 200 to 250, the width of MainContent is automatically changed to 650px. Doing this with .Less is surprisingly simple:
@full-width: 900px;
@left-navigation-width: 200px;

#PageWrapper
{
  width: @full-width;
}

#LeftNavigation
{
  width: @left-navigation-width;
}

#MainContent
{
  width: @full-width - @left-navigation-width;
}
When rendered in the browser, this results in the exact same CSS as above. However, when you now change the width of the left navigation to 250px, the MainContent element is resized accordingly:
#PageWrapper { width: 900px; }
#LeftNavigation { width: 250px; }
#MainContent { width: 650px; }
This can be a real time-safer, especially in more complex layouts or larger CSS files.
Be sure to check out the documentation for a description of all features and more information on how scope works in .Less, how comments are processed and how you can import external files (using @import like in normal CSS files).
Using T4 Templates
So far you've seen how to use the HTTP Handler to process files with a .less extension. However, that requires .Less to be on the sever. It also requires the files to be processed on the server at run-time. If you prefer a pure design-time solution, you can use the T4 templates that are available from the Downloads page of .Less. Originally created by Phil Haack, the T4 template is now part of the .Less project. Using it is pretty simple again:
- Add the dotless.Core.dll assembly somewhere to your project. You don't have to reference it, as long as it's within reach of the Visual Studio solution
- Drop the T4 template in a folder. For each .less file it finds in that folder, it will generate a CSS file for you, so you typically drop the T4 template in a folder such as Css, Styles or Content.
Once you've set it up like that, you'll see the CSS files appear:
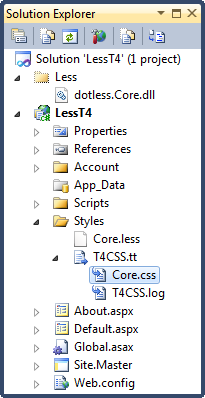
Figure 1
The contents of the Core.css are now based on those of the Core.less file, taking all .Less rules you've seen before into account.
if you can't make it work and get an error like this:
Error 8 Compiling transformation: Metadata file 'dotless.Core.dll' could not be found
open up the T4 template and look at the assembly reference for the Less library:
<#@ assembly name="dotless.Core.dll" #>
This reference tries to find the DLL in the project folder itself. If you have it located elsewhere, you can use a fixed folder location (e.g. D:\Tools\DotLess\dotless.core.dll) or use the Visual Studio folder expansion macros such as $(SolutionDir) and $(ProjectDir) to refer to the Less dll relative to your Visual Studio solution or project.
For more information on fixing these problems, take a look at Understanding T4: <#@ assembly #> directive
The downside of this template is that every time you change your CSS files, you need to save your T4 template as well, or the changes won't be processed. For a work around, check out the section "The T4 file automatically runs whenever you build" in the article The MVC T4 template is now up on CodePlex, and it does change your code a bit or take a look at Chirpy that handles this and more for you automatically.
Programmatically Generating .Less Based CSS
While the above set of features probably take care of most of your CSS handling needs, it's good to know you can also generate CSS based on .Less syntax programmatically. Doing so is a matter of creating a new instance of a class implementing the ILessEngine and then then passing a new LessSourceObject to its TransformToCss method. Here's the .NET code for the previous example that converted the nested .Less rules:
string input = @"#Footer
               {
                 border: 3px solid green;
                 ul
                 {
                   padding: 0;
                   li
                   {
                     margin: 0;
                     padding: 0;
                   }
                 }
               }";

ILessEngine lessEngine = new EngineFactory().GetEngine(new DotlessConfiguration());
string output = lessEngine.TransformToCss(new LessSourceObject() { Content = input });
When run, the variable output contains the exact same CSS as shown earlier:
#Footer { border: 3px solid green; }
#Footer ul { padding: 0; }
#Footer ul li
{
  margin: 0;
  padding: 0;
}
This code creates a new DotlessConfiguration class with its MinifyOutput and CacheEnabled properties both set to false by default. If you want minimize the generated CSS, simply set its MinifyOutput property to true.
Using the Command Line Compiler
For completeness sake, I'll also mention the command line compiler here. it's usage is once again pretty simple. You typically use it like this:
dotless.Compiler.exe [-switches] <inputfile> [outputfile]
The supported switches are:
| m | When set, minifies the output. |
| w | When set, keeps the command line compiler open and puts a watch on the source file. Every time the source file is changed on disk, the output is regenerated. This is useful when you're designing your CSS file outside Visual Studio (in, say Dreamweaver or Expression Web) and want to have an updated version of the CSS file at all times so you can display it in your browser for example. |
| w | Displays the help text. |
The Command Line Compiler is also pretty easy to integrate in any automated build system you may be using.
Conclusion
While it's CSS syntax looks a bit different at first, it's very easy to get used to .Less. In a way, it feels much more natural than the original CSS syntax, especially when using variables and nested rules. Although I haven't done many projects with .Less yet, it looks like it's going to find a place in my web development toolkit. The advantages, both at development time when writing CSS and at run-time when serving the minified files are obvious, and I have yet to run into a disadvantage (other than the short learning curve of learning the .Less syntax).
The many different options to use .Less (HTTP Handler, T4 templates, Command Line Compiler or programmatically) should make it possible to use .Less anywhere you need it.
If you want to learn more or start using .Less, be sure to check out its official web site: dotlesscss.org.
Where to Next?
Wonder where to go next? You can post a comment on this article.
Links in this Document
| Doc ID | 536 |
| Full URL | https://imar.spaanjaars.com/536/using-less-to-change-the-way-you-write-your-css |
| Short cut | https://imar.spaanjaars.com/536/ |
| Written by | Imar Spaanjaars |
| Date Posted | 06/03/2010 11:10 |
Comments
Talk Back! Comment on Imar.Spaanjaars.Com
I am interested in what you have to say about this article. Feel free to post any comments, remarks or questions you may have about this article. The Talk Back feature is not meant for technical questions that are not directly related to this article. So, a post like "Hey, can you tell me how I can upload files to a MySQL database in PHP?" is likely to be removed. Also spam and unrealistic job offers will be deleted immediately.
When you post a comment, you have to provide your name and the comment. Your e-mail address is optional and you only need to provide it if you want me to contact you. It will not be displayed along with your comment. I got sick and tired of the comment spam I was receiving, so I have protected this page with a simple calculation exercise. This means that if you want to leave a comment, you'll need to complete the calculation before you hit the Post Comment button.
If you want to object to a comment made by another visitor, be sure to contact me and I'll look into it ASAP. Don't forget to mention the page link, or the Doc ID of the document.