Using the ValidatorCallout control in Combination with ASP.NET 2 Templated Controls
Now that the release date for the final version of ASP.NET AJAX 1.0 is getting closer (RC1 was released on December 14 2006), I decided to dig a little deeper in its feature set and see what it has to offer. I also looked at the ASP.NET AJAX Control Toolkit and the new controls that are part of this toolkit.
One of those new controls is the ValidatorCallout extender control that displays a big yellow call out with the error message.
Introduction
If you haven't seen the control at work yet, take a look at this live demo. Leave the User Name and Password fields blank and click the Log In button. You'll see the following screen appear:
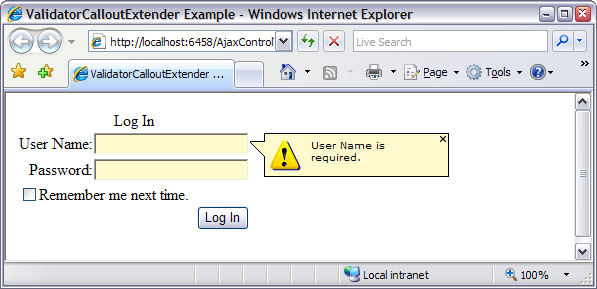
Figure 1 - The Login Control with a ValidatorCalloutExtender
Instead of the standard red error message, you now get a good looking yellow call out with an attention icon and the original error message.
Using the ValidatorCallout is pretty easy. Just add it to an ASP.NET AJAX Control Toolkit enabled site, set its TargetControlID property to the ID of your validator control and you're done. The markup could be as simple as this:
<ajaxToolkit:ValidatorCalloutExtender
  runat="Server"
  ID="vceUserName"
  TargetControlID="reqUserName"
/>
In addition to the three attributes above, you have a few other attributes available, like Width (to determine the width of the call out), HighlightCssClass (contains the CSS class that is applied to the control whose value is invalid (like the TextBox for the user name in Figure 1), WarningIconImageUrl (the icon that is shown in the call out in case you don't like the default yellow icon) and CloseImageUrl (that can contain a small Close image to replace the existing one at the top right-hand corner of the call out.
So, using the control as per the instructions on its demo page is dead easy. However, getting the ValidatorCallout to work with standard, templated ASP.NET controls like the <asp:Login> control is a bit trickier.
If you have an <asp:Login> control on a page, all you see is the following markup:
<asp:Login ID="Login1" runat="server"></asp:Login>
(Your code may be a bit more verbose as it's easy to set additional attributes on the control, like event handlers). If you view a page with this control in a browser, you do get automatic validation. You can't log in to the site without entering a user name and a password. So, somehow this control seems to contain a number of RequiredFieldValidator controls. But where?
The answer is in the template code for the control. By default, the Login control (and other template based controls) doesn't show the markup that it will render at run-time. Instead, it shields you from all the complex HTML that is necessary to draw the control in a browser. This is a good thing, as you often don't need to see all this HTML, and instead want to use the control's designer capabilities to format it. But, looking at the HTML can help you in understanding what the control does and how it works. Fortunately, getting that HTML is very easy: switch the page that contains the control into Design View, open its Smart Task pane by clicking the little black arrow and choose Convert to Template. The control will expand its code so you can see how it's build up. In Code View you now see a <LayoutTemplate> element that holds an HTML <table> that in turn contains a number of controls, like TextBox controls for the user name and password, a Login button to trigger the login action and two <asp:RequiredFieldValidator /> controls that are used to make sure you fill in a user name and a password.
If you don't mind the additional markup for the Login or other template based controls in your page, you're pretty much done now. All that's left to do is add two <ajaxToolkit:ValidatorCalloutExtender /> controls to the <LayoutTemplate> template of the Login control and set their TargetControlID properties to UserNameRequired and PasswordRequired respectively. You should end up with code similar to this:
<asp:Login ID="Login1" runat="server">
  <LayoutTemplate>
    <ajaxToolkit:ValidatorCalloutExtender
        runat="Server" ID="reqUserName" TargetControlID="UserNameRequired" />
    <ajaxToolkit:ValidatorCalloutExtender
        runat="Server" ID="reqPassword" TargetControlID="PasswordRequired" />
    <table border="0" cellpadding="1" cellspacing="0"
                 style="border-collapse: collapse">
    <tr>

      ... Snip ...

      <asp:TextBox ID="UserName" runat="server"></asp:TextBox>
      <asp:RequiredFieldValidator ID="UserNameRequired"
           runat="server" ControlToValidate="UserName"
           ErrorMessage="User Name is required."
           ToolTip="User Name is required." ValidationGroup="Login1">*
      </asp:RequiredFieldValidator>

      ... Snip ...

      <asp:TextBox ID="Password" runat="server" TextMode="Password"></asp:TextBox>
      <asp:RequiredFieldValidator ID="PasswordRequired"
           runat="server" ControlToValidate="Password"
           ErrorMessage="Password is required."
           ToolTip="Password is required." ValidationGroup="Login1">*
      </asp:RequiredFieldValidator>


      ... Snip ...

    </tr>
    </table>
  </LayoutTemplate>
</asp:Login>
Notice I only posted the relevant parts of the markup for the Login control. The download you find at the end of this article contains a fully working example with all the code.
To make the Login and ValidatorCallout control look a little nicer, you need to hide the original red error message. You can do this by setting the Display property of the RequiredFiledValidator to None:
<asp:RequiredFieldValidator ID="UserNameRequired"
    Display="None"
    runat="server" ControlToValidate="UserName"
    ErrorMessage="User Name is required."
    ToolTip="User Name is required." ValidationGroup="Login1">*
</asp:RequiredFieldValidator>
Now when the call out is shown, you no longer see the red error message behind it.
Changing the ValidatorCallout Extenders at Run-Time
Whether the example presented above works for you is mostly a matter of preference. Personally, I don't like the large amount of markup that has been inserted in my page by converting the <asp:Login> control to a template. Instead, I prefer to have the much cleaner alternative. However, with the short version of the control, you can't set the ValidatorCallout TargetControlID property in the markup anymore. Instead, you need to write some code in the Code Behind for the page to set those properties dynamically at run-time. The main benefit of doing this through code is that you avoid page clutter. With the code based solution your page can look as clean as this:
<form id="form1" runat="server">
<div>
  <asp:ScriptManager ID="ScriptManager1" runat="server" />
  <ajaxToolkit:ValidatorCalloutExtender runat="Server" ID="reqUserName" />
  <ajaxToolkit:ValidatorCalloutExtender runat="Server" ID="reqPassword" />
  <asp:Login ID="Login1" runat="server" />
</div>
</form>
Notice how these ValidatorCalloutExtender controls don't have their TargetControlID set. This is now done in the code behind with this code in the Page_Load event handler:
C#
protected void Page_Load(object sender, System.EventArgs e)
{
  RequiredFieldValidator valUserName =
        (RequiredFieldValidator)Login1.FindControl("UserNameRequired");
  RequiredFieldValidator valPassword =
        (RequiredFieldValidator)Login1.FindControl("PasswordRequired");

  reqUserName.TargetControlID = valUserName.UniqueID;
  reqPassword.TargetControlID = valPassword.UniqueID;

  valUserName.Display = ValidatorDisplay.None;
  valPassword.Display = ValidatorDisplay.None;
}


VB.NET
Protected Sub Page_Load(ByVal sender As Object, _
	  ByVal e As System.EventArgs) Handles Me.Load
  Dim userNameRequired As RequiredFieldValidator = _
	  CType(Login1.FindControl("UserNameRequired"), RequiredFieldValidator)
  Dim passwordRequired As RequiredFieldValidator = _
	  CType(Login1.FindControl("PasswordRequired"), RequiredFieldValidator)

  reqUserName.TargetControlID = userNameRequired.UniqueID
  reqPassword.TargetControlID = passwordRequired.UniqueID

  userNameRequired.Display = ValidatorDisplay.None
  passwordRequired.Display = ValidatorDisplay.None
End Sub
The first two lines of code (split over four lines in this article) use the FindControl method of Login1 to get a reference to the RequiredFieldValidators for the user name and password respectively.
The RequiredFieldValidators controls are then used to set the TargetControlID properties of the ValidatorCalloutExtender controls. Notice how I am using UniqueID and not the normal ID property. Because the validators live in the naming container of the Login control, you need to get a name that takes this naming container into account. UniqueID returns something like Login1$UserNameRequired which is the full and unique name of the control.
The final two lines of code set the Display property of the validators to None to avoid the standard error message from appearing. This is similar to setting the Display attribute in the markup as you saw earlier.
Summary
ASP.NET AJAX 1.0 is a very promising and fun technology, especially in combination with the ASP.NET AJAX Control Toolkit. The two combined offer great possibilities for creating cool looking and functional web UIs. Because they're based on standard .NET and ASP.NET practices, these technologies are pretty easy to learn. As you saw in this article, fixing something that looks difficult at first, is pretty easy to do using standard ASP.NET practices, like using FindControl.
Download Files
Source Code for this ArticleWhere to Next?
Wonder where to go next? You can post a comment on this article.
Links in this Document
| Doc ID | 413 |
| Full URL | https://imar.spaanjaars.com/413/using-the-validatorcallout-control-in-combination-with-aspnet-2-templated-controls |
| Short cut | https://imar.spaanjaars.com/413/ |
| Written by | Imar Spaanjaars |
| Date Posted | 12/16/2006 16:50 |
Comments
Talk Back! Comment on Imar.Spaanjaars.Com
I am interested in what you have to say about this article. Feel free to post any comments, remarks or questions you may have about this article. The Talk Back feature is not meant for technical questions that are not directly related to this article. So, a post like "Hey, can you tell me how I can upload files to a MySQL database in PHP?" is likely to be removed. Also spam and unrealistic job offers will be deleted immediately.
When you post a comment, you have to provide your name and the comment. Your e-mail address is optional and you only need to provide it if you want me to contact you. It will not be displayed along with your comment. I got sick and tired of the comment spam I was receiving, so I have protected this page with a simple calculation exercise. This means that if you want to leave a comment, you'll need to complete the calculation before you hit the Post Comment button.
If you want to object to a comment made by another visitor, be sure to contact me and I'll look into it ASAP. Don't forget to mention the page link, or the Doc ID of the document.