Using the Microsoft Access Providers to Replace the Built-In SQL Server Providers
Update 2011/1/9: I just published a short article that shows you how to use the Microsoft Access Providers in an ASP.NET 4 web site.
The biggest features brought by ASP.NET 2.0 are most likely the new services for membership, roles, personalization and profiles. These services supply you with a lot of functionality out-of-the-box with little to no custom code. The services that ship with .NET 2.0 all use SQL Server as the data store (either the Express edition, or the full commercial versions) by means of a provider. But what if you can't use SQL Server, for example because your hosting company doesn't support it? In that case, you can use the Microsoft Access Providers, a shared source initiative released by Microsoft that allows you to use a Microsoft Access database for all the provider based features.
This article shows you how to acquire, compile and use these Microsoft Access Providers.
Introduction
The greatest benefit of the services that ship with the .NET 2.0 Framework is their ease of use. Normally, enabling a feature such as user authentication and role management is as simple as dropping a Login control on your page.
However, all of this only works if you can use SQL Server, whether it's the free SQL Server 2005 Express Edition, or one of the full 2005 or 2000 editions. (For a description about configuring your application to work with the full SQL Server 2000 and 2005 editions, check out this post made by Scott Guthrie.) But what if you can't use SQL Server? What if you are using an ISP that only allows you to host a Microsoft Access database?
In that case, don't worry. You can use the Access Providers that have been made available by Microsoft. During early betas of the .NET 2.0 Framework, the Access Providers were part of the shipping framework so it was easy for everyone to target a Microsoft Access database. However, in beta 2 and the final (RTM) version, the Access providers were gone, leaving you with SQL Server only. Fortunately, Microsoft released the complete source code for the original Access Providers, enabling you to use an Access database while still making use of all the goodies that come with the ASP.NET 2.0 providers.
The remainder of this article focuses on downloading, compiling, configuring and using the Access Providers in your own ASP.NET 2.0 application. I'll be using Visual C# 2005 Express Edition and Visual Web Developer Express Edition in this article. These two programs can be downloaded for free from the Microsoft site so they are accessible to everyone. But of course if you have a full version of Visual Studio 2005, like the Standard or Professional edition, you can still follow along. In fact, you'll find that most things are identical to what I describe here.
Services Overview
ASP.NET 2.0 includes a number of services that are common to many web based applications. Examples are membership and role management (authentication and authorization), Profiles, Session State, and Personalization. In previous versions of ASP.NET, you often had to write your own code to enable these features, but ASP.NET 2.0 comes with a number of services that you can use out of the box. Figure 1 lists some of these services and gives an overview of how services, providers and data stores are related in ASP.NET 2.0 web applications.
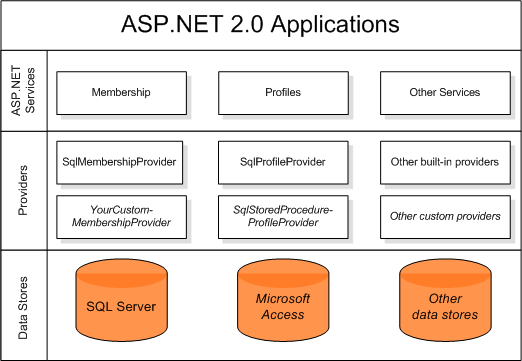
Figure 1: Services and Providers in ASP.NET 2.0
The second layer from the top lists two of the services currently found in the .NET 2.0 Framework: Membership and Profiles. The Other Services box represents the other built-in services and possibly extension services developed by third parties.
Each of the services that requires a persistent data store (e.g. a database, XML files and so on) doesn't talk directly with that data store, but instead talks to a provider. The third layer from the top lists a number of providers. The ones in italic (e.g. the bottom half) are custom providers that you can build or implement yourself. The others are built-in and ship with the RTM version of the .NET Framework. If you don't like the behavior of the existing providers, or they don't do exactly what you want them to do, it's pretty easy to swap a built-in provider with a custom one, like the Access Providers that are discussed in this article.
Provider Overview
Before we dig into making the Access Providers work in your site, let's briefly look at what a provider is. The Microsoft site has a nice definition:
A provider is a software module that provides a uniform interface between a service and a data source. Providers abstract physical storage media, in much the same way that device drivers abstract physical hardware devices. Because virtually all ASP.NET 2.0 state-management services are provider-based, storing session state or membership state in an Oracle database rather than a Microsoft SQL Server database is as simple as plugging in Oracle session state and membership providers. Code outside the provider layer needn't be modified, and a simple configuration change, accomplished declaratively through Web.config, connects the relevant services to the Oracle providers.
This may be a bit hard to digest at first, but it all comes down to the following simple idea: instead of performing certain actions directly from the code in your service (e.g. Membership, role management and so on), such as creating a user in a database, you delegate the actual responsibility of the action (creating the user) to a separate component. This way, you can easily replace the separate component with another version to perform more or less the same task but in a different way.
Let's look at an example. When you call the Membership.CreateUser method in your ASPX page, you end up with a user in your SQL Server database. This user is not created by the CreateUser method. Instead, all this method did was call a similar method on the configured provider that in turn created the user in the SQL Server database. The idea with the provider model is that you can easily reconfigure the application, so it uses a different provider that can create the user in an entirely different data store like an XML file, or, as presented in this article, in a Microsoft Access database.
A lot has been written about providers, so I won't dig any deeper into them in this article. Instead, take a look at the Provider Toolkit. In the toolkit, you'll find a number of useful articles, including an Introduction to the Provider Model and an article that "dives deep into the ASP.NET Providers". The latter article, while pretty technical is definitely worth a read; especially the complete PDF version.
Prerequisites
If you want to follow along with this article, you'll need a copy of Visual Studio 2005 (Standard, Professional, Team System) or a copy of Visual C# 2005 Express Edition. The latter is free and can be downloaded from the MSDN site. Make sure you download the C# version, and not the Visual Basic edition. The code for the Access providers is in C#, so to be able to compile the code you need a C# compiler.
Obtaining and Installing the Microsoft ASP.NET 2.0 Access Providers
You can download the Access providers from the Microsoft MSDN site at this location: http://download.microsoft.com/download/5/5/b/55bc291f-4316-4fd7-9269-dbf9edbaada8/SampleAccessProviders.vsi. This download, a Visual Studio Community Content Installer file installs a project template that is accessible in Visual Studio 2005 or Visual C# Express in the New Project dialog. To install it, simply double click it and follow the instructions. When you get a warning about unsigned code, simply click Yes to proceed. After installation, you'll find a ZIP file called ASP.NET Access Providers.zip with all the relevant files in your My Documents folder under Visual Studio 2005\Templates\ProjectTemplates\Visual Web Developer. You don't have to unpack this file; The format for project templates in Visual Studio 2005 is a zip file, so Visual Studio knows how to handle it.
With the template installed, the next step is to create a new project based on this template.
Opening, Compiling and Tweaking the Project
To create a new project with the Access Providers template, fire up Visual C# Express Edition (remember, you can also do this with the full version of Visual Studio 2005) and choose File | New Project.... In the Project types tree, make sure that Visual C# and Visual Web Developer are expanded and then click Starter Kits. In the Templates box on the right, choose ASP.NET Access Providers and then click OK:
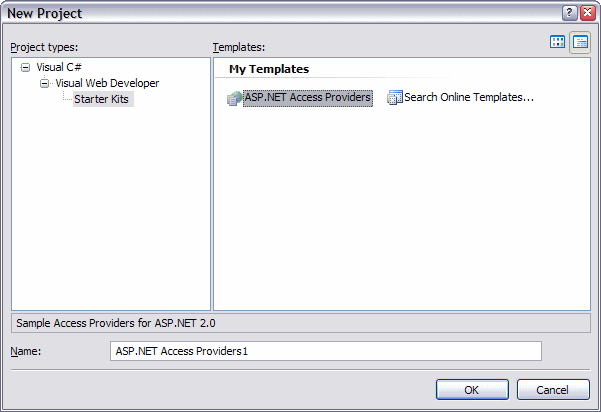
Figure 2: The New Project Dialog with the Access Providers template
After you click OK, a new project is created for you with all the files you need to build, configure and run an application with the Access Providers. Your Solution Explorer should look similar to this:
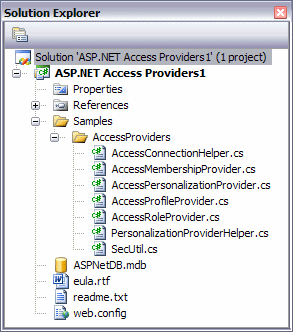
Figure 3: The Solution Explorer for the Access Providers Project
The solution contains a number of important files that are listed below:
| Filename | Description |
| web.config | The file is not used in the Access Provider project itself. However, it contains all the settings you need to configure your ASP.NET 2.0 application to work with the provider. You'll see how this works in the section "Configuring the Access Providers for your Web Site" later in this article. |
| ASPNetDB.mdb | This is the Microsoft Access counterpart of the SQL Server database ASPNETDB.mdf (notice the different extension) that is used in your application. When you use SQL Server 2005, the database is often created automatically for you. This is not the case for the Access Providers, so you need to use this database as the template for your own web site. Again, you'll see how this works later. |
| *.cs | Four of these files contain the actual implementation for four provider based features: Membership, Roles, Personalization and Profiles. The other three files contain helper code that is used in the other files. |
You don't need the files readme.txt and eula.rtf so after you read them, you can safely delete them from the project.
The next step you need to carry out is to give a new name to the assembly created by this project. If you chose all defaults when creating the new project, the .DLL file that is being created by this project will be called ASP.NET Access Providers1.dll. The configuration file expects the file to be called SampleAccessProviders.dll so you'll need to configure the project accordingly. To do this, right-click the project in the Solution Explorer and choose Properties (alternatively, choose ASP.NET Access Providers1 Properties from the main Project menu). On the Application tab, change the Assembly name to SampleAccessProviders:
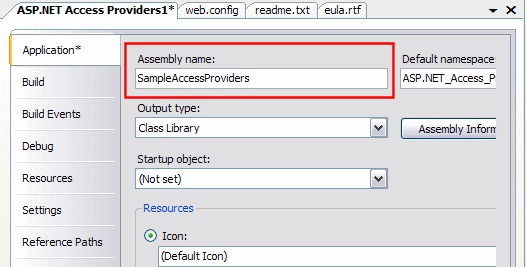
Figure 4: The Project Properties Dialog Showing the Assembly Name
You can close the Properties dialog now. The changes will be saved automatically.
Next, it's time to save the project. Press Ctrl+S and Visual C# will offer you a location to save the project (note that if you're using a version of Visual Studio other than the Express Edition, you won't get this dialog; you have indicated where to save the project when you created it).

Figure 5: The Save Project Dialog
Remember the path that is listed under Location; you'll need it when you need to locate the generated .DLL file later.
Next, it's time to compile the project. If you're not using Visual C# Express Edition, choose Configuration Manager from the main Build menu. Make sure that Release is selected in the Active solution configuration drop-down list and click Close.
Then, regardless of the version of Visual Studio that you are using, choose Build Solution from the main Build menu. This compiles the project into an assembly called SampleAccessProviders.dll. You'll find the assembly in the folder ASP.NET Access Providers1\bin\Release which you can find at the location where you saved the project.
This is pretty much all that you need to do with the Access Providers project. The compiled DLL is all you need from now on. However, if you're brave, take a look around in the .cs files in the Samples\AccessProviders folder to see how things work. You may be tempted to "personalize" things, for example by changing the namespace in code from Samples.AccessProviders to MyCompany.AccessProviders for example. However, it's recommended not to do that right now. It's much easier to get the providers to work with all the default settings. Once you understand how they work, you can make these kind of changes one by one more easily.
With the assembly built, you're done creating the Access Providers. The next step is creating and configuring your web application so it makes use of the new provider. You can close Visual C# Express Edition now because you don't need it anymore.
Configuring the Access Providers for your Web Site
In this section I'll show you to create a new web site that uses the Access Providers. I'll show you how to create and configure the application and how you can use the Web Site Administration Tool (the WSAT) to create new users and roles that are stored in your new Access database by making use of the Access Providers.
At this stage, you may be tempted to apply this to an existing web site directly. However, it's recommended to create a brand new and empty web site first and configure it correctly. Once you understand how it all fits together, you can redo the steps on an existing web site.
So, fire up Visual Web Developer Express Edition (or the full version of Visual Studio) and choose File | New Web Site. From the Visual Studio installed templates box, choose ASP.NET Web Site. Under Location, make sure File System is selected and verify that the location is set to the path you would like to use.
In the Language drop-down list select the language you want to use. I'll be using Visual Basic in my example, but feel free to use C# if you want. All of the configuration I am showing in this article is the same for a Visual Basic and a C# web site.
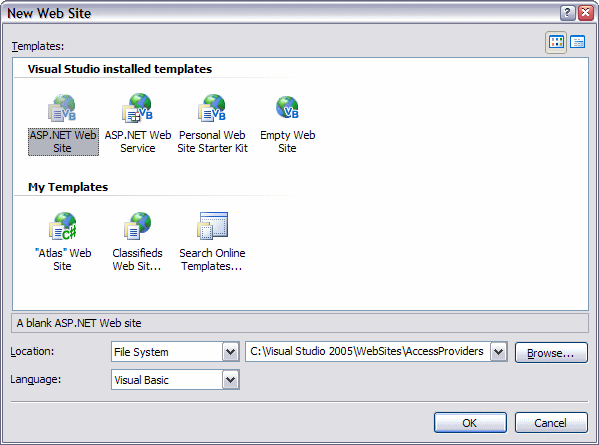
Figure 6: The New Web Site Dialog
Finally, click the OK button to create the new site. A new web site will appear in the Solution Explorer, with two default files: Default.aspx and web.config. You can delete the latter file because it will be replaced with another version later in this walk through.
It's now time to configure the site for the Access providers. First, right-click the project in the Solution Explorer and choose Add ASP.NET Folder | Bin. This creates a Bin folder in your project that will hold the Access Providers assembly.
Then open a Windows Explorer and locate the Access providers project you compiled earlier in this article. Move the Windows Explorer next to Visual Web Developer so both are visible at the same time. Then drag and drop the file web.config from the Windows Explorer onto the root of the project in Visual Web Developer. Repeat this step, but this time drag the database file ASPNetDB.mdb and drop it in the App_Data folder of the project.
Repeat the drag and drop operation once more, but this time drag the file SampleAccessProviders.dll from the bin\Release folder onto the Bin folder in Visual Web Developer. When you're done, your Solution Explorer should look like this:
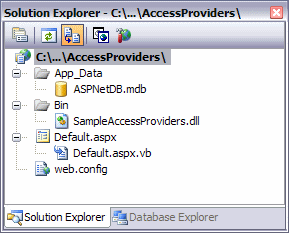
Figure 7: The Solution Explorer for the Test Web Site
If you're having troubles adding the files using drag and drop, you can also add them directly from within Visual Web Developer. To add a file, right-click either the project or a folder in the Solution Explorer of Visual Web Developer, choose Add Existing Item and browse for the file. So if you want to add the Microsoft Access database, you should right click the App_Data folder and choose Add Existing Item, for the .DLL file you should right-click the Bin folder and for the web.config file you can right-click the project itself
Let's briefly recap what changes you just made to your web site:
- You added the sample web.config file that came with the Access Providers project. This config file contains configuration settings that tell the ASP.NET 2.0 run-time to use the Access Providers and the Access database for all provider based features, instead of the default SQL Server based providers.
- You added the ASPNetDB.mdb Microsoft Access database. This database is similar to the SQL Server 2005 version that is created automatically by the ASP.NET 2 run-time. However, there are also a number of differences that you should be aware of. The section "Differences between the SQL Server Based Providers and the Access Based Providers" later in this article describes these differences in more detail.
- You added the SampleAccessProviders.dll assembly. This assembly contains all the logic that the providers need to work with the Access database. So, API calls like CreateUser or ValidateUser are redirected to this assembly, that in turns accesses the Access database.
If you get compilation errors in your site after you replaced the web.config file, you can add the following default namespace references to the web.config file, as a sub node of the <system.web> element:
  <pages>
    <namespaces>
      <clear />
      <add namespace="System" />
      <add namespace="System.Collections" />
      <add namespace="System.Collections.Specialized" />
      <add namespace="System.Configuration" />
      <add namespace="System.Text" />
      <add namespace="System.Text.RegularExpressions" />
      <add namespace="System.Web" />
      <add namespace="System.Web.Caching" />
      <add namespace="System.Web.SessionState" />
      <add namespace="System.Web.Security" />
      <add namespace="System.Web.Profile" />
      <add namespace="System.Web.UI" />
      <add namespace="System.Web.UI.WebControls" />
      <add namespace="System.Web.UI.WebControls.WebParts" />
      <add namespace="System.Web.UI.HtmlControls" />
      </namespaces>
    </pages>
  </system.web>
</configuration>
These namespaces are added to your web.config file automatically when you create a new web site in Visual Web Developer. However, they were not part of the sample config file that came with the Access providers project.
If all you want to know is how to configure and use the Access Providers, you may want to skip to the next section that shows how to use the providers. Otherwise, keep reading and you'll learn a bit more about the configuration settings and where the default providers that ship with .NET get their information from.
The web.config file you added to the project contains a number of interesting settings that do the magic. I won't discuss all of them, but instead focus on a few interesting ones.
The connectionStrings Node
At the top of the config file, you see the following element:
<connectionStrings>
  <add name="AccessFileName" connectionString="~/App_Data/ASPNetDB.mdb"
         providerName="System.Data.OleDb"/>
</connectionStrings>
What's important here is the connection string. As you can see it points to ~/App_Data/ASPNetDB.mdb which means as much as "the ASPNetDB.mdb database in the App_Data folder of my current web site". The tilde (~) in the connection string is expanded at run-time to the full path to your web application. So, if your web site is located at c:\inetpub\wwwroot\MySite, then at run-time the connection string is expanded to c:\inetpub\wwwroot\MySite\App_Data\ASPNetDB.mdb.
The membership Node
Another interesting element to look at is the <membership> element:
<membership defaultProvider="AccessMembershipProvider">
  <providers>
    <clear/>
    <add name="AccessMembershipProvider"
      type="Samples.AccessProviders.AccessMembershipProvider,
                SampleAccessProviders"
      connectionStringName="AccessFileName"
      enablePasswordRetrieval="false"
      enablePasswordReset="false"
      requiresUniqueEmail="false"
      requiresQuestionAndAnswer="false"
      minRequiredPasswordLength="1"
      minRequiredNonalphanumericCharacters="0"
      applicationName="SampleSite"
      hashAlgorithmType="SHA1"
      passwordFormat="Hashed"
    />
  </providers>
</membership>
This element tells the ASP.NET 2 run-time that it should use the AccessMembershipProvider for all membership services. You may wonder why you need to add this now, but not to normal web sites that use a SQL Server Express database instead. The answer is found in the file machine.config in your framework's installation folder (located at %windir%\Microsoft.NET\Framework\v2.0.50727\CONFIG). This machine.config file is like the mother of all .NET applications. Without specific actions, your new web site automatically inherits all the configuration settings defined in this file. For the <membership> section, you see something like this in the machine.config file:
<membership>
  <providers>
    <add name="AspNetSqlMembershipProvider"
      type="System.Web.Security.SqlMembershipProvider,
                  System.Web, Version=2.0.0.0,
                  Culture=neutral,
                  PublicKeyToken=b03f5f7f11d50a3a"
      connectionStringName="LocalSqlServer"
      enablePasswordRetrieval="false"
      enablePasswordReset="true"
      requiresQuestionAndAnswer="true"
      applicationName="/"
      requiresUniqueEmail="false"
      passwordFormat="Hashed"
      maxInvalidPasswordAttempts="5"
      minRequiredPasswordLength="7"
      minRequiredNonalphanumericCharacters="1"
      passwordAttemptWindow="10"
      passwordStrengthRegularExpression=""
    />
  </providers>
</membership>
You can see there are a lot of similarities between your config element and the default one defined in machine.config. The biggest differences can be found in the type, applicationName and connectionstringName attributes.
The type attribute points to the full namespace and assembly name of the provider you want to use. In your application, this points to Samples.AccessProviders.AccessMembershipProvider in the SampleAccessProviders assembly. In the default machine.config, this points to the built-in (e.g. the one that ships with the .NET framework) System.Web.Security.SqlMembershipProvider that you find in the System.Web assembly.
The next difference is the applicationName attribute. The applicationName in the provider definition is used to uniquely identity an application in the database. By design it's possible to host multiple applications in the same provider database. You can have two applications, listening to http://www.yourserver.com/App1 and http://www.yourserver.com/App2 for example that both make use of the same database. However, users from one application cannot access the other application and vice versa. This is accomplished by connecting every user to a unique application name. When the .NET run-time sees that no application name is configured, it will automatically generate a name for you. Therefore, it's recommended to always define an explicit applicationName on the providers. In the sample web.config that comes with the Access Providers, the applicationName has been set to SampleSite for all providers as you can see in the code sample shown earlier. To avoid confusion about names, you should consider giving each application a unique name, like WebShop or Intranet in the web.config file.
The other difference that's worth looking at is the connectionStringName attribute. In the machine.config file, this points to a connection string called LocalSqlServer. This connection string in turn points to a database called aspnetdb.mdf in the App_Data folder:
<connectionStrings>
  <add name="LocalSqlServer"
    connectionString="data source=.\SQLEXPRESS;
        Integrated Security=SSPI;
        AttachDBFilename=|DataDirectory|aspnetdb.mdf;
        User Instance=true"
    providerName="System.Data.SqlClient" />
</connectionStrings>
The SQL Server Providers are smart enough to create the necessary database objects at run-time when the database that is used doesn't have them already. That's why you often see a delay when you run an application for the very first time. Inside an internal helper method called Install the necessary SQL scripts are executed against the database to create the tables, views, stored procedures and so on that are required for the providers' operation.
The Access Providers presented in the article don't create the database structure for you. So, the database that your connection string points to has to exist and contain all the relevant tables. You saw the <connectionString> element for the Access database earlier, but take another look so you can focus on the actual connection sting:
<connectionStrings>
  <add name="AccessFileName" connectionString="~/App_Data/ASPNetDB.mdb"
         providerName="System.Data.OleDb"/>
</connectionStrings>
As I explained earlier, ~/App_Data/ASPNetDB.mdb points to an Access database called ASPNetDB.mdb in your App_Data folder. Not coincidentally, this is the database you copied there earlier in this article. This database, that you need to deploy to App_Data (or another location, referenced by your connectionString) for each and every web application that uses the Access Providers, has the following schema:
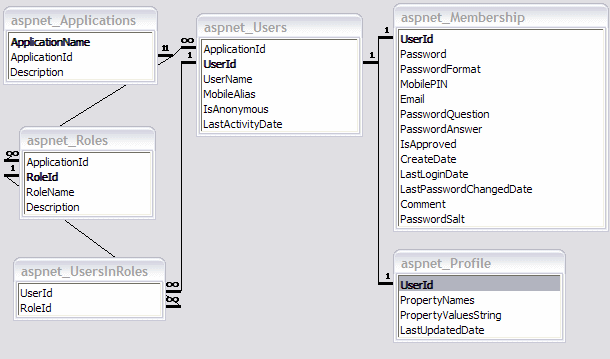
Figure 8: Part of the Database Schema of the Access Providers Database
This database schema lists most of the important tables in the database. These tables are used to store users, roles, profile information and so on. Besides these tables, you also find a number of queries in the database that are used to create and modify the data in the database.
In most cases, you don't need to change the structure of this database, or mess with the queries. However, should you decide to change or extend the behavior of the Access providers, it's nice to know where you need to look at.
Using the Access Providers in your own Web Site
Once you have set up the site with the previous instructions (e.g. copied the database to App_Data, copied the DLL to the Bin folder and changed the web.config file) you're ready to use the providers in your own site. The good thing about the provider model is that everything you have learned so far about the features that come with the providers is still valid. That is, you can still create users with the CreateUserWizard control, you can still let users login with an <asp:Login> control, you can still call the CreateUser method to create a user programmatically and you can still use the Web Site Administration Tool (the WSAT) to manage your users and roles. Under the hood, ASP.NET will talk to your configured provider which in turn talks to your database. But for you, as a page developer, this is all transparent. All you do is talk to the provider's APIs and they'll handle the hard work for you.
To test out your new provider, choose Website | ASP.NET Configuration from the main menu in Visual Web Developer, assuming you still have your web site open. Once the WSAT is open, click the Provider tab and then click the "Select a different provider for each feature (advanced)" link. On the screen that follows, you'll see that the Access Provider is now the selected provider for both the Membership and the Roles feature:
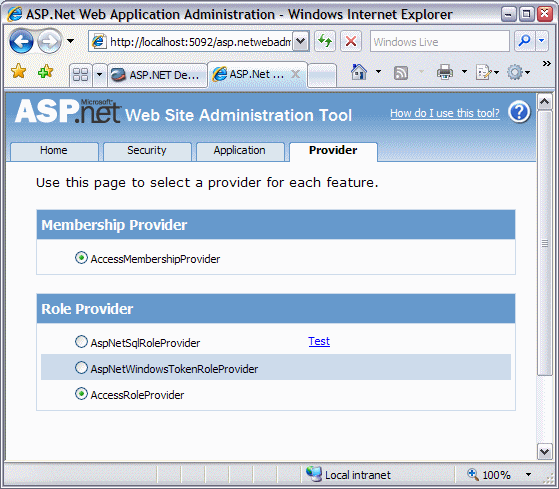
Figure 9: The Web Site Administration Tool
At this point you may be wondering how the WSAT is able to see your custom providers. The answer is in the web.config file. As explained earlier, all web applications inherit their settings from the master machine.config file. This file contains default settings for all the providers as shown earlier. However, you can choose not to use the defaults by overriding certain settings. That is exactly what is being done by the settings in the sample web.config file that came with the Access Providers. For each of the four services supported by the Access Providers, a new <providers> element is added to the web.config file. This element tells the .NET run-time where the custom provider is located (assembly and namespace) and how it should be configured (settings like applicationName, requiresUniqueEmail and requiresQuestionAndAnswer for the AccessMembershipProvider for example).
At run-time, the ASP.NET Framework looks at this web.config file to find out what provider to use. The same applies to the WSAT; it looks in the web.config file for all supported and configured providers and lists them on the Provider tab. You can also see how the inheritance principle works for your site. Although your own web.config file doesn't contain settings for providers like the AspNetSqlRoleProvder, you can still see them in the WSAT because they have been defined in the master machine.config file that applies to your site as well.
A final note about the settings in the web.config file may help you in understanding how the provider knows what to do. For example, let's look at the settings for the Membership provider. You see a number of settings in the web.config file like requiresUniqueEmail and passwordFormat. At run-time, these settings are passed to the provider in its Initialize method. The provider then knows what to do with them. For example, a setting of Hashed for the passwordFormat attribute will tell the provider that all password should be hashed before they are stored in the database. With a value of Encrypted all password are stored in a reversible encrypted format, while with the Clear setting all passwords are stored as clear text, in a user readable format. If you want to know how this works, look at methods like CheckPassword and EncodePassword in the AccessMembershipProvider file. Of course this is only one settings, but the principle applies to other settings for all providers as well. You configure them in the web.config file; at run-time they are passed into the provider and then the provider determines what to do with them.
When you've verified that the correct providers are listed (as shown in Figure 8), click the Security tab and create a Role called Administrators. Next, create a user (called Admin for example) and assign that user to the Administrators roles.
Then close the WSAT and go back to Visual Web Developer. Add a new page to your project and call it Login.aspx. From the Visual Web Developer Toolbox drag a Login control on the page.
Next, open the web.config file again and change the authentication element so it looks as follows:
<authentication mode="Forms">
  <forms loginUrl="Login.aspx" defaultUrl="Default.aspx"/>
</authentication>
Finally, in the Default.aspx, add a Label control and add the following code in the Page_Load event in the code behind:
Protected Sub Page_Load(ByVal sender As Object, _
         ByVal e As System.EventArgs) Handles Me.Load

  Dim result As String = _
          "Hello {0}. Member of Admin role: {1}"

  Label1.Text = String.Format(result, _
          User.Identity.Name, User.IsInRole("Administrators"))
This code sets the Text property of the label with the user's name and a value indicating whether the current user is an Administrator or not.
To test it out, open the page Login.aspx in your browser and login with the account you created earlier. If all turned out as planned, you should see the following after you logged in:
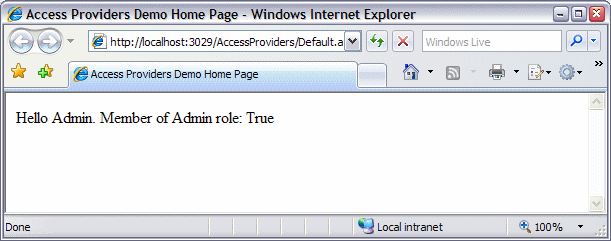
Figure 10: The Test Page in the browser Showing the User's Name and Group Membership
While I am sure these 39 characters aren't the most exciting things you've ever seen, it's still quite a miracle you see them at all. Although it took you some time to configure the application, you haven't actually coded a lot. Simply by dragging and dropping, and declaratively adding controls and settings to your application, you have a complete security framework at your disposal. Personally, I see this as the greatest strength of .NET: a lot of power is available out of the box. If you don't like the standard behavior, it's still pretty easy to change certain aspects of the built-in functionality and replace them with custom components.
While it may seem that the Access Providers are a great asset to your developer's toolbox (and they are), there are also a few differences with the "real", SQL Server based providers that you need to be aware off.
Differences between the SQL Server Based Providers and the Access Based Providers
The biggest difference is the database schema. In the SQL Server implementation GUIDs (Globally Unique IDentifiers) are used to uniquely identify objects like Users, Roles and Applications. In the Microsoft Access database and the Access Providers, numeric values (Integers) are used. In itself this is not a problem as long as you stick to the Access Providers. However, it's not unlikely that over time your web site grows and you'll find that your Access implementation no longer cuts it. When you then want to upsize to SQL Server, you'll run into a few conversion issues. While it should be possible to upgrade the data to the SQL Server format, you'll need to carry out a number of "data massaging" tasks that may be time-consuming. Note that I haven't actually tried to upsize the Access database to the SQL format yet, so be sure to test this out thoroughly if you think you'll take this route in the future.
Another difference is the absence of certain features like enforcing password strength requirements in the Membership provider. The readme.txt that comes with the Access Providers lists all of the missing features and "known issues".
The final difference is not as much related to the Access Providers, as it is to Microsoft Access itself: performance. While an Access database is useful in many situations, it's just not as powerful as its bigger brothers SQL Server 2000 and SQL Server 2005. For many small to medium-sized web sites, you'll find that Access works fine, though. Just don't use it to run the next Yahoo killer web site on it....
Although the Access providers have different behavior than, say, the SQL providers, the services that ASP.NET 2.0 provides are not aware of this. For example, both the custom AccessMembershipProvider and the built-in SqlMembershipProvider have the same set of methods, as you can in the following diagram:

Figure 11: The Class Diagram for the Access and SQL Based Membership Provider
As you can see, both providers stick to a contract and implement the same set of methods, like CreateUser, GetAllUsers and so on. This contract is enforced by the abstract MembershipProvider class that both implementations inherit from.
Summary
The Access Providers used in this article may be a welcome tool for many developers. When you can't use SQL Server, but still want to use the built-in features for membership, role management, profiles and personalization, you have to look at other means to store your data. The Access Providers that I used in this article do exactly that: they allow you to use the complete ASP.NET 2.0 feature set, with a Microsoft Access database as the backing store.
This article didn't focus on the inner workings of the providers. In fact, the good thing about the provider model is that often you don't even have to look at the inner workings of things. As long as you know how to configure a new component, you can easily reuse functionality created by others.
So instead, this article focused on making the Access Providers work in your web application. You saw how to acquire them from the MSDN site. You then saw how to customize and compile them, so they're ready to be used in your own web sites. You then saw how to configure your ASP.NET 2.0 web application to make use of these new providers.
The article ended with a quick tour of using the providers and an overview of the biggest differences between the Access Providers and the SQL Server providers that ship with ASP.NET 2.0.
If you want your web site to work with the Microsoft Access providers, this article has shown you everything you need to know and do to embed them in your web application.
References and Related Reading
The following links may help you to better understand the .NET provider model, or help you find and fix problems related to security that you may run into when you install and use the Access Providers.
The Provider Model
- The Provider Toolkit
- Introduction to the Provider Model
- Microsoft ASP.NET 2.0 Providers: Introduction (HTML)
- Microsoft ASP.NET 2.0 Providers: Introduction (PDF)
- A Look at ASP.NET 2.0's Provider Model
Security
- How Do I Determine the Security Account that IIS Uses to Run My Web Site?
- How Do I Fix ASP 80004005 errors?
Download Files
Where to Next?
Wonder where to go next? You can post a comment on this article.
Links in this Document
| Doc ID | 404 |
| Full URL | https://imar.spaanjaars.com/404/using-the-microsoft-access-providers-to-replace-the-built-in-sql-server-providers |
| Short cut | https://imar.spaanjaars.com/404/ |
| Written by | Imar Spaanjaars |
| Date Posted | 08/21/2006 22:30 |
| Date Last Updated | 05/07/2008 20:49 |
| Listened to when writing | The Only Mistake by Joy Division (Track 18 from the album: Heart And Soul (CD 1)) |
Comments
Talk Back! Comment on Imar.Spaanjaars.Com
I am interested in what you have to say about this article. Feel free to post any comments, remarks or questions you may have about this article. The Talk Back feature is not meant for technical questions that are not directly related to this article. So, a post like "Hey, can you tell me how I can upload files to a MySQL database in PHP?" is likely to be removed. Also spam and unrealistic job offers will be deleted immediately.
When you post a comment, you have to provide your name and the comment. Your e-mail address is optional and you only need to provide it if you want me to contact you. It will not be displayed along with your comment. I got sick and tired of the comment spam I was receiving, so I have protected this page with a simple calculation exercise. This means that if you want to leave a comment, you'll need to complete the calculation before you hit the Post Comment button.
If you want to object to a comment made by another visitor, be sure to contact me and I'll look into it ASAP. Don't forget to mention the page link, or the Doc ID of the document.